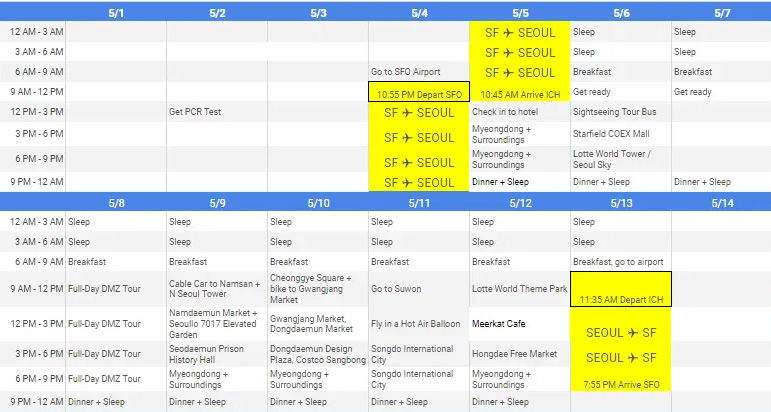
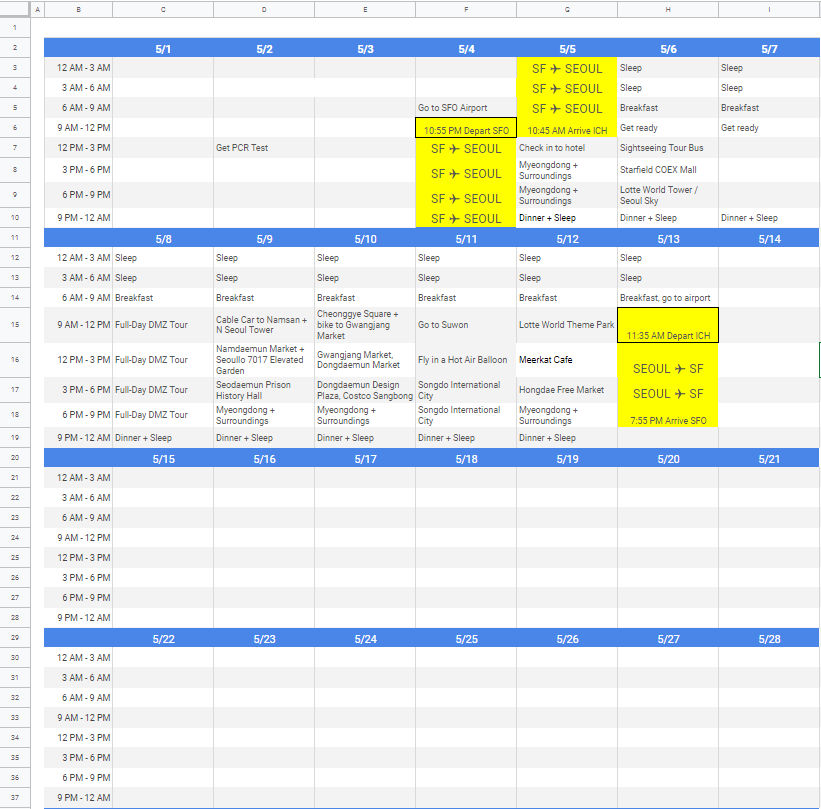
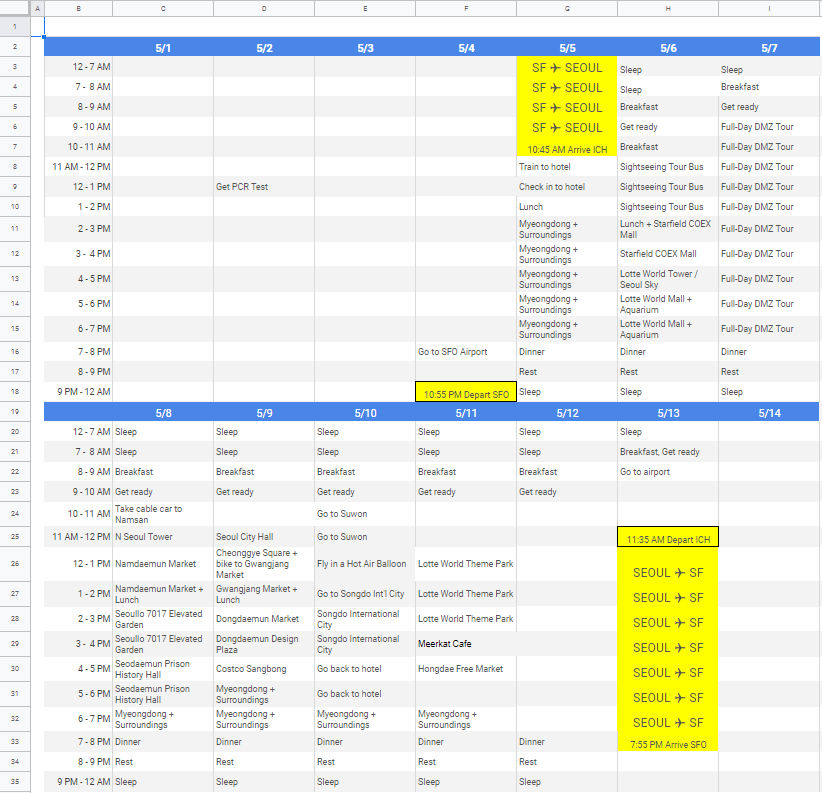
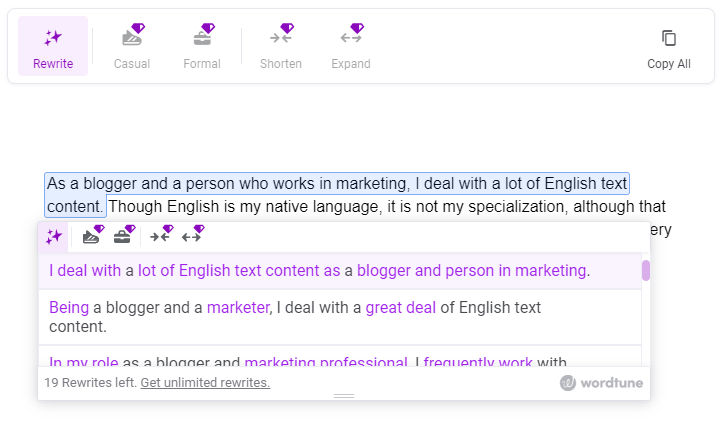
Planning a trip can be fun, but it can also be challenging. With so many activities to plan for, having a high-level view of a month-long or two-week-long trip makes it easy to see the bigger picture, but a certain amount of detail is necessary to ensure your planned itinerary is reasonable and makes sense, e.g. if it takes 2 hours to get to the airport and you have to be at the airport 3 hours before departure, then you better take that into account so you don’t miss your flight. One simple way to plan a trip is by using a spreadsheet like Google Sheets. I’ve created a hypothetical San Francisco, USA to Seoul, Korea vacation plan showing day-by-day and hour-by-hour activities in two different views.
Month View (each time block is 3 hours long) – View template
2-Week View (daytime time blocks are 1 hour long) – View template
Of course, you can group or split each time block to have less or more time slots depending on your needs.
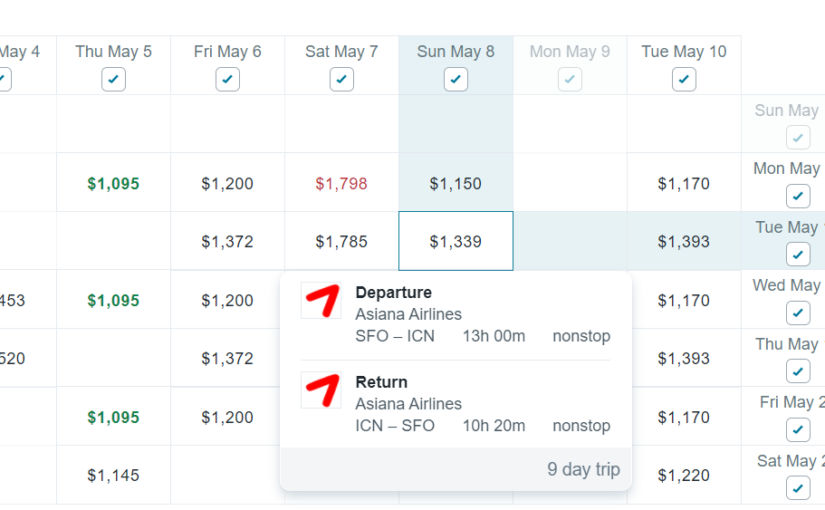
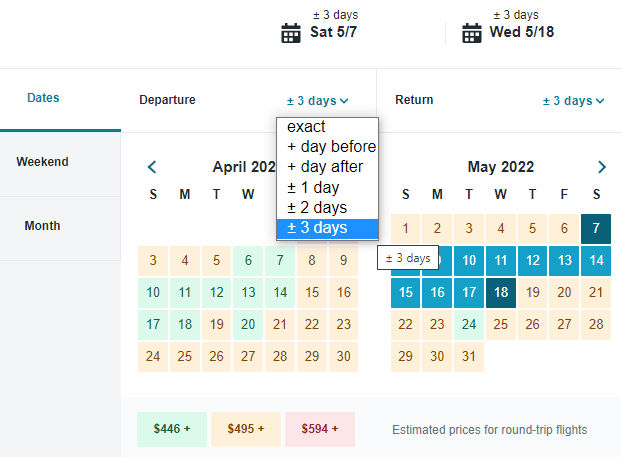
Plane ticket prices can vary significantly from one day to another and by airline, number of stops, total trip duration, etc. If your dates are flexible, you can easily find cheaper flights using Kayak.com and Google Flights’ price grids. Here’s an example. Say I want to fly from San Francisco to Korea some time in early May.
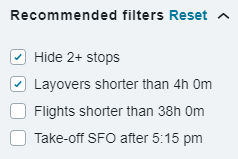
I want no more than 1 stop / layover
I don’t want a layover longer than 4 hours
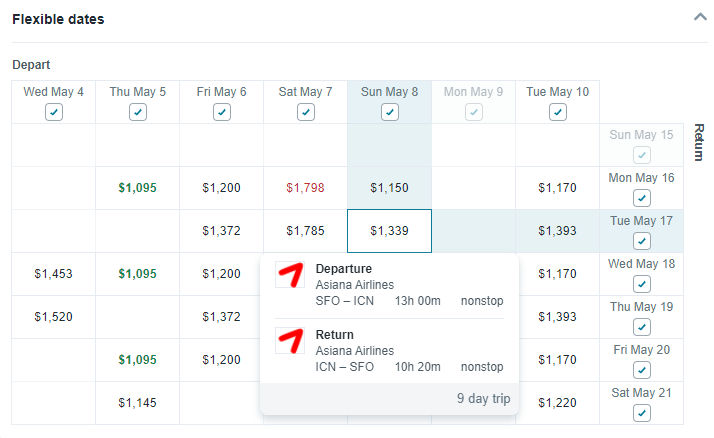
Kayak
On Kayak.com, you need to select +- 3 days for each departure and return date.
Choose some filters.
After the search results appear, expand the Flexible Dates section to show the price grid.
What’s nice about Kayak is, when you hover over a price, you see
the total price
the airline
the number of stops
the total flight plus layover time, if any, for both departure and return
the total trip duration
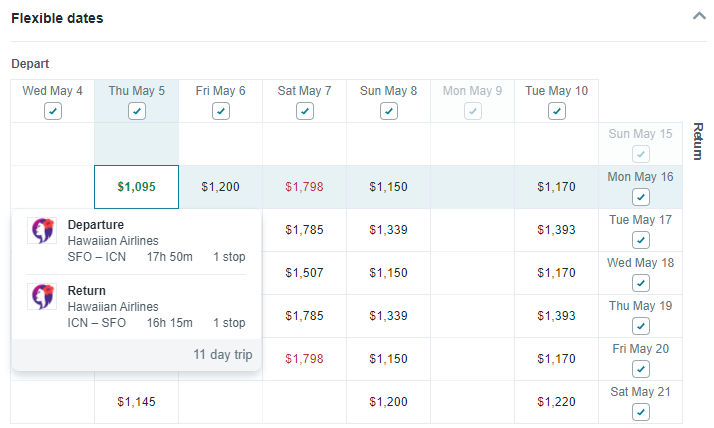
In the example above, the $1339 price offers nonstop service for a 9-day trip. If we compare that to the cheapest price ($1095), we’d have to stop somewhere and the total trip duration would be 11 days.
Google Flights
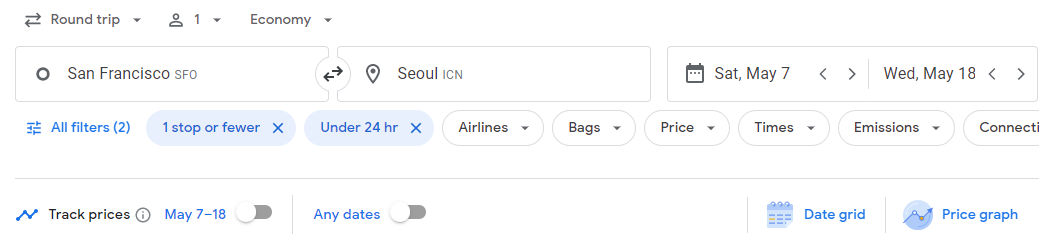
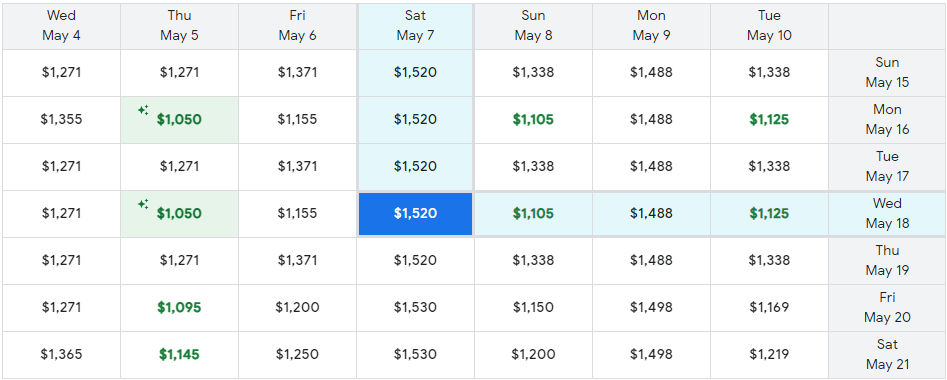
On Google Flights, you can do a similar search. For round trip flights, there will always be a price grid so you just enter your preferred departure and return dates. For the filters, I chose “1 stop or fewer” and “Under 24 hr”.
What’s interesting, and very useful, about Google Flights is, once you choose a departure date, prices start to show up in the date picker so you can choose a return date that is cheaper than others.
Google Flights is really fast. The prices and search results show up almost instantly.
On Google Flights, the cheapest prices are highlighted in green cells. In this example, it’s $1050. Compared to Kayak, it looks like Google Flights has more flight options as all of the cells have a price. However, unlike Kayak, in order to see more information like the airline, trip duration, and number of stops, you have to choose a price and click OK. The price grid will disappear and you will see the flight details.
Which is cheaper?
If we put both grids next to each other, we find that
Google Flights offers more flights (all cells have a price)
Google Flights offers either the same price or cheaper prices, even if the price difference is just $1.
KayakGoogle Flights
Note
Kayak can book flights for you whereas Google Flights will always send you to an external booking website. Price differences are often due to different travel websites offering different prices. It’s always preferable to book directly with the airline as that cuts out any intermediaries and, if there are any issues, you can contact the airline (or Kayak) directly and usually get better customer service. Just because Google Flights may offer cheaper flights, you might still find an overall better deal on Kayak.
The article is based on this YouTube video. These instructions are similar for adding 120 V circuits as well.
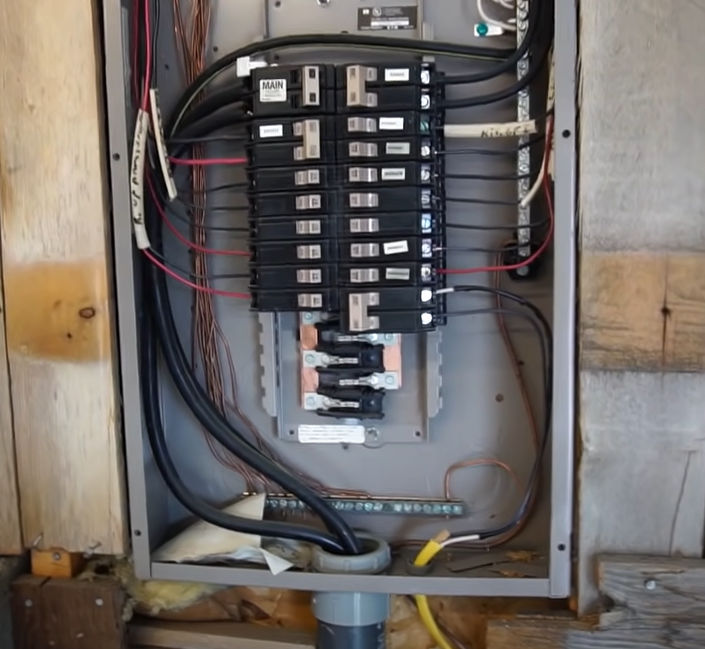
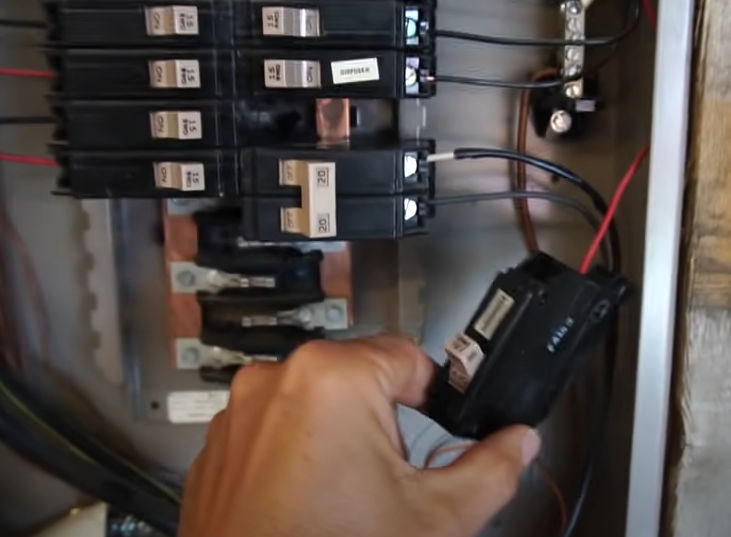
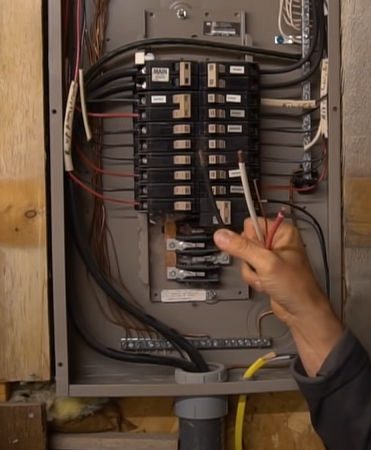
When you open the panel door, verify that you have empty slots to put a one-pole (120 V) or two-pole (240V) circuit breaker. If you don’t, you may need to upgrade your panel to a larger one.
Unscrew the screws and remove the panel cover.
You will usually see two large cables coming into the box.
One black wire = + 120
Other black wire = – 120
Voltage diff between the two = 240
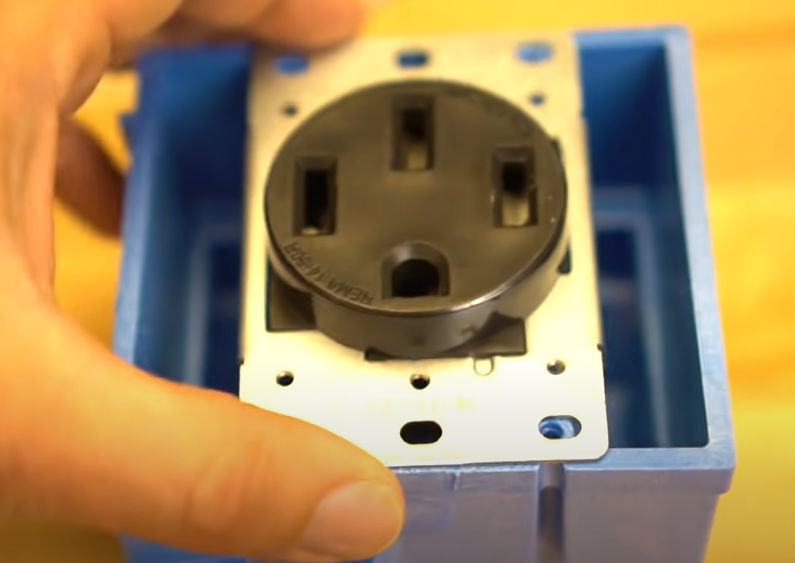
The 2 black wires go into a main breaker.
In this example, the main breaker supports 125 amps, and the main breaker is located in the same panel as the circuit breakers.
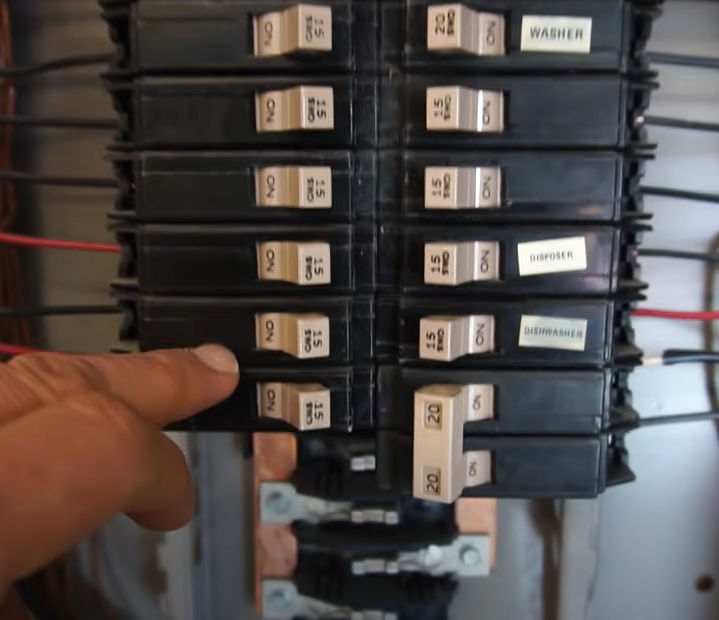
The electricity then goes into the two left and right rails. Usually, you’ll have some 120 V / 15 A circuit breakers for general power, 120 V / 20 A circuit breakers for kitchen and bathroom power, and 240 V / 20 A double circuit breakers for an electric dryer.
Electricity flows from the rail through the circuit breaker through the wires.
Everything in the box is hot until you turn off the main breaker. Once you turn off the main breaker, only the 2 black wires and the terminals they are connected to are still hot.
In my home, the main breaker is located in a separate panel outside whereas my circuit breaker panel is in the garage. This is safer because once you turn off the main breaker outside, there are no hot / live wires in the circuit breaker panel.
The “6/3” identifier means this cable is 6 gauge and has 3 conductor wires and 1 ground wire for a total of 4 wires. The max amperage that this cable supports is 55 amps as indicated in the chart below.
Find the right kind that fits your circuit breaker box. My breaker box brand is Challenger. From the time when Challenger went out of business in the 90s, they were bought by different companies until Eaton/Cutler-Hammer finally got a hold of them. So, in my case, I can buy Eaton BR/C breakers.
The amperage of the circuit breaker must be less than or equal to the max amperage of the cable connected to it to prevent the cable from melting and causing a fire.
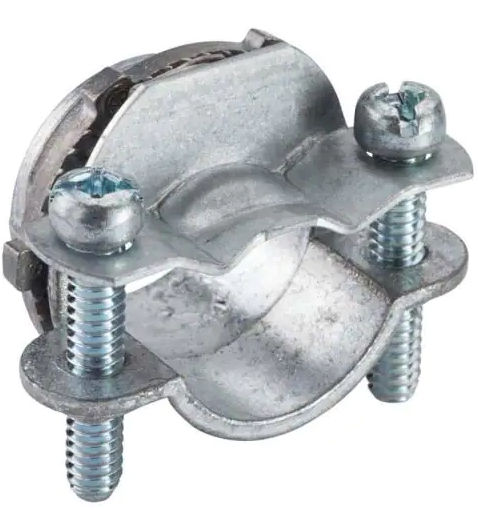
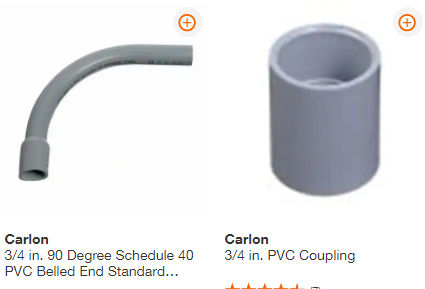
When you knock out a hole, make sure you knock out a 3/4″ center hole in one of the sides, not a smaller 1/2″ hole. If you accidentally knock out a 1/2″ hole, you can seal it with one of these:
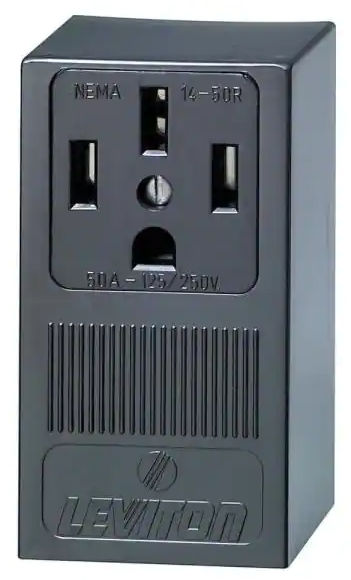
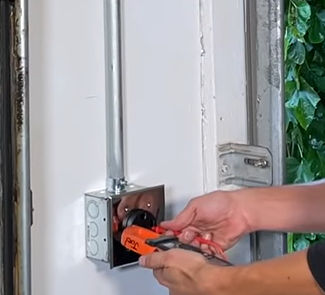
Note: The cable is very thick and difficult to bend. Using the Leviton outlet is MUCH easier than making your own outlet because with the Leviton, you don’t need to bend the cable at all.
Run the cable through the stud and into the breaker box.
The cable can be hard to cut. If you can’t cut it with scissors or snips, you can use an angle grinder.
For ease of work, feed the thick wire into the electrical box before attaching box to stud.
Strip the wires in the cable. First, slit the exterior jacket / sheathing lengthwise using a sharp utility knife. Then, use a wire stripper to cut just the sheathing layer using the flat blade part. You can’t use the various round blades because the cable is too thick.
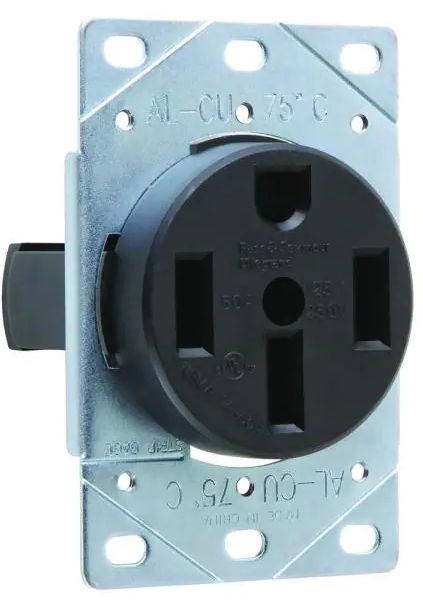
Attach the wires to the outlet.
The red and black (hot) wires are interchangeable and connect to the gold screw terminals.
The white (neutral) wire goes to the silver screw terminal.
The bare copper (ground) wire goes to the white screw terminal.
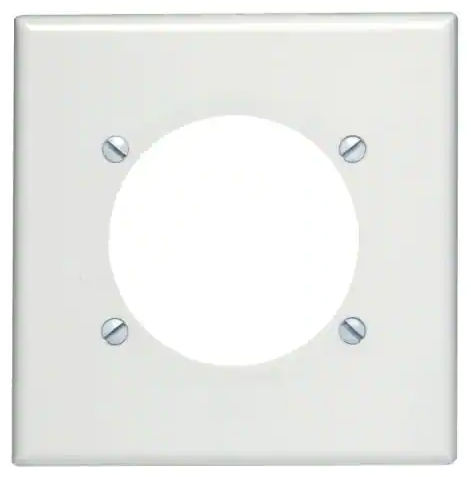
Screw the outlet to the box.
Strip the wires on the other end of the cable. Make sure the main circuit breaker is off.
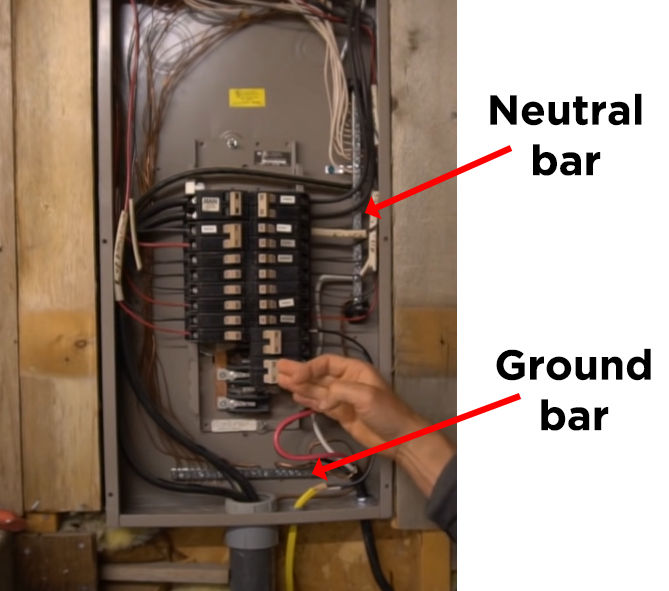
Connect the white (neutral) wire to the neutral bar.
Connect the bare copper (ground) wire to the ground bar.
Connect the two red and black (hot) wires to the 240V circuit breaker.
Insert the circuit breaker.
Turn on the main breaker and then turn on the new 240 V circuit breaker.
Test voltage
Hot (red) to hot (black) should be about 240 V.
Hot (red) to neutral should be about 120 V.
Hot (black) to neutral should also be about 120 V.
Do the same voltage test at the receptacle.
Here’s how mine came out.
It would have been more expensive and a hassle to put the outlet by the garage door, so I just put it next to the circuit breaker panel. I’ll just use an extension cord to reach the garage door.
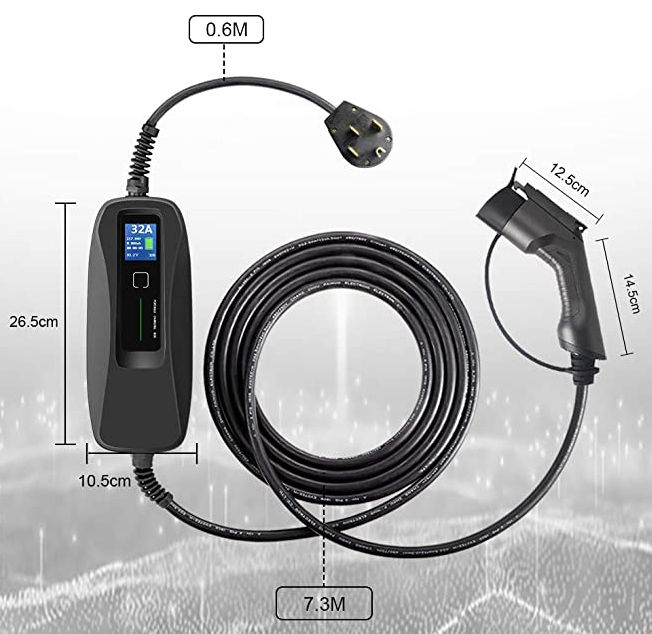
You can buy this EV charger cable on Amazon for $330.
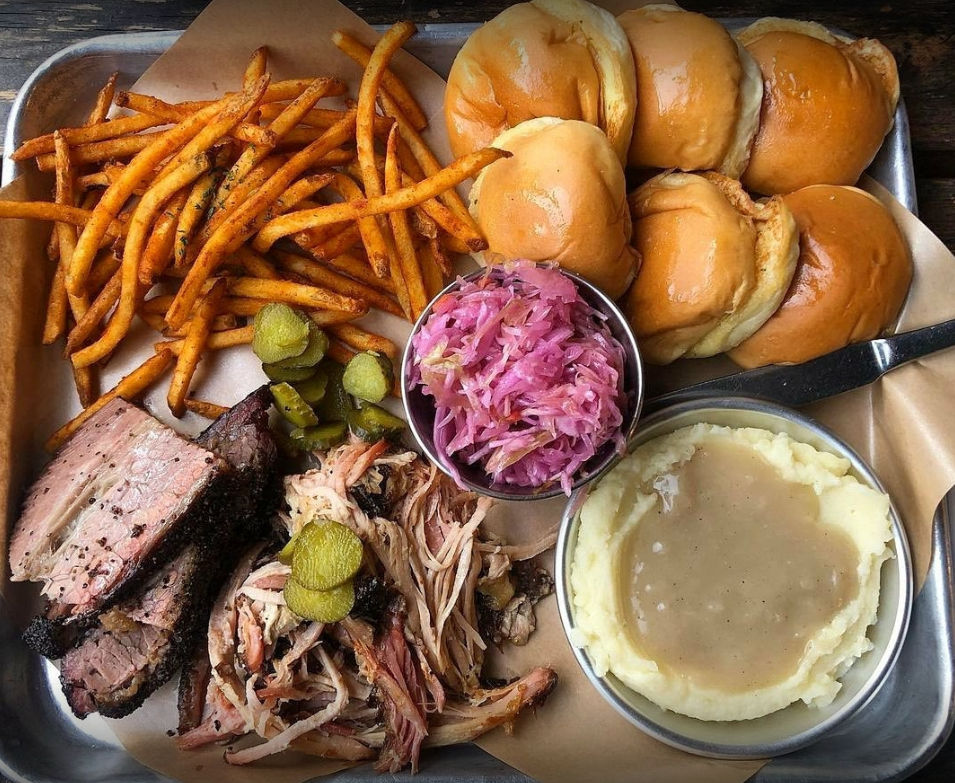
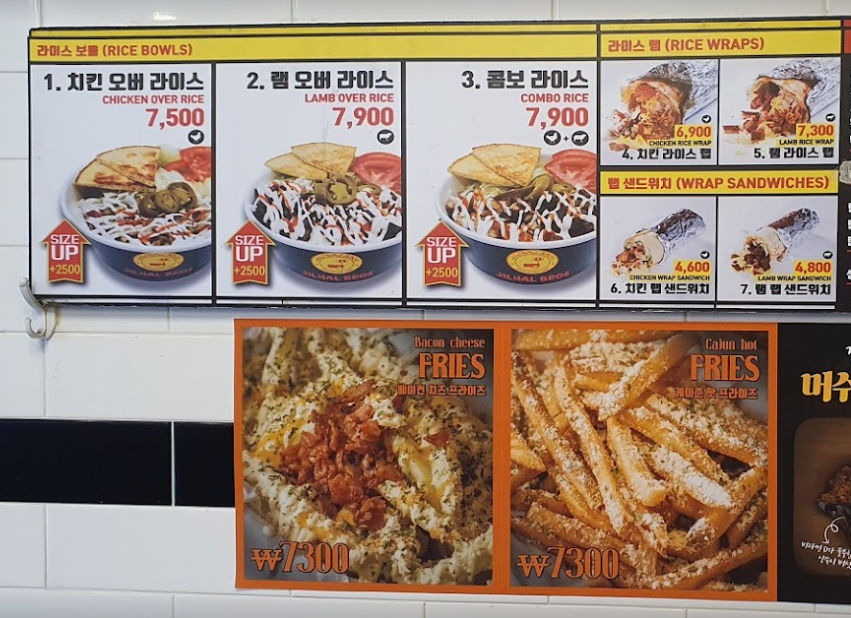
This is not a complete list of tourist places and popular Korean food. It’s just a list of places that I think may be worth visiting and a few other relevant things.
As of December 30, 2021, all travelers, including fully vaccinated travelers, must submit a negative PCR test taken within 48 hours of departure in order to board flights to the US. Learn more.
As of March 2, 2022, foreigners must submit a negative PCR test taken within 48 hours of departure in order to board flights to Korea. Read consular notice.
Starting from April 1, 2022, vaccinated travelers who have completed vaccination overseas AND register their vaccination history through the Quarantine COVID19 Defence (Q-Code) systemBEFORE traveling to Korea will be eligible for quarantine exemption. Vaccination is considered to be complete 14 days after the 2nd shot for a two-dose vaccine (valid up to 180 days) or with booster shots. Read consular notice.
Incheon Airport Tourist Information Center: 1F, Passenger Terminal 1 in front of Gates 5 & 10 / 7 AM-10 PM
Myeong-dong Tourist Information Center: In front of Euljiro 1(il)-ga Station (Seoul Subway Line 2), Exit 5 / 09:00-20:00, Closed on the day of Seollal (Lunar New Year’s Day) & Chuseok (Korean Thanksgiving Day)
Seoul Station Tmoney Town : 1F, Seoul City Tower near Seoul Station (Seoul Subway Line 1, 4, AREX), Exit 10 / Weekdays 09:00-18:00
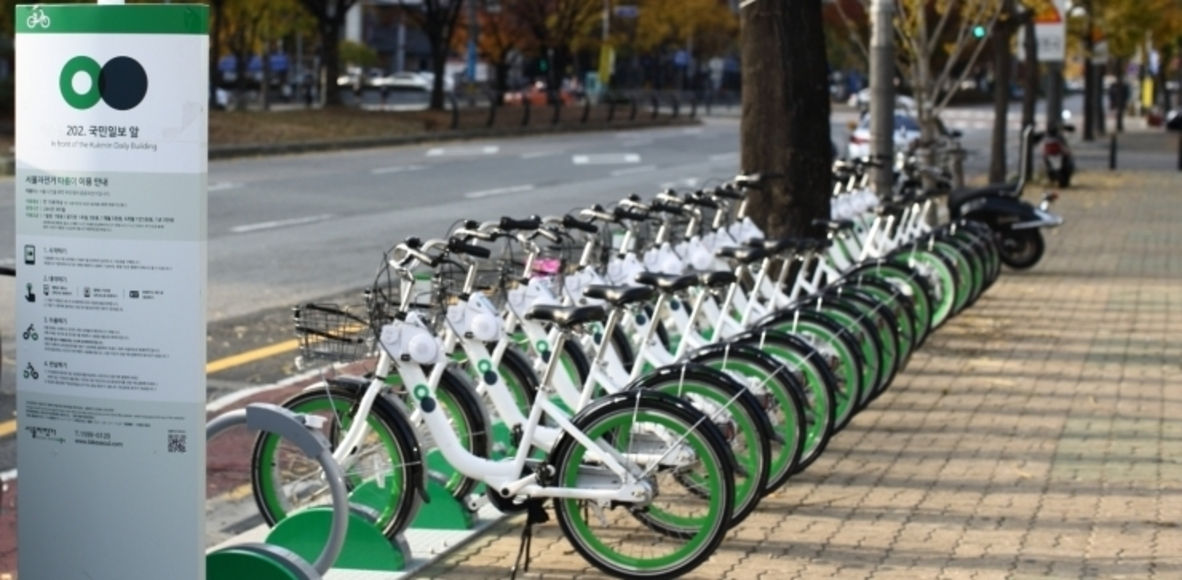
There is a $4.11 deposit. Get deposit refund (minus $0.41 for the cost of the card) at the Tourist Information Center at the airport before leaving Korea.
MPass can be used on subway lines, airport railroad all-stop train, Seoul city buses (mainline buses, branch buses, circulation buses, village buses, night buses)
The pass offers 20 rides a day for the duration of the pass.
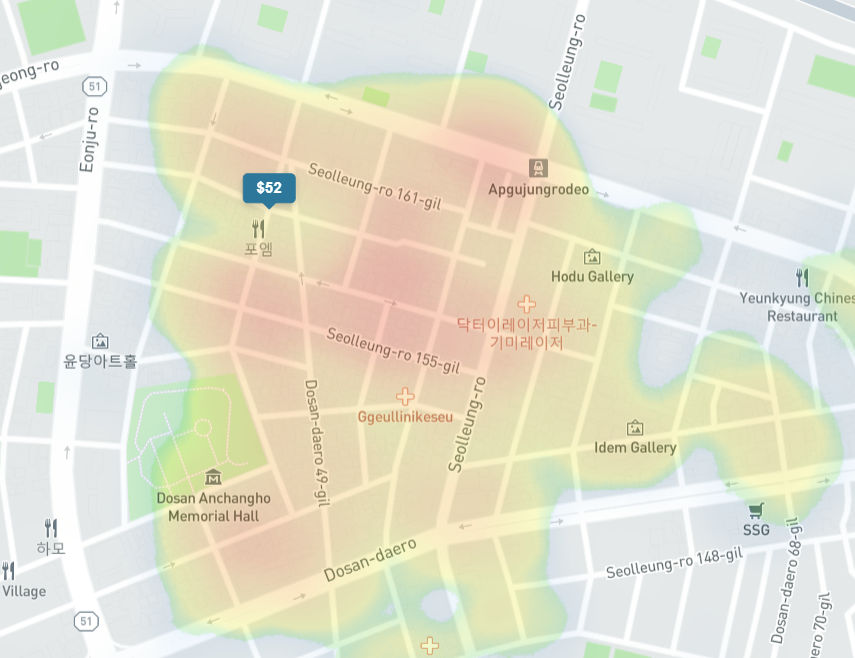
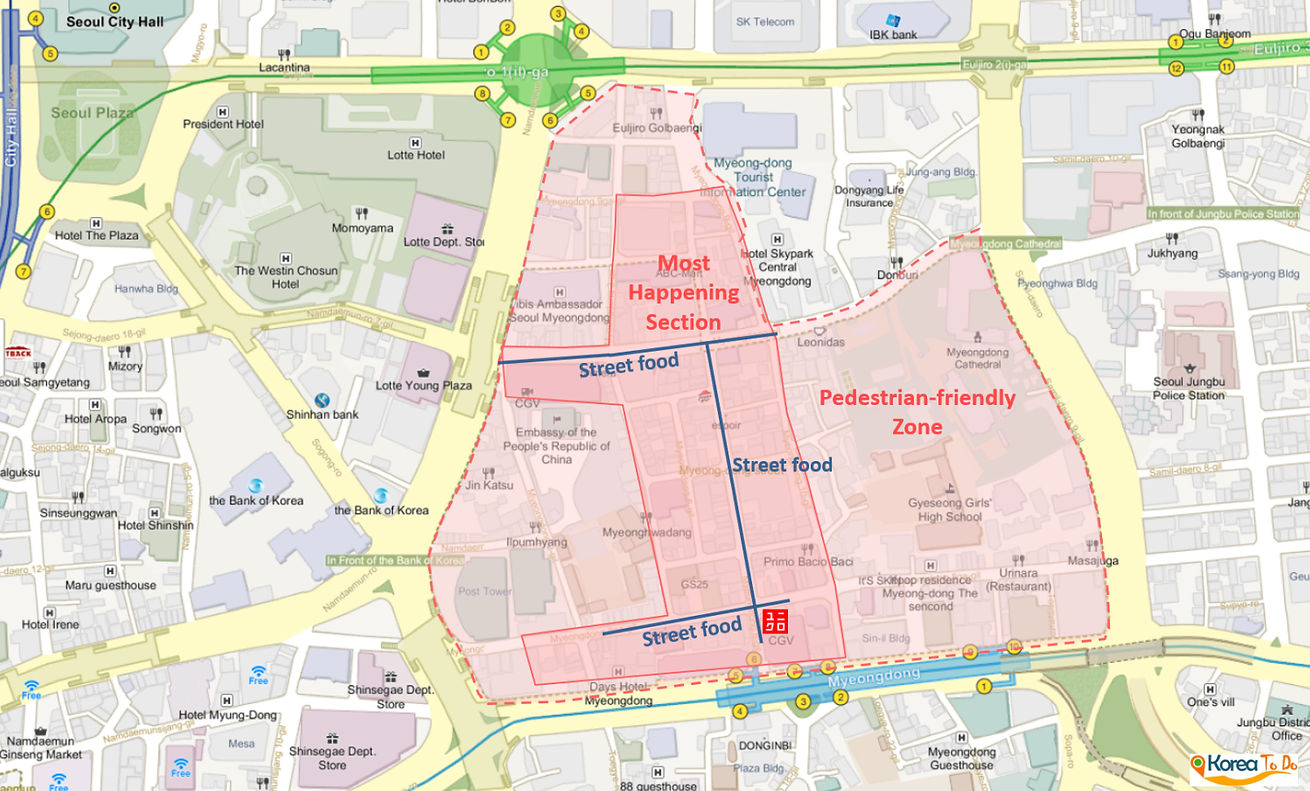
Hotels
When choosing a hotel, if you want to be close to
many attractions
easy subway transportation with direct connection to the airport
tons of food options
tons of shopping options
you probably want to stay around the Myeong-dong area.
The Seoul Sky Observatory is located at the top of the Lotte World Tower, the world’s fifth tallest building standing 123 stories and 555 meters high. As the tallest building in South Korea, it is the only place where you can take in a gorgeous 360-degree view of Seoul, the capital city of South Korea roaring with brilliant history and dynamic modern culture.
Seoul Grand Park is a park complex to the south of Seoul, South Korea, in the city of Gwacheon. Facilities at Seoul Grand Park include hills and hiking trails, Seoul Grand Park Zoo, Children’s Zoo, a rose garden, Seoul Land amusement park, and the Seoul Museum of Modern Art.
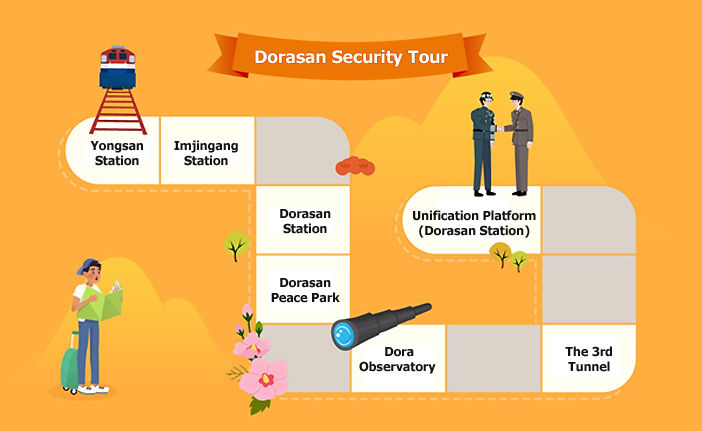
Tour package is available from the KORAIL Travel Center at each departure station
Foreigners can purchase train tickets from Yongsan Station to Dorasan Station online, but will have to register for the Dorasan Security Tour at Dorasan Station if they wish to travel further.
Operating days: Wednesday-Sunday, once a day / No trains Monday-Tuesday
To visit the DMZ Joint Security Area, you must go with an approved travel agency. This visit is part of the Panmunjeom Tour. Panmunjeom is one of the most visited tourist sites of the DMZ
A traditional street market in Jongno-gu, Seoul, South Korea. The market is one of the oldest and largest traditional markets in South Korea, with more than 5000 shops and 20,000 employees in an area of 42,000 square meters.
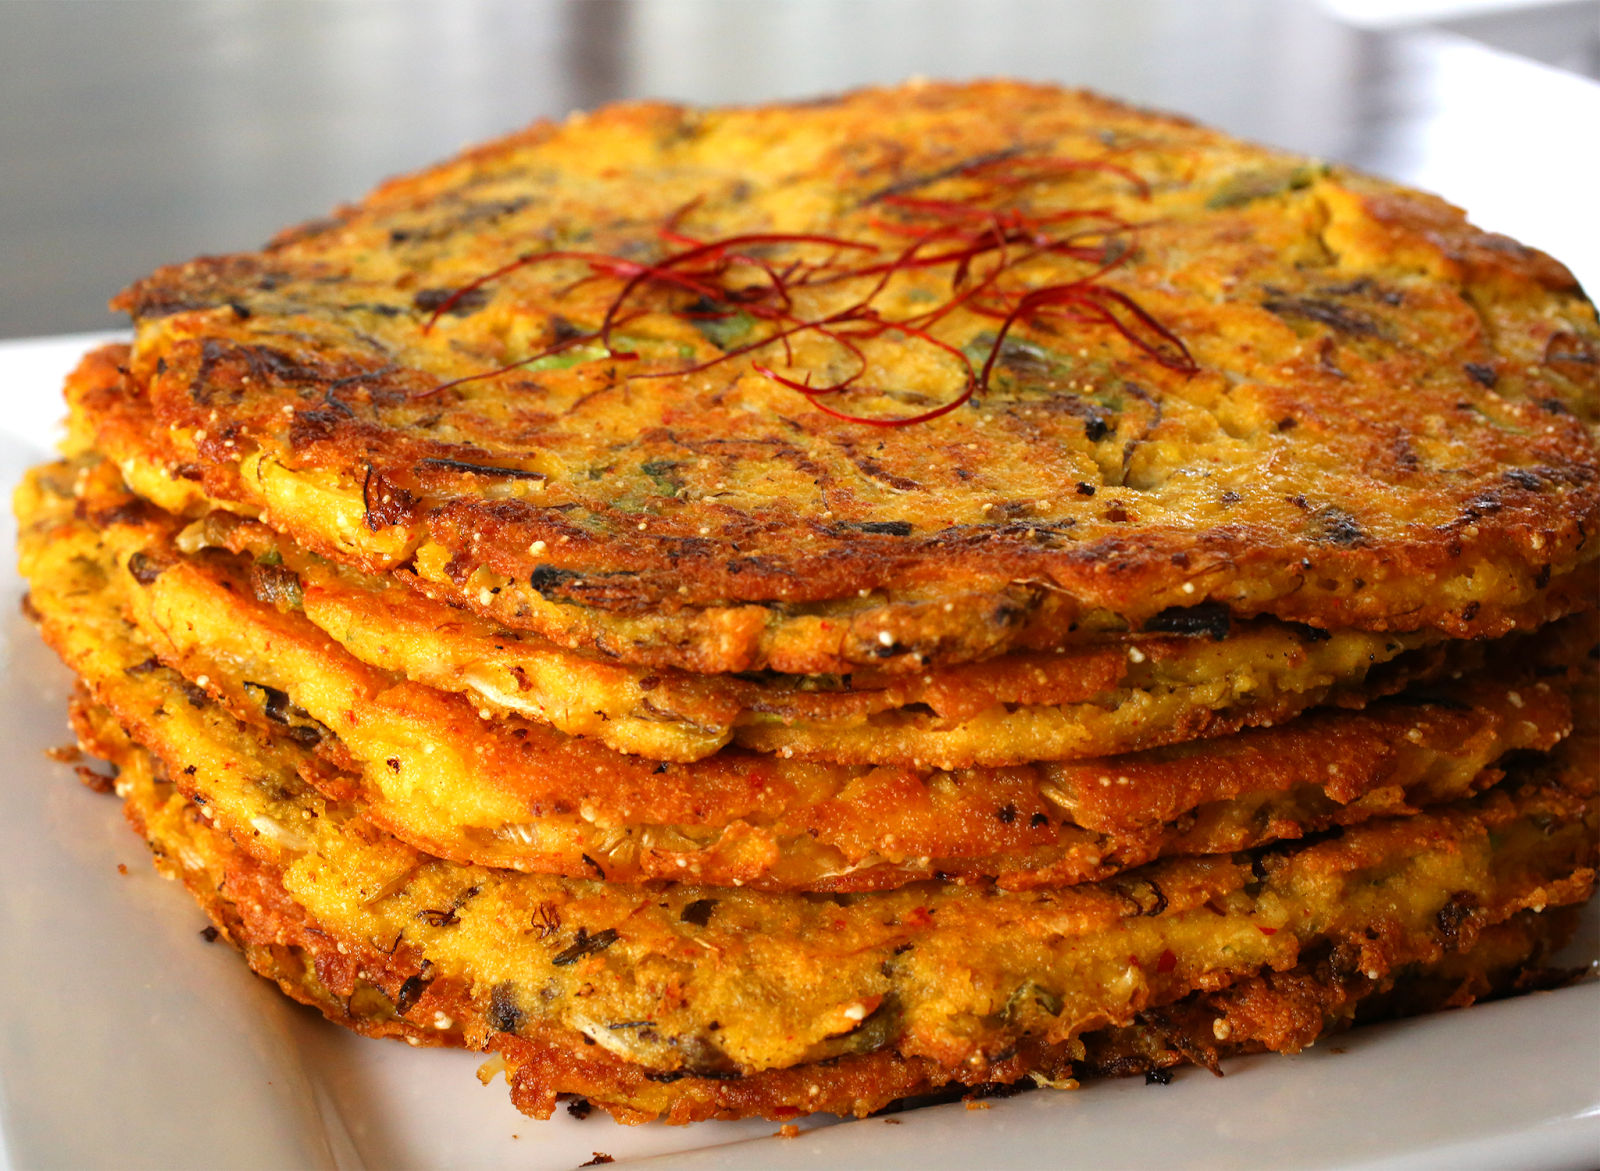
Hottoek is a Korean-styled pancake. One of the most popular Korean street snacks, it is made from a simple flour batter and filled with sweet syrup made from cinnamon, brown sugar, and peanuts. It’s a great snack when you’re between meals.
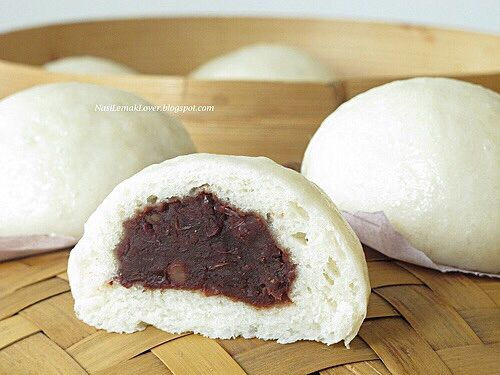
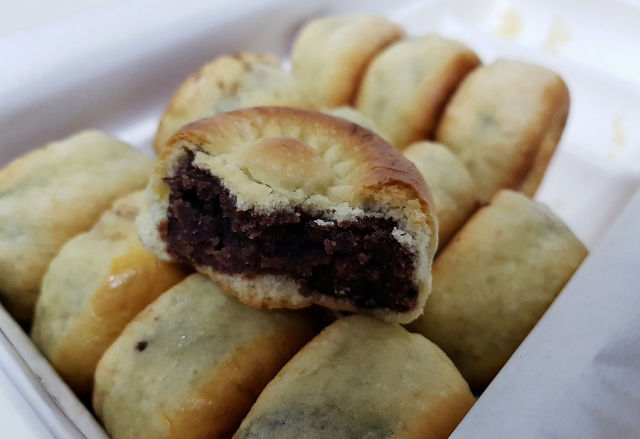
Red beans are mixed with eggs and wheat dough by hand, then this artisan bread is shaped and baked without any artificial sweeteners or preservatives, keeping only the sweetness of its original natural ingredients.
Hodu means walnut in Korean and they are cookies filled with red bean paste and walnuts.
허니 브래드 (Honey Bread)
Thick bread is divided into nine parts filled with whipped cream and then topped with honey, caramel syrup, and cinnamon powder. Its original name was Honey Butter Bread.
계란빵 (Gyeran-ppang: Egg Bread)
has a shape of rounded rectangle and contains whole egg inside of a bread. They are often sold by street vendors.
꽈배기 (Kkwabaegi: Twisted Korean Doughnuts)
It is made with glutinous rice flour and melted butter. The dough is deep-fried in oil and tossed in sugar and cinnamon powder. Like most fried breads, it tastes better when it’s hot. You can enjoy the original taste of twisted bread by eating when it just comes out of the oil, or by heating them up.
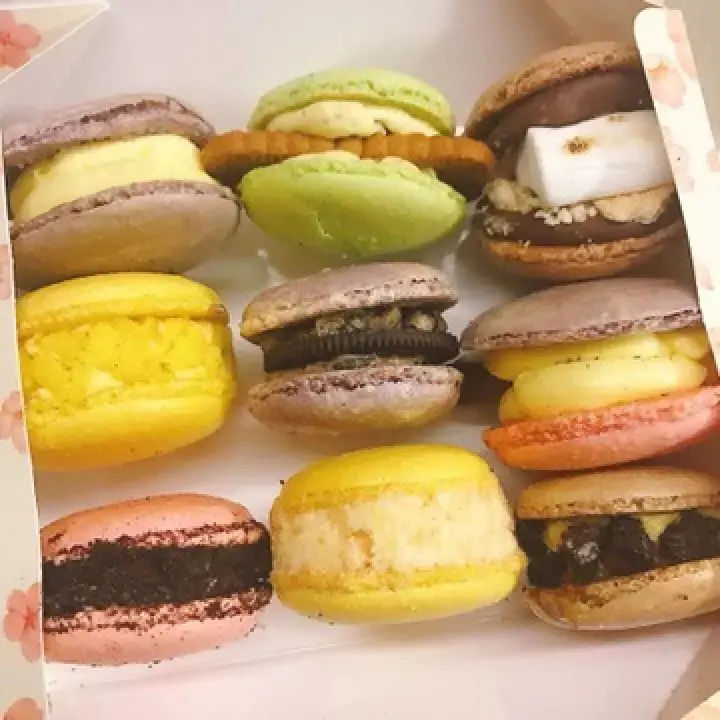
뚱카롱 (Ddungcaron: Fat Macaron)
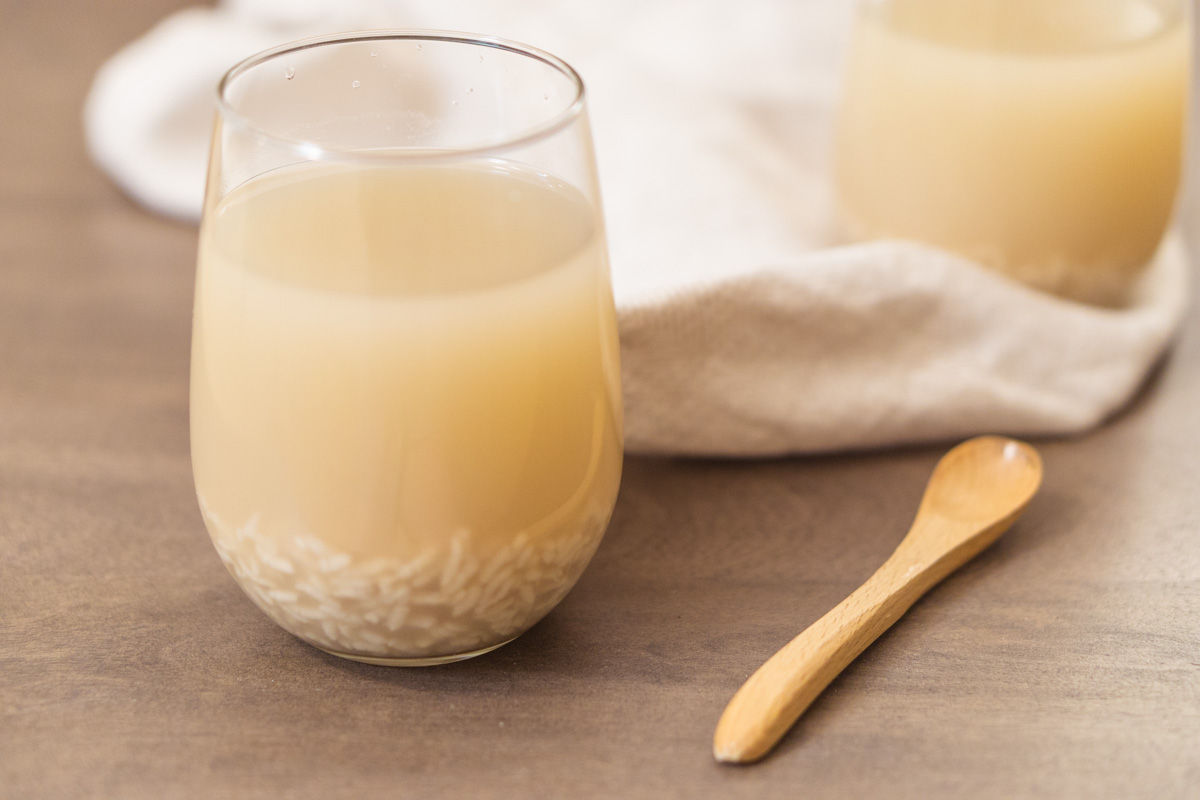
Rice Punch 식혜 (Korean Sweet Rice Drink)
Songpyeon half-moon rice cake (송편)
The fillings for these rice cakes vary, but the most common are sweetened sesame seeds and mung beans.
Pat-sirutteok 팥시루떡 (Layered rice cake with red beans)
율란 Yul-lan – Chestnut cookies
무지개떡 Mujigae-tteok (Rainbow rice cake)
불고기 Beef Bulgogi
Thinly sliced or shredded beef marinated in soy sauce, sesame oil, garlic, sugar, scallions, and black pepper, cooked on a grill (sometimes at the table). Bulgogi literally means “fire meat.” Variations include pork (dwaeji bulgogi, 돼지불고기), chicken (dak bulgogi 닭불고기), or squid (ojingeo bulgogi, 오징어불고기).
Galbi (갈비) – pork or beef ribs
Cooked on a metal plate over charcoal in the centre of the table. The meat is sliced thicker than bulgogi. It is often called “Korean barbecue” along with bulgogi, and can be seasoned or unseasoned.
Dak galbi (닭갈비)
Stir-fry marinated diced chicken in a gochujang-based sauce, and sliced cabbage, sweet potato, scallions, onions and tteok.
Dubujeon (두부전)
Steamed tofu mixed with ground beef and vegetables.
Bungeoppang (붕어빵; “carp-bread”)
is the Korean name for the Japanese fish-shaped pastry Taiyaki that is usually filled with sweet red bean paste and then baked in a fish-shaped mold. It is very chewy on the inside and crispy on the outside.
Gukwa-ppang (국화빵)
is almost the same as bungeoppang, but it is shaped like a flower.
Places Not in Seoul
As a bonus, here are a few places in Korea outside of Seoul.
I’ve used many enterprise-level productivity tools like Atlassian Jira, Confluence (Wiki), Microsoft Teams, Asana, and, of course, email. Asana seems to be the best for managing large projects that have multiple tasks and deadlines. Microsoft Teams is great for having discussions separated by topic and sharing documents related to each discussion. As the president of an HOA (Homeowner’s Association) that pays an experienced property manager, it’s interesting that we’re still communicating by email because so often we’d have a hard time finding specific information and documents. Microsoft Teams would be a big improvement but the free version doesn’t come with some useful features available in the paid version. Of all the tools I’ve used, it looks like Slack fits the bill because 1) there is no bill (pun intended – there’s a free version) and 2) it comes with features similar to the ones in the paid version of Microsoft Teams. This post will explain some of Slack’s features that could be beneficial for small groups like an HOA.
Separate Discussions By Topic
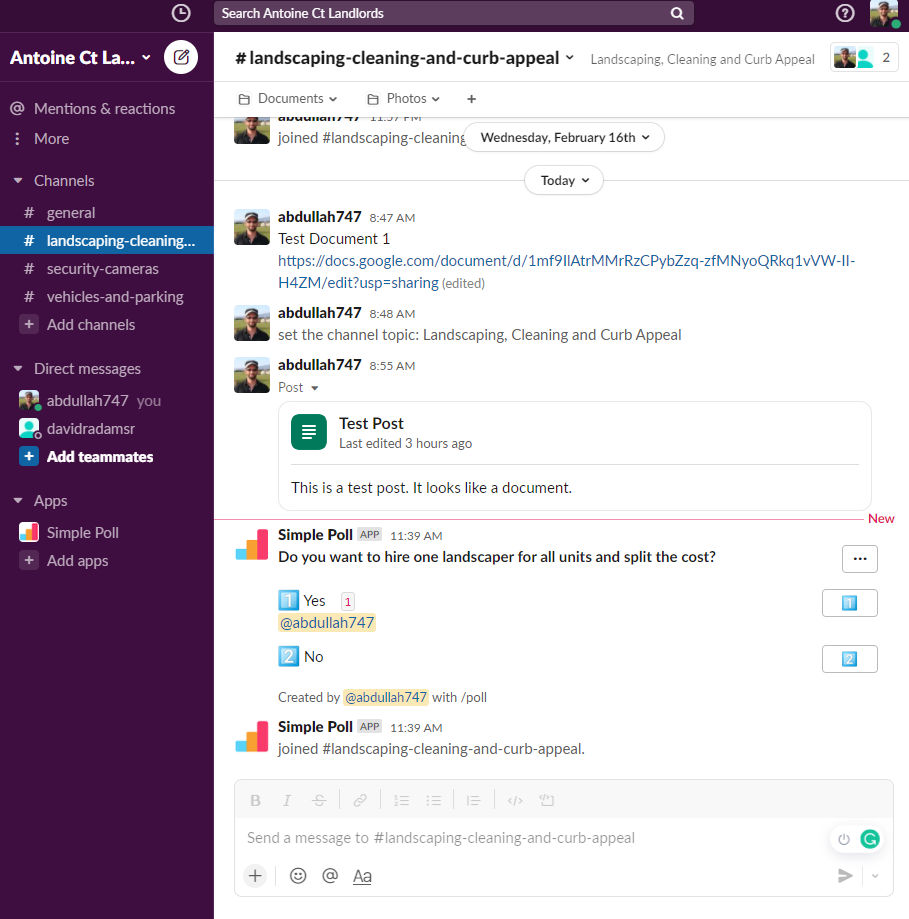
One of the problems with a simple chat tool is different topics get lost in one super long chat. At my HOA, we have different topics to talk about, e.g. landscaping, security cameras, parking, etc. With Slack, you can create multiple channels to represent these topics. Each channel is a separate chat discussion as you can see in the screenshot below.
In the screenshot above, you can see:
Group Name: Antoine Ct Landlords
Channels: These are discussion topics:
landscaping-cleaning
security-cameras
vehicles-and-parking
Direct messages: this shows you who is in the group and allows you to send a message directly to one specific person
Apps: you can see the list of apps you’ve integrated with Slack such as a polling app
In the screenshot above, the chat in view is the one for the landscaping-cleaning channel.
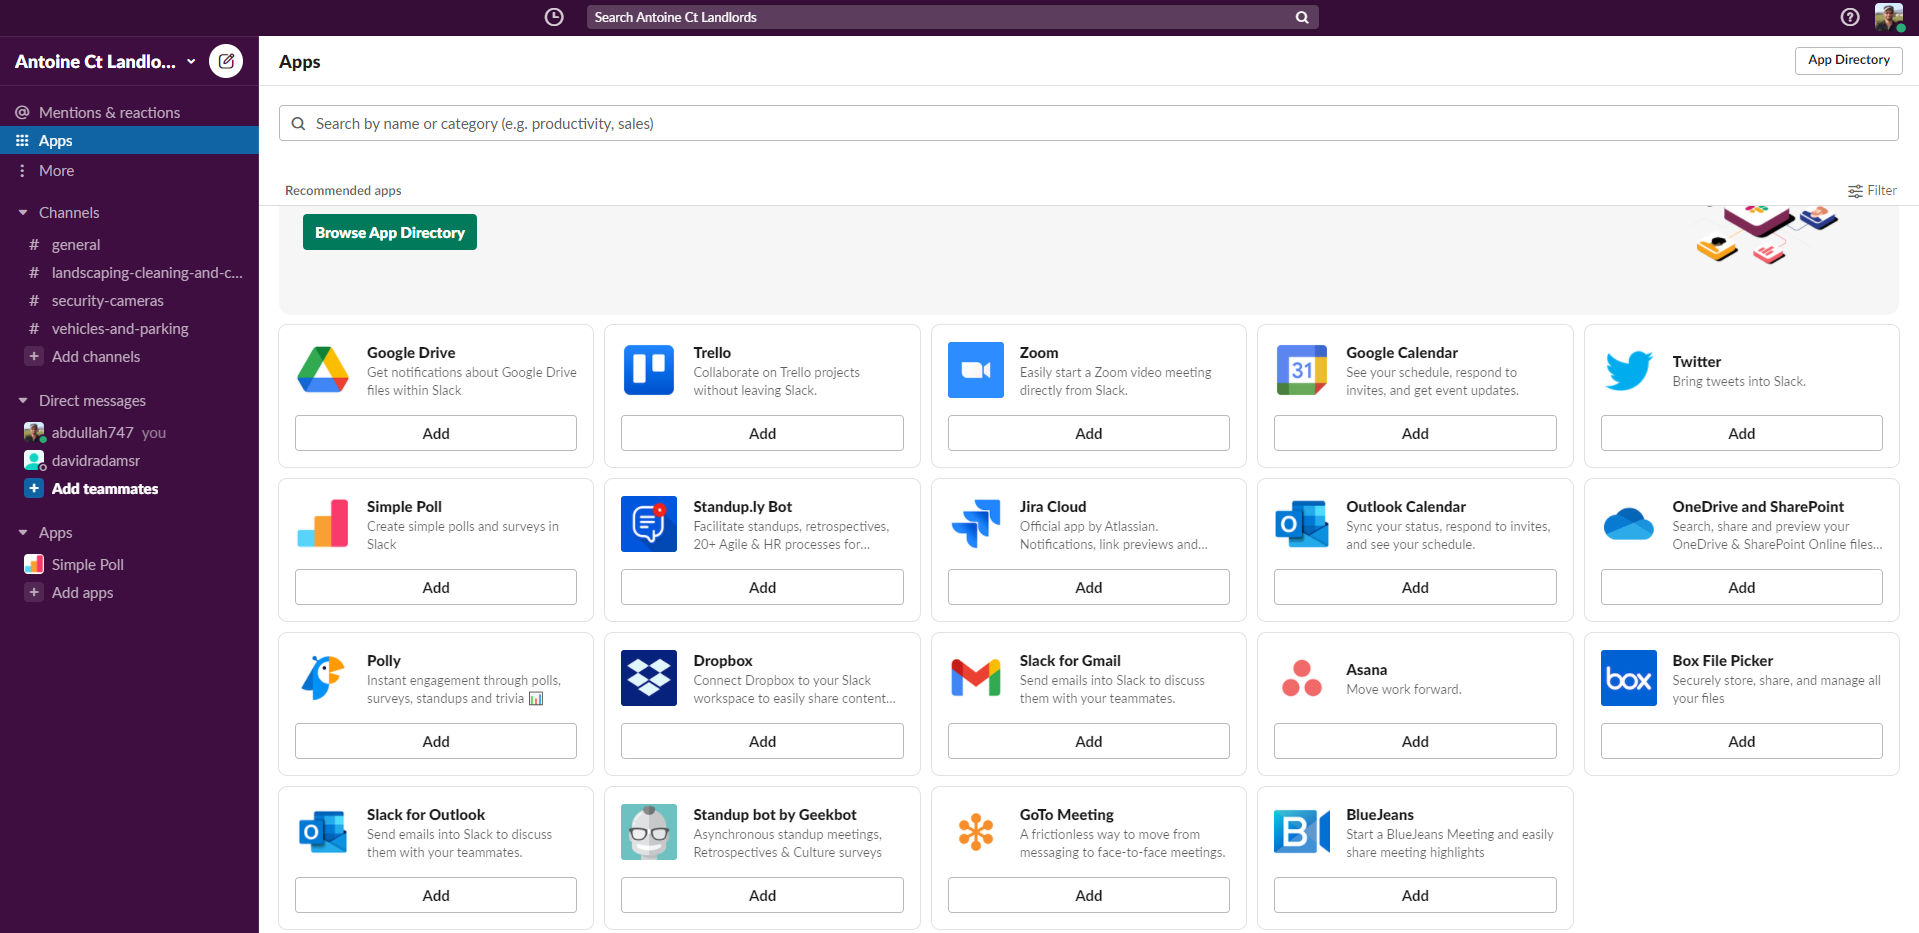
Apps
Slack allows you to integrate many apps for a seamless experience. Below are some of the apps you can integrate.
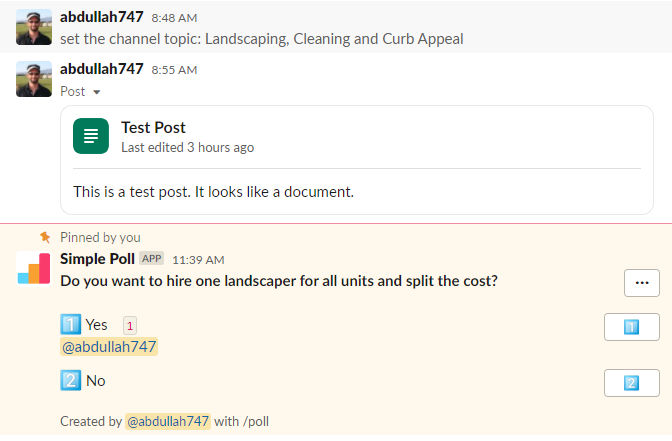
One thing we often do as an HOA is conduct polls. You can add a polling app and then create a poll in a channel. For example, I added the Simple Poll app and created a poll in the landscaping-cleaning channel. In the screenshot below, the simple poll asks if everyone wants to hire one landscaper for all units and split the cost. The answer options are simply yes and no.
Of course, if there is too much chatter, the poll can get buried in the history of chat messages. If that happens, you can pin the poll to the top. It then shows up in the bar at the top of the channel like this:
Links to Documents
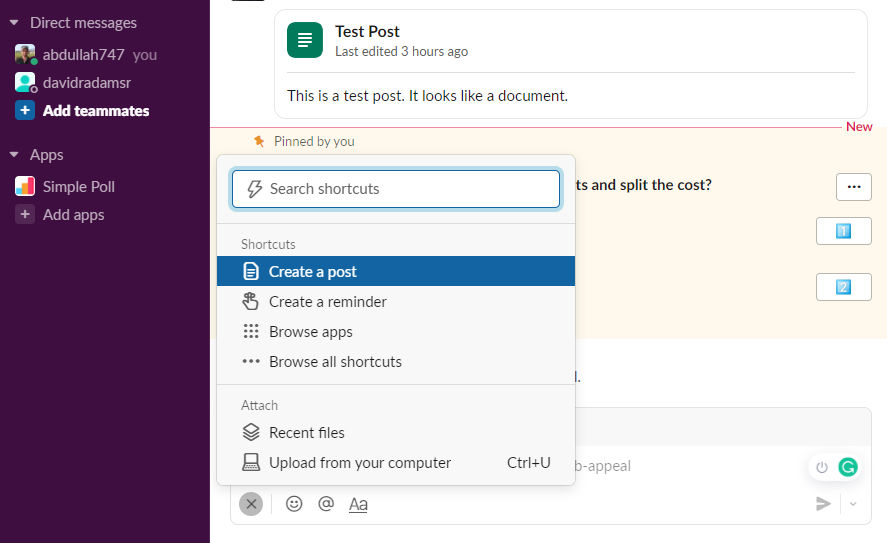
Chatting is useful, but eventually you’re going to need other productivity tools like documents, spreadsheets, presentations, etc. In the chat field, you can click the + button to insert things other than text, e.g. create a post.
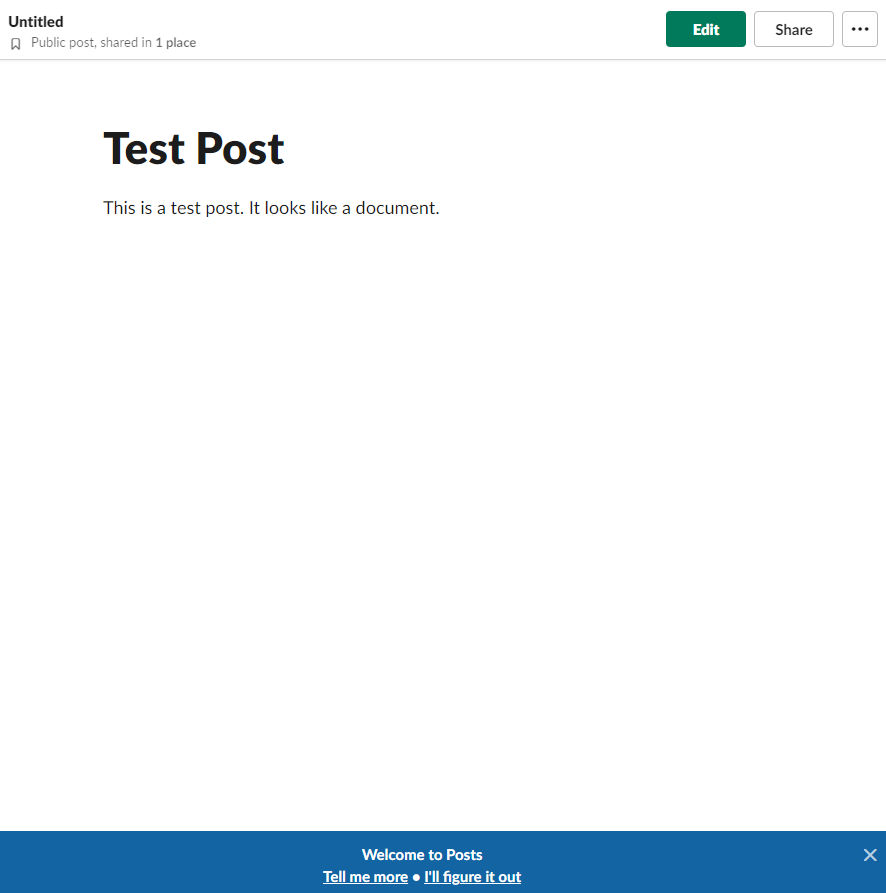
A post in Slack is like a Google or Word doc.
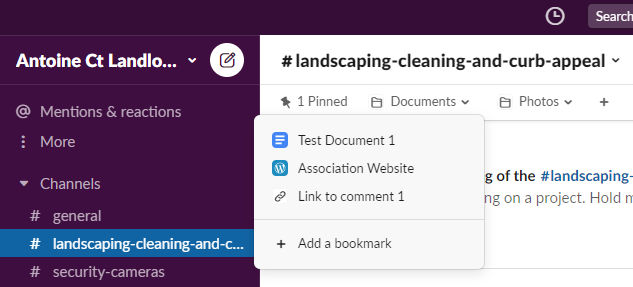
If you prefer to use a different tool like Google Docs, you can link the Google Doc to your Slack channel. Just copy the Google Doc share URL and paste it into the chat and, optionally, pin it to the top as I did for the poll example above. Or, you can create folders in the bar at the top of the channel to organize documents and chat messages. In the screenshot below, I clicked the + button to add two folders: Documents and Photos.
I then hovered over the Documents folder link and clicked Add to bookmark to add links to external resources:
Test Document 1 (link to a shared Google Doc)
Association Website (link to a WordPress site)
Multiple Teams
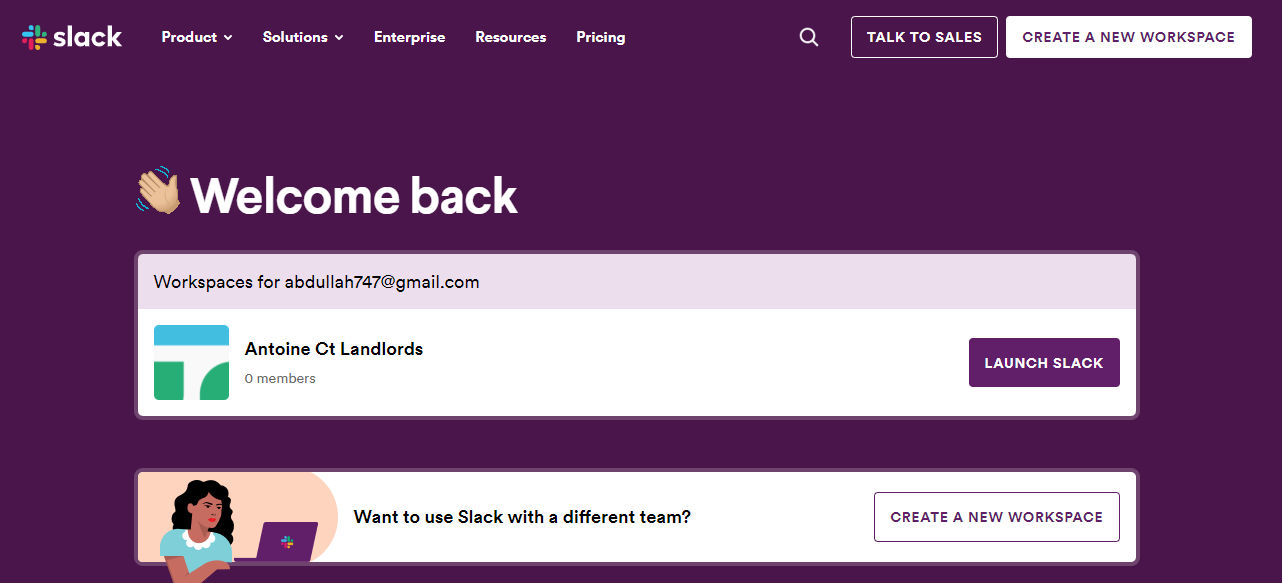
If you are part of multiple groups or teams of people, you can create a separate Slack group (called Workspaces). In the screenshot below of the Slack homepage, I see the workspace for the example HOA group mentioned above called “Antoine Ct Landlords”. There is also a button to create a new workspace.
If you are part of a small (or large) group of people and need to discuss many topics and don’t want to pay a monthly fee, you may want to give Slack a try.
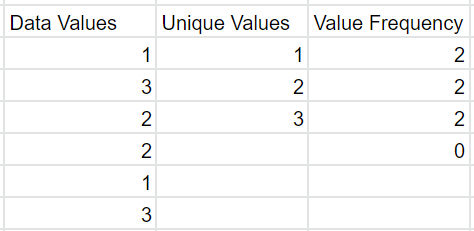
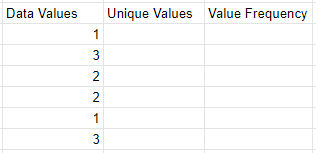
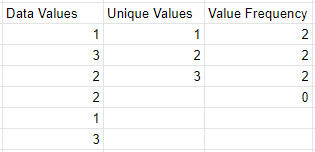
I’m often finding myself needing to calculate the frequency of unique values in a spreadsheet. It turns out it’s a 2-step process. For example, if you have a column of data as shown below and you want to know how many times the numbers 1, 2, and 3 occur, you need to first add a column containing the unique values in column 1. Then, you can use the frequency function to calculate frequency.
1. Get Unique Values
In column 2, get the unique values in column one using the unique function:
=UNIQUE(A2:A7)
If you want, you can also sort the values as follows.
=SORT(UNIQUE(A2:A7))
2. Get Value Frequency
In column 3, get the value frequency using the frequency function. The data is in column 1 and the classes are in column 2.
FREQUENCY(data, classes)
=FREQUENCY(A2:A7, B2:B4)
Google Sheets seems to want to add an extra row with the value 0. I just ignore that.
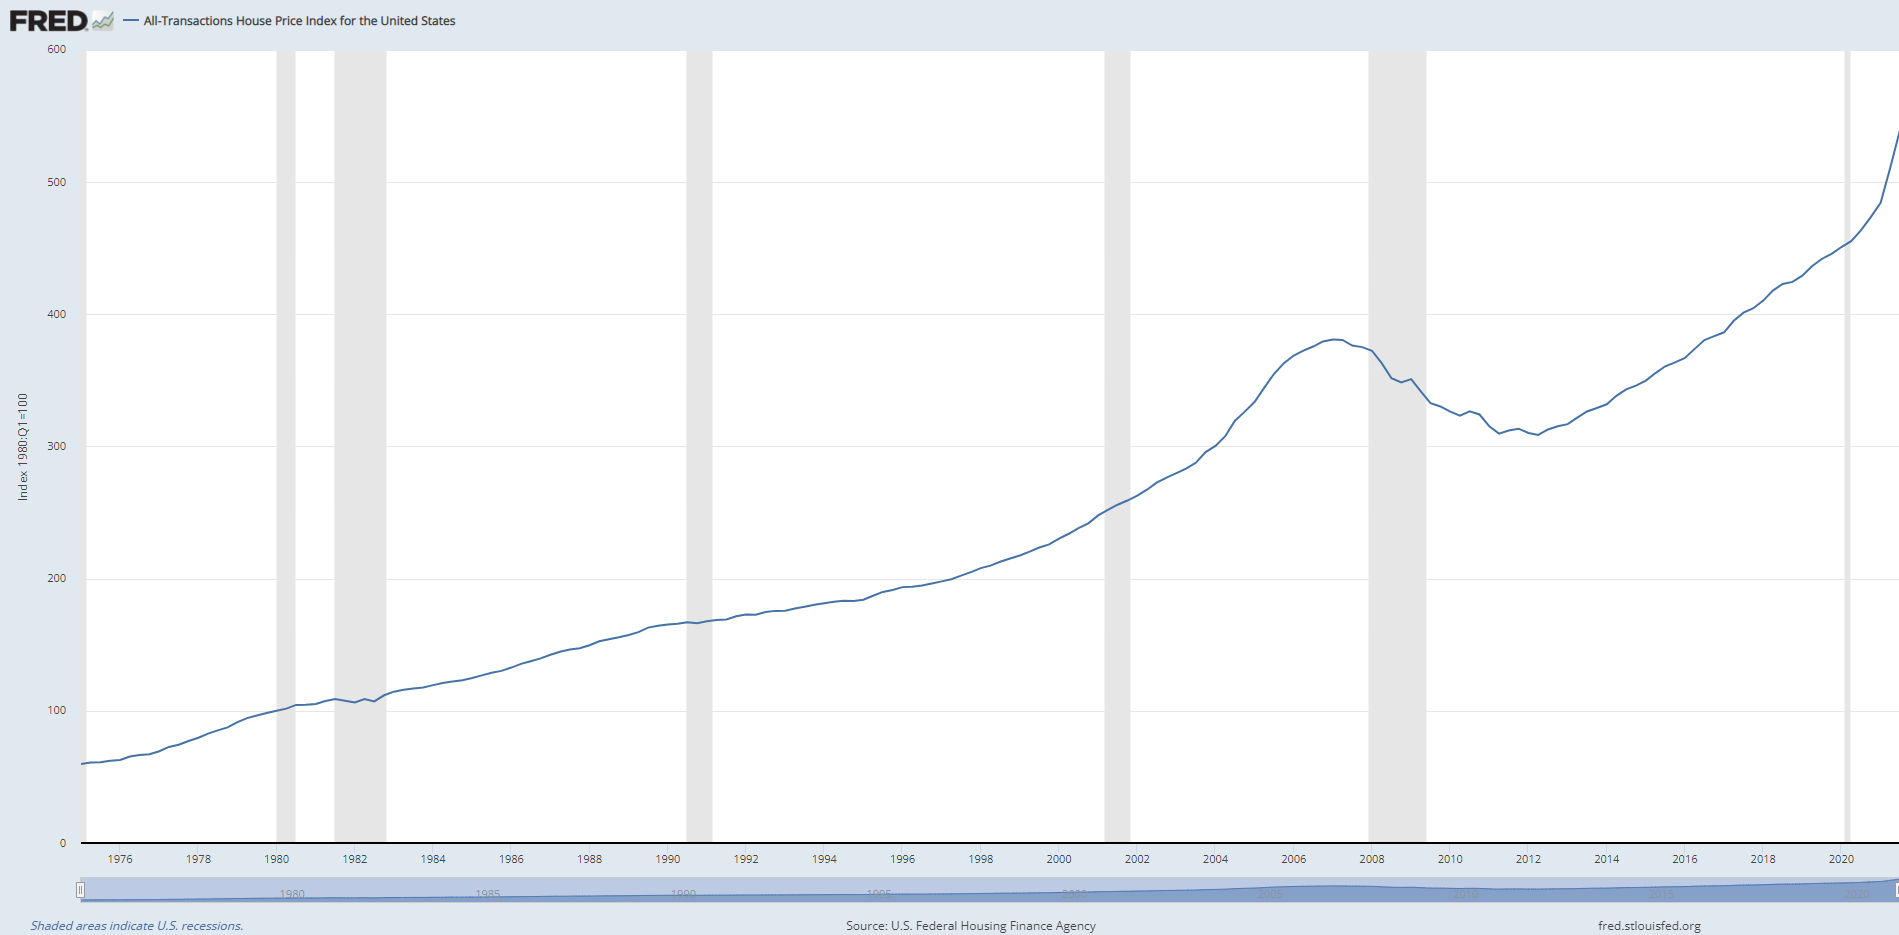
I haven’t invested in the stock market because of its volatility and because no one I know seems to know what they are doing or have made lots of money doing it. Maybe I’m around the wrong people. I invest in real estate for the reasons listed here. If we look at a graph of house prices in the US, their values have always gone up despite occasional dips. That’s the kind of graph you want to see.
House price index for California from 1975 to 2021
Though you can make a lot of money investing in real estate, you can make even more if you invest early in certain stocks. The problem is in knowing which stocks to invest in.
DISCLAIMER: I am not a professional stock market investor. At the time of this writing, the only stocks I own are the ones given to me by my employer. This article is just my personal opinion at the time of this writing.
Investing in Index Funds
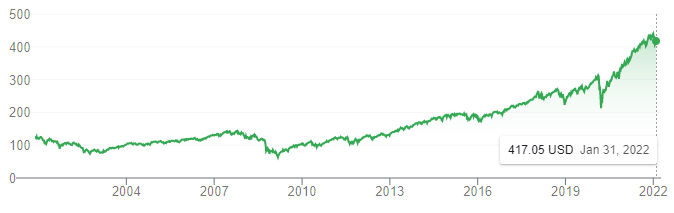
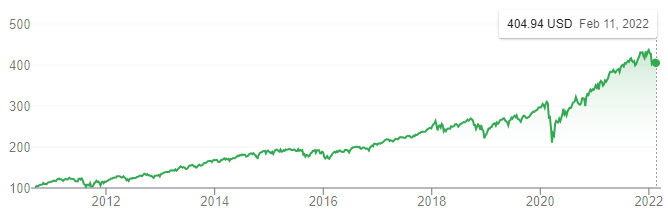
Warren Buffett, known as the “Oracle of Omaha,” is an American businessman and philanthropist, widely considered the most successful investor of the 20th century. He has amassed a personal fortune of more than $60 billion by defying prevailing investment trends. Instead of stock picking, Buffett suggested investing in a low-cost index fund. “I recommend the S&P 500 index fund,” Buffett said, which holds 500 of the largest companies in the U.S., “and have for a long, long time to people.” … “I just think that the best thing to do is buy 90% in S&P 500 index fund.” He specifically identifies Vanguard’s S&P 500 index fund. Vanguard offers both a mutual fund (VFIAX) and ETF (VOO) version of this fund. He recommends the other 10% of the portfolio go to a low-cost index fund that invests in U.S. short-term government bonds. Below are stock charts for VFIAX and VOO.
VFIAXVOO
As you can see, both have an overall consistent upward trend. If you invested in each one 10 years ago, in 2012, you could have quadrupled your investment. Twelve years ago, one share of each was about $100. And now, each is around $400. But, if you only bought 1 share, then you would have only made $300 in 12 years. What if you invest $10,000 at the time. Then, you would have made $30,000 in 12 years. Or, instead of putting 20% down on a $400K house, you put $100K in one of these funds. Then in 12 years, you would have made $300K. Though that’s not bad, you would make more in real estate, especially if you include rental income, but then again, owning rental properties is not 100% passive. Nevertheless, if you don’t want to or can’t invest in real estate, then investing in one of these funds over the long term appears to be a safe bet.
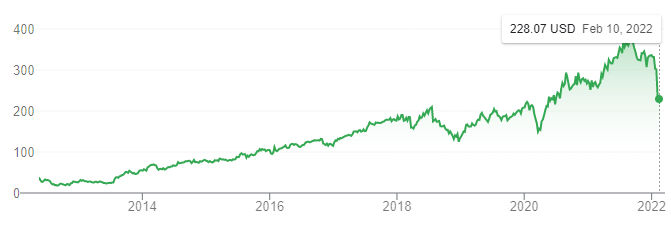
Stock Picking
If you want to pick stocks, you obviously want to pick ones that have the potential to grow fast. Tech companies seem to get more publicity for many reasons such as everyone’s familiarity with them and their potential to change the way we live. For example, there was a ton of publicity before and during Facebook’s IPO. Everyone knew what Facebook was at the time. Facebook went public on May 18, 2012, and shares closed the first day of trading at $38.23. Now, the value is $228. That’s a 6x increase in 10 years. When you invest in stocks, the general advice is you shouldn’t invest more than you can feel comfortable losing. At the time, I probably wouldn’t have minded losing $1000. Had I invested $1K in FB, the investment would be worth about $6K now (10 years later) for a $5K profit. That’s still a very petty profit. If I had $50K, which is about the cost of a down payment on a $250K house at the time, then the investment would be worth $300K now for a $250K profit. While that is a good profit, there’s no way I would have invested $50K in FB at the time because I would not have felt comfortable losing it all. With real estate investing, however, it’s so much safer and predictable that one need not worry about their losing their investment. Plus, had I invested $50K in real estate instead of FB, I would still have made a profit of $250K or more in the same period.
Following are stock price graphs of some of the biggest and most popular tech companies along with how much you could have made if 10 years ago you had invested $1000 in each.
FACEBOOK (FB)
IPO date: May 18, 2012
Opening price: $38
Price in 2012: ~38
Price in 2022: ~ $300
Price increase factor: 7.9x
Profit from $1K investment: $6900
Microsoft (MSFT)
IPO date: March 13, 1986
Opening price: $21
Price in 2012: ~50
Price in 2022: ~ $320
Price increase factor: 6.4x
Profit from $1K investment: $6400
Apple (AAPL)
IPO date: December 12, 1980
Opening price: $22
Price in 2012: ~25
Price in 2022: ~ $155
Price increase factor: 6.2x
Profit from $1K investment: $6200
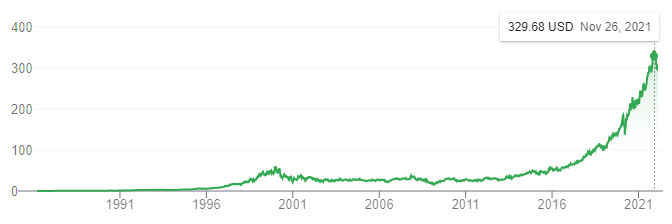
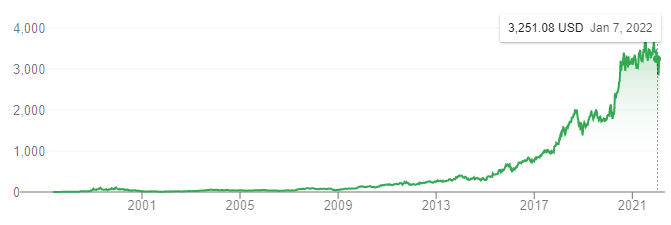
Amazon (AMZN)
IPO date: May 15, 1997
Opening price: $18
Price in 2012: ~200
Price in 2022: ~ $3200
Price increase factor: 16x
Profit from $1K investment: $15000
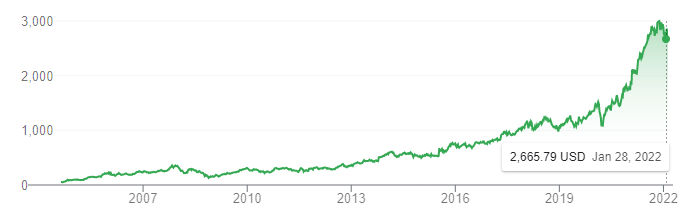
Alphabet (GOOG)
IPO date: May 15, 1997
Opening price: $18
Price in 2012: ~200
Price in 2022: ~ $3200
Price increase factor: 16x
Profit from $1K investment: $15000
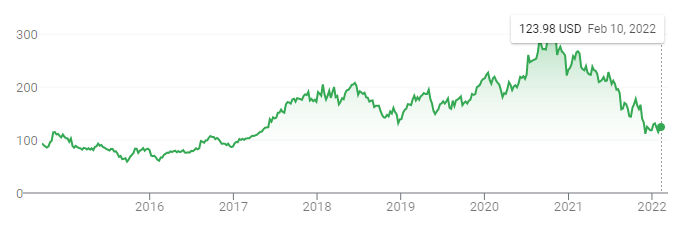
Alibaba (BABA)
IPO date: Sept. 14, 2014
Opening price: $68
Price in 2022: ~ $125
Price increase factor: 1.8x
Profit from $1K investment: $800
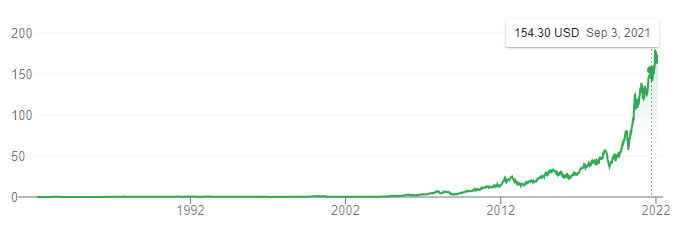
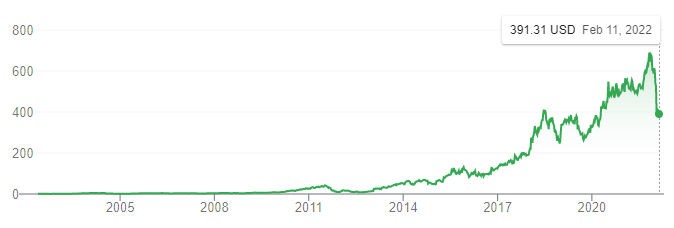
Netflix (NFLX)
IPO date: May 23, 2002
Opening price: $15
Price in 2012: ~15
Price in 2022: ~ $400
Price increase factor: 26x
Profit from $1K investment: $25000
Disruptive Technologies
Disruptive technologies also have a large potential for a huge gain. Everyone has heard of Tesla, the automaker that has proven that electric vehicles can replace gas vehicles. Then there’s Bitcoin which revolutionizes money.
Tesla (TSLA)
IPO date: June 29, 2010
Opening price: $3.84
Price in 2012: ~6
Price in 2022: ~ $1000
Price increase factor: 166x
Profit from $1K investment: $165000
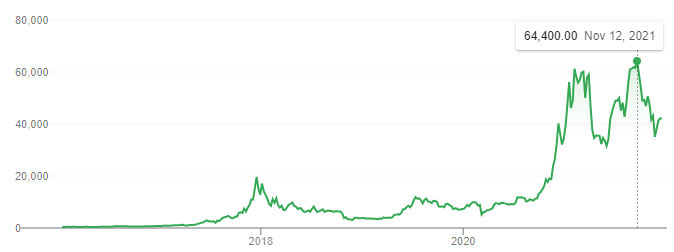
Bitcoin (BTC)
Price in 2012: ~$320
Price in 2022: ~ $43000
Price increase factor: 134x
Profit from $1K investment: $132000
Conclusion
Based on the analysis above, if you are going to hold on to popular tech stocks for the long term, e.g. 10 years, then you’re probably safe in that you won’t lose money and will likely profit. Of course, how much you profit will depend a lot on how much you invest and luck. One pattern to note is the performance of disruptive tech (electric cars, cryptocurrency) which realized the biggest gains. Considering the above, I think a safe and good investment diversification strategy, if you are comfortable managing rental properties, is
75% real estate
5% S&P 500 index fund – mutual fund (VFIAX) and/or ETF (VOO)
Adjectives are words that describe the qualities or states of being of nouns: enormous, doglike, silly, yellow, fun, fast. They can also describe the quantity of nouns: many, few, millions, eleven.
Often, when adjectives are used together, you should separate them with a comma or conjunction.
✗
Please use three, white flowers in the arrangement.
✓
Please use three white flowers in the arrangement.
✗
I’m looking for a small good-tempered dog to keep as a pet.
✓
I’m looking for a small, good-tempered dog to keep as a pet.
Coordinate adjectives
Coordinate adjectives should be separated by a comma or the word and. Adjectives are said to be coordinate if they modify the same noun in a sentence.
✗
No one could open the old, silver locket.
Wrong because silver locket forms a unit modified by old.
An adverb is a word that modifies (describes) a verb (he sings loudly), an adjective (very tall), another adverb (ended too quickly), or even a whole sentence (Fortunately, I had brought an umbrella). Adverbs often end in -ly, but some (such as fast) look exactly the same as their adjective counterparts.
✗
That is a hastily, written note.
✗
That is a hastily-written note.
✓
That is a hastily written note.
Placement of adverbs
Place adverbs as close as possible to the words they are supposed to modify. Incorrect placement can change the meaning of the sentence, especially when it comes to the adverb only.
Phillip only fed the cat. (The only thing that Phillip did was feed the cat)
Phillip fed only the cat. (The only thing that Phillip fed was the cat)
Conjunctions are words that link other words, phrases, or clauses together, e.g.
I like cooking and eating, but I don’t like washing dishes afterward. Sophie is clearly exhausted, yet she insists on dancing till dawn.
The most common coordinating conjunctions are for, and, nor, but, or, yet, and so; you can remember them by using the mnemonic device FANBOYS. Commas are used when a coordinating conjunction is joining two independent clauses.
✗
I’d like pizza or a salad for lunch. We needed a place to concentrate so we packed up our things and went to the library. Jesse didn’t have much money but she got by. (missing necessary commas)
✓
I’d like pizza or a salad for lunch. We needed a place to concentrate, so we packed up our things and went to the library. Jesse didn’t have much money, but she got by.
Subordinating Conjunctions
Subordinating conjunctions join independent and dependent clauses.
Common subordinating conjunctions are because, since, as, although, though, while, and whereas. Sometimes an adverb, such as until, after, or before can function as a conjunction. If the dependent clause comes first, use a comma before the independent clause.
✓
Before he leaves, make sure his room is clean.
✓
I drank a glass of water because I was thirsty. Because I was thirsty, I drank a glass of water.
Prepositions indicate relationships between other words in a sentence.
Ending a Sentence With a Preposition
You are allowed to end a sentence with a preposition. Not doing so can result in an unnatural sentence.
✓
There’s no one else to hide behind. (Grammatically correct and natural)
✓
There’s no one else behind whom to hide. (Grammatically correct, but unnatural)
✓
Where did you come from? (Grammatically correct and natural)
✓
From where did you come? (Grammatically correct, but unnatural)
It is sometimes more elegant to move a preposition to an earlier spot in a sentence, especially in very serious and formal writing. But if you do move the preposition, remember to delete it from the end.
✓
This is something we must meditate on.
✓
This is something on which we must meditate.
✗
This is something on which we must meditate on.
Unnecessary Prepositions
✗
Where is your brother at?
✓
Where is your brother?
✗
For many people, the reality of an entry into a new area of employment is cause for a host of anxieties.
Personal pronouns are pronouns that refer to specific individuals and groups, e.g. I/me, She/her, He/him, They/them, We/us, You.
Antecedents
Antecedents are the things that pronouns refer to, e.g. My family tests my patience, but I love them.
Relative pronouns
Relative pronouns connect relative clauses to independent clauses. Relative pronouns are that, what, which, who and whom.
who refers to people
which and that refer to animals or things
Examples
The womanwho called earlier didn’t leave a message.
All the dogsthat got adopted today will be loved.
My car, which is nearly twenty years old, still runs well.
Who vs. whom—subject and object pronouns
who is for the subject of a sentence
whom is for the object of a verb or preposition
Examples
Who mailed this package?
To whom was this package sent?
Demonstrative pronouns
That, this, these, and those.
Indefinite pronouns
Indefinite pronouns are used when you need to refer to a person or thing that doesn’t need to be specifically identified. Some common indefinite pronouns are one, other, none, some, anybody, everybody, and no one.
Reflexive pronouns
Reflexive pronouns end in -self or -selves, e.g. myself, themselves.
Example: I saw myself in the mirror.
Using myself when you mean me is a common mistake writers and speakers make. Reflexive pronouns are only correct when the subject and object of a sentence are the same.
Intensive pronouns
Intensive pronouns look the same as reflexive pronouns, but their purpose is different. Intensive pronouns add emphasis.
Example: I told them I could do it myself.
Possessive pronouns
E.g. my, your, our.
Example: I crashed my bike into a telephone pole.
Independent possessive pronouns
E.g. mine, yours, theirs.
Example: She forgot her jacket, so I gave her mine.
Interrogative pronouns
Who, what, which, and whose.
Example: What is your name?
Reciprocal pronouns
Each other, one another.
Distributive pronouns
Either, Each, Neither, Any, None
Pronouns and gender identity
The most common gender-neutral pronoun is the singular they.
A contraction is a shortened form of a word (or group of words) that omits certain letters or sounds, e.g. He would=He’d. I have=I’ve. They are=They’re. You cannot=You can’t.
Less common contractions
something -> somethin’
ever -> e’er
you all -> y’all
1960s -> 60’s
Apostrophes and Possessive Nouns
For most singular nouns, add apostrophe+s:
The dog’s leash.
The writer’s desk.
The planet’s atmosphere
For most plural nouns, add only an apostrophe:
The dogs’ leashes (multiple dogs).
The writers’ desks (multiple writers).
The planets’ atmospheres (multiple planets).
For plural nouns that do not end in s, add apostrophe+s:
The children’s toys.
The geese’s migration route.
Style guides vary in their recommendations of what to do when you have a singular proper noun that ends in s.
Charles Dickens’ novels
Kansas’ main airport
Charles Dickens’s novels
Kansas’s main airport
No matter which style guide you use, add only the apostrophe to plural proper nouns that end in s:
The Harrises’ house
The Smiths’ vacation
How to Write Joint Possession
When one thing belongs to two or more people, make only the final name possessive:
Bob and Jim’s bait shop (Bob and Jim co-own the same bait shop)
Ryan, Jessica, and Elinor’s parents (All three share the same parents)
When you’re talking about separate things that belong to different people, make all the names possessive:
Bob’s and Jim’s bait shops (Bob owns one bait shop and Jim owns a different one)
Ryan’s, Jessica’s, and Elinor’s parents (Each has a different set of parents)
Apostrophes and Plurals
With very few exceptions, apostrophes do not make nouns plural. The one notable exception to this rule is the plural form of lowercase letters, which are formed with an apostrophe to prevent misreading:
A colon introduces an element or series of elements that illustrates or amplifies the information that preceded the colon. While a semicolon normally joins two independent clauses to signal a close connection between them, a colon does the job of directing you to the information following it. When a colon appears in a sentence, it usually gives the silent impression of “as follows,” “which is/are,” or “thus.”
There are three types of muscle in the body: cardiac, smooth, and skeletal.
We have two options here: stay and fight, or run like the wind.
He ended with the immortal words of Neil Young: “Rock and Roll can never die.”
Misuse of Colons
✗
The three types of muscle in the body are: cardiac, smooth, and skeletal.
✓
The three types of muscle in the body: cardiac, smooth, and skeletal.
✗
When I graduate, I want to go to: Rome, Israel, and Egypt.
✓
When I graduate, I want to go to Rome, Israel, and Egypt.
While a period ends a sentence, a comma indicates a smaller break. Some writers think of a comma as a soft pause—a punctuation mark that separates words, clauses, or ideas within a sentence.
Comma with Subjects and Verbs
With few exceptions, a comma should not separate a subject from its verb.
✗
My friend Cleo, is a wonderful singer.
✓
My friend Cleo is a wonderful singer.
✗
The things that cause me joy, may also cause me pain.
✓
The things that cause me joy may also cause me pain.
✗
Navigating through snow, sleet, wind, and darkness, is a miserable way to travel.
✓
Navigating through snow, sleet, wind, and darkness is a miserable way to travel.
Comma Between Two Nouns in a Compound Subject or Object
Don’t separate two nouns that appear together as a compound subject or compound object.
✗
Cleo, and her band will be playing at Dockside Diner next Friday.
✓
Cleo and her band will be playing at Dockside Diner next Friday.
✗
Cleo will wear a sparkly red blazer, and high heels.
✓
Cleo will wear a sparkly red blazer and high heels.
When a subject or object is made up of two items and the second item is parenthetical, you can set off the second item with commas—one before it and one after it. But you don’t need a comma when you’re simply listing two items.
Comma Between Two Verbs in a Compound Predicate
You get a compound predicate when the subject of a sentence is doing more than one thing. In a compound predicate that contains two verbs, don’t separate them with a comma.
✗
Cleo will sing, and play the banjo.
✓
Cleo will sing and play the banjo.
✗
I meant to buy tickets for Cleo’s show, but ran out of time.
✓
I meant to buy tickets for Cleo’s show but ran out of time.
Don’t use a comma in compound predicates unless there is a chance of misreading:
Cleo spotted the man who entered the diner, and waved.
In the sentence above, you need the comma to make clear that it was Cleo who waved, not the man.
Comma Splices
When you want to join two independent clauses, you need a conjunction or a semicolon. A comma alone isn’t strong enough to join them. This kind of mistake is called a comma splice.
✗
We were out of milk, I went to the store.
✓
We were out of milk, so I went to the store.
✓
We were out of milk; I went to the store.
✓
We were out of milk. I went to the store.
Comma After Introductory Phrase
A comma normally follows participial phrases that introduce a sentence:
Grabbing her umbrella, Kate raced out of the house. Confused by her sister’s sudden change in mood, Jill stayed quiet.
When an adverbial phrase begins a sentence, it’s often followed by a comma but it doesn’t have to be, especially if it’s short. As a rule of thumb, if the phrase is longer than about four words, use the comma. You can also use a comma with a shorter phrase when you want to emphasize it or add a pause for literary effect.
After the show, Cleo will be signing autographs.
Behind the building there is enough space to park two limousines.
Without knowing why, I crossed the room and looked out the window.
In 1816 life was very different.
Suddenly, an angry black cat sprang from the shadows.
But, if there is a chance of misreading the sentence, use the comma:
✗
Before eating the family said grace.
✓
Before eating, the family said grace.
Comma Within a Comparison
Don’t use a comma before “than” when you’re making a comparison.
✗
This box is lighter, than that box.
✓
This box is lighter than that box.
✗
Hardcover books are more expensive, than paperback books.
✓
Hardcover books are more expensive than paperback books.
Commas with Interrupters or Parenthetical Elements
Interrupters are little thoughts that pop up in the middle of a sentence to show emotion, tone, or emphasis. A parenthetical element is a phrase that adds extra information to the sentence but could be removed without changing the meaning of the sentence. Both interrupters and parenthetical elements should be set off with commas.
✗
The weather I was happy to see was beginning to clear.
✓
The weather, I was happy to see, was beginning to clear.
✗
Geoff’s cooking skills if you can call them skills left something to be desired.
✓
Geoff’s cooking skills, if you can call them skills, left something to be desired.
✗
It was sadly the last day of camp.
✓
It was, sadly, the last day of camp.
✗
Mary unlike Anne is very organized.
✓
Mary, unlike Anne, is very organized.
Comma with a Question Tag
A question tag should be preceded by a comma.
These willow trees are beautiful, aren’t they?
You didn’t actually write a 600-page vampire romance novel, did you?
I know, right?
Comma with Direct Address
When addressing another person by name, set off the name with commas.
Mom, I can’t find my shoes!
Cleo, there’s someone on the phone for you.
Hello, Chester.
Comma with an Appositive
An appositive is a word or phrase that refers to the same thing as another noun in the same sentence. Often, the appositive provides additional information about the noun or helps to distinguish it in some way. If you could remove the appositive without changing the meaning of the sentence, it is said to be nonessential and should be set off with commas. If the appositive is necessary, it’s said to be essential and it should not be set off with commas.
Nonessential appositives:
My sister, Angela, is a wonderful cook.
The painter, one of the city’s most promising young artists, began showing his work in galleries before he was sixteen.
Chocolate, my favorite treat, always makes me feel better after a bad day.
Essential appositives:
Edgar Allan Poe’s poem The Raven is a classic.
Alec Baldwin’s brother Stephen is the most underrated Baldwin.
The detective Sherlock Holmes is one of literature’s greatest sleuths.
Commas in Dates
When writing a date in month-day-year format, set off the year with commas.
July 4, 1776, was an important day in American history. I was born on Sunday, May 12, 1968.
If you are using the day-month-year format, however, commas are unnecessary.
Applications are due by 31 December 2016.
If you are referencing a day of the week and a date, use a comma:
On Tuesday, April 13, at three o’clock, there will be a meeting for all staff.
Please join us on Saturday, June 14, 2010, for the marriage of Annie and Michael.
When you are referencing only a month and year, you don’t need a comma.
The region experienced record rainfall in March 1999.
Comma Between Coordinate Adjectives
When multiple adjectives modify a noun to an equal degree, they are said to be coordinate and should be separated by commas. One way to tell whether the adjectives are coordinate is to try switching the order of them. If the sentence still sounds natural, the adjectives are coordinate.
That man is a pompous, self-righteous, annoying idiot.
That man is a self-righteous, annoying, pompous idiot.
The sweet, scintillating aroma of cinnamon buns filled the kitchen.
The scintillating, sweet aroma of cinnamon buns filled the kitchen.
If the adjectives are not coordinate, don’t separate them with a comma.
✗
The adorable, little boy was eating ice cream.
✓
The adorable little boy was eating ice cream.
Comma Before But
Use a comma before the word but if it is joining two independent clauses:
✗
Cleo is a good singer but she’s an even better dancer.
✓
Cleo is a good singer, but she’s an even better dancer.
If but is not joining two independent clauses, leave the comma out.
✗
My teacher is tough, but fair.
✓
My teacher is tough but fair.
✗
Life is, but a dream.
✓
Life is but a dream.
Comma Before And
When you have a list that contains only two items, don’t use a comma before the and.
✗
My dog Charlie is cute, and smart.
✓
My dog Charlie is cute and smart.
✗
Cleo’s favorite activities are singing on stage, and relaxing in the sunshine.
✓
Cleo’s favorite activities are singing on stage and relaxing in the sunshine.
When correcting a comma splice, that is when joining two independent clauses with a coordinating conjunction, put the comma before and.
Commas with Lists
When you have a list that contains more than two elements, use commas to separate them.
✗
Julie loves ice cream books and kittens.
✓
Julie loves ice cream, books, and kittens.
✓
Julie loves ice cream, books and kittens.
✓
I cleaned the house and garage, raked the lawn, and took out the garbage.
✓
I cleaned the house and garage, raked the lawn and took out the garbage.
The comma before the and in a list of three or more items is optional.
Serial Comma (Oxford Comma)
When you are listing three or more items, commas should separate each element of the list. However, the final comma—the one that comes before the and—is optional. This comma is called the serial comma or the Oxford comma.
✗
Mary needs bread, milk, and butter at the grocery store. (With serial comma)
✓
Mary needs bread, milk and butter at the grocery store. (Without serial comma)
✗
I still have to buy a gift, pack the suitcases, and arrange for someone to water the plants while we’re at the wedding. (With serial comma)
✓
I still have to buy a gift, pack the suitcases and arrange for someone to water the plants while we’re at the wedding. (Without serial comma)
Though the serial comma is optional, it is occasionally necessary for clarity.
I dedicate this award to my parents, Jane Austen and Albert Einstein. (Is the award dedicated to the parents and to Jane and Albert or are Jane and Albert the names of the parents?)
I dedicate this award to my parents, Jane Austen, and Albert Einstein. (The award is dedicated to the parents and to Jane and Albert)
Comma Separating a Verb and Its Object
Don’t separate a transitive verb from its direct object with a comma.
✗
I’m glad I trained, Charlie not to beg for scraps.
✓
I’m glad I trained Charlie not to beg for scraps.
✗
Mary said, she likes chocolate.
✓
Mary said she likes chocolate.
Comma with Nonrestrictive Clause
A nonrestrictive clause offers extra information about something you have mentioned in a sentence, but the information isn’t essential to identify the thing you’re talking about. Nonrestrictive clauses are usually introduced by which or who and should be set off by commas.
Posey’s Cafe, which Chester recommended, is a fantastic restaurant.
My wife, whom I love dearly, is a brilliant physicist.
Comma with Restrictive Clauses
A restrictive clause adds necessary information about something you have mentioned in a sentence. Restrictive clauses are often introduced by that or who and should never be set off by commas.
✗
The cafe, that Chester recommended, is a fantastic restaurant.
✓
The cafe that Chester recommended is a fantastic restaurant.
Comma Between Correlative Conjunctions
Correlative conjunctions are conjunctions that come in pairs (such as either/or, neither/nor, and not only/but also) and connect words or phrases in a sentence to form a complete thought. Typically, commas are unnecessary with correlative conjunctions.
✗
Either the blue shirt, or the red sweater will look good with your jeans.
✓
Either the blue shirt or the red sweater will look good with your jeans.
✗
You can wear a pashmina not only for warmth, but also for fashion.
✓
You can wear a pashmina not only for warmth but also for fashion.
Comma Between Direct Quote and Attributive Tag
An attributive tag is a phrase like “he said” or “she claimed” that identifies the speaker of a quote or piece of dialogue. Attributive tags can come before, after, or even in the middle of a quote. Use commas to separate attributive tags from quotations.
The professor remarked, “How attentive you have been today!”
“Once you know the solution,” Tiffany said, “the whole problem seems very simple.”
“You have ice cream on your nose,” my friend snickered.
“When you leave the house,” my mother yelled, “don’t slam the door!”
If a quotation before an attributive tag ends in a question mark or exclamation point, however, there’s no need for a comma.
✗
“You have a spider on your nose!”, my friend yelled.
✓
“You have a spider on your nose!” my friend yelled.
✗
“Where did that spider come from?”, I asked.
✓
“Where did that spider come from?” I asked.
Comma Inside Quotation Marks
In American English, commas always go before closing quotation marks.
“Pass me that thesaurus,” said Matthew.
“If you knew what was good for you, you’d sit down and finish that essay right now,” my roommate said.
“We’re going down to the soup kitchen to help serve dinner,” her mother called.
In British English, however, unquoted punctuation typically follows the quotation marks. If you are writing for a British audience, put the comma after the closing quotation mark. Furthermore, British English tends to use single quotes rather than double quotation marks.
Comma Before Parenthesis
✗
After opening the new cookie tin, (and eating several of the cookies), Chester had a hard time replacing the lid.
✗
After opening the new cookie tin (and eating several of the cookies,) Chester had a hard time replacing the lid.
✓
After opening the new cookie tin, Chester had a hard time replacing the lid.
✓
After opening the new cookie tin (and eating several of the cookies), Chester had a hard time replacing the lid.
Comma with As Well As
The phrase “as well as” usually doesn’t require commas unless it’s part of a nonrestrictive clause.
Please proofread for grammatical mistakes as well as spelling.
Spelling mistakes, as well as grammatical errors, are distracting to readers.
Comma with Such As
The phrase “such as” requires commas if it introduces a nonrestrictive clause.
Coniferous trees, such as pine and spruce, do not drop their needles in the winter.
If “such as” introduces a restrictive clause, omit the commas.
Trees such as pine and spruce do not drop their needles in the winter.
Comma Before Too
Using a comma before “too” is optional. A comma simply adds emphasis.
There are three forms of dashes: em, en, and the double hyphen. The most common types of dashes are the en dash (–) and the em dash (—).
Em Dashes
Em dashes can replace parentheses at the end of a sentence or when multiple commas appear in a parenthetical phrase.
Example
After a split second of hesitation, the second baseman leaped for the ball (or, rather, limped for it).
After a split second of hesitation, the second baseman leaped for the ball—or, rather, limped for it.
Em dashes can also replace colons.
Example
He is afraid of two things: spiders and senior prom.
He is afraid of two things—spiders and senior prom.
Writers and transcriptionists replace unknown, censored, or intentionally omitted letters with em dashes. In these cases, em dashes appear in pairs or threesomes.
Example
A former employee of the accused company, ———, offered a statement off the record.
“H—— are all the same. They cause trouble wherever they go.”
Carved into the dresser drawer was a faded inscription: “Made for Kristina, by your de——ted sailor.”
En Dashes
The en dash is often used to indicate spans of time or ranges of numbers. In this context, the dash should be interpreted as meaning either “to” or “through.”
Example
The teacher assigned pages 101–181 for tonight’s reading material.
The scheduled window for the cable installation is 1:00–3:00pm.
The 2015–2016 fiscal year was the most profitable year for the new business.
The en dash may also be used to indicate a connection between two words.
Example
The pro-choice–pro-life argument is always a heated one.
The Nobel Prize–winning author will be reading from her book at the library tonight.
Those three little dots are called an ellipsis (plural: ellipses). You can use an ellipsis to show that you’ve omitted some words, e.g.
Hamlet asked whether it was “nobler . . . to suffer the slings and arrows of outrageous fortune or to take arms against a sea of troubles.”
You can also use an ellipsis to show a pause in speech or that a sentence trails off. This technique doesn’t belong in formal or academic writing, though. You should only use the ellipsis this way in fiction and informal writing.
Andrew, can you, um . . . never mind, I forgot what I was saying. So, do you think we should . . . ?
How Many Dots?
There are 3 dots in an ellipsis. But, if the ellipsis comes immediately after a grammatically complete sentence, that sentence still needs its own period. So you would end up with a period followed by 3 dots. For example:
“Call me Jonah. My parents did, or nearly did. They called me John.”
could be shortened to
“Call me Jonah. . . . They called me John.”
Spacing
Whether you put spaces between the dots or not is a matter of style. The Chicago Manual of Style calls for spaces between every ellipsis point. The AP Stylebook says to treat the ellipsis as a three-letter word, with spaces on either side of the ellipsis but no spaces between the dots. For example,
Exclamation points go at the end of exclamatory sentences. An exclamatory sentence is one that expresses a strong or forceful emotion, such as anger, surprise, or joy.
I got a perfect score on the SAT! Get out of my sight!
Occasionally, you might see one at the end of a sentence that is phrased as a question.
Careful! That spider is poisonous. Holy cow! How could I have forgotten to pack underwear!
Exclamatory Quotations
Put the exclamation point inside the closing quotation marks if it applies to the words enclosed by the quotation marks.
“There’s a spider on my arm!” yelped Jeremy.
If the exclamation point applies to the sentence as a whole, then place it at the very end.
And then the paramedics tried to tell Jeremy it was “only a spider”!
Exclamation Points and Parentheses
Put the exclamation point inside the parentheses when it applies to the words inside the parentheses.
Jeremy didn’t find out until later what kind of spider it was (a black widow!).
Put the exclamation point outside the parentheses if it applies to the whole sentence.
They settled out of court and Jeremy got a million dollars (cash)!
Exclamation marks are considered to be relatively casual, so using them in business or formal academic writing is a no-no. Instead of relying on exclamation points to convey your urgency or excitement, use more vivid vocabulary. Instead of “Make sure you finish this by tomorrow morning!” try “It’s crucial that you finish this before tomorrow morning’s deadline.”
A hyphen (-) is a punctuation mark that’s used to join words or parts of words. It’s not interchangeable with other types of dashes. Use a hyphen in a compound modifier when the modifier comes before the word it’s modifying.
Hyphen with Compound Modifiers: Two-Word Adjectives Before Nouns
A compound modifier is made up of two words that work together to function like one adjective. When you connect words with the hyphen, you make it clear to readers that the words work together as a unit of meaning.
Use a Hyphen in an Noun and an Adjective (Before the Noun They Describe)
NOUN-ADJECTIVE NOUN
✓
This rock-hard cake is absolutely impossible to eat.
✓
We’re looking for a dog-friendly hotel.
Don’t Use a Hyphen in Compound Modifiers That Come After the Noun They Describe
Generally, you need the hyphen only if the two words are functioning together as an adjective before the noun they’re describing. If the noun comes first, leave the hyphen out.
This wall is load bearing.
It’s impossible to eat this cake because it is rock hard.
Is this hotel dog friendly?
Don’t Use a Hyphen in an Adverb and an Adjective (Before the Noun They Describe)
You also don’t need a hyphen when your modifier is made up of an adverb and an adjective.
ADVERB ADJECTIVE NOUN
✗
Do you expect me to believe this clearly-impossible story?
✓
Do you expect me to believe this clearly impossible story?
Don’t Use a Hyphen in a Multi-word Proper Noun (Before the Noun They Describe)
You also don’t need a hyphen when your modifier is made up of a proper noun consisting of multiple words as the capital letters group the words. Source
PROPER NOUN NOUN
✗
Our product as Six-Sigma accuracy?
✓
Our product as Six Sigma accuracy?
Use a Hyphen in a Noun or Adjective and a Present Participle (Before the Noun They Describe)
When we combine a noun or adjective and a present participle (a word ending in ‑ing) to form a unit of meaning that describes another word, use a hyphen to make that unit of meaning clear.
NOUN-PRESENT PARTICIPLE NOUN
✗
It’s recommended you don’t take down any load bearing walls when renovating.
In this sentence, it sounds like you shouldn’t take down any load that is holding up a wall. A hyphen should be inserted between load and bearing to make it clear that we’re talking about walls that are bearing a load.
✓
It’s recommended you don’t take down any load-bearing walls when renovating.
ADJECTIVE-PRESENT PARTICIPLE NOUN
✗
There are some beautiful looking flowers in the garden.
Without the hyphen between beautiful and looking, your reader may stumble over the sentence. Perhaps there’s a new type of daisy called the “looking flower”?
✓
There are some beautiful-looking flowers in the garden.
Don’t Use a Hyphen With a Noun or Adjective and a Present Participle (After the Noun They Describe)
Don’t use a hyphen when the modifier comes after the noun it’s describing. Compare the following:
Fast-acting medication can be useful when one has a headache.
This medication is fast acting.
Don’t Use a Hyphen in an Adverb and a Participle (Before the Noun They Describe)
ADVERB PARTICIPLE NOUN
✗
The room was like a heavily-decorated chocolate box.
✓
The room was like a heavily decorated chocolatebox.
Use a Hyphen in a Noun and Past Participle (Before the Noun They Describe)
Compound modifiers that contain a past participle also follow the same rules as any other compound modifier. Use a hyphen when the compound goes before the noun it modifies:
NOUN-PAST PARTICIPLE NOUN
✓
The municipal government is funding a community-based education system.
✓
Wind-powered generators can be excellent sources of electricity.
✓
Many veterinarians find meat-fed cats to be quite healthy.
Don’t Use a Hyphen in a Noun and Past Participle (After the Noun They Describe)
Don’t use a hyphen when the compound comes after the noun it describes. Compare the following:
A well-known local singer will perform tonight.
The singer performing tonight is well known.
Hyphenated Compound Words
Hyphenated compound words are the ones (obviously) with a hyphen between the words. Over time, many hyphenated compounds become closed compounds—teen-ager became teenager for instance. Check a dictionary if you’re not sure whether to use a hyphen or not. Here are a few examples of common hyphenated compound words:
Mother-in-law
Master-at-arms
Editor-in-chief
Ten-year-old
Factory-made
Twelve-pack
Closed Compound Words
Hyphenated words tend to become closed compounds (single words with no hyphens) over time. Email instead of e-mail, for example, is increasingly common. If you aren’t sure whether a words is a closed compound or a hyphenated one, check your preferred dictionary.
Notebook
Superman
Waistcoat
Bookstore
Fireman
Open Compound Words
Open compounds are typically made up of two nouns that are used together to represent a single idea. “Open” means that there is a space between the two words and no hyphen. A good dictionary is the best place to check whether a compound is open or not.
Living room
Real estate
Dinner table
Coffee mug
Hyphens and Numbers
Numbers between twenty-one and ninety-nine should be hyphenated when they’re spelled out.
Fifty-six bottles of pop on the wall, fifty-six bottles of pop…
No, I won’t party “like it’s nineteen ninety-nine.”
I’ve got a hundred twenty-two of these gizmos to sell.
Hyphen in Compound Adjective With Numbers
When numbers are used as the first part of a compound adjective, use a hyphen to connect them to the noun that follows them. This applies whether the number is written in words or in digits.
The president of the company gave a 10-minute speech to the Board of Directors.
He is knowledgeable in thirteenth-century politics.
The boy threw a rock at the second-story window.
However, a hyphen is not required if the number is the second word in the compound adjective.
He is a victim of Type 2 diabetes.
This elevator doesn’t go down to Basement 3.
Hyphen In Compound Adjective With Fractions
When using a fraction (e.g. half or quarter) as part of a compound adjective, it should be hyphenated so the reader understands which fraction is modifying which noun.
I half-wanted to commit a felony.
A quarter-million dollars is still a large amount of money.
You’ll need one-third of a pound of flour and one egg.
That’s a half-baked idea if I ever heard one!
Hyphen With Prefixes: Ex-, Self-, All-
Use a hyphen with the prefix ex- (meaning former).
Don’t sit Adam next to Martha! She’s his ex-wife!
Though he no longer held an official position, the ex-mayor still attended all the town’s functions.
Use a hyphen with the reflexive prefix self-.
Lying on the floor beside the plant he had knocked over and chewed on, the cat looked extremely self-satisfied.
Do you want a self-serve or a full-serve gas station?
Make sure you don’t confuse the prefix self- with the noun self.
The self serves no other.
When using all as a prefix, add a hyphen.
It’s a bad leader who thinks of himself as all-powerful.
Hyphens with High or Low
When using high or low as part of a compound adjective, use a hyphen when the compound comes before the noun it’s modifying. Some examples of compound adjectives using high and low include high-level/low-level and high-impact/low-impact.
Low-flying airplanes contribute to the noise pollution in the area.
This car runs best on high-octane gasoline.
Low-income families often face more stress than their higher-income counterparts.
A high-interest savings account is one of the best ways to save money.
Parentheses are punctuation marks that are used to set off information within a text or paragraph. They can enclose a single word, a phrase, or even an entire sentence. Typically, the words inside the parentheses provide extra information about something else in the sentence.
Curators from the American Museum of Natural History (AMNH) have announced a new dinosaur exhibit. While walking down the street (paying more attention to her phone than to her feet), Catherine tripped over the curb and sprained her ankle.
Brackets, sometimes called square brackets, are most often used to show that words have been added to a direct quotation. Sometimes, when quoting a person or document, adding a word or two is necessary to provide enough context for the quote to make sense. For example, the original sentence you want to quote might read “We went and had a great time.” Out of context, this sentence doesn’t mean much. But you can add bracketed information to make the context clear.
“We went [to the new dinosaur exhibit] and had a great time.”
It’s extremely important to use brackets when you change a direct quote—forgetting to add them results in a misquote.
Parentheses or Brackets With Surrounding Punctuation
Treat parentheses or brackets and the words inside them as separate from the rest of the sentence. Any sentence that contains a parenthetical element should still make sense if the element is removed.
✗
Meena (studied all night for) the grammar test.
✓
Meena studied (all night) for the grammar test.
✓
Meena studied for the grammar test.
Periods, question marks, and exclamation points should go before the closing parenthesis or bracket only if they belong to the words inside the parentheses or brackets. If the punctuation belongs to the surrounding sentence, put them outside the parentheses or brackets. Never put a comma immediately before a closing parenthesis.
✗
After dinner (an enormous, healthy salad,) Posey treated herself to ice cream.
✗
After dinner, (an enormous, healthy salad) Posey treated herself to ice cream.
✓
After dinner (an enormous, healthy salad), Posey treated herself to ice cream.
In American English, the period goes inside the closing quotation mark at the end of a sentence.
My mother loved to remind me of the old saying “waste not, want not.” Phillip said, “I can’t remember where I heard about the banjo concert, but I sure want to go.”
Periods and Parentheses
When a complete, independent sentence is entirely enclosed by parentheses, the period goes inside the closing parenthesis.
Charlie scarfed up every Cheeto that fell out of the bag. (I wasn’t fast enough to stop him.) At least we won’t have to sweep the floor.
But, if the parenthetical material is nested inside another sentence, the period should go on the outside.
Charlie barked wildly when he caught the scent of fresh bacon (his favorite).
Ellipses
An ellipsis (plural: ellipses) looks like three periods in a row with spaces in between them. There are two main uses for ellipses. One is to show that part of a quote has been omitted.
Hamlet asked whether it was “nobler . . . to suffer the slings and arrows of outrageous fortune or to take arms against a sea of troubles.”
You can also use an ellipsis for literary effect, to represent a dramatic pause or a thought that trails off.
The bus was supposed to come at 3:00 so we waited and waited . . . and waited. Wait a minute . . . If you’re not watching Charlie, who is? I guess we could meet you there later. If there’s time . . .
Keep the question mark inside the quotation marks if it logically applies to what is enclosed by the quotation marks. You’ll often see this in written dialogue:
The chicken asked, “Why is everyone so concerned about where I’m walking?” “What do you have to hide?” asked the nosy reporter.
If the question mark applies to the sentence as a whole instead of to the phrase inside the quotation marks, put it at the very end:
Haven’t you ever heard the expression “It’s a free country”?
This holds true even when you have a quotation containing a question:
“When I spoke to the chicken, she said ‘Why won’t you leave me alone?’” recalled the reporter.
And for a quoted question containing a quoted statement:
“What did the chicken mean,” the reporter wondered, “when she said ‘It’s a free country’?”
When you have a question mark that applies to both the quoted phrase and the rest of the sentence, just use one question mark:
Who said “Why did the chicken cross the road?”
Question Marks and Parentheses
If a question mark applies to the parenthetical information, place the question mark inside the parentheses:
I saw the chicken (or was it the rooster?) crossing the road.
The chicken wrote a bestselling memoir called My Road (published abroad as Who Needs a Crosswalk?).
When the question applies to the whole sentence, put it outside the parentheses:
Will the chicken cross the road again tomorrow (April 1)?
Quotation Marks and Dialogue
Quotation marks are used to identify words that someone has said or a direct quote from a person in an article or quoting material that was written by someone else.
American vs. British Quotation Marks
American English uses double quotation marks (“ ”) for quotes and reserves single quotation marks (‘ ’) for quotes within quotes. In British English, the convention is the opposite. Another difference is that in American English, periods and commas go before closing quotation marks. In British English, they go after the closing quotation mark. The guidelines below apply to American English.
Dialogue
When writers become confused about quotation marks, it usually has to do with where to put other nearby punctuation. Below is an example of a conversation between two characters, with their dialogue correctly punctuated.
Martin said, “I’m going over to Jennifer’s house for a few hours.”
“You can’t be serious!” cried Fauntleroy.
“Oh, but I am,” Martin replied.
“How will you get there?” Fauntleroy asked.
“I thought I’d take the bus.”
“And,” Fauntleroy continued, “exactly how long is ‘a few hours’?”
“Probably two or three.”
“Well . . . fine. Tell Jennifer I said hello.”
Non-Dialogue Quotations
✗
The mayor said his two golden retrievers were “the best dogs in the world. I’m not a cat person.”
✓
The mayor said his two golden retrievers were “the best dogs in the world” and added that he was not a cat person.
Scare Quotes
Occasionally, writers enclose certain terms they wish to distance themselves from in quotation marks.
Silicon Valley has fully embraced the “sharing economy.”
Sometimes, scare quotes are needed to indicate that the writer is not talking about something in general, but rather a specific term itself.
For too many people, “computer security” is an oxymoron.
Semicolons (;) are as basic as a period stacked on top of a comma.
The most common use of the semicolon is to join two independent clauses without using a conjunction like and. Don’t use a capital letter after a semicolon. A semicolon should be followed by a capital letter only if the word is a proper noun or an acronym.
We can go to the museum to do some research; Mondays are pretty quiet there.
Semicolons Connect Related Independent Clauses
You can use a semicolon to join two closely related independent clauses. Let’s put that another way. The group of words that comes before the semicolon should form a complete sentence, the group of words that comes after the semicolon should form a complete sentence, and the two sentences should share a close, logical connection:
I ordered a cheeseburger for lunch; life’s too short for counting calories.
Money is the root of all evil; I don’t believe the reverse is necessarily true.
Martha has gone to the library; Andrew has gone to play soccer.
Notice that the letter following the semicolon is not capitalized.
Delete the Conjunction When You Use a Semicolon
I saw a magnificent albatross, and it was eating a mouse.
I saw a magnificent albatross; it was eating a mouse.
Use Semicolons in a Serial List
You can use semicolons to divide the items of a list if the items are long or contain internal punctuation. In these cases, the semicolon helps readers keep track of the divisions between the items.
I need the weather statistics for the following cities: London, England; London, Ontario; Paris, France; Paris, Ontario; Perth, Scotland; Perth, Ontario.
My plan included taking him to a nice—though not necessarily expensive—dinner; going to the park to look at the stars, which, by the way, are amazing this time of year; and serenading him with my accordion.
Use Semicolons With Conjunctive Adverbs
When you have a conjunctive adverb linking two independent clauses, you should use a semicolon. Some common conjunctive adverbs include moreover, nevertheless, however, otherwise, therefore, then, finally, likewise, and consequently.
I needed to go for a walk and get some fresh air; also, I needed to buy milk.
Reports of the damage caused by the hurricane were greatly exaggerated; indeed, the storm was not a “hurricane” at all.
The students had been advised against walking alone at night; however, Cathy decided walking wasn’t dangerous if it was early in the evening.
I’m not all that fond of the colors of tiger lilies; moreover, they don’t smell very good.
There are two types of slashes: a backslash (\) and a forward slash (/). The backslash is used only for computer coding. The forward slash, often simply referred to as a slash, is a punctuation mark used in English.
A Slash to Indicate Or
When leaving the classroom, the teacher noticed that a student had left his/her backpack.
College freshmen should bring a mattress and/or cot to sleep on during orientation.
If/when Mary ever shows up, we can all head out to the party together.
Burgers or pizza for dinner? Yeah, either/or is fine with me.
A Slash to Form Abbreviations
Slashes can also be used to form some abbreviations or shortened forms of words or phrases, although these shouldn’t be used in formal writing.
w/o = without
w/ = with
c/o =
care of (used when posting a letter or parcel)
a/c = air conditioning
A Slash to Indicate Connecting and Conflicting Relationships
Slashes can also be used to note that there is a connection or conflict between two words or phrases in a sentence.
The pro-life/pro-choice debate is a hot-button issue for many voters this election.
The designer often works in his bonus room/home office.
Space Before and After Slash
When a slash signifies alternatives between only two words, don’t use spaces before or after.
Add chili flakes and/or black pepper to the recipe.
When using slashes to signify alternatives between phrases or multi-word terms or compounds, a space before and after the slash makes text easier to read.
An abbreviation, simply put, is a shortened form of a word. Some readers may not know what an abbreviation means. If the abbreviation is obscure or unfamiliar, make sure to explain what it means the first time you use it.
Acronyms and Initialisms
Typically, acronyms and initialisms are written in all capital letters to distinguish them from ordinary words. (When fully spelled out, the words in acronyms and initialisms do not need to be capitalized unless they entail a proper noun.)
An acronym is pronounced as a single word, rather than as a series of letters.
National Aeronautics and Space Administration = NASA
light amplification by stimulated emission of radiation = lase
Initialisms are pronounced as a series of letters.
National Football League = NFL (en eff ell)
If you need to use an indefinite article before an acronym or initialism, use the initial sound of the word (not necessarily the initial letter) guide your choice.
Abbreviations for Courtesy Titles and Academic Degrees
Titles such as mister, miss, and doctor, as well as the names of academic degrees such as bachelor of arts and doctor of philosophy are almost always abbreviated. In American English, title abbreviations are followed by a period; in British English, the period is omitted.
Mr. = Mister
Mrs. = Mistress (pronounced “missus”)
Ms. = (pronounced “miss” or “miz”)
Sr. = Senior
Jr. = Junior
Dr. = Doctor
Mr. Green asked Ms. Grey if she had met Dr. Jekyl. (American style)
Mr Green asked Ms Grey if she had met Dr Jekyl. (British style)
B.S. = Bachelor of science
B.A. = Bachelor of Arts
M.A. = Master of Arts
M.B.A. = Master of Business Administration
Ph.D. = Doctor of Philosophy
The periods are optional with abbreviations of academic degrees. Follow whichever style your style guide recommends, or just choose one and use it consistently. When an academic degree is used like a title, it follows a person’s name and is set off by commas:
Molly Beagle, Ph.D., runs the canine cognition lab at Stanford University.
Latin Abbreviations
e.g.: exempli gratia It means “for example.” Use e.g. when you want to provide specific examples of a generalization.
We expect volunteers from many surrounding cities, (e.g., Springfield, Oakdale, Hogsmeade.)
i.e.: id est It means “that is.” Use i.e. when you want to provide more specific information about something you mentioned.
After a reasonable amount of time has passed—i.e. two business days—please report the missing shipment to our customer service department.
etc.: et cetera It means “and so forth.” Use it when you’re providing a partial list of details.
You should see the doctor when you have flu-like symptoms (fever, chills, etc.)
Other Common Abbreviations
Below are a few other abbreviations that are common in English. Remember that abbreviations are not always completely standardized. One style guide may advise you to abbreviate Thursday as Thurs. while another may argue for Thu. Likewise, some style guides allow you to omit the periods with these abbreviations, but it’s never wrong to include periods. So if you aren’t sure whether to use the periods, err on the side of leaving them in.
Times and dates
a.m. (ante meridiem) = before noon p.m. (post meridiem) = after noon
U.S. (United States) U.K. (United Kingdom) E.U. (European Union) U.A.E. (United Arab Emirates)
The U.S. highway system seems enormous to visitors from the U.K.
Units of Measurement
in. (inches) ft. (feet) lbs. (pounds)
mm. (millimeters) cm. (centimeters) m. (meters)
mg. (milligram) g. (gram) kg. (kilogram)
My cat weighs 10 lbs., which is about 4.5 kg.
Spelling Rules
English spelling of some words is wildly different from the way we pronounce them (It’s fuchsia, right? Or is it fuschia? Fushia?)
Around Shakespeare’s time, when spelling was first becoming standardized, the spelling of most English words was mostly phonetic—or at least more phonetic than it is today. For example, English speakers did once pronounce the k at the beginning of words like knife and knee. But even though no one has pronounced knee as “kuh-nee” in centuries, we still hang on to the old spelling.
Names are proper nouns. The names of cities, countries, companies, religions, and political parties are also proper nouns, so you should capitalize them, too.
We experienced some beautiful Southern California weather last fall when we attended a Catholic wedding in San Diego.
You should also capitalize words like mom and grandpa when they are used as a form of address.
Just wait until Mom sees this!
My mom is not going to like this.
Don’t Capitalize After a Colon (Usually)
I have one true passion: wombat racing.
One exception is when the word following the colon is a proper noun.
There is only one place I want to visit: New York City.
The other exception is when the words following the colon form one or more complete sentences.
Maggie wears a brimmed cap at all times for these two reasons: Strong light often gives her a headache. She also likes the way it looks.
When adverbs ending in -ly combine with another word, the resulting compound is always spelled as two separate words.
largely irrelevant
newly formed
There are a great many grammar rules regarding hyphens in compound words. One important rule of thumb to remember is that in most cases, a compound adjective is hyphenated if placed before the noun it modifies, but not if placed after the noun.
a long-term solution
an up-to-date user guide
This is not a good solution for the long term.
This user guide is not up to date.
It’s often necessary to consult the dictionary to determine whether these terms should be hyphenated or not.
Verb Tenses
Simple Present
Simple Past
Simple Future
I read nearly every day.
Last night, I read an entire novel.
I will read as much as I can this year.
Present Continuous
Past Continuous
Future Continuous
I am reading Shakespeare at the moment.
I was reading Edgar Allan Poe last night.
I will be reading Nathaniel Hawthorne soon.
Present Perfect
Past Perfect
Future Perfect
I have read so many books I can’t keep count.
I had read at least 100 books by the time I was twelve.
I will have read at least 500 books by the end of the year.
Present Perfect Continuous
Past Perfect Continuous
Future Perfect Continuous
I have been reading since I was four years old.
I had been reading for at least a year before my sister learned to read.
I will have been reading for at least two hours before dinner tonight.
Common Mistakes
Who’s vs Whose
“Who’s” is a contraction of “who is” or “who has”. For example,
Who’s watching TV?
Do you know who’s going to speak?
Who’s ready to go?
Who’s in the kitchen?
Who’s your doctor?
Who’s this?
Who’s already eaten?
Who’s been here before?
Who’s been watching that show?
“Whose” is the possessive of “who”. It’s always followed by a noun.
Whose book is this?
Do you know whose car this is?
I know a woman whose kids study there.
Whose side are you on?
An idea whose time has come.
It’s vs Its
“It’s” is a contraction of it is or it has.
It’s time to go.
Do you think it’s ready?
I read your article – it’s very good.
Do you know where my purse is? It’s on the table.
It’s been a long time.
“Its” is the possessive form of it.
That’s an interesting device – what is its purpose?
I saw Les Misérables during its initial run.
This stove has its own timer.
The bird lost some of its feathers.
Where is its head office?
Assure vs Ensure vs Insure
Assure most commonly means “to remove doubt about, to guarantee, to set one’s mind at rest.”
I assure you that we will be on time.
He assured us that there were no delays.
Ensure means “to make sure or certain” and must be followed by a direct object.
Winning the lottery ensured our happiness.
His loyalty will ensure your safety.
Insure refers to the provision of insurance: coverage against a specified loss.
My new car is not yet insured.
Our house was insured when the storm hit.
Bi- vs Semi-
Bi– comes from the Latin meaning two. When used with a temporal word, bi- means “every two” or “every other.”
This magazine is published bi-weekly, every other Friday.
Congressional elections are held biennially, on even-numbered years.
The U.S. celebrated the bicentennial of its 1776 founding in 1976.
Semi– comes from the Latin meaning half. When used with a temporal word, semi– means “twice.”
Our semi-annual meetings are in January and July.
I get paid semi-monthly, on the 5th and 19th of each month.
The semi-weekly deliveries occur on Monday and Thursday.
e.g. vs i.e.
e.g. stands for exempli gratia, which means “for example.” Use e.g. to introduce one or more possibilities among many.
He wastes his money on junk, e.g., cars that don’t run.
I’ll listen to anything, e.g., country-western, rap, light jazz.
i.e. stands for id est which means that is. Use i.e. when what you are introducing is equivalent to or an explanation of what comes before it in the sentence. Basically, i.e. means “in other words.” It’s used to reword or provide an alternate explanation.
He wastes his money on junk; i.e., stuff that he will never get around to fixing.
I’ll listen to anything; i.e., I like any kind of music.
Everyday vs Every day
Everyday is an adjective that means commonplace, ordinary, or normal.
These shoes are great for everyday wear.
You shouldn’t wear an everyday outfit to the wedding.
Don’t use the everyday dishes – it’s a special occasion.
Every day means “each day.”
I go to the park every day.
I have to work every day this week except Friday.
Every day I feel a little better.
Farther vs Further
Farther means “more far, more distant” in physical space.
Tom ran farther than Bill.
Which is farther, New York or Los Angeles?
Further means “more far, more distant” figuratively or non-physically.
Nothing could be further from the truth.
Who is further along in her research?
It can also mean “more/additional”:
Do you have any further ideas?
Nothing further, Your Honor.
And further is also a verb: “to advance”:
This class will further your understanding of ethics.
Furthest means “the most far, most distant” figuratively.
That is the furthest thing from my mind.
Good vs Well
Good is an adjective, which means that it modifies nouns.
This is a good movie.
What a good idea!
You speak good English.
This movie looks good.
His ideas are good.
Your English is good.
Well is an adverb, which means that it modifies verbs, adjectives, and other adverbs.
Did the movie do well at the box office?
It was a well-defined idea.
You speak English well.
Well can be used as an adjective to mean “in good health.”
You look well.
I don’t feel well.
Hers vs Her’s
Hers is the third person singular feminine possessive pronoun – it replaces the possessive adjective “her” + a noun. Though you may see her’s written even by native speakers, it is incorrect. Hers should never have an apostrophe.
I found a book – is it hers?
Is this his or hers?
I vs Me
I is the first person singular subject pronoun, which means that it refers to the person performing the action of a verb.
You and I need to get ready.
Tom and I are going to the movies.
Me is an object pronoun, which means that it refers to the person that the action of a verb is being done to, or to whom a preposition refers.
Between you and me, this is a bad idea.
She needs to talk to Joe or me.
If I would have …
When talking about something that didn’t happen in the past, many English speakers use the conditional perfect (if I would have done) when they should be using the past perfect (if I had done).
✗
If I would have known, I would have told you.
✓
If I had known, [then] I would have told you.
✗
If I would have gotten paid, we could have traveled together.
✓
If I had gotten paid, we could have traveled together.
✗
If you would have asked me, I could have helped you.
As a blogger and a person who works in marketing, I deal with a lot of English text content. Though English is my native language, it is not my specialization, although that is quickly changing the more I read and write. Here are some online tools I’ve found very useful for anyone wanting to improve their writing.
Grammarly
Grammarly can do many things including alerting you to typos, incorrect grammar, wordy phrases, inconsistent spelling, and more. It does this by underlining words in red or blue so you can quickly jump to words or phrases that could be improved. For example, in the screenshot below, the word “effect” is misspelled. On the right, there is an explanation of the typo and a link to learn more. Clicking on the box will fix the typo.
If you double-click on a word, you can get synonyms.
Grammarly has a great handbook in their blog that explains many grammar topics concisely and with good examples.
Note that Grammarly is not perfect and does not replace human review.
Ludwig.guru
Ludwig.guru is the first sentence search engine that helps you write better English by giving you contextualized examples taken from reliable sources.
As you can see in the screenshot above, Ludwig can do many things including
Find your sentence in the best contexts
Translate in English in the smartest way
Get definitions, synonyms and examples
Compare the frequency of two sentences
Discover the missing word
Paraphrase your sentence
Compare the frequency of words
Order a group of words
WordTune
WordTune helps you rewrite words and sentences. They can be shortened, expanded, and made to sound more casual or formal.
If you highlight a word and click on the WordTune icon, you can get synonyms.
One of the best ways to learn a language is by watching movies. But, video players usually only let you show one subtitle language at a time. Also, you can’t easily repeat what was just said or slow down the video when a character may be speaking too quickly. Here’s one way to make it easier to learn a language by watching movies. This example assumes the video is on Netflix.
1. Download the video and subtitles
Let’s say you want to learn Spanish and you speak English. One popular video series is Money Heist. You can download one or all episodes using Flixicam. Flixicam costs XXX. Since the purpose of this activity is to learn a language, you can download the video in the lowest resolution, e.g. 480p, so that the file is too big. Money Heist is at this URL: https://www.netflix.com/watch/80205342. When you play the video, you can click on the subtitles icon to see what subtitle languages are available. Unfortunately, in this case, there aren’t any Spanish subtitles, but you may be able to find Spanish subtitles online.
When watching a video, it helps to see two subtitles at once – one of the language you are learning and one of the language you understand. You can merge two subtitle files using an online tool.
3. Load video and subtitles in a subtitle editor tool
Subtitle editing tools may be designed to edit subtitles, but they’re also good for learning a language. The one I use is HappyScribe free online subtitle editor because I like the interface.
Just open the editor, upload your video, import the merged subtitle file, and start watching, listening and learning. Click on any subtitle paragraph to jump to the corresponding location in the video. Click on it again to repeat what was just said.
Change the playback speed to slow down the speech, if necessary.
The downside to this particular subtitle editor is it is online which means you have to upload your video which can take quite some time on a slow internet connection. You can also install a subtitle editor program on your computer which would eliminate the need to upload large videos. For example, here’s a simple one for Windows called Open Subtitle Editor.
However, with this one, I don’t see an option to change playback speed. If you use this one, you’ll probably want to go to Options > Settings > Double-clicking line in main window list view will “Go to video position and play”.