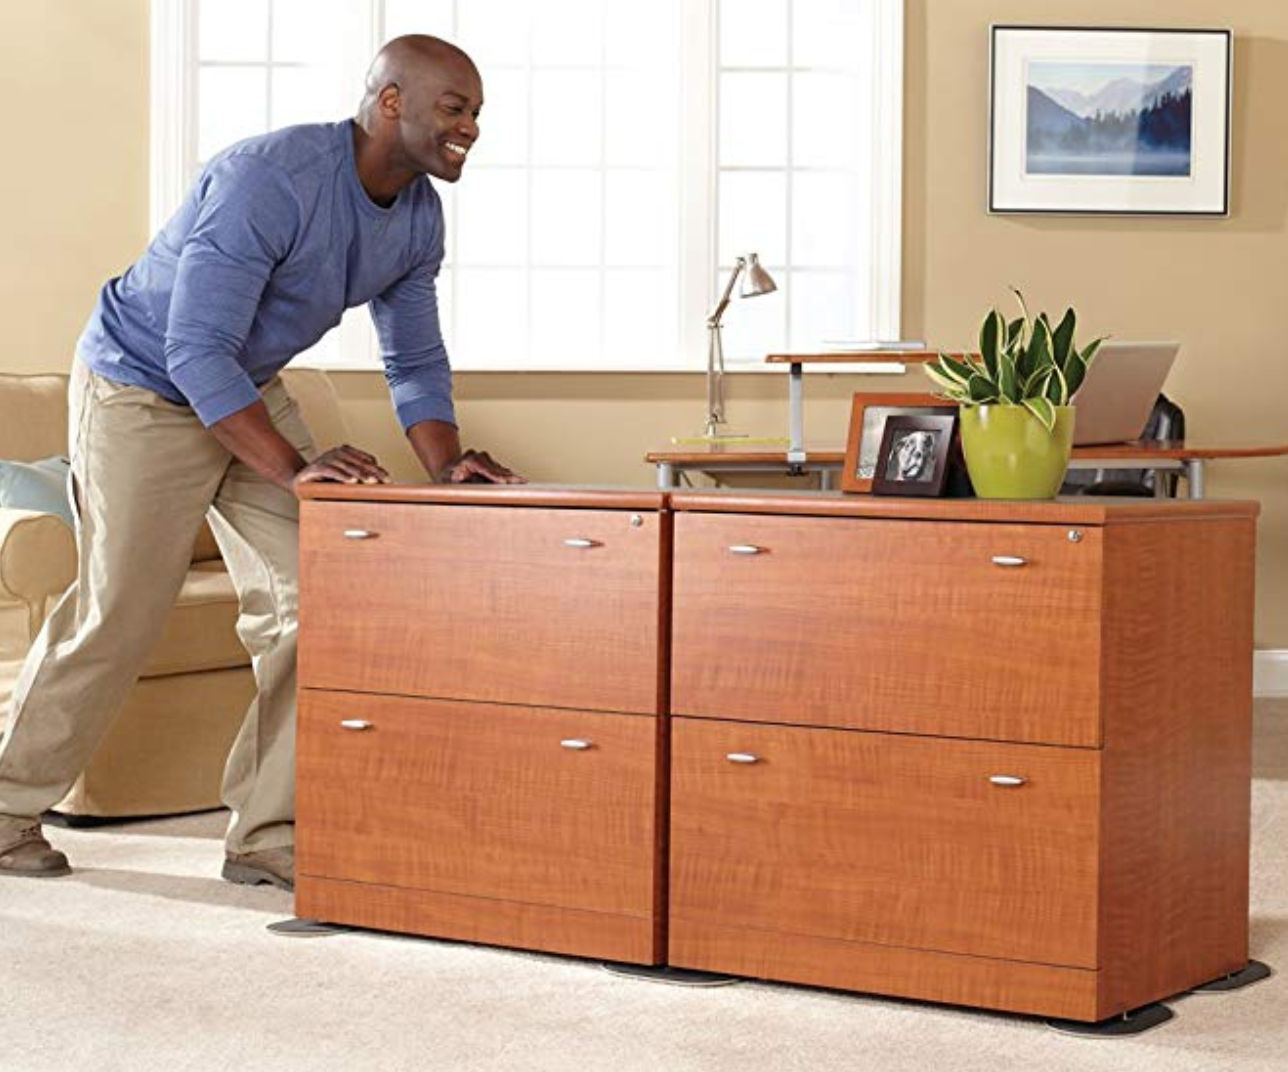
Slide Furniture on Carpet
SuperSliders 4724095N
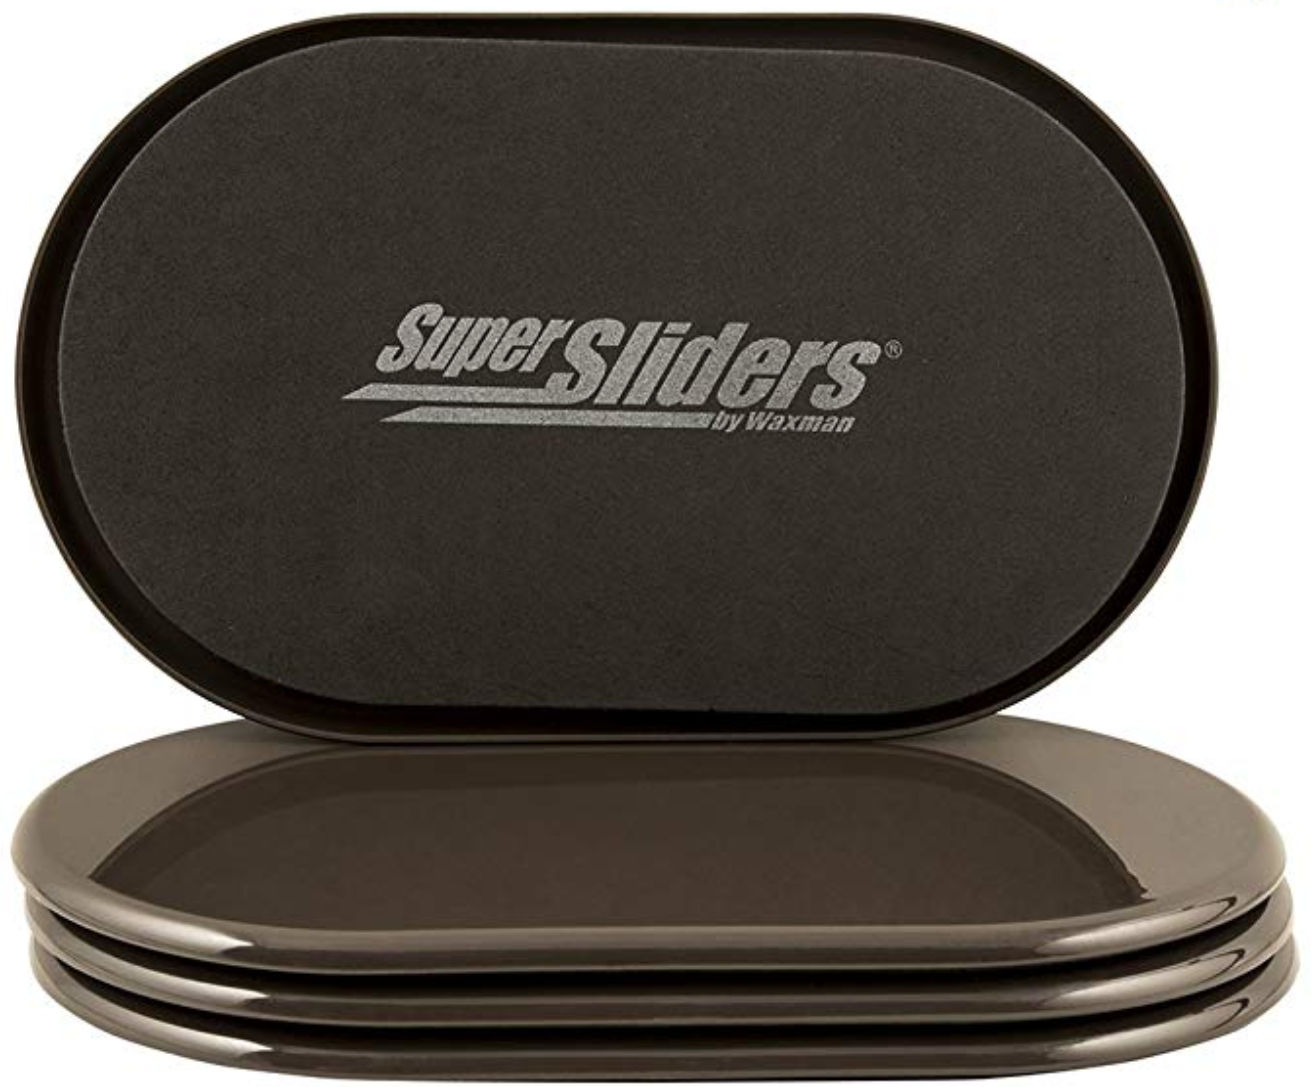
Place these large 9-1/2″ x 5-3/4″ sliders under your furniture and easily slide your furniture over carpet.
$10 for a pack of 4 sliders on Amazon
Place these large 9-1/2″ x 5-3/4″ sliders under your furniture and easily slide your furniture over carpet.
$10 for a pack of 4 sliders on Amazon
If you need to only create 2d house floor plans, I personally have found Lucidchart to be easy to learn and intuitive to use.
If you need to create 3d house floor plans, I have found Live Home 3D to offer the best features for the price. At $10 (on sale), you can easily create 2d and 3d home plans. You download and install the program which allows for faster 3d rendering. My typical workflow to design a house is as follows:
1. Create a room by clicking the Room button
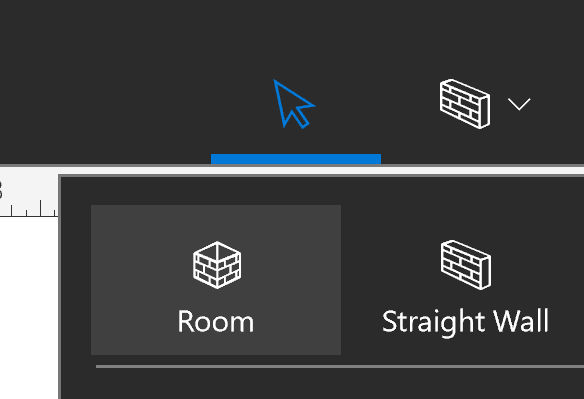
2. Draw a room (2d) by dragging the shape of a rectangle

3. Pick a door style

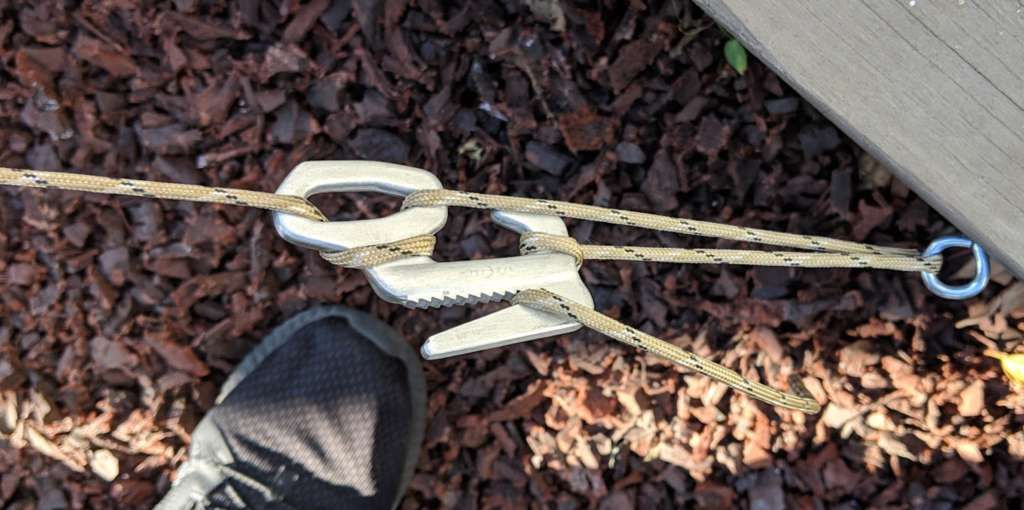
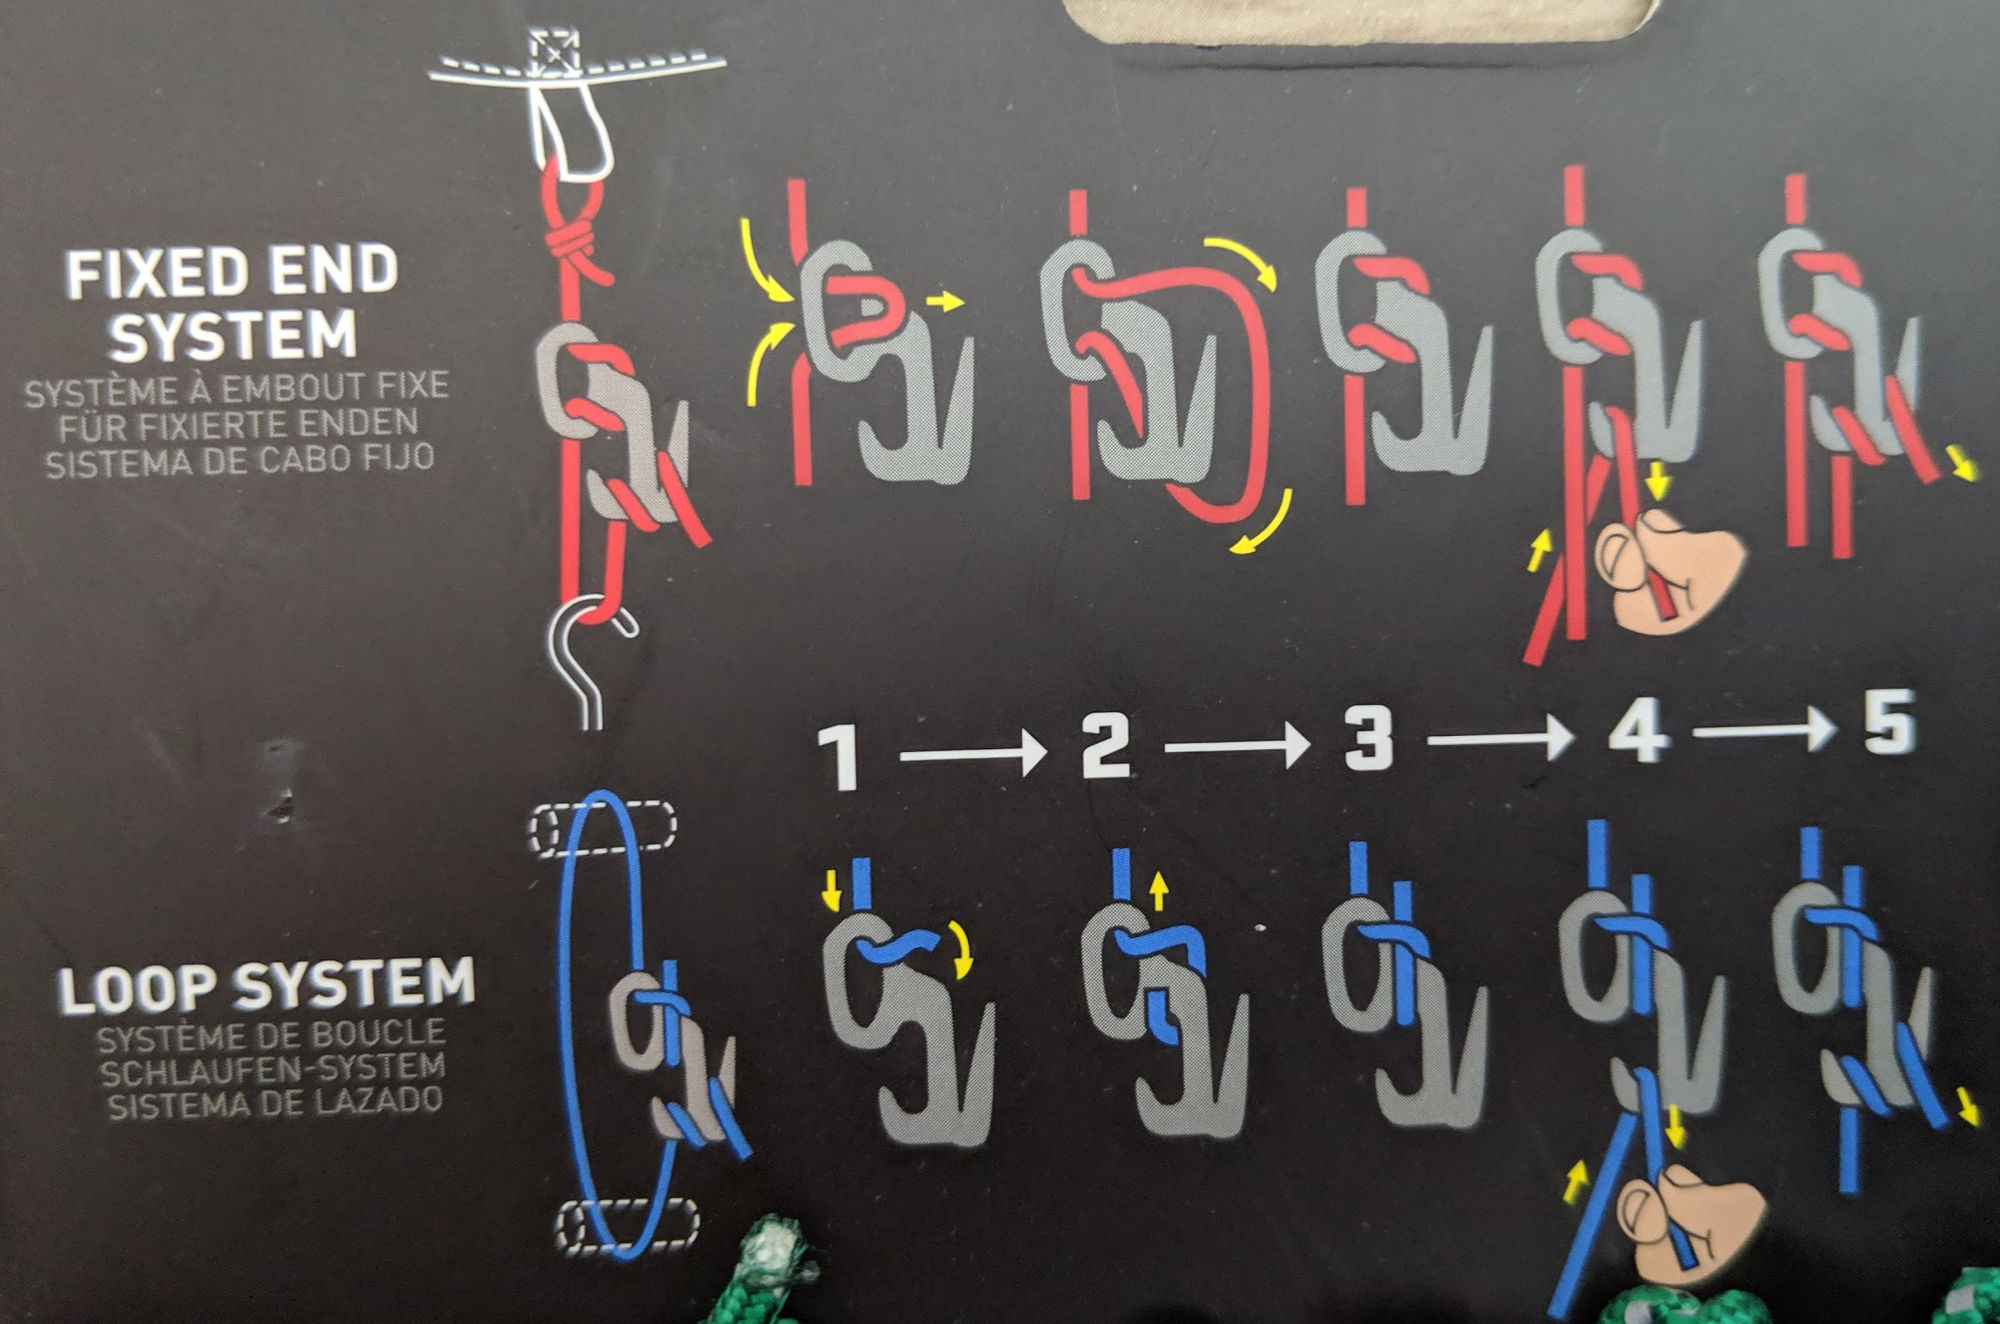
When you need to tighten a rope to hold something in place, e.g. a tent, cargo in a pickup truck, a leaning tree, bed sheets, etc, you might think you’ll need to tie a knot. Not only is it difficult to tie a knot without losing tension in the rope, it’s a hassle and often difficult untying the knot. Ratchet straps are easier to use but are overkill for non-heavy duty situations. A simpler solution is to use a figure 9.
Here, I used a figure 9 to hold a leaning tree in place.
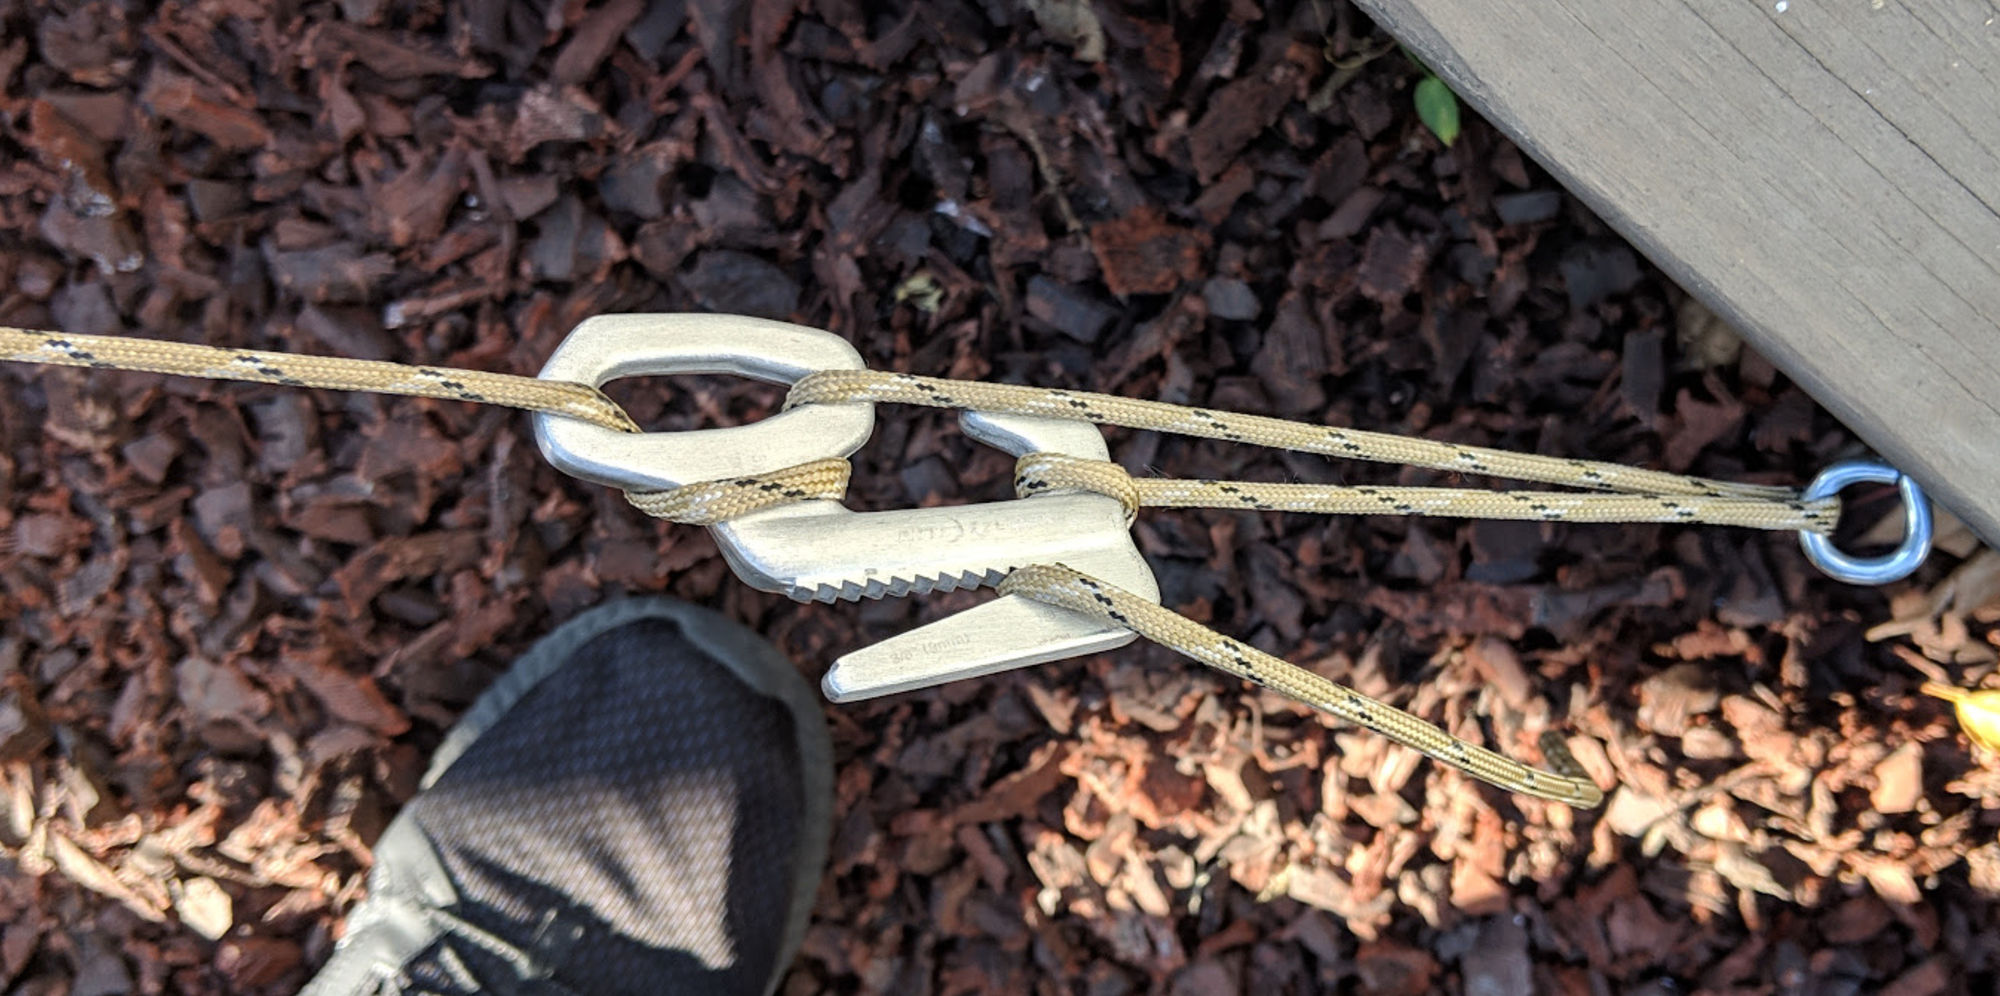
You can purchase Figure 9s at REI. One brand is Nite-ize but there’s also generic ones on Amazon for less.
This are two ways to tighten a rope using a Figure 9.
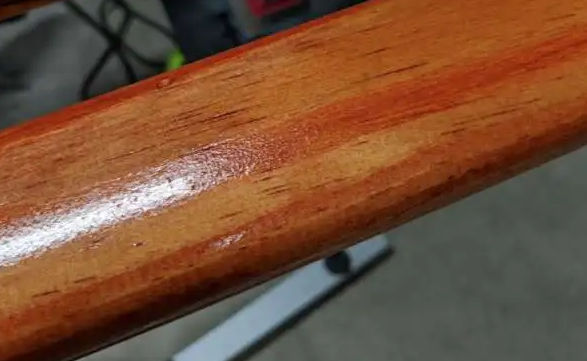
I recently worked on a project to replace my stair’s handrails. I bought the unfinished handrails at Home Depot and then stained them easily as follows.
Note: Applying anything wet, e.g. stain, to wood will cause the grain to rise resulting in bumps. If, after the first coat of stain, you notice bumpiness, then sand it down with 220 grit sandpaper until the bumps are gone and then restain the wood. This first coat following by the sanding process serves as a sort of “primer” to prepare the surface.
The tricky part was getting the protective finish coat on. I wanted a shiny, smooth, glossy handrail. After trying different products and processes, here’s my advice.
Lacquer is sticky and seemingly more toxic. My eyes felt weird even though none of it gone in them. A bit of lacquer got on my hands and cleaning my hands were a hassle and temporarily messed up my skin. The fumes were so strong I could smell some of it in other rooms of my house. Cleaning the brush used to apply the lacquer was impossible so it had to be thrown away.
Polyurethane is also toxic but the water based kind is easy to clean by simply rinsing with water and it doesn’t smell as much. I was able to easily rinse my brush so I could reuse it for additional coats.
Conclusion: Don’t even bother with lacquer. Just stick with polyurethane.
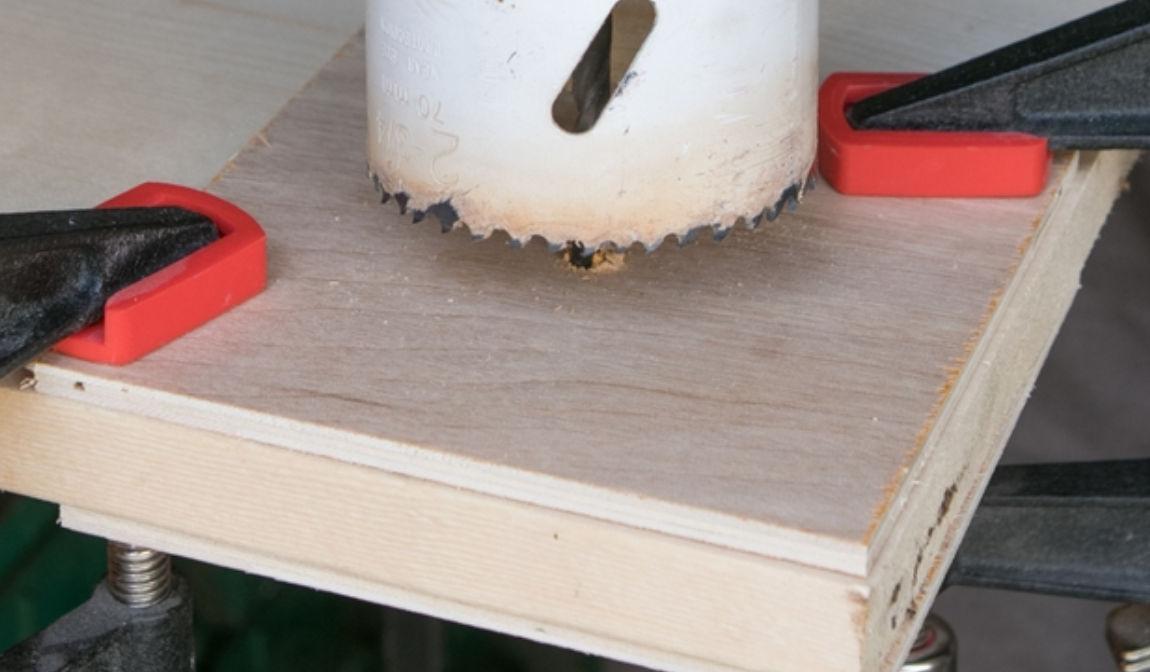
Continue reading How to Finish Wood With a Protective CoatThe other day I was drilling a hole in a wall to run a 3-prong extension cord through. I thought a 1 inch spade bit would do to create 1 inch diameter hole. Unfortunately, the plug end of the cord was still too big to fit through the hole. I couldn’t enlarge the hole using a hole saw bit

because that requires some material for the center shaft to bite in to.
Continue reading How to Enlarge a Hole in a WallWhen looking to buy a battery charger or power adapter for a device such as a phone or laptop, you may be unsure whether the one you buy will be sufficient or even blow up your device. Here are basic guidelines to keep in mind.
There will always come a time when you wish the noise outside your room in your home could go away and that the sound that you are making, e.g. from playing music to watching a movie, could not be heard by people in other rooms. There is a unit of measure called STC (Sound Transmission Control) that indicates how much of a sound can penetrate a wall. According to Wikipedia, here are common levels.
| STC | What can be heard |
|---|---|
| 25 | Normal speech can be understood quite easily and distinctly through wall |
| 30 | Loud speech can be understood fairly well, normal speech heard but not understood |
| 35 | Loud speech audible but not intelligible |
| 40 | Onset of “privacy” |
| 42 | Loud speech audible as a murmur |
| 45 | Loud speech not audible; 90% of statistical population not annoyed |
| 50 | Very loud sounds such as musical instruments or a stereo can be faintly heard; 99% of population not annoyed. |
| 60+ | Good soundproofing; most sounds do not disturb neighbouring residents. |
and here are different STC values by partition (wall) type.
| STC | Partition type |
|---|---|
| 27 | Single pane glass window (typical value) (Dual pane glass window range is 26-32) |
| 33 | Single layer of 1/2″ drywall on each side, wood studs, no insulation (typical interior wall) |
| 39 | Single layer of 1/2″ drywall on each side, wood studs, fiberglass insulation |
| 44 | 4″ Hollow CMU (Concrete Masonry Unit) |
| 45 | Double layer of 1/2″ drywall on each side, wood studs, batt insulation in wall |
| 46 | Single layer of 1/2″ drywall, glued to 6″ lightweight concrete block wall, painted both sides |
| 46 | 6″ Hollow CMU (Concrete Masonry Unit) |
| 48 | 8″ Hollow CMU (Concrete Masonry Unit) |
| 50 | 10″ Hollow CMU (Concrete Masonry Unit) |
| 52 | 8″ Hollow CMU (Concrete Masonry Unit) with 2″ Z-Bars and 1/2″ Drywall on each side |
| 54 | Single layer of 1/2″ drywall, glued to 8″ dense concrete block wall, painted both sides |
| 54 | 8″ Hollow CMU (Concrete Masonry Unit) with 1 1/2″ Wood Furring, 1 1/2″ Fiberglass Insulation and 1/2″ Drywall on each side |
| 55 | Double layer of 1/2″ drywall on each side, on staggered wood stud wall, batt insulation in wall |
| 59 | Double layer of 1/2″ drywall on each side, on wood stud wall, resilient channels on one side, batt insulation |
| 63 | Double layer of 1/2″ drywall on each side, on double wood/metal stud walls (spaced 1″ apart), double batt insulation |
| 64 | 8″ Hollow CMU (Concrete Masonry Unit) with 3″ Steel Studs, Fiberglass Insulation and 1/2″ Drywall on each side |
| 72 | 8″ concrete block wall, painted, with 1/2″ drywall on independent steel stud walls, each side, insulation in cavities |
Note that a typical interior wall has an STC value of 33.
Some options for increasing the STC value in your walls:
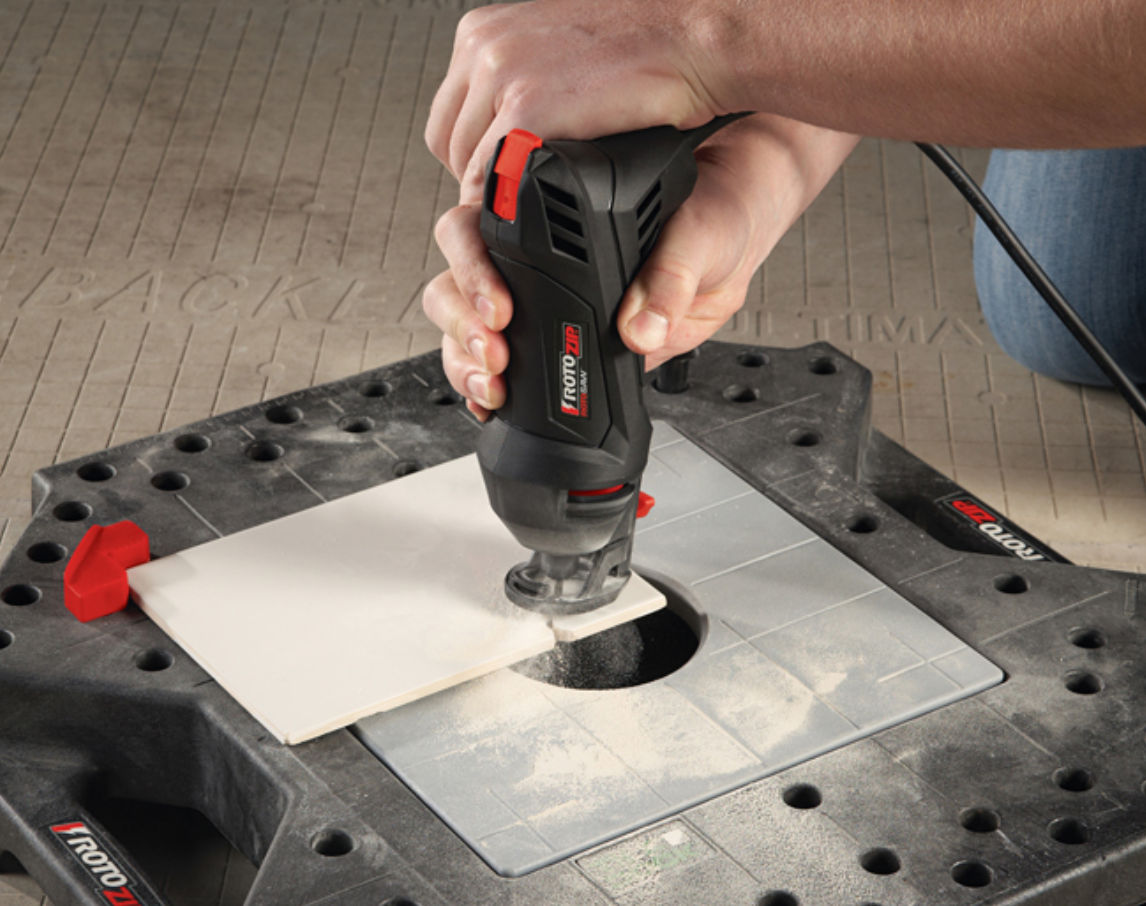
Cutting curves in ceramic tile, plywood, and plexiglass / acrylic
Cutting straight lines in ceramic tile is easy with a tile saw. But cutting curves, e.g. for toilet drains, can be tricky. Diamond hole saws are expensive. Instead, use a rotary tool (e.g. Dremel) with either a tile cutting bit or a tile cutting wheel. Or, use a jig saw with a carbide grit blade. You can also cut wood and plexiglass using the appropriate bits as well.

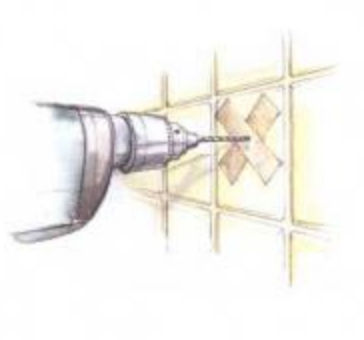
Drilling a hole in ceramic tile
Drilling a hole in ceramic or porcelain tile can’t be done with a regular twist drill bit. Use a diamond or carbide-tipped masonry bit. To keep the bit from slipping off the glossy surface, put masking tape on the surface.
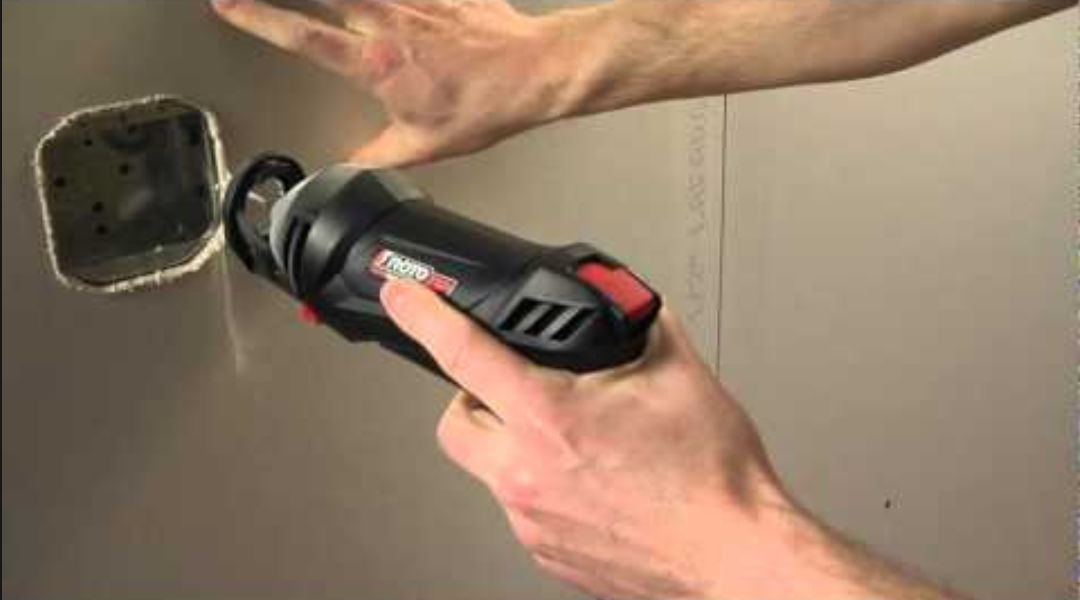
Cutting drywall
Cutting drywall can be done manually with a drywall saw but you can also use a power tool. Though oscillating tools and reciprocating saws can do the job, they won’t give a fine cut. Instead, use a rotary tool with a drywall bit.
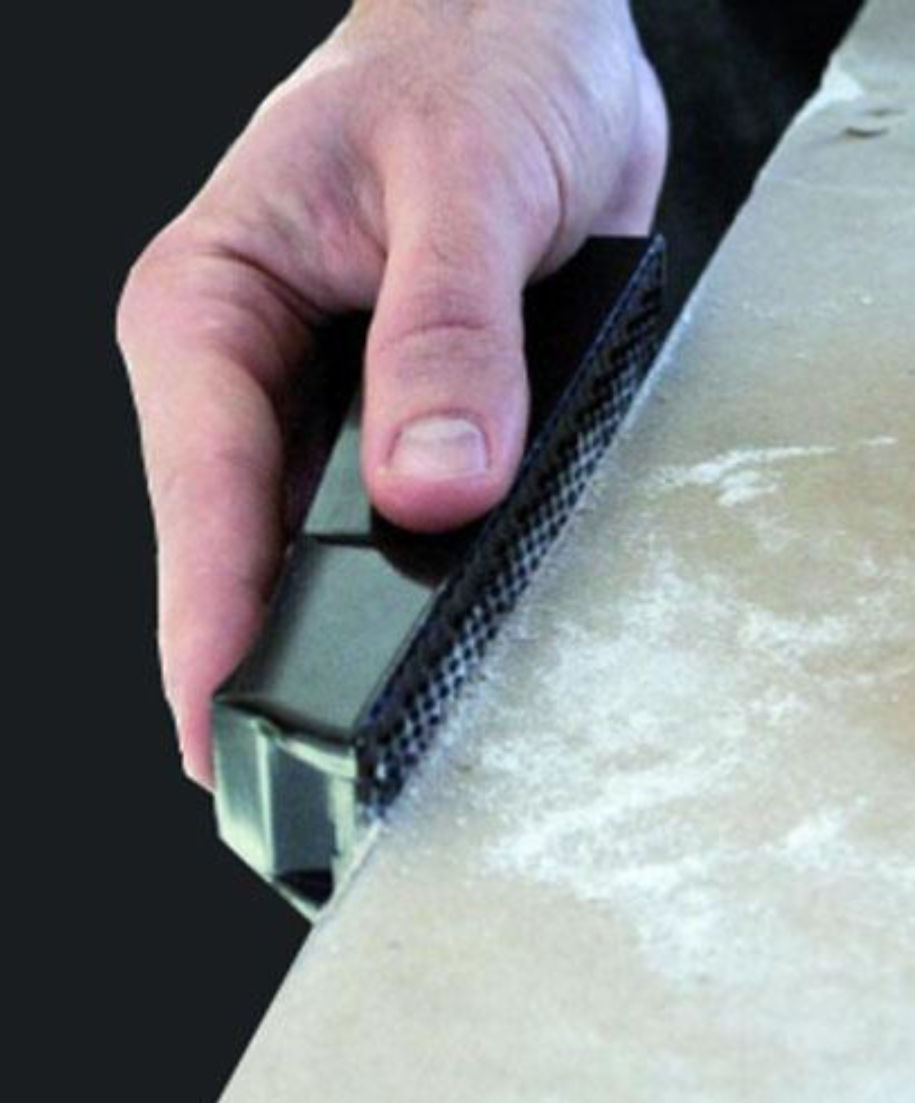
Trimming drywall
If you cut drywall that is slightly too large to fit an opening, instead of trying to trim it with a utility knife or saw, use a rasp plane.
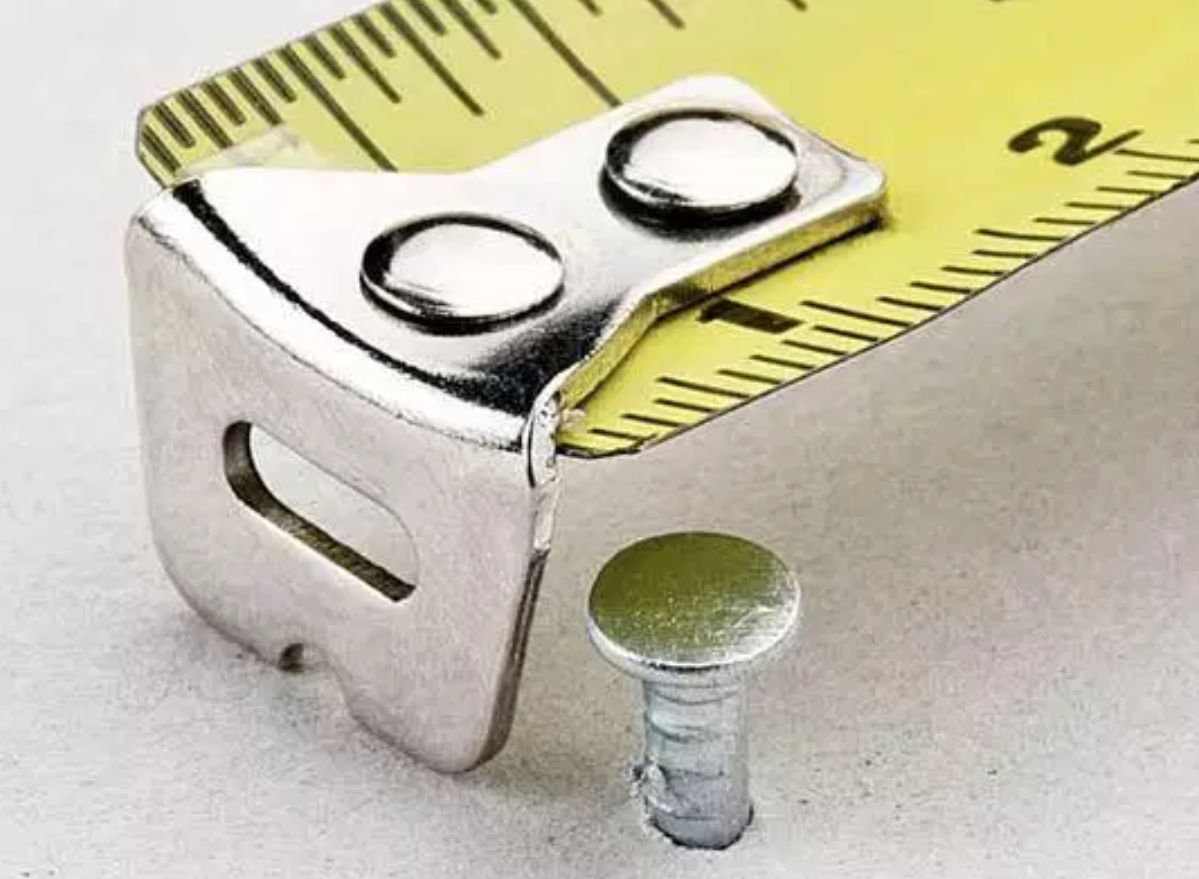
Measuring long distances by yourself
Put a nail into one end of the distance you want to measure. Put the end of the measuring tape into that nail to keep the measuring tape end in place. Pull the measuring tape end into the nail and pull.
Drawing circles
Put a nail into the material at the center of your desired circle. Hook the end of a tape measure into the nail. Hold a pencil against the tape measure at a distance equal to the radius of your desired circle. Rotate the measuring tape to draw a circle.