Easiest Way to Remove Lots of Dirt

I need to remove quite a bit of dirt from my backyard and thought that breaking up the dirt with a rented tiller and then shoveling the dirt aside by hand was sufficient. The problem is it’s a lot quicker to break up the dirt with a tiller than it is to move the dirt by hand so you end up not being able to use the tiller often enough in a short period of time making rental cost expensive. Also, manually moving lots of dirt by hand is incredibly tiring and time-consuming. Though renting an excavator seems like overkill ad expensive for a residential backyard, it’s actually not considering how easy it is to use and how quickly you can get a project done.

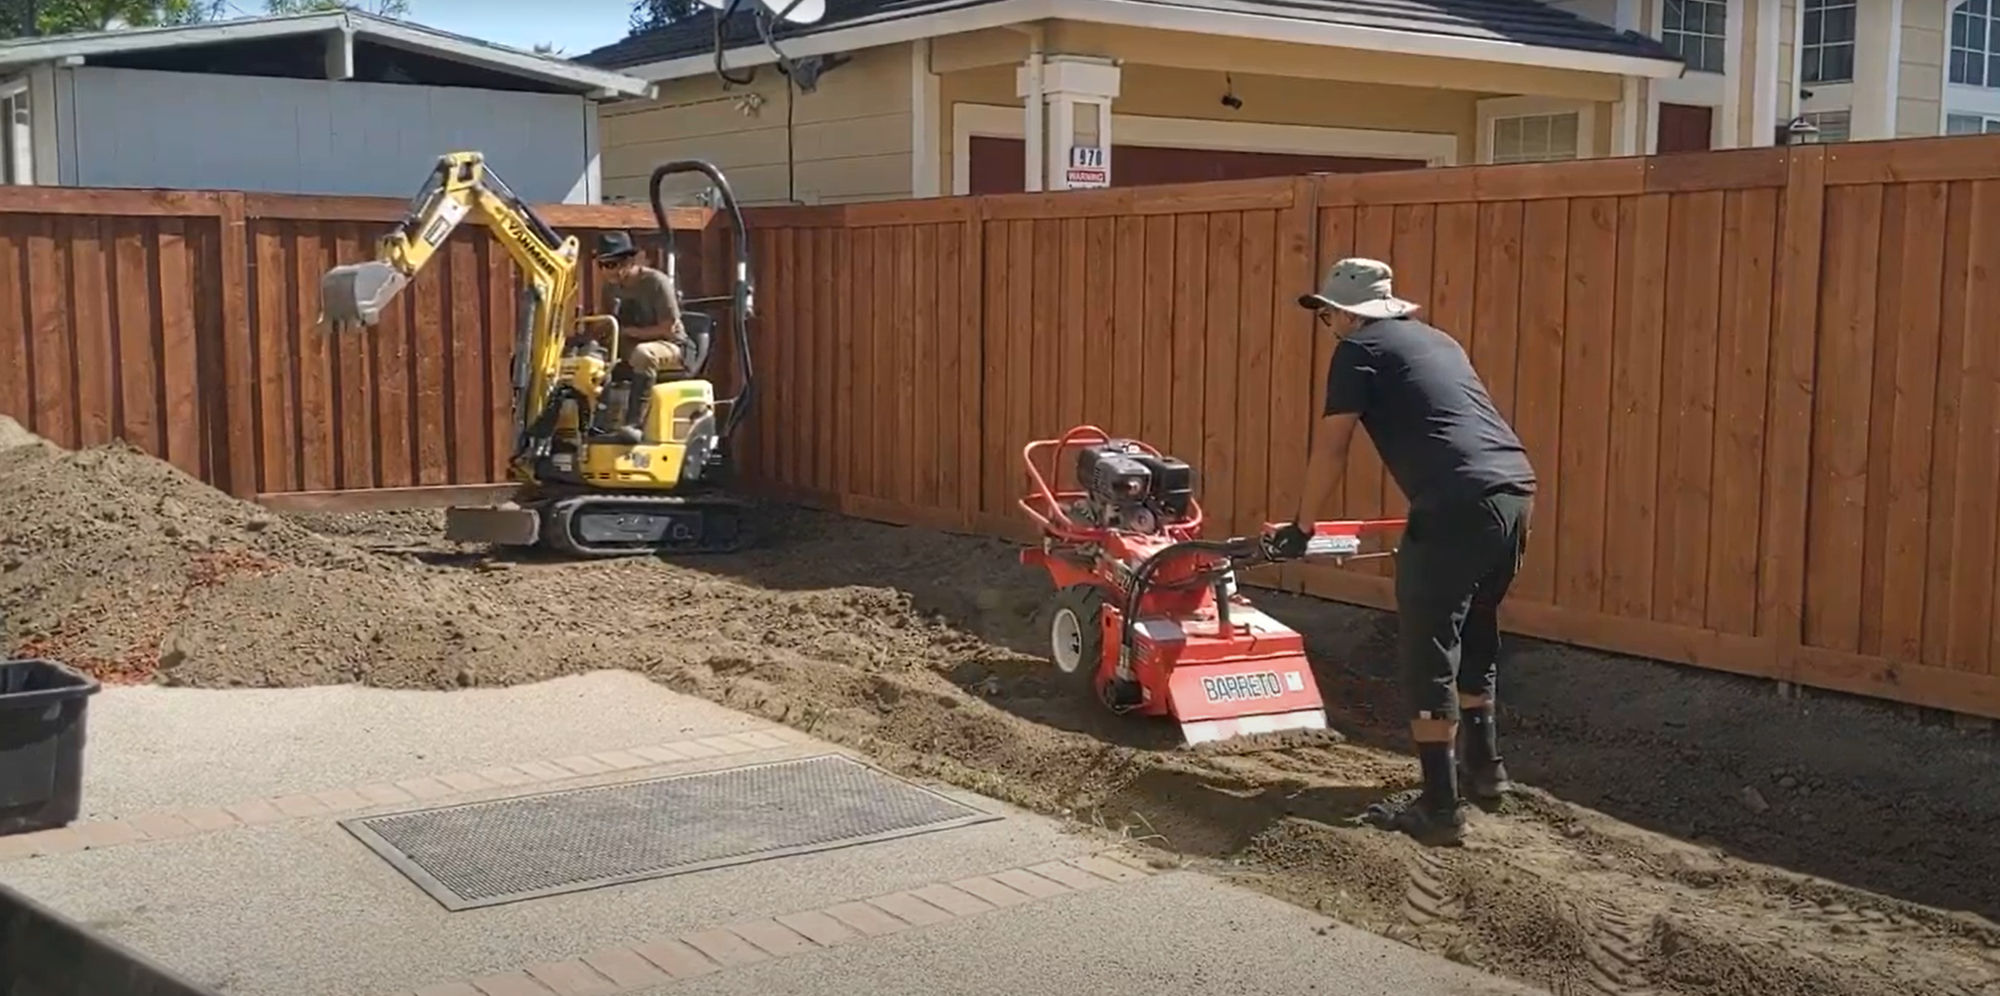
With two people working, one breaking up dirt with a tiller and the other moving dirt using an excavator, the project of removing dirt took only a day. The following tools were rented from the Home Depot.

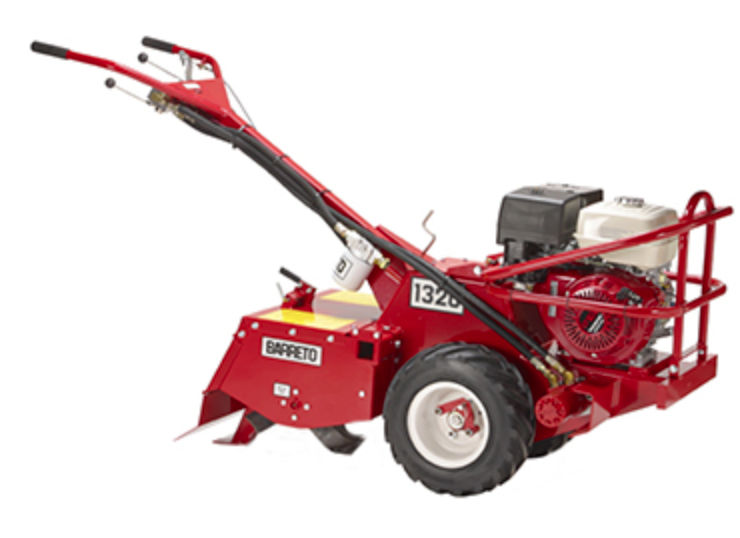
  • Baretto Hydraulic Tiller – ~ $159 per day
  • Yanmar Mini Excavator – ~ $350 per day

Note:

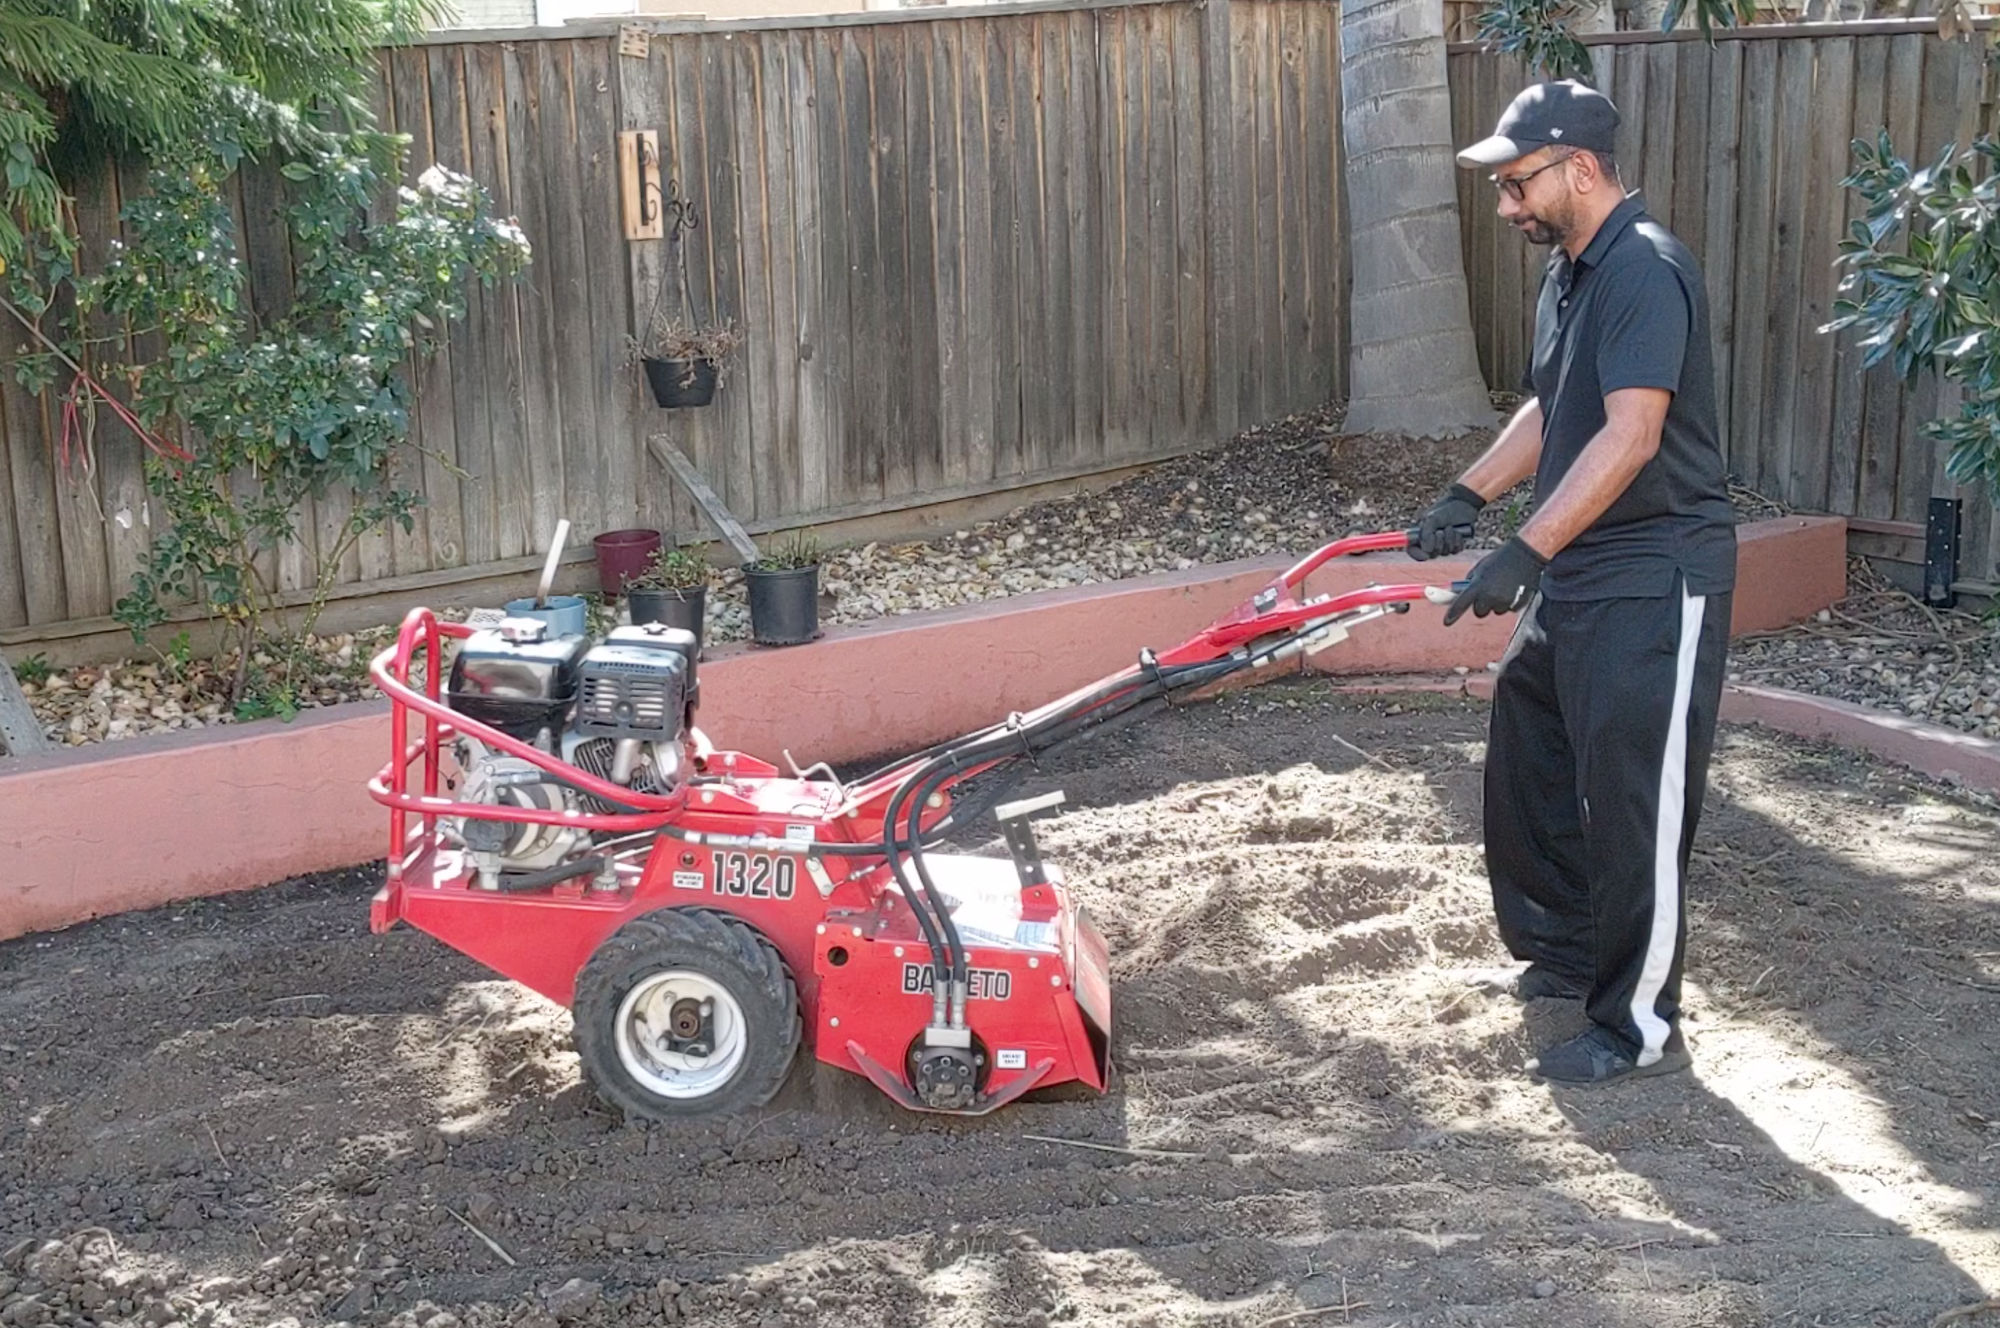
  • There are many tillers but the best is the Baretto hydraulic tiller. It’s huge but it can break up hard dirt that hasn’t even been softened with water. It’s also easy to use but due to its size, it can’t break up dirt along edges like along a fence. This tiller also comes with a mini trailer so you can just tow it.
  • The mini excavator is 2′ 4″ wide so it can fit through a standard 3′ wide fence gate. It takes diesel gas but is very efficient.

Tip:

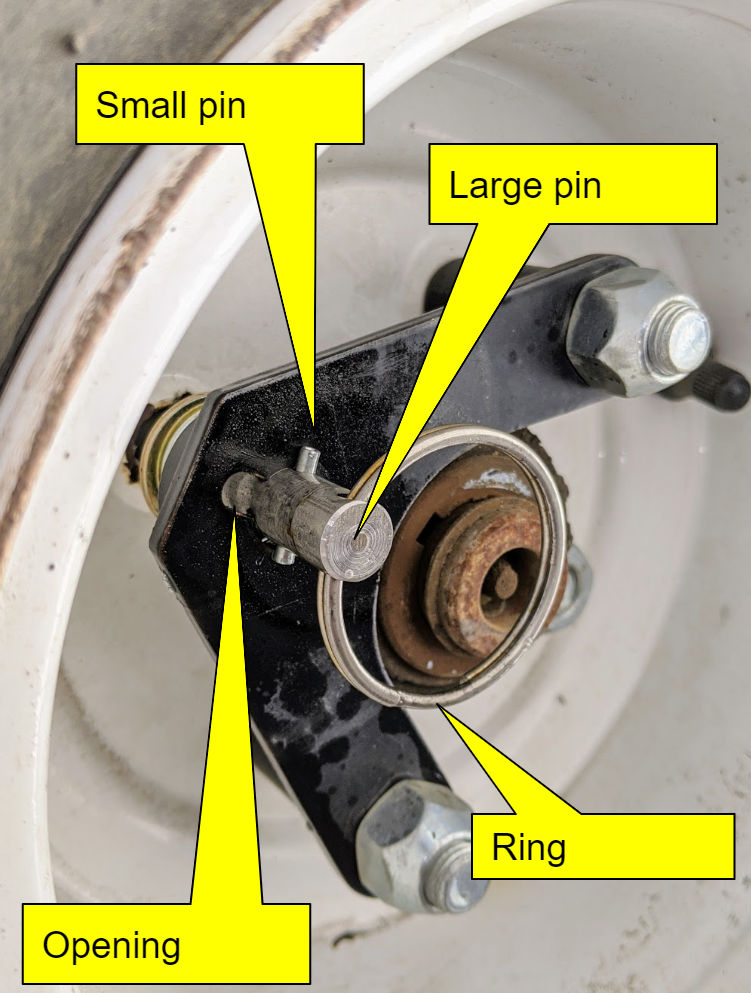
When using the tiller, you can pull the trigger to have the engine move the wheels forward and in reverse. However, the movement is very slow which is fine for when you’re actually tilling dirt. When you need to move the tiller from the trailer to your dirt, it’s must quicker and quieter to unlock the wheels and manually push the tiller with the engine off. To do that,

  1. rotate the ring that’s attached to a large pin that goes into the wheel rim until the small pin that sits perpendicular to the large pin is aligned with the opening
  2. pull the ring so that the small pin comes through the open and then rotate the ring so that the large pin is held out thereby unlocking the wheel from the engine. if you are unable to pull the ring, rotate it clockwise a few times and try again.

How to Straighten Weed Trimmer Line

I have the MaxPower PivoTrim weed trimmer head because the spool type trimmer heads always get tangled. The MaxPower PivoTrim head makes replacing trimmer line super easy.

When I ran out of the trimmer line that came with the head, I bought a spool of new trimmer line. Unfortunately, when you cut some trimmer line and install it in the head, the line curves up or down instead of pointing straight out. So, I found a way to straighten the trimmer line. Below is a picture of the line straightened (left) and before it was straightened (right).

To straighten the line, I cut the line to length, stapled each end down to a piece of 2×4, took a heat gun and carefully heat up the plastic line to soften it and cause it to take on a new shape.

Then, I folded the straightened line in half and stapled each end down to the 2×4 and heat up the folded end so that it would remember that position.

The end result is trimmer lines that are straight and cut weeds better. Note, you may have better performance if you remove the plastic guard on the trimmer shaft.

Easily break up (till) dirt with a tiller

Mantis Tiller and Mid-Tine Tillers

I’ve tried various types of tillers that you can rent from Home Depot. The light duty mantis tillers and mid tine are really only good for soft dirt.

MTA Rear Tine Tiller
(Model # FRC800K1A-656912)

This tiller is heavy duty and can break up hard clay BUT both the wheels and the tines move forward so unless the tines are partially underground breaking the dirt, you can easily be pulled forward and lose control of the machine. Though this is a heavy duty machine, I find it less easy to control compared to the Barreto Hydraulic tiller.

Barreto Hydraulic Tiller
(Model # E1320HX)

This tiller is big and heavy but it’s easy to use, easy to control, and will destroy clay and hard dirt. The rear tines move in the opposite direction of the wheels so the machine never runs away from you moving you forward out of control. It’s the most expensive to rent, but the time savings and ease of use make it worth it. I personally recommend this tiller over all the others.

High Pile, Plush Shag Rug

Trying to find a thick, plush rug with high pile can be difficult with so many options but inaccurate advertising. Here’s my experience and recommendations for comfy carpet.

Thomasville Shag Rugs

Basically, all of the Thomasville Shag rugs are good, if not the best. They are definitely the best value.

  • Thomasville Bali Shag Rug
    I felt this rug at Costco and it’s definitely thick, soft and super dense.
  • Thomasville Marketplace Luxury Shag
    I personally have this rug. It’s definitely high pile and soft but not as soft at the Bali Shag rug. I like the edges of this rug more than the Bali shag rug, though.
  • Thomasville Marketplace Savoy Shag Rug
    I haven’t felt this rug but it’s got a lot of good reviews and is by Thomasville.

Easily Clean Oven Window

Oven windows can get really dirty with baked-on grease. This makes it really hard to clean. Instead of manually scrubbing and wasting your time and energy, I found that using a steamer works pretty well. I use the Bissel Steamer.

You will it with water, wait for it to heat up, attach the hard bristle brush attachment, then pull the trigger to release steam as your gently melt and scrub the grease off.

The steam, which is really hot, will detach the dry grease from the glass but you’ll still need to remove the grease off the glass. For that, I use Clorox or Lyson disinfectant wipes. In general, these wipes are great for cleaning glass.

Now, when I make roasted tomatoes and turn on the oven light, I can actually see through the window again 🙂

Replace Batteries with DC Power Supply

I have some fairy lights used to light up some lanterns at home.

The lights are battery powered. I’m using rechargeable batteries but it’s still a hassle replace the batteries when they die. I decided to replace the batteries with a DC power supply which I can just plug in to an ordinary electrical outlet. I could then use a smart outlet to programmatically turn on the lights whenever I want.

To convert the batteries to use a DC power supply, here’s what I did.

  • Since the lights take 3 AA (1.5V) batteries, the total voltage I need the DC power supply to provide is 4.5 V. I an AC (120V) to DC (5V) power supply on Amazon with barrel to wire connector adapter for $9.
  • 1/2″ diameter round wood dowel from Home Depot (3 ft for ~ $3)
  • Speaker wire

I cut the wood dowel to the length of a AA battery. Drill a hole in one end. Partially screwed in a screw. Stripped the end off of a bit of speaker wire. Wound up the end of the wire around screw and screwed the screw in.

I then identified the positive and negative terminals in the battery pack and inserted my fake batteries in them. The wires from each fake battery were then connected to the corresponding positive and negative terminals to the DC power supply. Everything works.

Circuit Breakers, Electrical Wiring and Device Wattage

I need to install an electric fireplace but I’m not sure if the circuit can handle the load with other devices on. Here’s an explanation of device load, electrical wiring and circuit breakers.

In a typical residential home, you’ll have two types of circuits:

  • 15A (amp) circuit using 14 gauge (thin) electrical wire (usually white) connected to a 15A circuit breaker. Based on the formula P (watt) = V (volts) x i (current), the max wattage this circuit can handle before tripping the circuit breaker is 120 V x 15 A = 1800 W. This circuit is usually used for general lighting.
  • 20A (amp) circuit using 12 gauge (thick) electrical wire (usually yellow) connected to a 20A circuit breaker. This circuit can support a total load of 120V x 20A = 2400 W. This circuit is usually used for kitchen devices.

You can’t just replace a 15A circuit breaker with a 20A one since the wires going into the 15A circuit breaker are likely 14 gauge (thin) wires. If these wires carry a load greater than 1500 watts, the wire can burn, catch on fire, and burn the house down. When installing new circuits, just always use 12 gauge wiring even if connected to a 15 amp circuit breakers.

In the example above, I have these devices

  • electric fireplace (1500 W)
  • LG OLED 65″ TV (150 W)
  • 2 x LED lamps (2 x 15 W = 30 W)

Total power consumption = 1500 W + 150 W + 30 W = 1680 W. Since this is less than 1800 W (the max wattage for a 15 A circuit), I should be okay, although it would be preferable to put the fireplace on a 20A circuit.

How to Build a Strong, Attractive Good-Neighbor Fence

Goals:

  • No gaps between boards
  • Strong, sturdy
  • Inexpensive
  • Looks good on both sides
  • Simple to build
  • Long-lasting

Materials

Wood Post or Steel Post:

Many people use pressure-treated wood posts but though they are cheaper, they do have downsides includng:

  • they can rot and decay
  • they can warp and bend, especially if you leave them out in the sun and don’t finish the fence right away
  • attaching 2x4s to them require toenailing or toescewing nails and screws at an angle or using metal brackets for 2x4s
  • if you attach 2x4s to the post and later decide you want to move them up or down, it’s a hassle

Steel posts have holes all along the length on both sides so screwing 2x4s into them are very easy. This saves a lot of time and money from not having to buy a bunch of brackets. Furthermore, there’s no worry about it warping due to the elements.

Continue reading How to Build a Strong, Attractive Good-Neighbor Fence