UPDATE: A better alternative to Heroku is Render. Your code repo is in GitHub and you don’t need to download any CLI like you do with Heroku. Render also supports static site generators like Netlify. Render is like Netlify + Heroku.
I’ve decided to move my PHP-based websites from GoDaddy shared hosting to Heroku (PaaS / Platform as a Service). Here are the steps I followed so if I need a quick reminder of how I did it, I can just look here. I decided not to go with IaaS (Infrastructure as a Service) options like AWS, Azure, and GCP (Google Cloud Platform) because they are overkill for my needs, are more complicated, and, as a developer, I want to focus on development, not infrastructure.
1. Get PHP Locally
Download PHP. Since I’m on Windows, I downloaded the VS16 x64 Thread Safe (2022-Dec-06 16:15:24) Zip file. I then extracted it to C:\php-8.2.0-Win32-vs16-x64
2. Update Path
Add the PHP path to your system PATH or user environment variable.
Verify the updated Path environment variable is loaded by running the following command on the command line.
If you see the PHP path in the output, then the updated Path environment variable has been loaded. If you don’t see it, then restart Explorer or your computer (there may be easier ways to load updated environment variables).
Test PHP by checking the version on the command line. Run the following command:
php -v
If you see the PHP version, then PHP is working.
3. Start a web server
PHP comes with a built-in web server. In your project folder, run the following command.
php -S localhost:8000
You can then open your PHP website in a browser at http://localhost:8000/.
4. Install PHP Composer
Composer is a dependency manager for PHP. Even if you don’t need it, it’s required by Heroku. Heroku will know that your website runs PHP by detecting the presence of the file composer.json.
Since I’m on Windows, I’ll download and run Composer-Setup.exe. It will install the latest Composer version and set up your PATH so that you can call composer from any directory in your command line. Follow the instructions to install Composer. Then, verify it is loaded by running the following command to check its version.
composer -v
5. Add composer.json file
Create a file in the root of your project folder called composer.json. In my case, I don’t need any dependencies so I will just add {} to the file which is an empty JSON object. (In my case, I guess I didn’t really need to install composer since my composer.json file is empty).
6. Commit to git
This step assumes you have git installed. In my case, I will also commit my project to GitHub.
Create a new repository in GitHub To avoid errors, do not initialize the new repository with README, license, or gitignore files. You can add these files after your project has been pushed to GitHub.
Initialize the local directory as a git repo. Run git init -b main in our project folder. This will create a hidden .git folder.
Add the files in your new local repository. This stages them for the first commit.
git add .
Commit the files that you’ve staged in your local repository.
git commit -m "First commit"
At the top of your repository on GitHub.com’s Quick Setup page, click to copy the remote repository URL. In the Command prompt, add the URL for the remote repository where your local repository will be pushed.
$ git remote add origin <REMOTE_URL>
# Sets the new remote
$ git remote -v
# Verifies the new remote URL
5. Set tracking information for the main branch
git branch --set-upstream-to=origin/main main
6. Push changes to GitHub
git push origin main
7. Add gitignore file
Create a .gitignore file in the root of your project folder and add the following lines.
vendor/
.env
That way, when you commit files, you will not commit the .env file, if any, and any files in the vendor folder, if any.
8. Create a procfile
Create a file in the root of your project folder called Procfile. It should not have an extension. Add the following line to it.
web: vendor/bin/heroku-php-apache2
This will tell Heroku to set up a web server using Apache and PHP. If you want nginx instead of Apache, add the following line instead.
web: vendor/bin/heroku-php-nginx
9. Install Heroku CLI
The Heroku CLI (Command Line Interface) is necessary to push (publish) changes to your website to Heroku. Since I’m on Windows, I’ll download the Windows installer. The installer will add Heroku to the Path environment variable.
To load the updated environment variable, close all Explorer and command line / PowerShell windows. Reopen a command line / PowerShell and type enter the following
heroku login
A browser tab will open asking you to log in to Heroku CLI. Log in.
Once you’ve logged in you, you can close the browser tab and return to the command line.
The command line will get updated to show that you’ve logged in.
10. Deploy your website
Create an app on Heroku, which prepares Heroku to receive your source code. Run the following command.
heroku create
When you create an app, a git remote (called heroku) is also created and associated with your local git repository.
Heroku generates a random name (in this case sharp-rain-871) for your app, or you can pass a parameter to specify your own app name.
To deploy your website, run the following command.
git push heroku main
11. Run the app
Now that the website has been deployed, ensure that at least one instance of the app is running. Run the following command.
heroku ps:scale web=1
12. View the website
heroku open
The website will magically open in a browser.
13. Make changes
Whenever you make changes to the website, commit and push them to Heroku. To simplify deployments, you can tell Heroku to use GitHub instead of the Heroku CLI.
When most people write, they usually just use basic words. This is likely because people tend to write the same way their peers write and because their vocabulary may just be limited. Occasionally, however, you may read a note or email from someone and you suddenly perceive them in a different light. Their style of writing and choice of words may make you feel they are smarter than you, as much as you may wish not to admit that. If this happens in the workplace, you may even proceed with caution as you may feel that this person is at a higher level than you which can seem intimidating. Luckily, you don’t need to memorize a vast vocabulary or have a PhD just to sound smarter than others.
Synonyms
A simple thesaurus like the one included in Grammarly or a dedicated and powerful one like Power Thesaurus can elevate your writing and self-image at the click of a button. Consider the following basic words and some of their synonyms.
As you can see, without looking at one’s resume (or LinkedIn profile), using more descriptive words can hint that the author is educated, intellectual, knowledgeable, cultured, and not someone to mess with 🙂 Now, I’m not suggesting that you specifically choose synonyms that are so rarely used that people need to look up their meaning. That would be annoying to readers and could backfire as people would know that you’re intentionally choosing rare words instead of trying to communicate clearly and effectively.
Compare the following sentences and see which ones sound more interesting and lend an air of sophistication.
Sometimes, I come across a video that shows poor people in many places around the world.
Occasionally, I’d chance upon a documentary that depicts extreme poverty in various locations around the globe.
I can’t help but wonder why many of these countries don’t appear to be growing whereas others that used to be poor, like China and Singapore, have become rich in a relatively short period of time.
I can’t help but ponder as to why many of these countries don’t appear to be advancing whilst others that used to be destitute, like China and Singapore, have become prosperous in a relatively short timeframe.
Adjectives
Another tip for making your writing more interesting is by using adjectives, especially adjectives that come before the words the describe. Compare the following phrases and see which ones sound better.
This is not just another guidebook.
This is not just another cliched guidebook.
Manhattan is known for its skyscrapers.
Manhattan is known for its gleaming skyscrapers.
Jakarta is full of toll roads.
Jakarta is full of imposing toll roads.
Beijing is covered in pollution.
Beijing is enveloped in a gigantic cloud of pollution.
In the plane, we could smell the odor of durian.
In the plane, we could smell the unmistakable odor of durian.
He discussed issues related to city administration.
He discussed civic issues.
Our visit to Palm Springs was on a hot day.
Our visit to Palm Springs was on a stiflingly hot day.
Analogies
Another technique is to use analogies. Compare the following.
The auto rickshaw is a noisy 3-wheel vehicle.
The auto rickshaw is a noisy 3-wheel vehicle. It is undoubtedly the cockroach of the automotive world.
The little boat gently drifted across the pond exactly the way a bowling ball wouldn’t.
Her vocabulary was as bad as, like, whatever.
McBride fell 12 stories, hitting the pavement like a Hefty bag filled with vegetable soup.
It was an American tradition, like fathers chasing kids around with power tools.
Artificial Intelligence
I just started playing around with ChatGPT artificial intelligence. I tested it to rewrite the two first sentences above in a “better” way. Shockingly, it did an amazing job!
Process
To summarize the above into a step-by-step process, you can do the following:
Write as you normally do
ChatGPT: Use ChatGPT to improve your writing.
Synonyms: If necessary, use a thesaurus to choose better words.
Adjectives: Consider prefixing words with adjectives without being excessive.
Analogies: If possible, add analogies, again, without being excessive.
Following are some tools for finding synonyms.
Power Thesaurus
This is my favorite because it’s super easy to use and offers probably the most synonyms than any alternative. Looking up definitions of a synonym can easily be done inline while browsing a list of synonyms. The website version looks like this.
Switching between your editing window and the Power Thesaurus window can be annoying and time-consuming. To remedy this, you can install the Power Thesaurus browser extension (this one is for Chrome). Clicking on a word will display an icon that, when clicked on, will trigger a tooltip-like overlay showing a few synonyms.
If you want even more synonyms and more features in the overlay, you can upgrade for $4 / month or $30 / year.
Grammarly
Grammarly has an online editing interface. You can edit your content directly in Grammarly’s website and while editing, you can double-click on a word to see an overlay of synonyms. There are not many synonyms which is why I prefer Power Thesaurus.
400 grams of long grain rice (leftover from the day before or refrigerated for at least 2 hours)
3 eggs
3/4 cup carrots, diced (can just chop pre-shredded carrots)
3/4 cup red or yellow onion, coarsely chopped
3/4 cup frozen peas
2 tbsp oyster sauce
4 tbsp soy sauce
1 tbsp toasted sesame oil
1 cup meat (chicken or beef, optional)
¼ cup green onions, chopped into small pieces
To taste MSG, salt, pepper (MSG is actually not bad for you)
2 cloves garlic, minced
Instructions
Make an omelette. Beat the eggs (I like to use a handheld electric mixer). Using a small pat of butter, make an omelette (I use a large pan for this). Slice the omelette into squares and set aside.
Cook the meat. I used ground beef. When done, set aside.
Sauté veggies. Using butter, sauté the onions, carrots, peas and garlic until soft and cooked through. (I use a wok for this)
Stir fry rice. Turn the burner to high heat. Scooch the veggies over to one side of the pan, melt the remaining butter in the other half, and add the chilled rice, soy sauce, and oyster sauce (if using). Then stir to combine with the veggies and continue sautéing the rice, stirring every 15-20 seconds or so for 3 minutes, or until you notice the rice and veggies starting to brown slightly.
Remove pan from heat. Stir in the green onions, sesame oil, sliced omelette, and meat.
Taste and season. Give the rice a taste, and season with MSG and pepper, plus any extra soy sauce or sesame oil, if needed.
Mixing 3 eggsChop some shredded carrotsMake an omeletteSlice the omeletteGround beef
To break up the rice, use a food masher utensil.
You can also just buy one of these spice packets to make things simple.
I’ll try to make fried rice using each of these spice packets and rate each one.
Let’s say you have a bunch of video clips and you want to simply join them together without any fancy transitions or anything. The clips could be from a bunch of short videos you took on your phone, action cam, or maybe even your security camera. In my case, I had 2 Wyze cam security cameras that recorded 24/7 footage to an SD card. Each video clip was one-minute long grouped by folder indicating the hour of the day and then grouped by day of the year.
Your first thought might be to drag all video clips to a video editing tool like Adobe Premiere or Corel VideoStudio and render one combined video. I tried that using VideoStudio but it had to reencode all clips which took a long time. Also, the resulting file size was huge because the lowest encoding settings available were much higher than the source audio and video settings.
LosslessCut
LosslessCut describes itself as the swiss army knife of lossless video/audio editing.
The main feature is lossless trimming and cutting of video and audio files, which is great for saving space by rough-cutting your large video files taken from a video camera, GoPro, drone, etc. It lets you quickly extract the good parts from your videos and discard many gigabytes of data without doing a slow re-encode and thereby losing quality. Or you can add a music or subtitle track to your video without needing to encode. Everything is extremely fast because it does an almost direct data copy.
The thing I hate the most about video editing is how long it takes. I tried LosslessCut to join 60 video clips and it completed almost instantly. Drag the files to the window.
LosslessCut will allow you to sort the files. Just drag a file to the position where you want it to go. Check the “Include all streams?” checkbox and click “Merge!”
Missing Audio
In my case, I couldn’t use LosslessCut directly with the mp4 files from Wyze Cam. I would get this error.
I then converted each file to MOV and then I was able to merge each MOV file. But, when I imported the MOV file into Corel VideoStudio, there was no sound. This seems to be a common issue for many people. Apparently, the audio codec used by Wyze Cam is some unknown one. To remedy this, I first batch converted all video clips using HandBrake while keeping the audio and video quality almost the same. In the screenshot below, you can see the audio is being converted from “1 Unknown” to “160 kbps AAC).
After batch encoding all video clips, I was able to merge them instantly using LosslessCut.
On a modern map of the world, numerous lines can be observed dividing nations from one another. What many people seem to forget or not even realize is that these borders never used to exist and are entirely artificial. One of the best examples of the man-made — and in some cases, random — creation of borders is when in 1884, Western European countries met in Berlin to divide Africa so they could each colonize parts of it without fighting each other.
These lines are often the cause of dispute for all sorts of reasons including absurd ones like the sense of superiority of members of one state over those of a neighboring one. For instance, Arabia used to be one large region with no borders. Now, people living in one area like Saudi Arabia may have a sense of superiority over people in neighboring Yemen. This may be because Saudi Arabia is one of the wealthiest countries in the world (only after having discovered large oil reserves) whereas Yemen is one of the poorest. Another example is the people of India and Pakistan. The maps below show the changing borders in that part of the world. Prior to August 15, 1947, there was one country (India). Then, the British partitioned it into two thereby creating a new country called Pakistan. It is believed that between 14 million and 18 million people moved across the newly created border. Now, it is not uncommon to see people in both countries claim superiority over the other despite the fact that they were all from the same country. I think Yanni explained it well when he commented on world borders. These borders can create a sense of nationalism which Albert Einstein called “an infantile disease, the measles of mankind.” Nationalism is an ideology that a person’s nation is superior to all others. Nationalists’ feeling of superiority differentiates their nationalism from patriotism. Patriotism equates to pride in one’s country and a willingness to defend it. Nationalism, on the other hand, extends that to arrogance and potential military aggression. Political scientists blame nationalism for civil wars and territorial ambitions, from Rwanda and Yugoslavia to Nazi Germany and Napoleonic France. Nationalism was even the cause of World War I. Nationalism is not necessarily a bad thing unless it causes people of a certain nation to view their neighbors, or people of any other nation, as inferior or, worse, as enemies. The borders on a map separate one nation from another. These borders have changed dramatically in the last 5000 years.
This post contains 3 sections.
Video (4K) of a map of the world with changing borders from 3000 BCE to 2013 CE in intervals of 100 years
Table of significant historical events that had an effect on geographic borders
List of maps (4K) showing borders from 3000 BCE to 2013 CE in intervals of 100 years
According to consensus in modern genetics, anatomically modern humans first arrived on the Indian subcontinent from Africa between 73,000 and 55,000 years ago. By 4500 BCE, settled life had spread more widely, and began to gradually evolve into the Indus Valley civilization. Their Vedic Period (1500–500 BCE) was marked by the composition of the Vedas, large collections of hymns of these tribes. Their varna system, which evolved into the caste system, consisted of a hierarchy of priests, warriors, and free peasants.
The Akkadian Empire was the first ancient empire of Mesopotamia after the long-lived civilization of Sumer. It was centered in the city of Akkad and its surrounding region. The empire united Akkadian and Sumerian speakers under one rule. The Bible refers to Akkad in Genesis 10:10–12.
The Third Dynasty of Ur, also called the Neo-Sumerian Empire, refers to a 22nd to 21st century BC (middle chronology) Sumerian ruling dynasty based in the city of Ur.
The Middle Kingdom of Egypt (also known as The Period of Reunification) is the period in the history of ancient Egypt following a period of political division known as the First Intermediate Period. The Middle Kingdom lasted from approximately 2040 to 1782 BC, stretching from the reunification of Egypt under the reign of Mentuhotep II in the Eleventh Dynasty to the end of the Twelfth Dynasty.
The Minoan civilization was a Bronze Age Aegean civilization on the island of Crete and other Aegean Islands, whose earliest beginnings were from c. 3500 BC, with the complex urban civilization beginning around 2000 BC, and then declining from c. 1450 BC until it ended around 1100 BC. The term “Minoan” refers to the mythical King Minos of Knossos, a figure in Greek mythology associated with Theseus, the labyrinth and the Minotaur.
According to Chinese tradition, the first dynasty was the Xia, which emerged around 2100 BCE. The Xia dynasty marked the beginning of China’s political system based on hereditary monarchies, or dynasties, which lasted for a millennium.
The Old Babylonian Empire, or First Babylonian Empire, is dated to c. 1894 BC – c. 1595 BC, and comes after the end of Sumerian power with the destruction of the Third Dynasty of Ur, and the subsequent Isin-Larsa period.
The Hittites were an Anatolian people who played an important role in establishing first a kingdom in Kussara (before 1750 BC), then the Kanesh or Nesha kingdom (c. 1750–1650 BC), and next an empire centered on Hattusa in north-central Anatolia (around 1650 BC).
Mycenaean Greece (or the Mycenaean civilization) was the last phase of the Bronze Age in Ancient Greece, spanning the period from approximately 1750 to 1050 BC.[1] It represents the first advanced and distinctively Greek civilization in mainland Greece with its palatial states, urban organization, works of art, and writing system.
The New Kingdom, also referred to as the Egyptian Empire, is the period in ancient Egyptian history between the sixteenth century BC and the eleventh century BC, covering the Eighteenth, Nineteenth, and Twentieth dynasties of Egypt.
The Middle Assyrian Empire was the third stage of Assyrian history, covering the history of Assyria from the accession of Ashur-uballit I c. 1363 BC and the rise of Assyria as a territorial kingdom to the death of Ashur-dan II in 912 BC. The Middle Assyrian Empire was Assyria’s first period of ascendancy as an empire.
The Greek Dark Ages is the period of Greek history from the end of the Mycenaean palatial civilization, around 1100 BC, to the beginning of the Archaic age, around 750 BC. Archaeological evidence shows a widespread collapse of Bronze Age civilization in the Eastern Mediterranean world at the outset of the period, as the great palaces and cities of the Mycenaeans were destroyed or abandoned. At about the same time, the Hittite civilization suffered serious disruption, as cities from Troy to Gaza were destroyed. In Egypt, the New Kingdom fell into disarray.
The Neo-Assyrian Empire was the fourth and penultimate stage of ancient Assyrian history and the final and greatest phase of Assyria as an independent state. Beginning with the accession of Adad-nirari II in 911 BC, the Neo-Assyrian Empire grew to dominate the ancient Near East throughout much of the 8th and 7th centuries BC, becoming the largest empire in history up to that point. Because of its geopolitical dominance and ideology based in world domination, the Neo-Assyrian Empire is by many researchers regarded to have been the first world empire in history. At its height, the empire was the strongest military power in the world and ruled over all of Mesopotamia, the Levant and Egypt, as well as portions of Anatolia, Arabia and modern-day Iran and Armenia.
Carthage was the capital city of Ancient Carthage, on the eastern side of the Lake of Tunis in what is now Tunisia. Carthage was one of the most important trading hubs of the Ancient Mediterranean and one of the most affluent cities of the classical world.
Archaic Greece was the period in Greek history lasting from circa 800 BC to the second Persian invasion of Greece in 480 BC, following the Greek Dark Ages and succeeded by the Classical period. In the archaic period, Greeks settled across the Mediterranean and the Black Seas, as far as Marseille in the west and Trapezus (Trebizond) in the east; and by the end of the archaic period, they were part of a trade network that spanned the entire Mediterranean.
The history of Rome includes the history of the city of Rome as well as the civilisation of ancient Rome. Roman history has been influential on the modern world, especially in the history of the Catholic Church, and Roman law has influenced many modern legal systems. According to legend, Romulus founded Rome.
The Neo-Babylonian Empire or Second Babylonian Empire, historically known as the Chaldean Empire, was the last polity ruled by monarchs native to Mesopotamia. Beginning with the coronation of Nabopolassar as the King of Babylon in 626 BC and being firmly established through the fall of the Neo-Assyrian Empire in 612 BC, the Neo-Babylonian Empire was conquered by the Achaemenid Persian Empire in 539 BC, marking the collapse of the Chaldean dynasty less than a century after its founding.
The Achaemenid Empire or Achaemenian Empire (/əˈkiːmənɪd/; Old Persian: ????????????, Xšāça, lit. ‘The Empire’ or ‘The Kingdom’), also called the First Persian Empire, was an ancient Iranian empire founded by Cyrus the Great in 550 BC. Based in Western Asia, it was contemporarily the largest empire in history, spanning a total of 5.5 million square kilometres (2.1 million square miles) from the Balkans and Egypt in the west to Central Asia and the Indus Valley in the east.
The Greco-Persian Wars (also often called the Persian Wars) were a series of conflicts between the Achaemenid Empire and Greek city-states that started in 499 BC and lasted until 449 BC. The collision between the fractious political world of the Greeks and the enormous empire of the Persians began when Cyrus the Great conquered the Greek-inhabited region of Ionia in 547 BC. Struggling to control the independent-minded cities of Ionia, the Persians appointed tyrants to rule each of them. This would prove to be the source of much trouble for the Greeks and Persians alike.
The Peloponnesian War (431–404 BC) was an ancient Greek war fought between Athens and Sparta and their respective allies for the hegemony of the Greek world. The war remained undecided for a long time until the decisive intervention of the Persian Empire in support of Sparta. Led by Lysander, the Spartan fleet built with Persian subsidies finally defeated Athens and started a period of Spartan hegemony over Greece.
Alexander III of Macedon, commonly known as Alexander the Great, was a king of the ancient Greek kingdom of Macedon. He succeeded his father Philip II to the throne in 336 BC at the age of 20, and spent most of his ruling years conducting a lengthy military campaign throughout Western Asia and Egypt. By the age of thirty, he had created one of the largest empires in history, stretching from Greece to northwestern India. He was undefeated in battle and is widely considered to be one of history’s greatest and most successful military commanders
The Parthian Empire, also known as the Arsacid Empire, was a major Iranian political and cultural power in ancient Iran from 247 BC to 224 AD. The empire, located on the Silk Road trade route between the Roman Empire in the Mediterranean Basin and the Han dynasty of China, became a center of trade and commerce.
The Roman Empire was the post-Republican period of ancient Rome. As a polity, it included large territorial holdings around the Mediterranean Sea in Europe, North Africa, and Western Asia, and was ruled by emperors. From the accession of Caesar Augustus as the first Roman emperor to the military anarchy of the 3rd century, it was a principate with Italia as the metropole of its provinces and the city of Rome as its sole capital.
The Sassanid Empire, officially known as the Empire of Iranians and also referred to by historians as the Neo-Persian Empire, was the last Iranian empire before the early Muslim conquests of the 7th-8th centuries AD. Named after the House of Sasan, it endured for over four centuries, from 224 to 651 AD, making it the longest-lived Persian imperial dynasty. The Sasanian Empire succeeded the Parthian Empire, and re-established the Persians as a major power in late antiquity alongside its neighbouring arch-rival, the Roman Empire (after 395 the Byzantine Empire).
The migration period was a period in European history marked by large-scale migrations that saw the fall of the Western Roman Empire and subsequent settlement of its former territories by various tribes, notably the Franks, Goths, Alemanni, Alans, Huns, early Slavs, Pannonian Avars, Magyars, and Bulgars within or into the former Western Empire and Eastern Europe.
The barbarian kingdoms were the states founded by various non-Roman, primarily Germanic, peoples in Western Europe and North Africa following the collapse of the Western Roman Empire in the fifth century.
The Byzantine Empire, also referred to as the Eastern Roman Empire or Byzantium, was the continuation of the Roman Empire in its eastern provinces during Late Antiquity and the Middle Ages, when its capital city was Constantinople (present-day Istanbul).
The Indian early medieval age, from 600 to 1200 CE, is defined by regional kingdoms and cultural diversity. In the 6th and 7th centuries, the first devotional hymns were created in the Tamil language. They were imitated all over India and led to both the resurgence of Hinduism and the development of all modern languages of the subcontinent. After the 10th century, Muslim Central Asian nomadic clans, using swift-horse cavalry and raising vast armies united by ethnicity and religion, repeatedly overran South Asia’s north-western plains, leading eventually to the establishment of the Islamic Delhi Sultanate in 1206.
A bunch of dynasties controlled China: 581: The Northern and Southern dynasties were reunited by the Sui in 581 which restored Han power to China. 618-906: Tang dynasty took control. 960-1279: Song dynasty (northern and southern) 1279-1368: Yuan dynasty 1368-1644: Ming dynasty
A caliphate or khilāfah (Arabic: خِلَافَة) is an institution or public office under the leadership of an Islamic steward with the title of caliph (Arabic: خَلِيفَة), a person considered a political-religious successor to the Islamic prophet Muhammad and a leader of the entire Muslim world. During the medieval period, three major caliphates succeeded each other: the Rashidun Caliphate (632–661), the Umayyad Caliphate (661–750), and the Abbasid Caliphate (750–1258).
The Reconquista describes the 781-year period in the history of the Iberian Peninsula between the Umayyad conquest of Hispania in 711 and the fall of the Nasrid kingdom of Granada in 1492, in which the Christian kingdoms expanded through war and conquered al-Andalus; the territories of Iberia ruled by Muslims.
Viking expansion was the historical movement which led Norse explorers, traders and warriors, the latter known in modern scholarship as Vikings, to sail most of the North Atlantic, reaching south as far as North Africa and east as far as Russia, and through the Mediterranean as far as Constantinople and the Middle East, acting as looters, traders, colonists and mercenaries.
From the accession of Otto I in 962 until the twelfth century, the Empire was the most powerful monarchy in Europe. The empire dissolved in 1806 during the Napoleonic Wars.
The Crusades were a series of religious wars initiated, supported, and sometimes directed by the Latin Church in the medieval period. The best known of these Crusades are those to the Holy Land in the period between 1095 and 1291 that were intended to recover Jerusalem and its surrounding area from Islamic rule. Beginning with the First Crusade, which resulted in the recovery of Jerusalem in 1099, dozens of Crusades were fought, providing a focal point of European history for centuries.
The Mongol Empire of the 13th and 14th centuries was the largest contiguous land empire in history. The Mongol Empire emerged from the unification of several nomadic tribes in the Mongol homeland under the leadership of Temüjin, known by the more famous title of Genghis Khan (c. 1162–1227), whom a council proclaimed as the ruler of all Mongols in 1206. The empire grew rapidly under his rule and that of his descendants, who sent out invading armies in every direction.
Marco Polo was a Venetian merchant, explorer and writer who traveled through Asia along the Silk Road between 1271 and 1295. His travels are recorded in The Travels of Marco Polo, a book that described to Europeans the then-mysterious culture and inner workings of the Eastern world, including the wealth and great size of the Mongol Empire and China in the Yuan Dynasty, giving their first comprehensive look into China, Persia, India, Japan and other Asian cities and countries.
The Hundred Years’ War was a series of armed conflicts between the kingdoms of England and France during the Late Middle Ages. It originated from disputed claims to the French throne between the English House of Plantagenet and the French royal House of Valois. Over time, the war grew into a broader power struggle involving factions from across Western Europe, fuelled by emerging nationalism on both sides. For 116 years, interrupted by several truces, five generations of kings from two rival dynasties fought for the throne of the dominant kingdom in Western Europe.
The Timurid Empire was a Persianate Turco-Mongol empire that dominated Greater Iran in the early 15th century, comprising modern-day Iran, Iraq, Afghanistan, much of Central Asia, the South Caucasus, as well as most of contemporary Pakistan and parts of contemporary North India and Turkey.
The empire was founded by Timur (also known as Tamerlane), a warlord of Turco-Mongol lineage, who established the empire between 1370 and his death in 1405. He envisioned himself as the great restorer of the Mongol Empire of Genghis Khan and regarded himself as Genghis’s heir.
The Inca Empire was the largest empire in pre-Columbian America. The administrative, political and military center of the empire was in the city of Cusco. The Inca civilization arose from the Peruvian highlands sometime in the early 13th century. The Spanish began the conquest of the Inca Empire in 1532 and by 1572, the last Inca state was fully conquered.
The Aztec Empire or the Triple Alliance was an alliance of three Nahua city-states: Mexico-Tenochtitlan, Tetzcoco, and Tlacopan. These three city-states ruled that area in and around the Valley of Mexico from 1428 until the combined forces of the Spanish conquistadores and their native allies who ruled under Hernán Cortés defeated them in 1521.
The Age of Discovery (or the Age of Exploration), also known as the early modern period, was a period largely overlapping with the Age of Sail, during which seafaring Europeans explored and colonized regions across the globe.
The extensive overseas exploration, with the Portuguese and Spanish at the forefront, later joined by the Dutch, English, and French, emerged as a powerful factor in European culture, most notably the European encounter and colonization of the Americas. It also marks an increased adoption of colonialism as a government policy in several European states. As such, it is sometimes synonymous with the first wave of European colonization.
The Black Death (also known as the Pestilence, the Great Mortality or the Plague) was a bubonic plague pandemic occurring in Western Eurasia and North Africa from 1346 to 1353. It is the most fatal pandemic recorded in human history, causing the deaths of 75–200 million people, peaking in Europe from 1347 to 1351. Bubonic plague is caused by the bacterium Yersinia pestis spread by fleas, but it can also take a secondary form where it is spread by person-to-person contact via aerosols causing septicaemic or pneumonic plagues.
The Ottoman Empire (Turkish Empire) was an empire that controlled much of Southeast Europe, Western Asia, and Northern Africa between the 14th and early 20th centuries. It was founded by the Turkoman tribal leader Osman I. After 1354, the Ottomans crossed into Europe and, with the conquest of the Balkans, the Ottoman beylik was transformed into a transcontinental empire. The Ottomans ended the Byzantine Empire with the conquest of Constantinople in 1453 by Mehmed the Conqueror.
Under the reign of Suleiman the Magnificent, the Ottoman Empire marked the peak of its power and prosperity, as well as the highest development of its governmental, social, and economic systems.
The Protestant Reformation was a major movement within Western Christianity that posed a religious and political challenge to the Catholic Church and in particular to papal authority, arising from what were perceived to be errors, abuses, and discrepancies by the Catholic Church. The Reformation was the start of Protestantism and the split of the Western Church into Protestantism and what is now the Roman Catholic Church.
The Counter-Reformation was the period of Catholic resurgence that was initiated in response to the Protestant Reformation. It began with the Council of Trent (1545–1563) and largely ended with the conclusion of the European wars of religion in 1648.
The Portuguese Empire was composed of the overseas colonies, factories, and the later overseas territories governed by Portugal. It was one of the longest-lived empires in European history, lasting almost six centuries from the conquest of Ceuta in North Africa, in 1415, to the transfer of sovereignty over Macau to China in 1999. The empire began in the 15th century, and from the early 16th century it stretched across the globe, with bases in North and South America, Africa, and various regions of Asia and Oceania.
In 1488, Bartolomeu Dias rounded the Cape of Good Hope, and in 1498 Vasco da Gama reached India. In 1500, either by an accidental landfall or by the crown’s secret design, Pedro Álvares Cabral reached what would be Brazil.
The Spanish Empire was a colonial empire governed by Spain and its predecessor states between 1492 and 1976. One of the largest empires in history, it was, in conjunction with the Portuguese Empire, the first to usher the European Age of Discovery and achieve a global scale, controlling vast portions of the Americas, territories in Western Europe, Africa, and various islands in Asia and Oceania. It was one of the most powerful empires of the early modern period, becoming the first empire known as “the empire on which the sun never sets”, and reached its maximum extent in the 18th century.
The Spanish empire in the Americas was formed after conquering indigenous people and claiming large stretches of land, beginning with Christopher Columbus in the Caribbean Islands. In the 16th century, the Spanish empire conquered and incorporated the Aztec and Inca empires. The Mayans were finally conquered in 1697.
Spain experienced its greatest territorial losses during the early 19th century, when its colonies in the Americas began fighting their wars of independence. By 1900, Spain had also lost its colonies in the Caribbean and Pacific, and it was left with only its African possessions.
The Mughal Empire was an empire that controlled much of South Asia. For some two hundred years, the empire stretched from the outer fringes of the Indus river basin in the west, northern Afghanistan in the northwest, and Kashmir in the north, to the highlands of present-day Assam and Bangladesh in the east, and the uplands of the Deccan Plateau in South India.
The French colonial empire comprised the overseas colonies, protectorates and mandate territories that came under French rule from the 16th century onward. A distinction is generally made between the “First French Colonial Empire”, that existed until 1814, by which time most of it had been lost or sold, and the “Second French Colonial Empire”, which began with the conquest of Algiers in 1830. At its apex between the two world wars, the second French colonial empire was the second-largest colonial empire in the world behind the British Empire.
The Eighty Years’ War or Dutch Revolt was an armed conflict in the Habsburg Netherlands between disparate groups of rebels and the Spanish government. The causes of the war included the Reformation, centralisation, taxation, and the rights and privileges of the nobility and cities. It led to the establishment of the Protestant-dominated Dutch Republic in 1588. In the Ten Years thereafter, the Republic (whose heartland was no longer threatened) made remarkable conquests in the north and east against a struggling Spanish Empire, and received diplomatic recognition from France and England in 1596. The Dutch colonial empire emerged, which began with Dutch attacks on Portugal’s overseas territories.
The British Empire was composed of the dominions, colonies, protectorates, mandates, and other territories ruled or administered by the United Kingdom and its predecessor states. It began with the overseas possessions and trading posts established by England between the late 16th and early 18th centuries. At its height it was the largest empire in history and, for over a century, was the foremost global power. By 1913, the British Empire held sway over 412 million people, 23 percent of the world population at the time, and by 1920, it covered 13.7 million sq miles, 24 per cent of the Earth’s total land area. As a result, its constitutional, legal, linguistic, and cultural legacy is widespread. At the peak of its power, it was described as “the empire on which the sun never sets”, as the Sun was always shining on at least one of its territories.
The Thirty Years’ War was one of the longest and most destructive conflicts in European history, lasting from 1618 to 1648. Fought primarily in Central Europe, an estimated 4.5 to 8 million soldiers and civilians died as a result of battle, famine, and disease, while some areas of what is now modern Germany experienced population declines of over 50%.
The Dutch Empire or the Dutch colonial empire comprised the overseas territories and trading posts controlled and administered by Dutch chartered companies—mainly the Dutch West India Company and the Dutch East India Company—and subsequently by the Dutch Republic (1581–1795), and by the modern Kingdom of the Netherlands after 1815. It was initially a trade-based system which derived most of its influence from merchant enterprise and from Dutch control of international maritime shipping routes through strategically placed outposts, rather than from expansive territorial ventures. The Dutch were among the earliest empire-builders of Europe, following Spain and Portugal.
This was a major war of the American Revolution. Widely considered as the war that secured the independence of the United States, fighting began on April 19, 1775, followed by the Lee Resolution on July 2, 1776, and the Declaration of Independence on July 4, 1776. The American Patriots were supported by the Kingdom of France and, to a lesser extent, the Dutch Republic and the Spanish Empire, in a conflict taking place in North America, the Caribbean, and the Atlantic Ocean.
The Qing dynasty, which lasted from 1644 until 1912, was the last imperial dynasty of China. Its conquest of the Ming (1618–1683) cost 25 million lives and the economy of China shrank drastically. After the Southern Ming ended, the further conquest of the Dzungar Khanate added Mongolia, Tibet and Xinjiang to the empire.[82] The centralized autocracy was strengthened to suppress anti-Qing sentiment with the policy of valuing agriculture and restraining commerce, the Haijin (“sea ban”), and ideological control as represented by the literary inquisition, causing social and technological stagnation.
The Anglo-Spanish War (1585–1604) was an intermittent conflict between the Habsburg Kingdom of Spain and the Kingdom of England. It was never formally declared. The war included much English privateering against Spanish ships, and several widely separated battles. It began with England’s military expedition in 1585 to what was then the Spanish Netherlands under the command of the Earl of Leicester, in support of the Dutch rebellion against Spanish Habsburg rule.
The French Revolution was a period of radical political and societal change in France that began with the Estates General of 1789 and ended with the formation of the French Consulate in November 1799. Many of its ideas are considered fundamental principles of liberal democracy, while phrases like liberté, égalité, fraternité reappeared in other revolts, such as the 1917 Russian Revolution, and inspired campaigns for the abolition of slavery and universal suffrage. The values and institutions it created dominate French politics to this day.
The Napoleonic Wars (1803–1815) were a series of major global conflicts pitting the French Empire and its allies, led by Napoleon I, against a fluctuating array of European states formed into various coalitions. It produced a period of French domination over most of continental Europe. The wars stemmed from the unresolved disputes associated with the French Revolution and the French Revolutionary Wars consisting of the War of the First Coalition (1792–1797) and the War of the Second Coalition (1798–1802). The Napoleonic Wars are often described as five conflicts, each termed after the coalition that fought Napoleon: the Third Coalition (1803–1806), the Fourth (1806–1807), the Fifth (1809), the Sixth (1813–1814), and the Seventh (1815) plus the Peninsular War (1807–1814) and the French invasion of Russia (1812).
The Spanish-American wars of independence were numerous wars in Spanish America with the aim of political independence from Spanish rule during the early 19th century. These began shortly after the start of the French invasion of Spain during the Napoleonic Wars. Thus, the strict period of military campaigns would go from the battle of Chacaltaya (1809), in present-day Bolivia, to the battle of Tampico (1829), in Mexico.
The Mexican–American War was an armed conflict between the United States and Mexico from 1846 to 1848. It followed the 1845 American annexation of Texas, which Mexico still considered its territory. Mexico refused to recognize the Velasco treaty, because it was signed by President Antonio López de Santa Anna while he was captured by the Texan Army during the 1836 Texas Revolution. The Republic of Texas was de facto an independent country, but most of its Anglo-American citizens wanted to be annexed by the United States.
In the 1844 United States presidential election, Democrat James K. Polk was elected on a platform of expanding U.S. territory to Oregon, California (also a Mexican territory) and Texas; by any means, with the 1845 annexation of Texas furthering that goal. In the end, Mexico recognized the cession of present-day California, Nevada and Utah as well as parts of present-day Arizona, Colorado, New Mexico and Wyoming.
The American Civil War was fought between the Union (“the North”) and the Confederacy (“the South”), the latter formed by states that had seceded. The central cause of the war was the dispute over whether slavery would be permitted to expand into the western territories, leading to more slave states, or be prevented from doing so, which was widely believed would place slavery on a course of ultimate extinction.
Decades of political controversy over slavery were brought to a head by the victory in the 1860 U.S. presidential election of Abraham Lincoln, who opposed slavery’s expansion into the western territories. An initial seven southern slave states responded to Lincoln’s victory by seceding from the United States and, in February 1861, forming the Confederacy. Four years of intense combat, mostly in the South, ensued.
The abolition of slavery became a war goal on January 1, 1863, when Lincoln issued the Emancipation Proclamation, which declared all slaves in states in rebellion to be free, applying to more than 3.5 million of the 4 million enslaved people in the country. By the end of the war, much of the South’s infrastructure was destroyed, especially its railroads. The Confederacy collapsed, slavery was abolished, and four million enslaved black people were freed. The war-torn nation then entered the Reconstruction era in an attempt to rebuild the country, bring the former Confederate states back into the United States, and grant civil rights to freed slaves.
The Franco-Prussian War or Franco-German War was a conflict between the Second French Empire and the North German Confederation led by the Kingdom of Prussia. The conflict was caused primarily by France’s determination to reassert its dominant position in continental Europe, which appeared in question following the decisive Prussian victory over Austria in 1866. In the waning days of the war, with German victory all but assured, the German states proclaimed their union as the German Empire under the Prussian king Wilhelm I and Chancellor Bismarck. With the notable exception of Austria, the vast majority of Germans were united under a nation-state for the first time. The war had a lasting impact on Europe. By hastening German unification, the war significantly altered the balance of power on the continent; with the new German nation state supplanting France as the dominant European land power
World War I (WWI) was one of the deadliest global conflicts in history. Belligerents included much of Europe, the Russian Empire, the United States, and the Ottoman Empire, with fighting occurring throughout Europe, the Middle East, Africa, the Pacific, and parts of Asia. An estimated 9 million soldiers were killed in combat, plus another 23 million wounded, while 5 million civilians died as a result of military action, hunger, and disease. Millions more died in genocides within the Ottoman Empire and in the 1918 influenza pandemic, which was exacerbated by the movement of combatants during the war.
In November 1914, the Ottoman Empire, Germany, and Austria-Hungary formed the Central Powers, and on 26 April 1915, Italy joined Britain, France, Russia, and Serbia as the Allies.
Towards the end of 1918, the Central Powers began to collapse; Bulgaria signed an armistice on 29 September, followed by the Ottomans on 31 October, then Austria-Hungary on 3 November. Isolated, facing the German Revolution at home and a military on the verge of mutiny, Kaiser Wilhelm II abdicated on 9 November, and the new German government signed the Armistice of 11 November 1918, bringing the conflict to a close. The Paris Peace Conference of 1919–1920 imposed various settlements on the defeated powers, with the best-known of these being the Treaty of Versailles. The dissolution of the Russian Empire in 1917, the German Empire in 1918, the Austria-Hungarian Empire in 1920, and the Ottoman Empire in 1922, led to numerous uprisings and the creation of independent states, including Poland, Czechoslovakia, and Yugoslavia. For reasons that are still debated, failure to manage the instability that resulted from this upheaval during the interwar period ended with the outbreak of World War II in September 1939.
The Russian Revolution was a period of political and social revolution that took place in the former Russian Empire which began during the First World War. This period saw Russia abolish its monarchy and adopt a socialist form of government following two successive revolutions and a bloody civil war.
This first revolt focused in and around the then-capital Petrograd (now Saint Petersburg). After major military losses during the war, the Russian Army had begun to mutiny. Army leaders and high-ranking officials were convinced that if Tsar Nicholas II abdicated, the domestic unrest would subside. Nicholas agreed and stepped down, ushering in a new government led by the Russian Duma (parliament) which became the Russian Provisional Government. This government was dominated by the interests of prominent capitalists, as well as the Russian nobility and aristocracy.
In response to these developments, grassroots community assemblies (called Soviets) were formed. These Soviets were led by soldiers and urban industrial proletarians, as well as rural farmers. The Soviets held the allegiance of the working-class, as well as the growing urban middle-class.
Many socialist and other leftist political organizations were engaged in daily struggle and vied for influence within the Provisional Government and the Soviets. Notable factions include the Social-Democrats, Mensheviks, Social Revolutionaries, and the Anarchists. These organizations competed with the Bolsheviks (“Ones of the Majority”), a far-left party led by Vladimir Lenin, for political power and popular influence.
The volatile situation in Russia reached its climax with the October Revolution, which was a Bolshevik armed insurrection by workers and soldiers in Petrograd that successfully overthrew the Provisional Government, transferring all its authority to the Bolsheviks. Under pressure from German military offensives, the Bolsheviks soon relocated the national capital to Moscow. The Bolsheviks which by now had secured a strong base of support within the Soviets and, as the supreme governing party, established their own government, the Russian Soviet Federative Socialist Republic (RSFSR). The RSFSR began the process of reorganizing the former empire into the world’s first socialist state. To further secure the new state, the Bolsheviks established the Cheka, a secret police that functioned as a revolutionary security service to weed out, execute, or punish those considered to be “enemies of the people” in campaigns called the red terror, consciously modeled on those of the French Revolution.
Russia erupted into a bloody civil war, which pitted the “Reds” (Red Army) (Bolsheviks) against its enemies collectively called the White Army. The RSFSR began establishing Soviet power in the newly independent republics that seceded from the Russian Empire. The RSFSR initially focused its efforts on the newly independent republics of Armenia, Azerbaijan, Belarus, Georgia, and Ukraine. The RSFSR began unifying these nations under one flag and created the Union of Soviet Socialist Republics (USSR). In 1923 the Russian Civil War concluded with the defeat of the White Army. The victorious Bolshevik Party reconstituted itself into the Communist Party of the Soviet Union and would remain in power for over six decades.
The Spanish Civil War was a civil war in Spain between the Republicans and the Nationalists. Republicans were loyal to the left-leaning Popular Front government of the Second Spanish Republic, and consisted of various socialist, communist, separatist, anarchist, and republican parties, some of which had opposed the government in the pre-war period. The opposing Nationalists were an alliance of Falangists, monarchists, conservatives, and traditionalists led by a military junta. Nationalists won the war, which ended in early 1939, and ruled Spain until Franco’s death in November 1975.
World War II involved the vast majority of the world’s countries—including all of the great powers—forming two opposing military alliances: the Allies and the Axis powers. World War II was a total war that directly involved more than 100 million personnel from more than 30 countries.
The major participants in the war threw their entire economic, industrial, and scientific capabilities behind the war effort, blurring the distinction between civilian and military resources. Aircraft played a major role in the conflict, enabling the strategic bombing of population centers and deploying the only two nuclear weapons ever used in war.
World War II was by far the deadliest conflict in human history; it resulted in 70 to 85 million fatalities, mostly among civilians. Tens of millions died due to genocides (including the Holocaust), starvation, massacres, and disease. In the wake of the Axis defeat, Germany and Japan were occupied, and war crimes tribunals were conducted against German and Japanese leaders.
The Cold War is a term commonly used to refer to a period of geopolitical tension between the United States and the Soviet Union and their respective allies, the Western Bloc and the Eastern Bloc. The term cold war is used because there was no large-scale fighting directly between the two superpowers, but they each supported major regional conflicts known as proxy wars. The conflict was based around the ideological and geopolitical struggle for global influence by these two superpowers, following their temporary alliance and victory against Nazi Germany and Imperial Japan in 1945. Aside from the nuclear arsenal development and conventional military deployment, the struggle for dominance was expressed via indirect means such as psychological warfare, propaganda campaigns, espionage, far-reaching embargoes, rivalry at sports events, and technological competitions such as the Space Race.
The Western Bloc was led by the United States as well as a number of other First World nations that were generally liberal democratic but tied to a network of authoritarian states, most of which were their former colonies. The Eastern Bloc was led by the Soviet Union and its Communist Party, which had an influence across the Second World and was also tied to a network of authoritarian states. The US government supported anti-communist and right-wing governments and uprisings across the world, while the Soviet government funded left-wing parties and revolutions around the w
The decolonization of Africa was a process that took place in the mid-to-late 1950s to 1975 during the Cold War, with radical government changes on the continent as colonial governments made the transition to independent states. The process was often marred with violence, political turmoil, widespread unrest, and organized revolts in both northern and sub-Saharan countries including the Algerian War in French Algeria, the Angolan War of Independence in Portuguese Angola, the Congo Crisis in the Belgian Congo, the Mau Mau Uprising in British Kenya, the Zanzibar Revolution in the Sultanate of Zanzibar, and the Nigerian Civil War in the secessionist state of Biafra.
The Arab–Israeli conflict is an ongoing intercommunal phenomenon involving political tension, military conflicts, and other disputes between Arab countries and Israel, which escalated during the 20th century, but had mostly faded out by the early 21st century.
Part of the Palestine–Israel conflict arose from the conflicting claims by these movements to the land that formed the British Mandatory Palestine, which was regarded by the Jewish people as their ancestral homeland, while at the same time it was regarded by the Pan-Arab movement as historically and currently belonging to the Arab Palestinians, and in the Pan-Islamic context, as Muslim lands. The sectarian conflict within the British Mandate territory between Palestinian Jews and Arabs escalated into a full-scale Palestinian civil war in 1947. Taking the side of the Palestinian Arabs, especially following the Israeli Declaration of Independence, the neighbouring Arab countries invaded the by-then former Mandate territory in May 1948, commencing the First Arab–Israeli War.
The Partition of British India in 1947 was the change of political borders and the division of other assets that accompanied the dissolution of the British Raj in South Asia and the creation of two independent dominions: India and Pakistan.[1][2] The Dominion of India is today the Republic of India, and the Dominion of Pakistan—which at the time comprised two regions lying on either side of India—is now the Islamic Republic of Pakistan and the People’s Republic of Bangladesh. The partition was outlined in the Indian Independence Act 1947. The change of political borders notably included the division of two provinces of British India,[a] Bengal and Punjab.[3] The majority Muslim districts in these provinces were awarded to Pakistan and the majority non-Muslim to India.
The Chinese monarchy collapsed in 1912 with the Xinhai Revolution, when the Republic of China (ROC) replaced the Qing dynasty. In its early years as a republic, the country underwent a period of instability known as the Warlord Era before mostly reunifying in 1928 under a Nationalist government. A civil war between the nationalist Kuomintang (KMT) and the Chinese Communist Party (CCP) began in 1927. Japan invaded China in 1937, starting the Second Sino-Japanese War and temporarily halting the civil war. The surrender and expulsion of Japanese forces from China in 1945 left a power vacuum in the country, which led to renewed fighting between the CCP and the Kuomintang. The civil war ended in 1949 with the division of Chinese territory; the CCP established the People’s Republic of China on the mainland while the Kuomintang-led ROC government retreated to the island of Taiwan. Both claim to be the sole legitimate government of China, although the United Nations has recognized the PRC as the sole representation since 1971. From 1959 to 1961, the PRC implemented an economic and social campaign called the Great Leap Forward, that resulted in a sharp economic decline and an estimated 15 to 55 million deaths, mostly through man-made famine. From 1966 to 1976, the turbulent period of political and social chaos within China known as the Cultural Revolution led to greater economic and educational decline, with millions being purged or subjected to either persecution or politicide based on political categories. Since then, the Chinese government has rebuked some of the earlier Maoist policies, conducting a series of political and economic reforms since 1978, which has greatly raised Chinese standards of living, and increased life expectancies.
Map of the World from 3000 BCE to 2013 CE
To view details within a map, click “View 4K map” to open the map at full size (3840 x 2160 px), preferably on a large, maybe 32″, 4K monitor.
Having a website without a reporting tool like Google Analytics (GA) is like flying blind. The data available is very useful, if not critical, in making business decisions. Yet, it surprises me how many people continue to make website changes based on pure assumption and without considering user behavior and traffic data at all.
Before looking at various reports, it’s important to understand some background information.
Terminology
Pageviews: # of times a page was viewed, including by the same visitor.
Unique Pageviews: # of times a page was viewed by unique visitor sessions
Avg Time on Page: The higher the avg time on page, the more the user is engaged with the content. If pageviews is high but avg time on page is low, then people probably aren’t finding what they are looking for.
Bounce Rate: A “bounce” is when someone lands on qualys.com from an external source and leaves without clicking on any internal links. They see only one page. Lower bounce rates are better, but a high bounce rate may be reasonable, depending on intent and context. For example, blogs tend to have higher bounce rates (70-90%)[1] than e-commerce/retail websites (20-45%)[2] because people read an article and leave whereas on retail sites, they tend to browse multiple product pages while shopping.
When interpreting data, it’s important to understand visitor intent.
Informational: people intend to find an answer to a specific question or general information. If a blog post has a high bounce rate but high avg time on page, that is to be expected because people come for information and nothing more.
Commercial: people intend to investigate brands or services. If people visit Qualys product pages, spend time reading the page, but bounce instead of sign up for a trial, that is reasonable if they are still investigating/comparing brands/products.
Transactional: people intend complete an action or purchase.
Navigational: people intend to find a specific site or page. If people come to the Qualys home page and the avg time on page is < 10 secs, that is to be expected if they know they are looking for a specific product page.
Channels (Traffic Source)
When interpreting data, it’s important to know where traffic came from.
Direct: Source is unknown or visitor typed the URL directly in a browser
Organic Search: Source is from non-paid search engine results, e.g. Google
Paid Search: Source is from paid search engine ads, e.g. Google CPC
Social: Source is a social network, e.g. LinkedIn, Facebook, etc
Paid Social: Source is from paid ads on a social network, e.g. LinkedIn, Facebook, etc
Email: Source is an email
Affiliates: Source is an affiliate/partner
Referral: The visitor came from some other website
Display: Source came from ad distribution network, e.g. banner ads on some websites
Q: How do I know if people are finding a particular page?
A: If the page has many unique pageviews, then many people are finding it.
Q: How do I know if people are engaged in consuming the content of a particular page?
A: If the avg time on page is high, then we can assume people are engaged in it (reading, watching videos, etc).
Q: How do I know where people are finding a particular page?
A: Look at the page’s source / medium, e.g. Google / organic, Email, Social, etc
Q: How do I know what people are clicking on on a particular page?
A: Look at the page’s next page path (page flow).
Q: One of my pages is long. The avg time on page is high but how do I know people are scrolling down to see the whole page?
A: Look at the page’s scroll depth. It will tell how what percentage of visitors see 25%, 50%, 75% and 100% of the page.
Now, let’s look at some reports in Google Analytics that are interesting and useful and that can be used to make data-driven decisions about website changes.
Audience > Geo > Language
Knowing what language your users speak can help you make a decision on which languages you should have your website in. GA gets language data from a user’s browser which are in specific language-country codes. en-US is English-US, en-gb is English-Great Britain, en-ca is English-Canada, and so on. In the screenshot below, we see that most users have their browser language set to some variant of English, but some (1.05%) have it set to zh-cn (Chinese-People’s Republic of China), de-de (German-Germany), and fr-fr (French-France).
Audience > Geo > Country
Google Analytics tracks user location based on their IP address. It’s always interesting to see where your website visitors are viewing your site from. In the screenshot below, almost 8% of website visitors are in India yet, compared to the language report above, hi-IN (Hindi-India) wasn’t in the list. I guess people in India set their browser language to English (en).
Audience > Behavior > New vs Returning
This report compares how many visitors are new versus returning. If many people are returning visitors to your website, then the website must have a lot of interesting content that makes them want to keep returning.
Audience > Behavior > Frequency & Recency
Frequency
If you click the “Count of Sessions” distribution, you will see how frequent the same individual visits your site in a given time period. For example, in the report below, 720 people visited the website 3 times (e.g. once a week over 3 weeks).
If you click the “Days Since Last Session” distribution, you will see how long it’s been since your visitors last came to your site in a given time period. For example, in the report below, it has been 2 days since 223 people last visited the website.
Recency
Audience > Behavior > Engagement
Session Duration Bucket
This report tells you how many visitor sessions are within a particular duration. For example, in the report below, there were 1204 visitor sessions that lasted between 601 and 800 seconds.
Page Depth
This report tells you the number of sessions where the page depth (number of pages visited) was 1, 2, etc. In the report below, there were 678 sessions where the visitors visited 3 pages during their session.
Audience > Technology > Browser & OS
Browser
In this report, you can see what percentage of users use a particular browser. In the report below, more than 50% of users use Chrome. So, if your website has a feature that is broken in Chrome, you should fix it. We also see that 0.58% of visitors use the Opera browser. So, if your website doesn’t work in Opera, who cares. Well, 0.58% of your visitors might care but so what.
Operating System
In this report, you can see what percentage of your visitors use a particular operating system. In the report below, the majority of visitors (30.41%) visit the website on iOS.
Screen Resolution
In this report, you can see what percentage of your visitors view your website at a particular screen resolution. In the report below, we see that 10.88% of people view the website on desktop at a resolution of 1920×1080. Many others view the site at screen widths below 500px. This means they are probably viewing the site on their phones. Notice how the smallest screen resolution is 360×800. In this case, you would want to ensure the mobile version of your site looks good at a width of 360 px.
Audience > Mobile > Overview
Device Category
In this report, we can see what percentage of people are visiting your site on mobile, desktop and tablet. In the report below, very few people (1.63%) view the site on tablet so ensuring the site looks good on tablet isn’t particularly important. However, the majority of visitors visit the site on mobile so it’s important to ensure the site looks good on mobile.
Audience > Mobile > Devices
In this report, we can see what percentage of people visit your site on a particular device (iPhone, iPad, etc). In the report below, more than 50% of the website visitors visit the site on mobile using an Apple iPhone.
Audience > Users Flow
In this report, you can see how people flow through your site. The first column is the primary dimension. In the report below, the primary dimension is “Country”.
Of the 17K sessions from the US, 1.6K land (start) on the home page, and from there, they go to some other pages shown in the 1st Interaction column.
If we click another band, we can see that of the 17K visitors from the US, 1.7K land (start) on the blog post about grilling corn using a Ninja Foodi grill.
You can also change the primary dimension to something else like “Landing Page”.
Acquisition > All Traffic > Channels
In this report, we can see what percentage of users visit the site from different channels (organic search, direct, social, etc). In the report below, 77.24% of visitors find the site from organic search, e.g. searching from Google.
If you click “Organic Search”, you’ll see another report like the one below. The default primary dimension is keyword. Almost all of the keywords used to find the site in a search engine have value of “(not provided)” or “(not set)”. Obviously, this is incorrect because people must have searched for something to find the site in Google. The reason why it says “not provided” or “not set” is because Google decided to hide this keyword data to protect users’ privacy.
If you click on the “Source” primary dimension, you can compare visits by search engine. In the report below, clearly, the majority of visitors found the site from Google.
Acquisition > All Traffic > Source/Medium
Sometimes, it’s more helpful to see how people are finding your website by a combination of source and medium as shown in the screenshot below.
Behavior > Behavior Flow
This report is similar to the Users Flow report mentioned above. You can see how people flow / traverse through your website as they click from one page to another.
Behavior > Site Content >All Pages
When the primary dimension is set to “Page” (default), in this report you can see traffic and behavior by page, e.g. how many pageviews, unique pageviews, average time on page, entrances, bounce rate, and % exit a particular page got. This report clearly tells you your most visited pages.
Secondary Dimension
The secondary dimension option allows you to see reports in other ways. This is extremely useful. For example, let’s say you have a registration page and you want to promote it by linking to it from many places, both internally on the same website, e.g. on your home page or a product page, and externally on other websites.
Internal referrals
To find which pages on your website are generating traffic directly to a particular page on your website, first, type part of the page URL in the filter field and click the search button. This will filter out all other pages and only show the specific page you are interested in
Then, in the secondary dimension dropdown, choose Behavior > Previous Page Path.
Now, in the resulting report (below), we can see that for the specific page we’re interested in, we find that 88% of people landing on that page (entered it from some other website like from Google search results). 0.6% got to that page from the home page and another 0.18% got to it from the About page.
External referrals
To find how people got to that page from an external source, change the secondary dimension to Acquisition > Source / Medium.
Now we see that 76% came from Google organic search results and 20% directly, e.g. they typed the URL in from somewhere or clicked a link in an email.
Next Page Path
What if we want to know what pages people are getting to from, say, the home page? If we change the filter to just “/” (the home page) and set the secondary dimension to “Next page path”, we see the following report.
The report above looks wrong because it says that 100% of visitors went from the home page to the home page (next page). To find out the correct next pages, click the Navigation Summary tab.
Now we can see what pages people came from before hitting the home page and what pages people went to after hitting the home page.
There are many other secondary dimensions so it’s worth spending time browsing the different types of reports you can get from other dimensions. For example, you can see how many people visited a specific page by country.
Behavior > Site Content >Content Drilldown
In this report, you can see pageviews (and other data) by folder structure (URL structure). For example, in the report below, there were 21,503 pageviews of pages in the 2019 folder (blog posts published in 2019).
If you click a folder like /2019/, you can drill down to subfolders. In the report below, the subfolders are numbers indicating months. For example, in the report below, there were 18,267 pageviews to pages in /2019/09/.
Behavior > Site Content >Landing Pages
This report is similar to the one under Behavior > Site Content > All Pages, but this one is specifically for landing pages, i.e., the pages through which visitors entered your site. You can think of “landing pages” as “entrance pages”.
Behavior > Site Content >Exit Pages
Opposite of landing pages is exit pages, i.e. pages from which people exited your site.
Behavior > Site Speed > Overview
In this report, you can see how fast your website loads on average by browser, country, and page. Of course, you want your website to load as fast as possible. In the report below, we see that the average page load time is 5.78 seconds. Interestingly, the average page load time in Chrome is much higher (7.15 sec) compared to Safari (3.33 sec).
If we look at the average page load time by country, we see that the website loads the fastest (1.53 sec) from Slovenia for some reason.
Behavior > Site Speed > Page Timings
In this report, we can compare the average page load time of individual pages against the site average page load speed. This is helpful to find specific pages that aren’t performing well, e.g. the one with the red bar in the screenshot below.
Behavior > Events > Top Events > Scroll
If you’ve added an event category of “Scroll”, you can see what percentage of people scrolled 25%, 50%, 75% and 100% down a page. In the example below, 46% of people only saw the top 25% of the home page and only 7% of people scrolled all the way to the bottom.
One of my properties is in an HOA. Though many people dislike HOAs and having to pay a monthly HOA fee, one huge benefit of being in an HOA is you never have to deal with unsightly views from the street. If someone violates the CC&Rs, they are fined and forced to stop. This improves everyone’s curb appeal including the neighborhood as a whole. For me, and many others, that’s valuable. But, my other properties are not in an HOA. And, unfortunately, people have very different ideas of what looks good. One neighbor put down pavers himself but was either lazy or didn’t know how to do it right. As a result, the pavers are uneven and weeds are growing everywhere. Another neighbor beheaded their tree leaving a 5′-tall trunk in the middle of their front yard surrounded by probably one of the cheapest rocks you can find – gray gravel. This is bad, but it’s nothing compared to another property of mine where one immediate neighbor is a mechanic who works on cars in his driveway almost 24/7. The neighboring property is a triplex owned by a slumlord who doesn’t appear to care one bit that her ghetto tenants are destroying her property as long as she collects the very low rent that she can get. Their lawn is destroyed because sometimes they park their cars on it. Their garbage bins are always overflowing and are a fly magnet. And if that’s not enough, the other immediate neighbor covered their lawn that meets my property line with concrete and illegally parks a beat-up pickup truck on it. They also leave a grill, used car parts, engine oil, and various other garbage along their side of the property line. As a result, no matter how much I improve my property, being sandwiched between two ugly neighbors significantly ruins my property’s curb appeal. Reporting code violations to the City is useless as they never do anything. Putting up a fence helps but the municipal code limits how tall they can be. Fortunately, there is no height limit on trees as there are 2 and even 3-story-tall trees in nearby front yards. So, one solution I decided on to block the unsightly neighbors is by creating a fence made up of Cypress trees. These trees are super low maintenance, evergreen, the leaves don’t fall and create a mess that you have to clean up all the time, and they grow in a very predictable manner (straight up) so you don’t need to worry about stray branches hitting your eaves or roof.
I bought the 5-gallon trees from a nearby nursery for $75 each. In Spring, you can get them at Costco for $40. You can rent a flatbed pickup truck from the Home Depot for $19 for 75 minutes. These trucks are ideal because you can lower the tailgate and the sides as well, making the loading and unloading of trees, or anything for that matter, much easier.
Along the east-facing fence, I had to dig holes in a section where there was no concrete. Digging holes is a PITA for sure. But, using the right tools like a gas-powered auger makes it less of a PITA. In the photo below, I made a square hole by making 4 small holes at each corner using the auger, then another hole in the middle, and then removed the remaining dirt.
Along the west-facing fence, I had previously poured concrete so I had to cut squares in it for the trees to go in. After backfilling with dirt, I covered the dirt with cement board to be used as weed fabric (regular weed fabric is useless), and then poured a layer of ginger rock.
Here’s how the west side looks. The fence boards are red-stained and cost about $3 each from Home Depot. I ran a 1/2″-diameter tube from the back of the building for irrigation. Connected to that tube are smaller tubes for drip irrigation directly at the root of each tree. The photo below is from before the concrete was pressure washed.
Here’s how the east side looks. You can still see the junk cars next door but after these trees grow tall and thick, my tenants will be shielded from the unsightly views next door and the curb appeal will continue to improve and there will be a clear delineation between my property and the neighboring ugliness.
I continued the fence/tree design alone much of the east side to block as much of the neighbors as possible.
Within 5 years, the trees will be as tall as the 2-story buildings and have a much wider diameter.
So there you have it. One way to block trashy neighbors while not violating most municipal codes.
This post will compare various aspects of a 2019 Toyota Prius Prime to a Tesla Model 3 in California. It assumes the buyer has a credit score of 870 and can get financing for 72 months (6 years) at 4.6%.
2019 Toyota Prius Plus Hatchback 4D2019 Telsa Standard Range Plus Sedan 4D
TL;DR:
The total purchase price including interest for the Tesla is $16,875 more than for the Prius.
For insurance, the Tesla will cost about $50 to $100 more per month than the Prius.
The Tesla can only go 220 miles before needing to be recharged whereas the Prius can go 640 miles on one full battery and small 11.4-gallon tank of gas.
The EV tax credit situation has changed since this post was originally published.
Vehicle
Oct 2022
Oct 2023
Tesla Model 3
No tax credit
$7500
Tesla Model Y
No tax credit
$7500
Prius Prime
No tax credit
No tax credit
MSRP
EV prices have changed since this post was originally published.
Vehicle
Oct 2022
Oct 2023
Tesla Model 3
$45,416 (cheapest)
$39K – $51K
Tesla Model Y
$65K – $68K
$44K – $52,500
Prius Prime
~$35,000
$32,350 – $39,170
Here’s a cost comparison of the Prius Prime top trim to the Tesla Model Y Performance trim in Oct 2022 and 2023. The loan assumption is 6 years at 4.6%.
Prius Prime
Tesla Model Y
Purchase Price
$35,000
$68,000
Tax (11%)
$3,850
$7,480
Extended Warranty
$2,000
$2,000
Down Payment
$10,000
$10,000
Financing Monthly Payment
~$400
~$920
Total Loan Cost
~$4,000
~$8,500
Total Cost with Interest
~$45,000
~$84,000
In Oct 2023, a Tesla Model Y Performance would have a total cost of approximately $39K more than the Prius Prime XLE. The loan assumption is 6 years at 6.5%.
Now, let’s compare the costs today in October 2023.
Prius Prime
Tesla Model Y
Purchase Price
$39,170
$52,500
Tax (11%)
$4,308
$5,775
Down Payment
$10,000
$10,000
Financing Monthly Payment
$490
$714
Total Loan Cost
$6,134
$8,938
Tax Credit
$0
$7500
Total Cost with Interest Minux Tax Credit
~$49,612
~$59,713
So, after the $7500 tax credit, the Tesla Model Y would cost approximately $10K more than the Prius Prime XLE.
Concrete in your home is everywhere. From your driveway, garage floor, patio, porch, and backyard, everyone has concrete. Unfortunately, concrete is porous and can easily get dirty. Oil, dirt, and stains from all sorts of things can permeate and discolor concrete seemingly permanently. Pressure washing concrete with a high-pressure washer won’t even remove the discoloration. To protect your concrete from stains, you’ll need to seal it. If your concrete is already ugly or if you want to change the way it looks, you’ll need to apply a coating on it, e.g. epoxy. But, in order for any coating to adhere and not peel off, you’ll need to prepare (prep) the surface very well. This is the most important step when renovating concrete. Do it right, and you’ll vastly improve and transform the look of your concrete and your home. Here’s an example before and after picture of a garage floor I renovated.
This is not the step where you want to be lackadaisical. Following are different ways you can prep your concrete surfaces.
Acid
You can pour acid on bare concrete and scrub it around. However, the chemicals are toxic, smelly, and harmful.
Floor Polisher with Diamabrush Concrete Prep Attachment
The concrete prep attachment is for etching bare concrete floors to prepare for adhesive coatings. This option is much better than using acid, IMHO. But, it’s a bit more expensive. I think I rented it for $140 for 4 hours from the Home Depot. It’s a bit tiring to use because the polisher likes to move in one direction so you need to force it to go in the other direction.
Floor polisherDiamabrush concrete prep attachment
Make sure you choose the concrete prep attachment and not the coating removal attachment picture below. Both look similar but the latter is for removal of mastics, glue, adhesives, thinset epoxies and paint from interior concrete.
Diamabrush coating removal attachment
Angle Grinder with Concrete Grinder Attachment and Dush Shroud
Another option is to grind the concrete down. This, however, requires getting down on the ground and can take a long time. You’ll also need to use a shopvac to suction the dust as this will product a ton of dust. Concrete dust is harmful because it contains silica which can mess with your lungs. If you have a small area to grind or if you need to grind edges, this tool is handy.
Walk-Behind Concrete Grinder
This commercial-grade concrete grinder can be rented at the Home Depot. It grinds down concrete high spots, removes sealers and thin mil paints, removes mastics and preps floors to accept new coatings.
This tool can be rented from Sunbelt Rentals for $270 / day. This tool works by blasting media (shot) at the concrete to scour the surface. This is one of the best ways to prepare concrete. However, what’s annoying about it is you have to periodically pick up the shot media that escapes the tool.


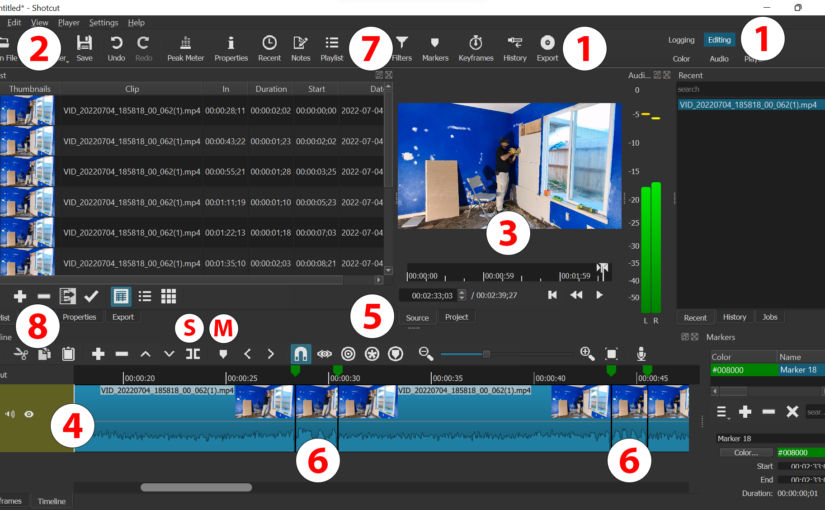
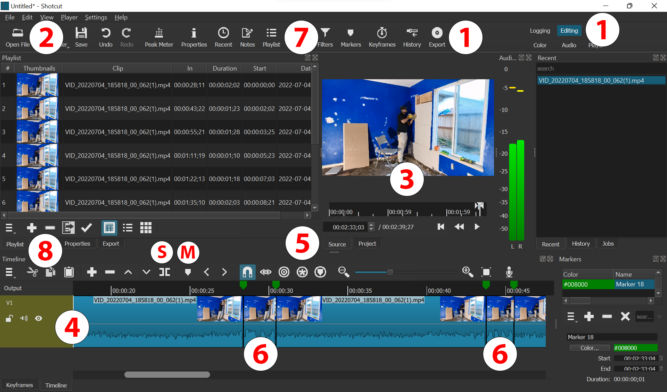
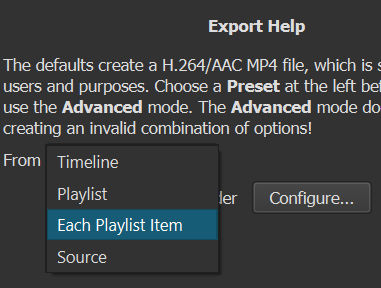
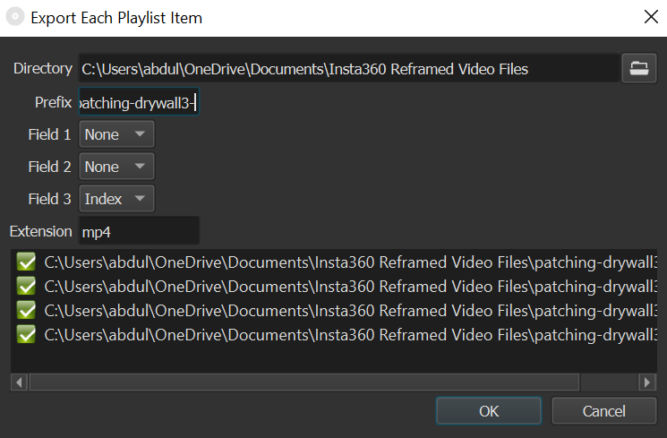


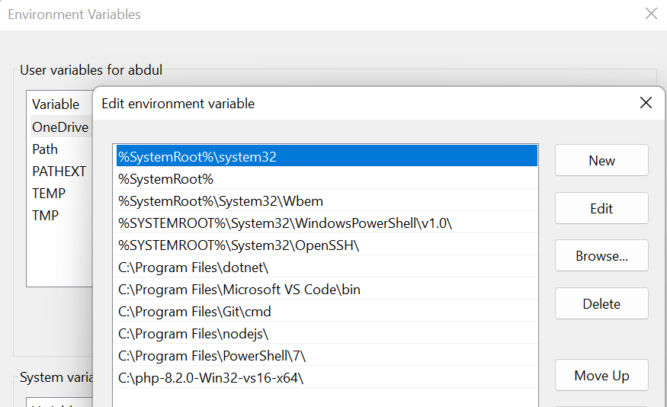
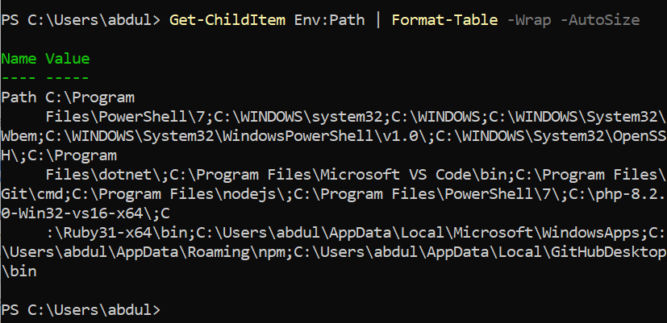


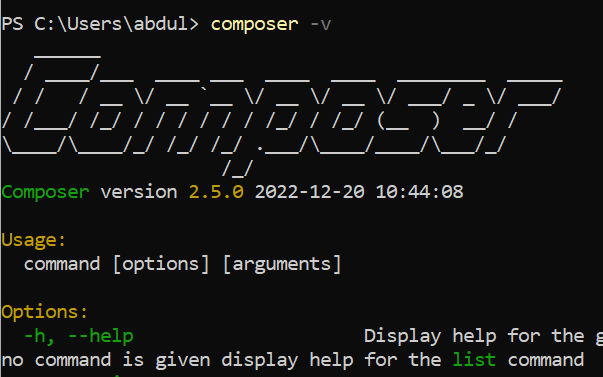

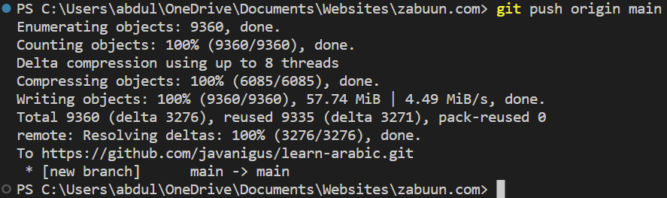
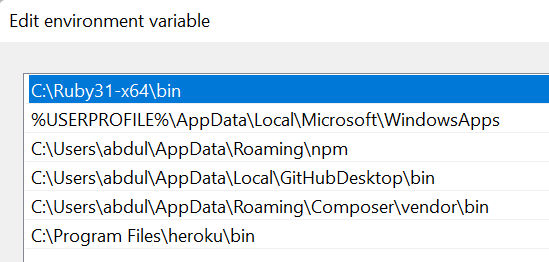


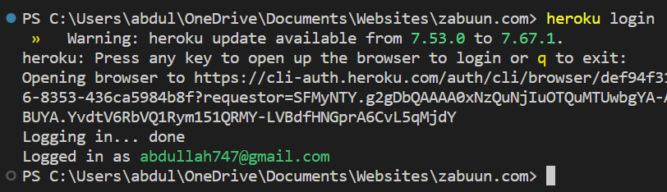


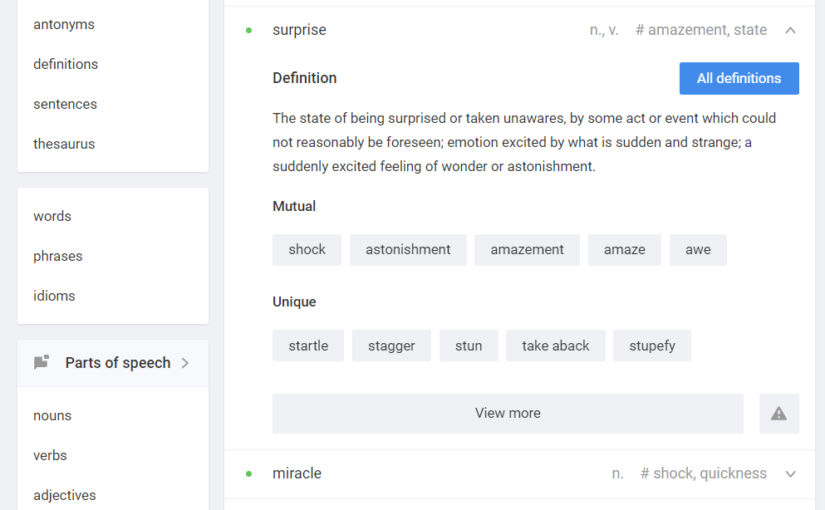
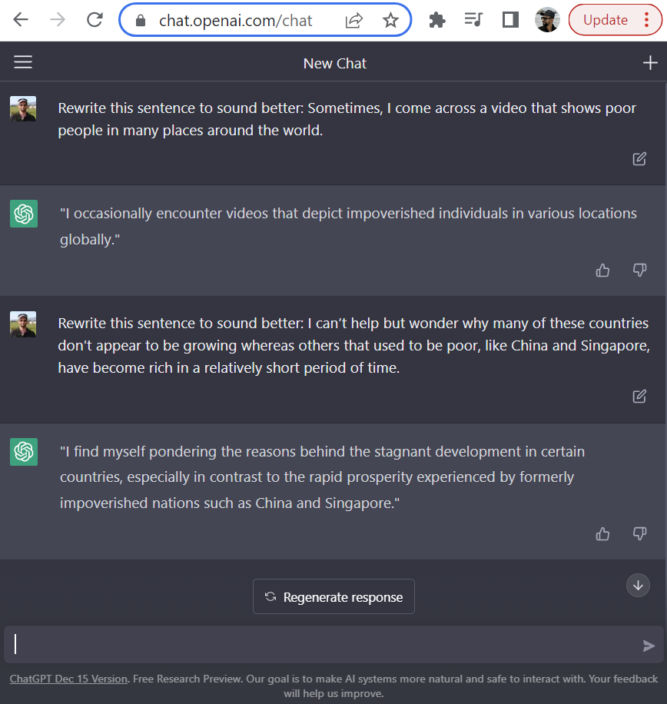
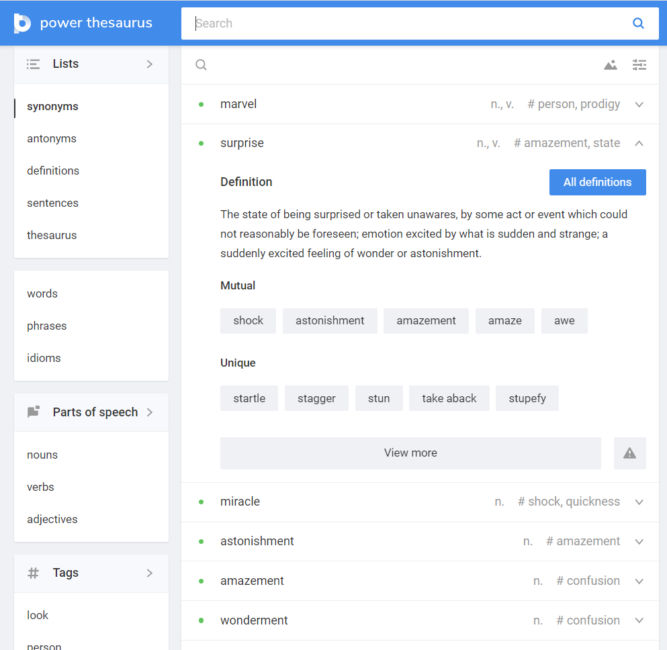

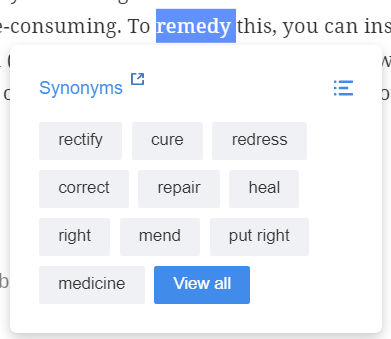

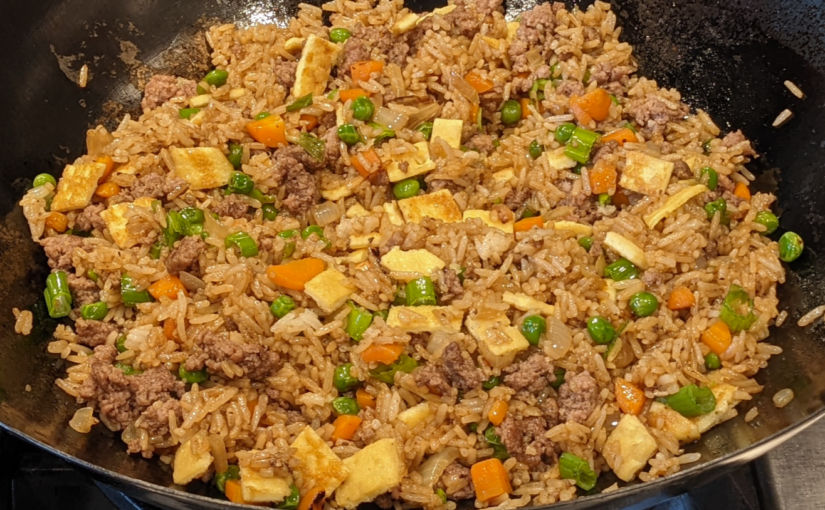
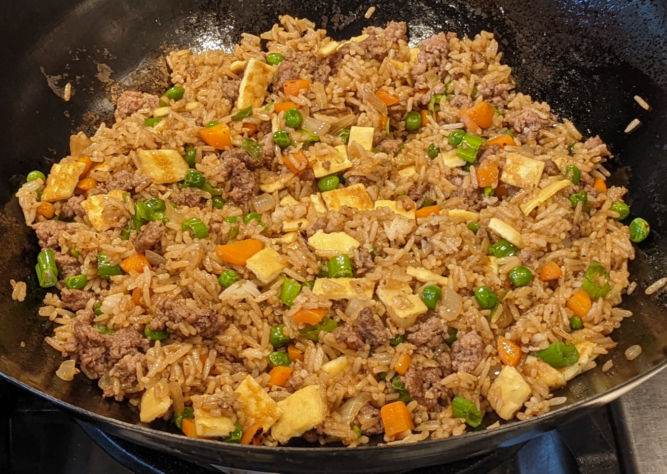


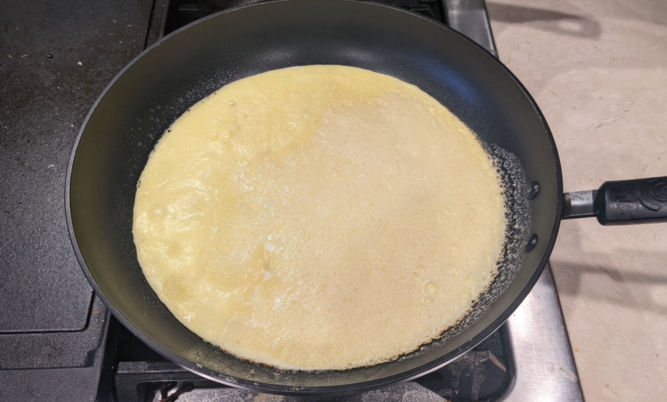
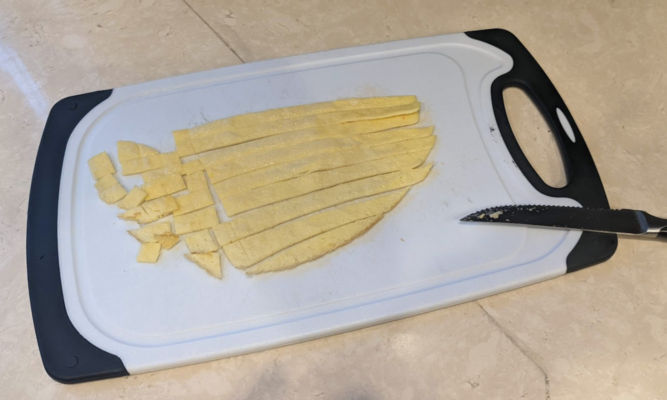
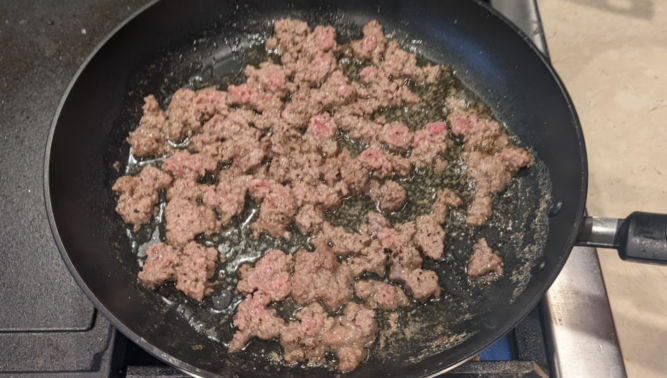
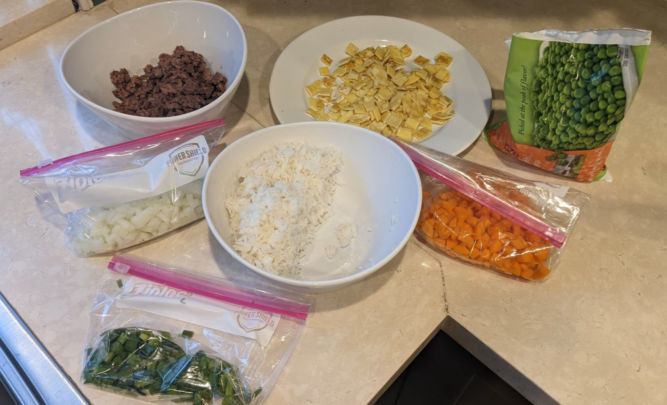
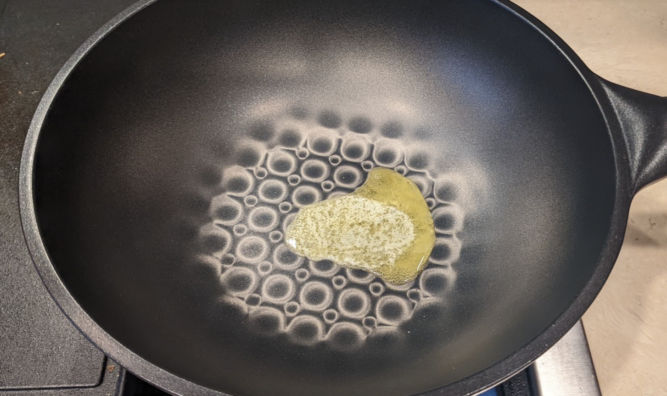

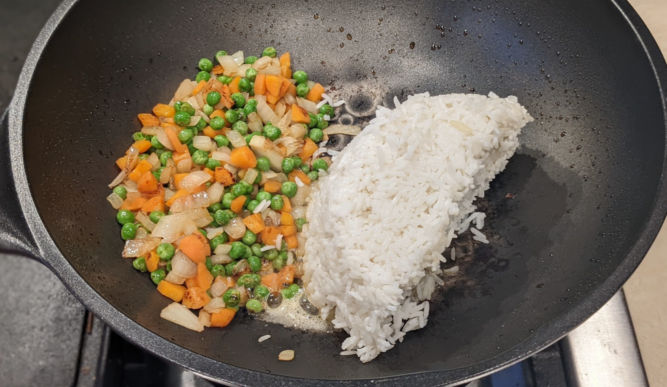
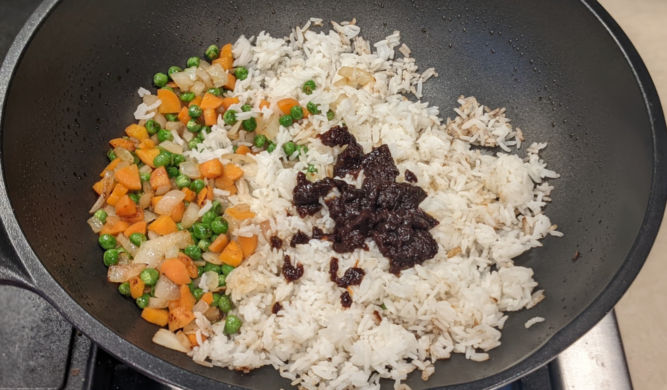
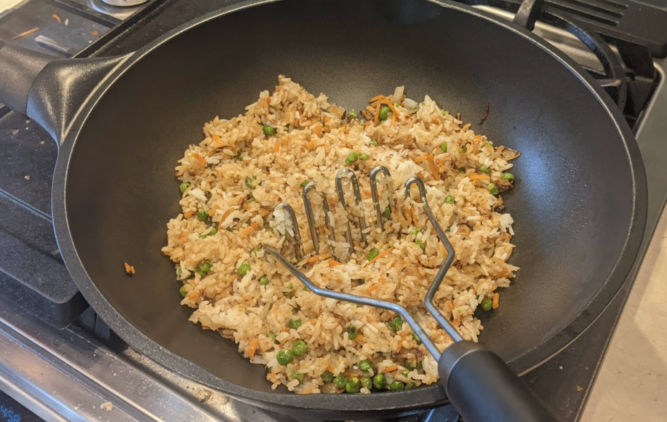
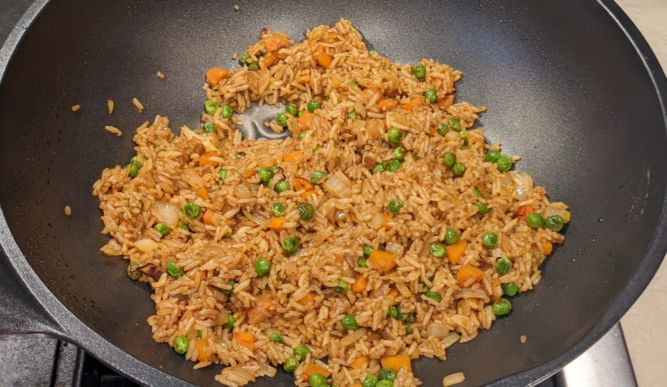
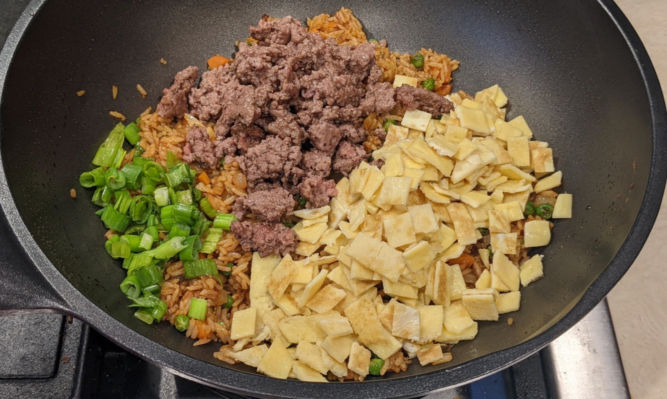
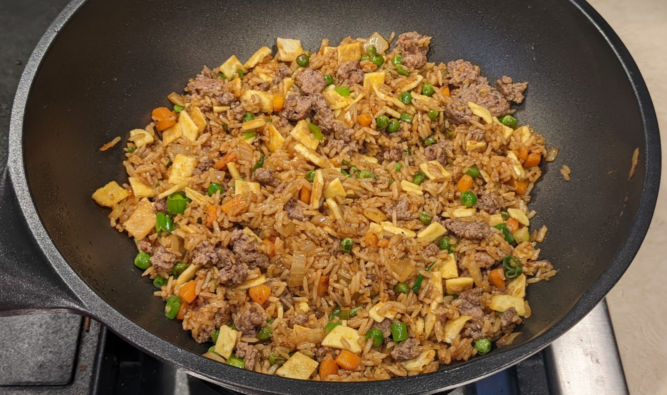

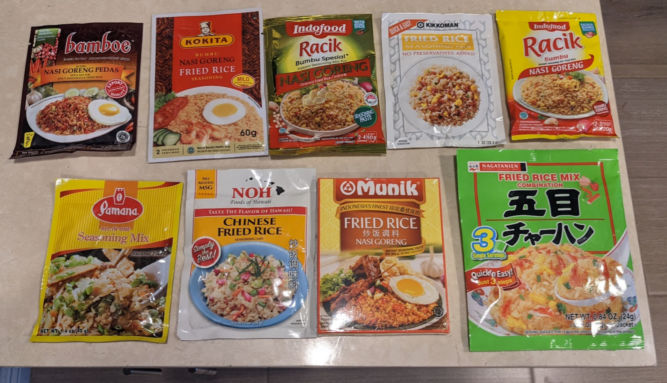

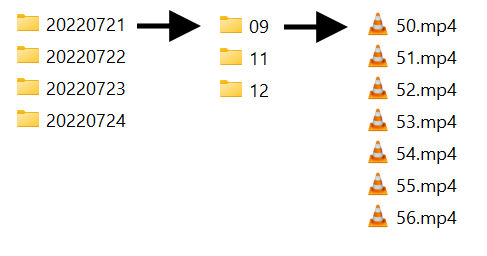
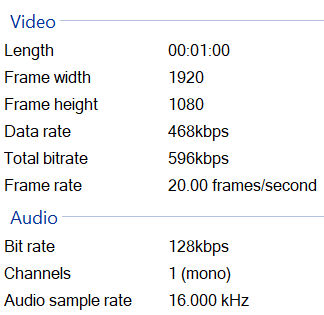
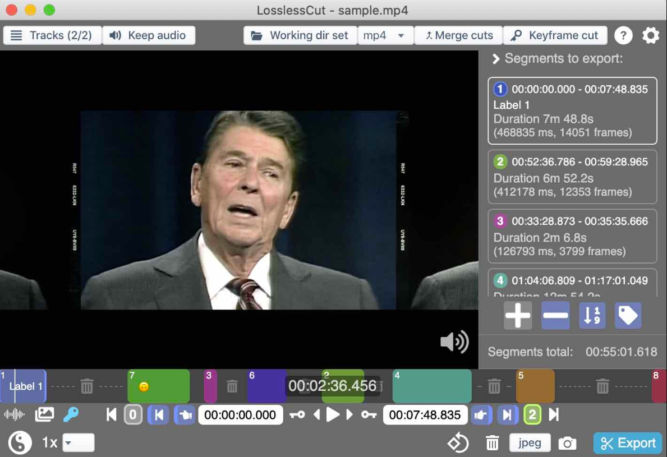
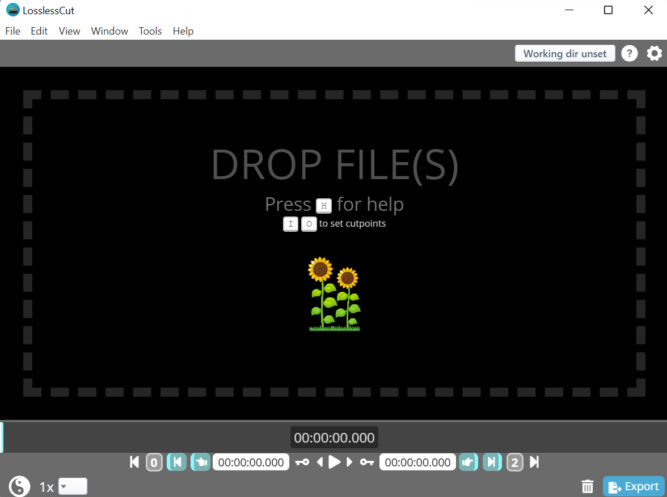
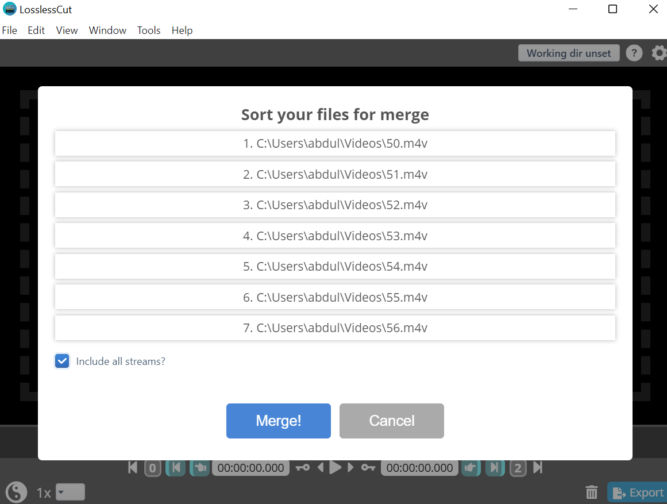

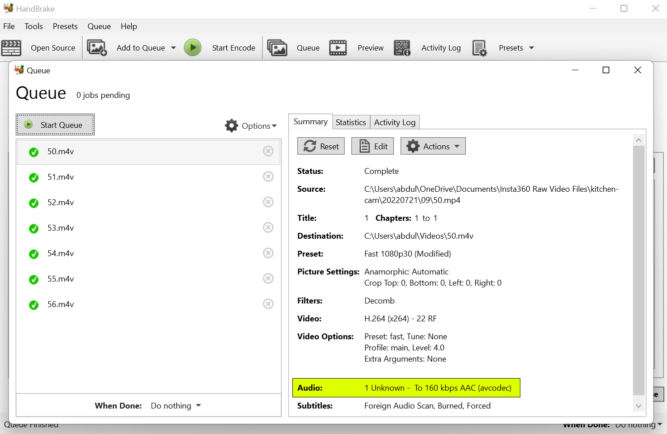
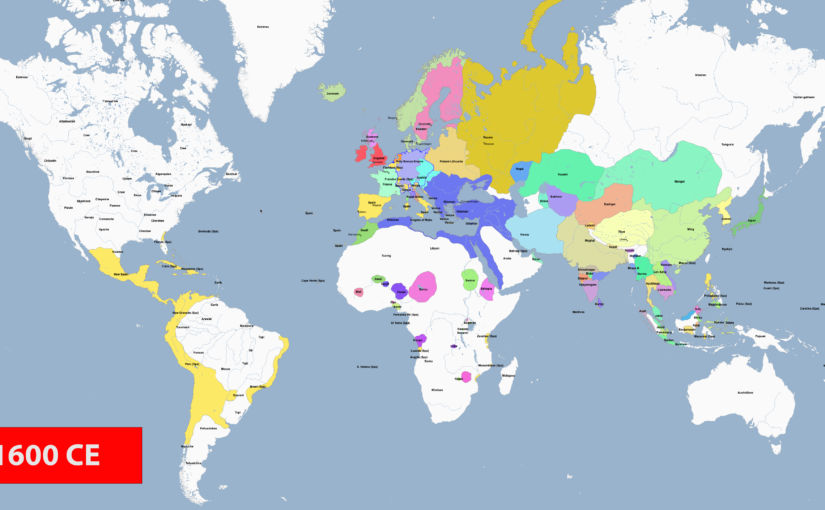
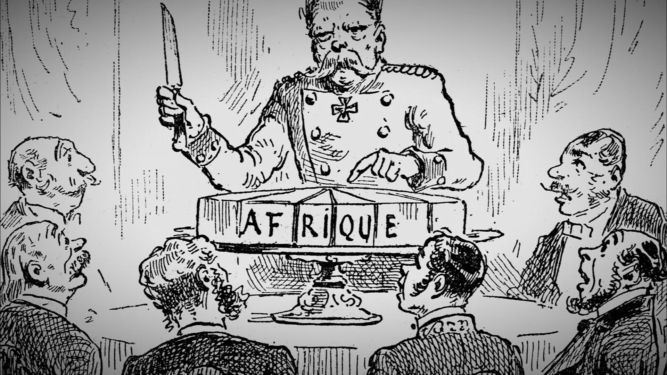
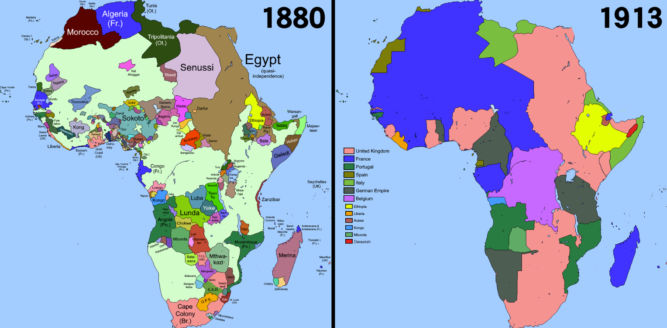


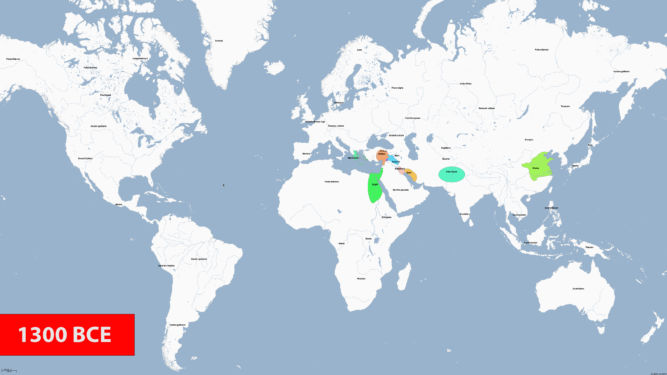


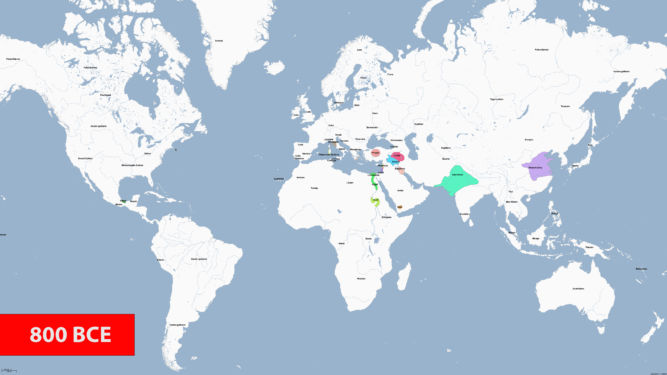

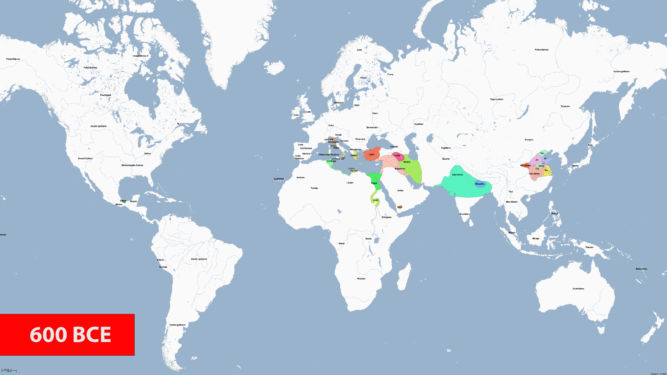
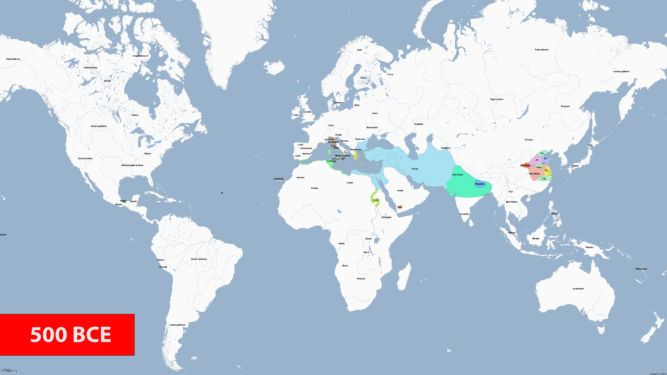

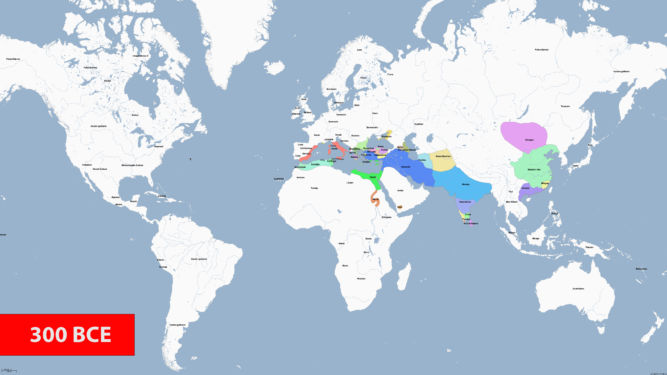

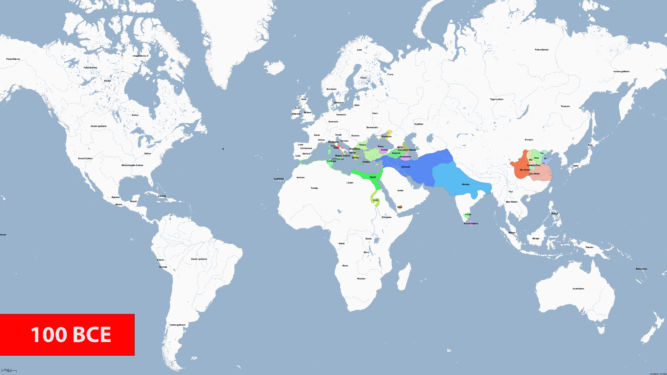


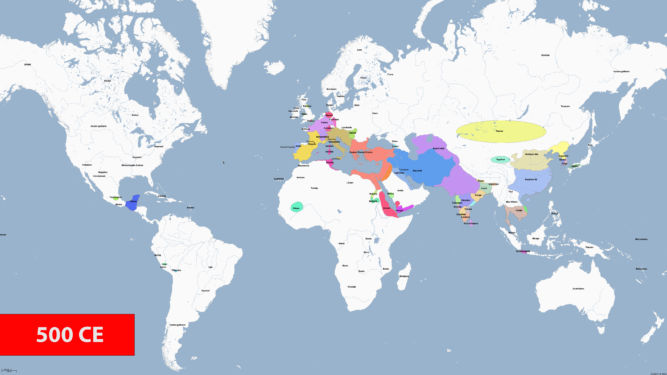
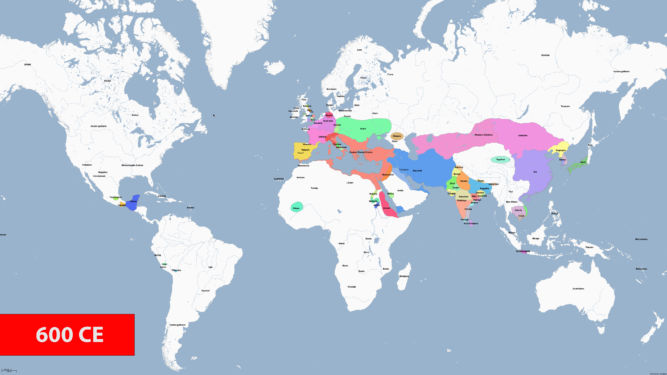
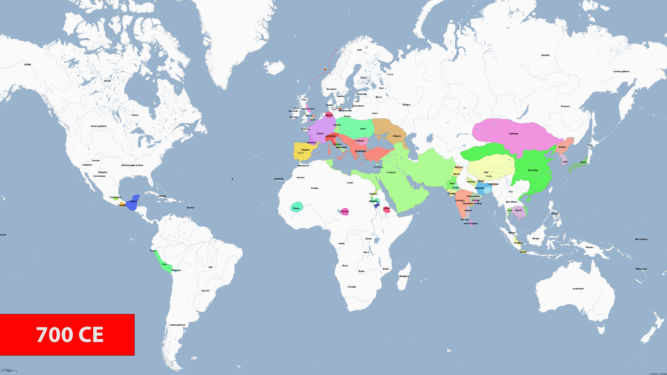


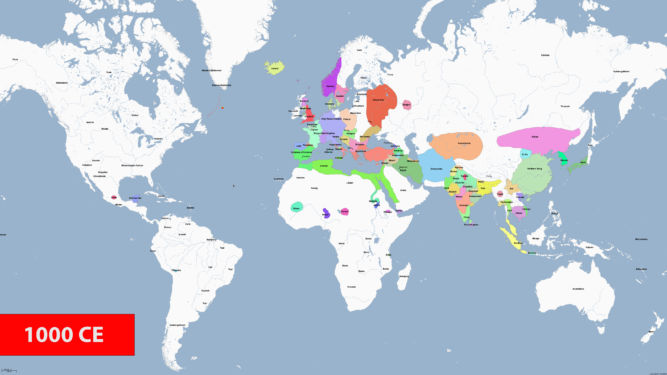
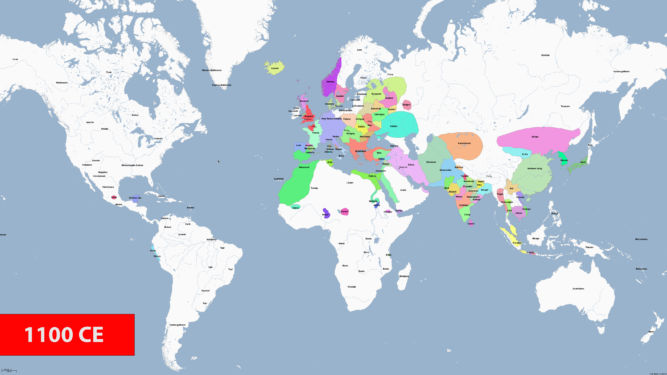


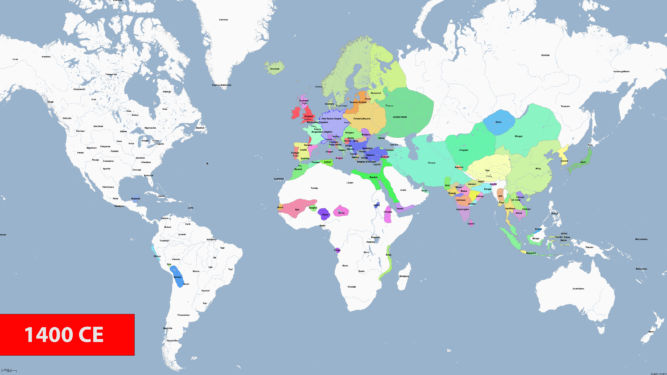
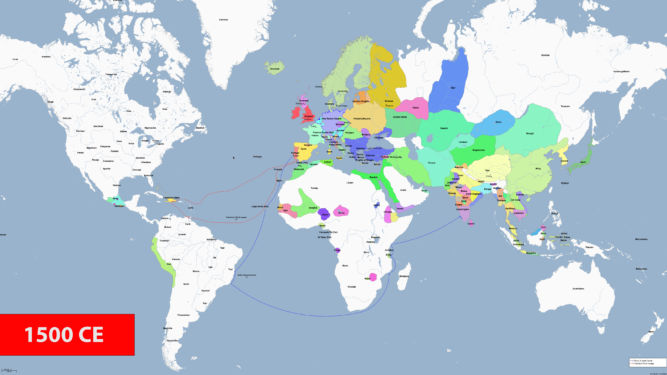
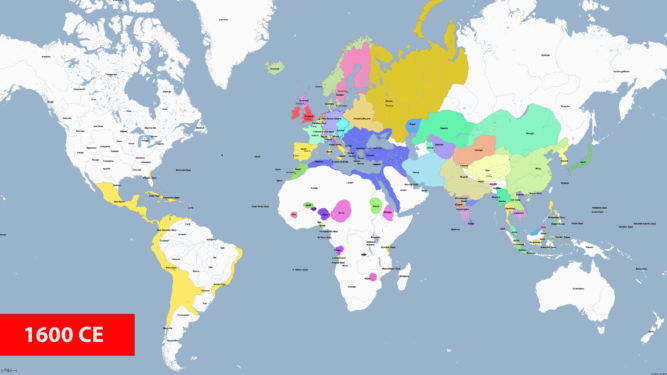
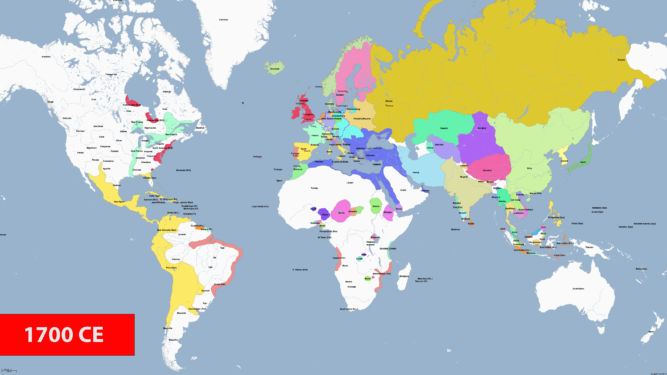
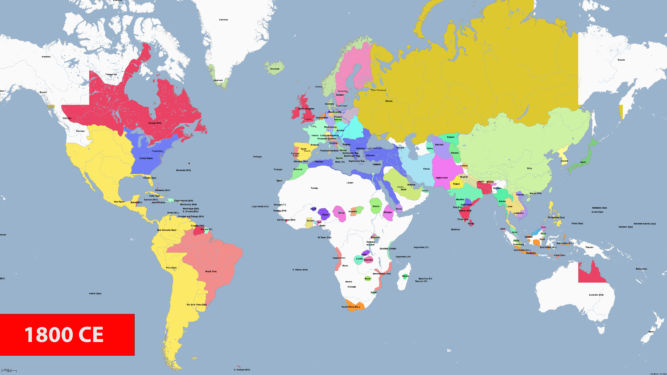
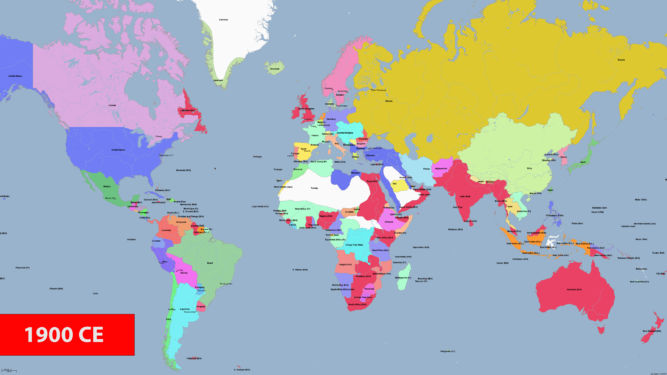


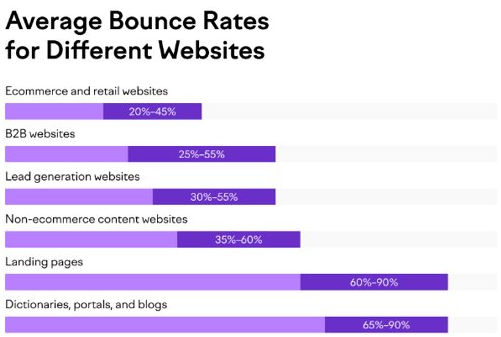
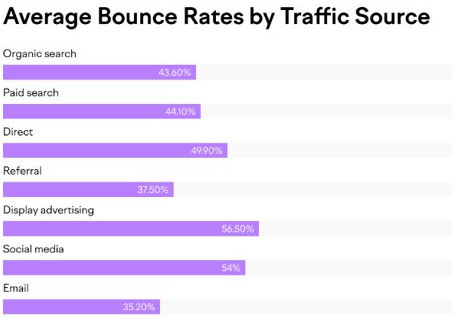
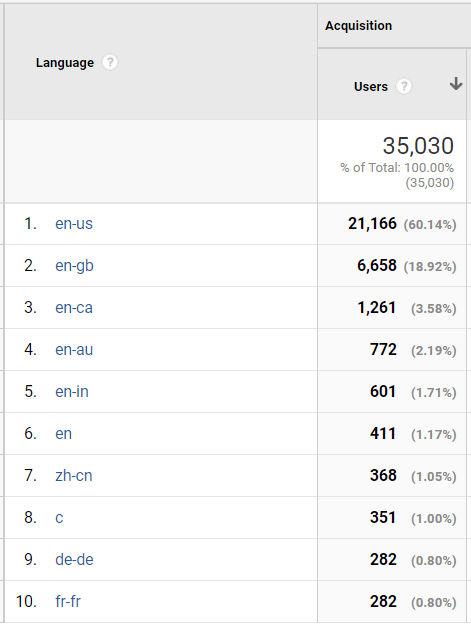

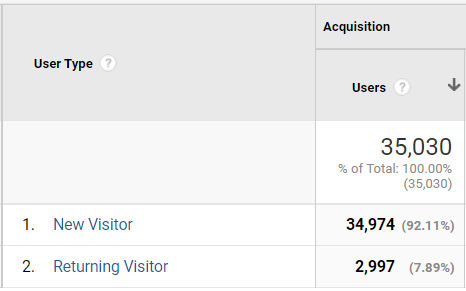
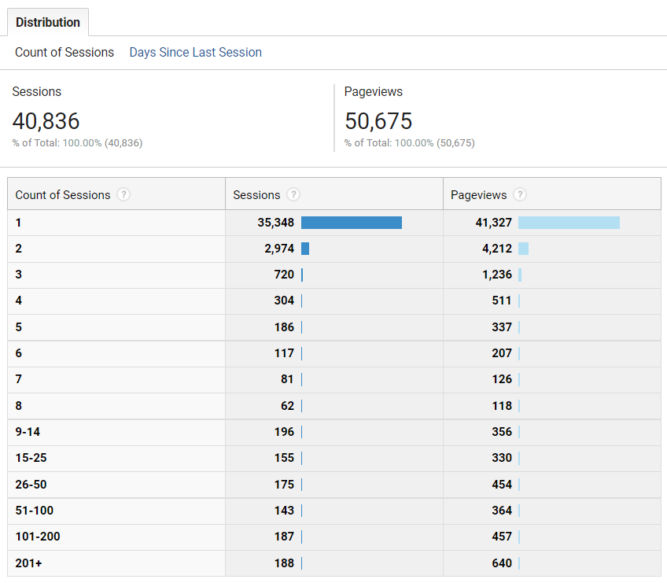
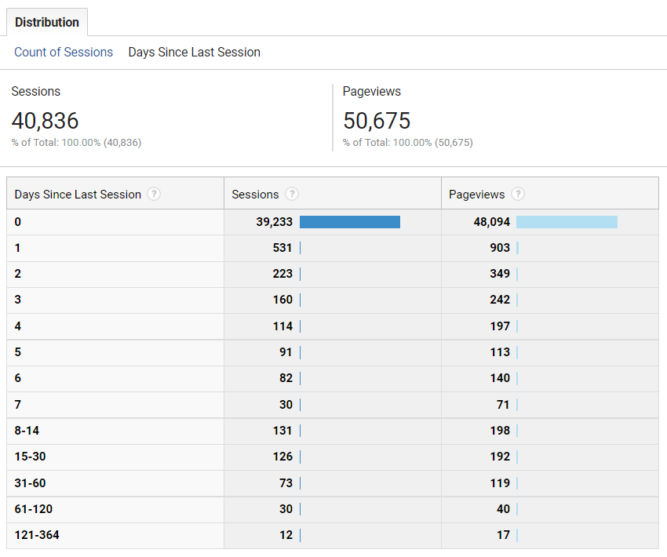
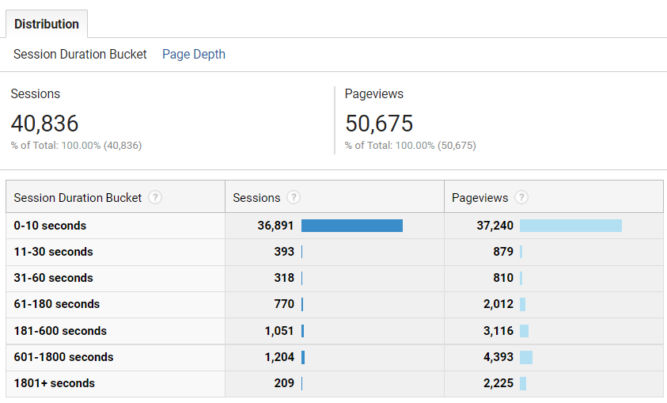
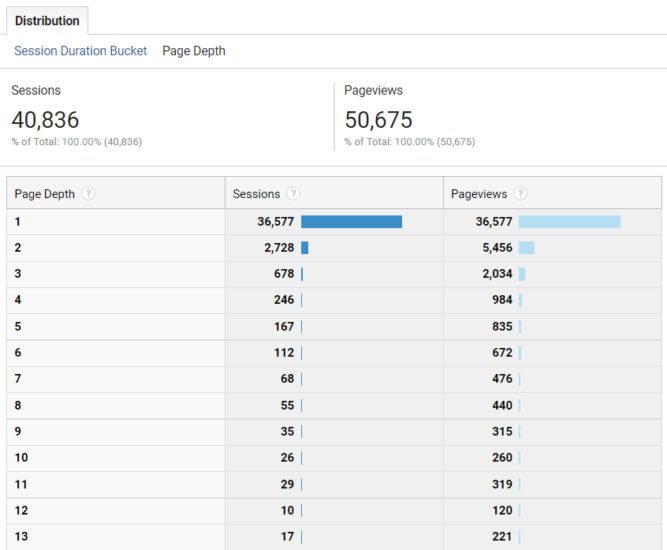
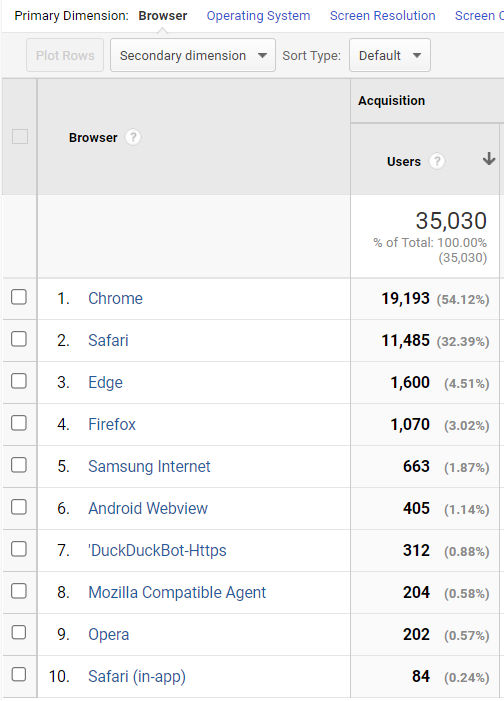
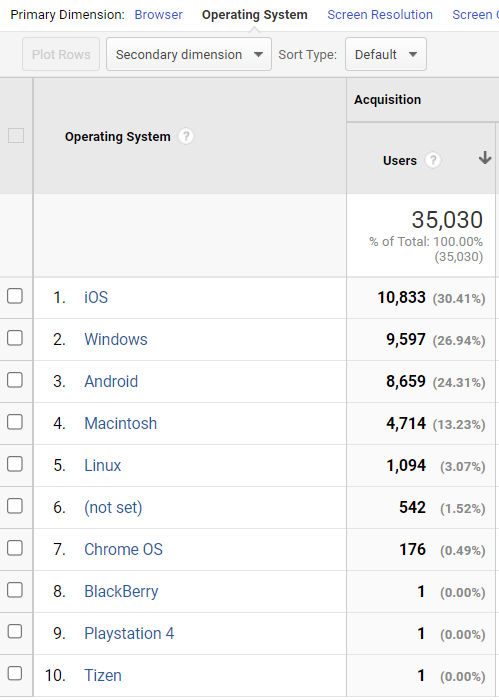
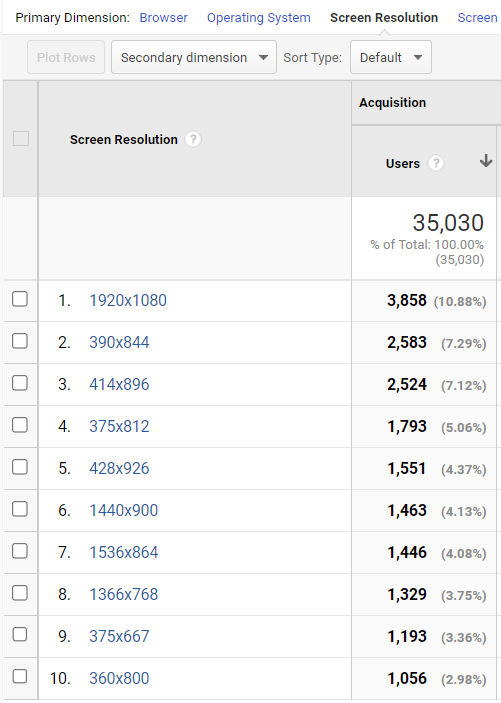
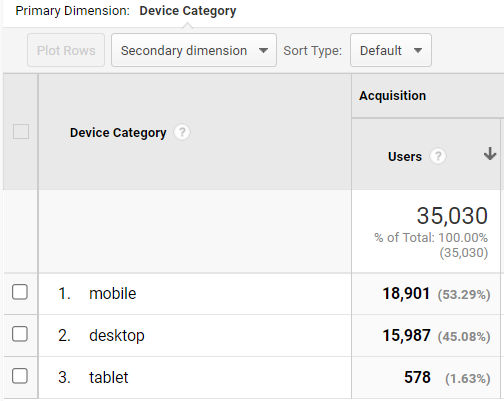
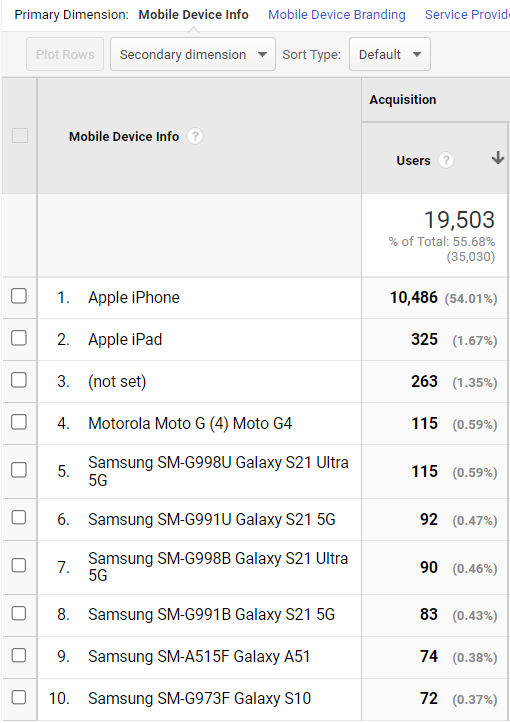
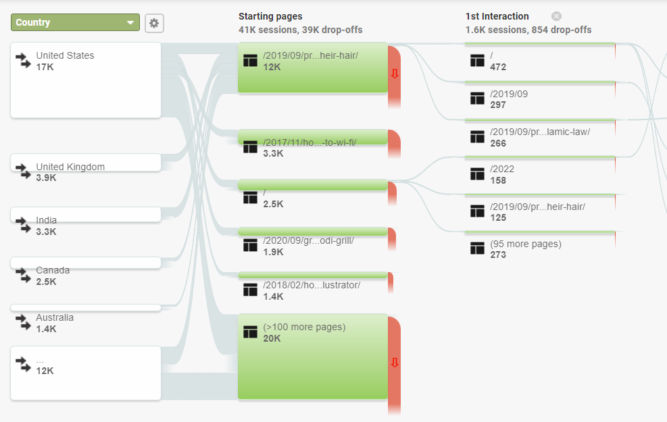
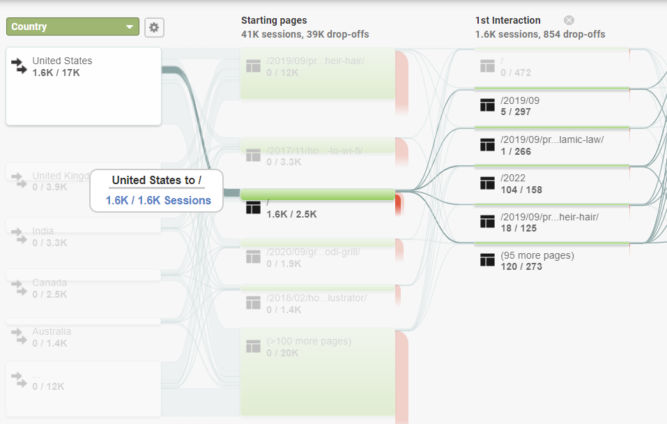
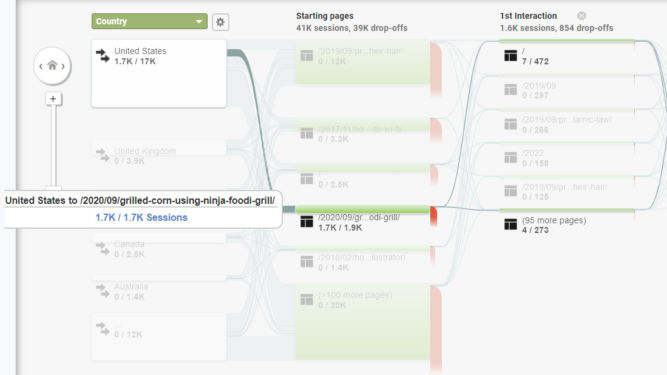
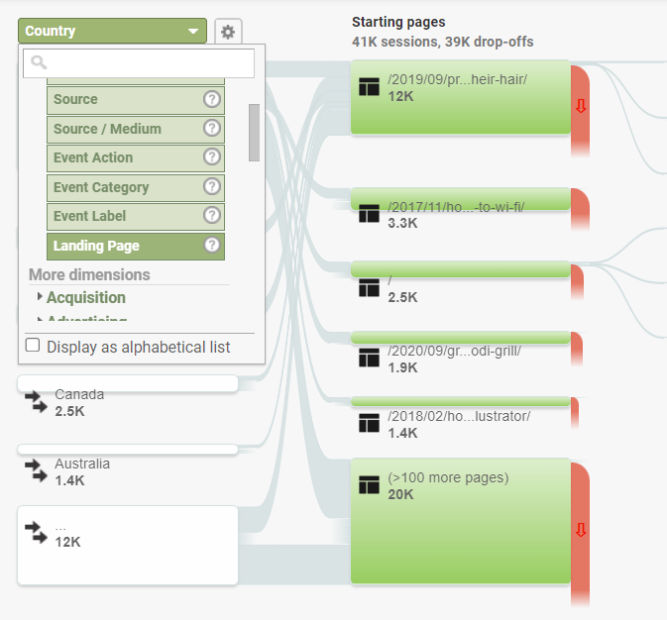
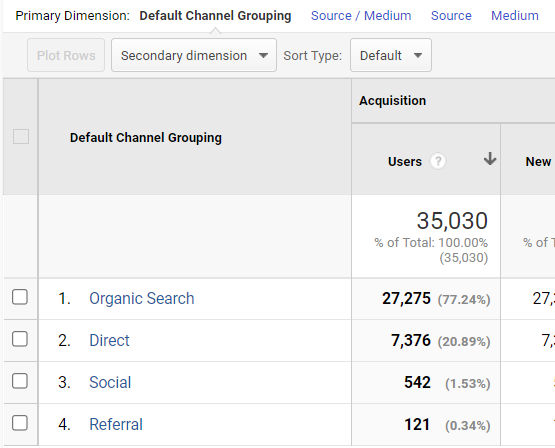
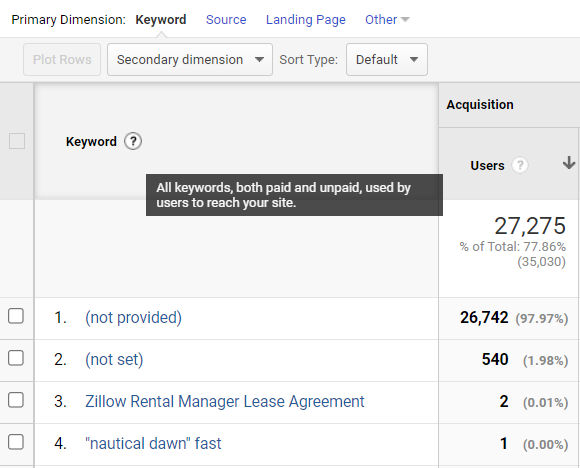
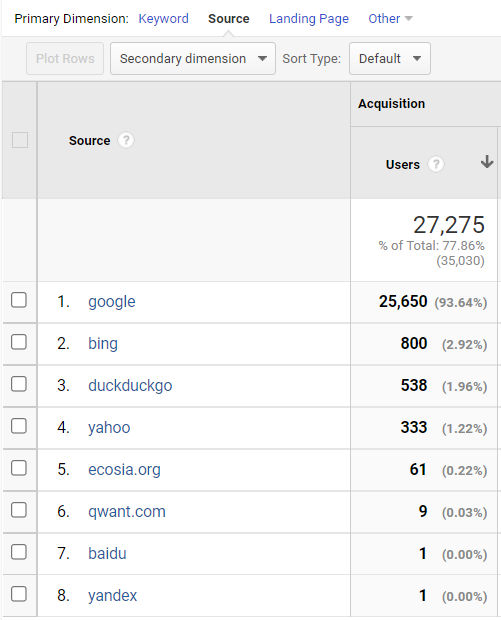
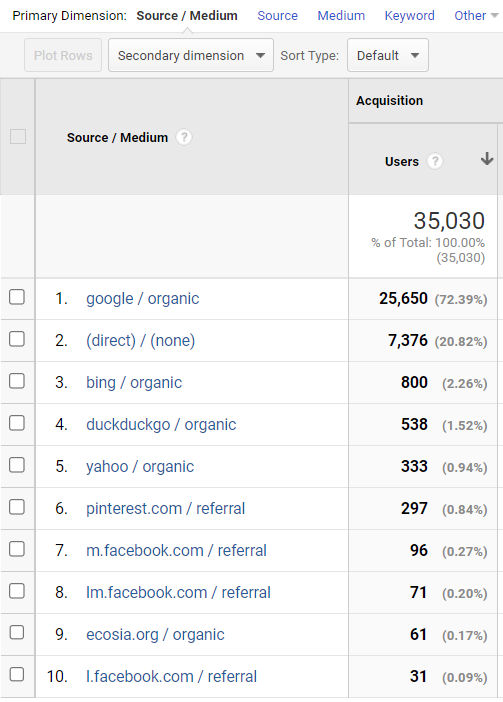
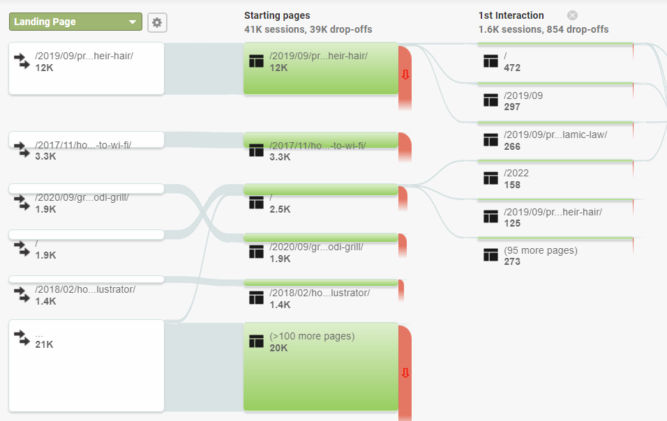
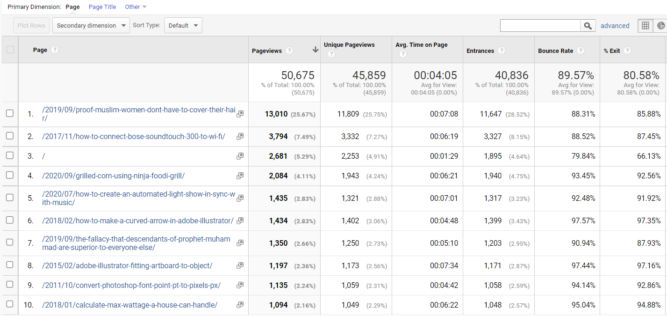

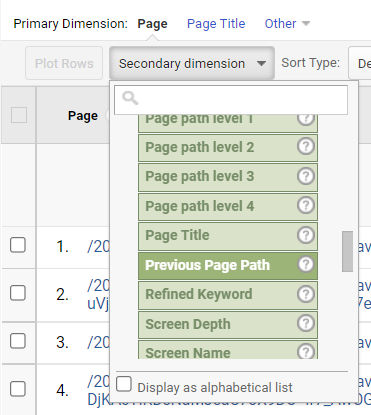
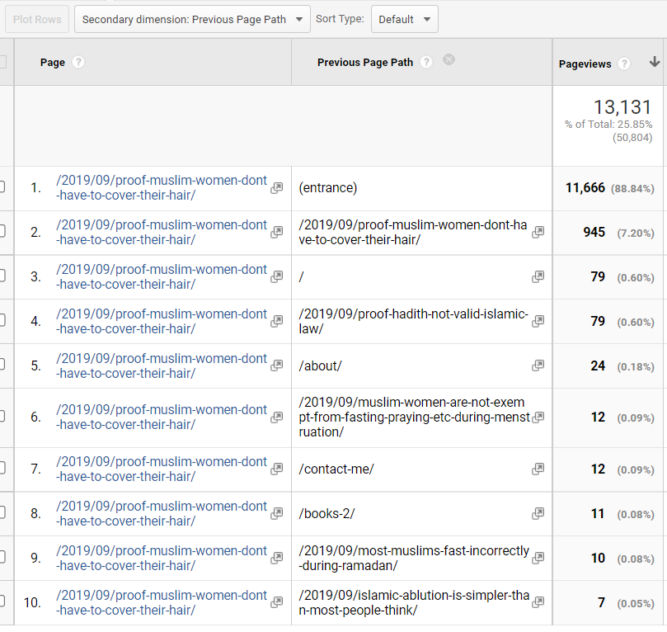
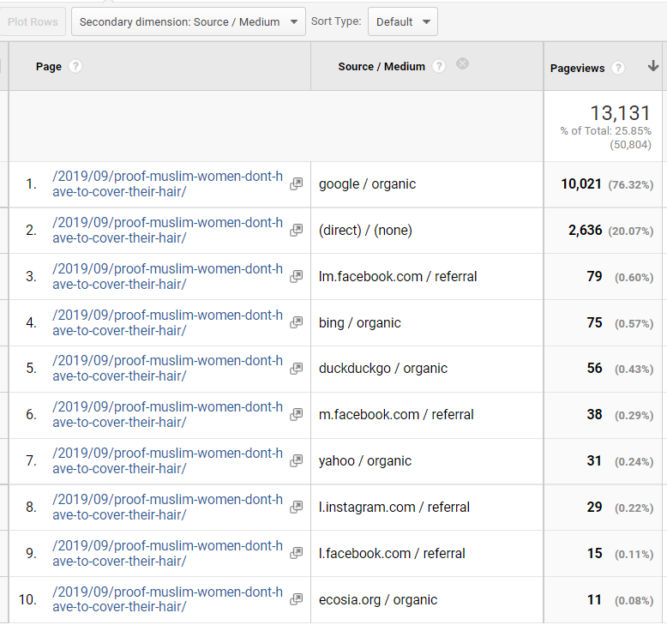
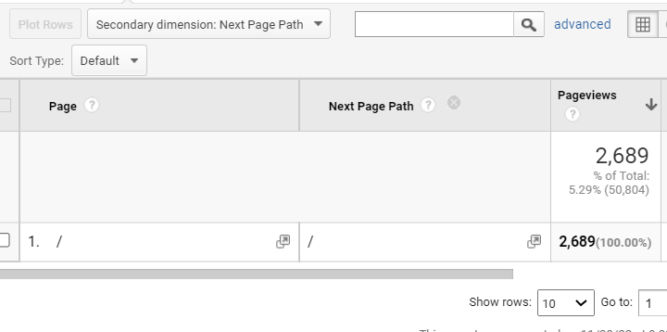


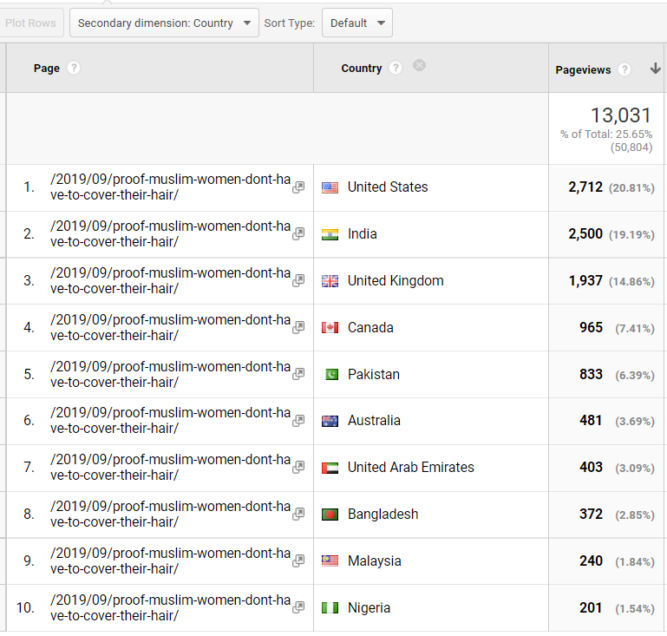
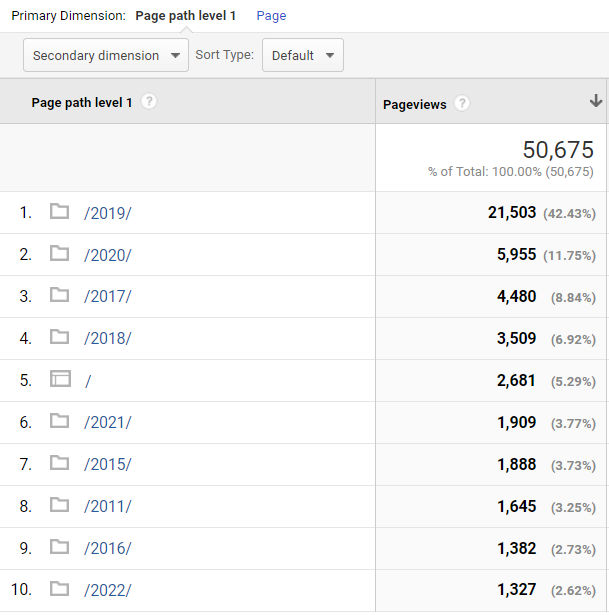

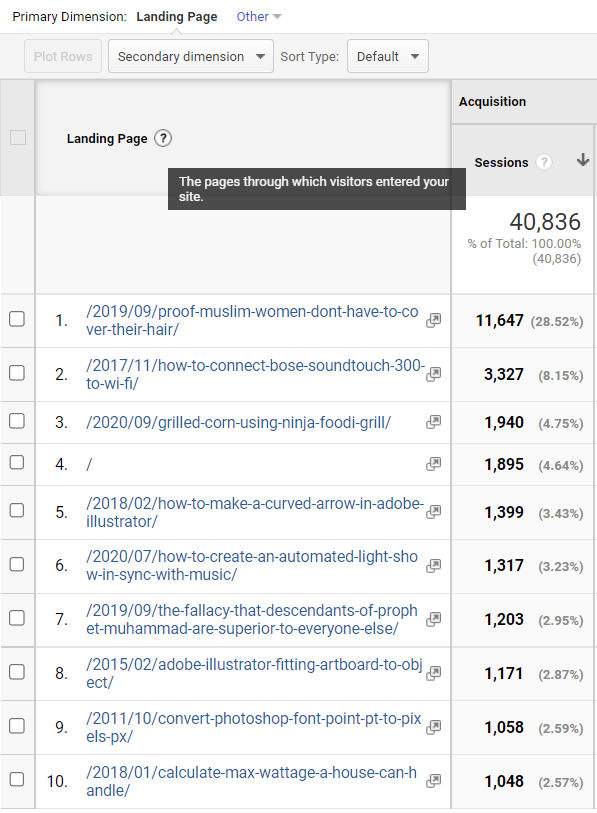
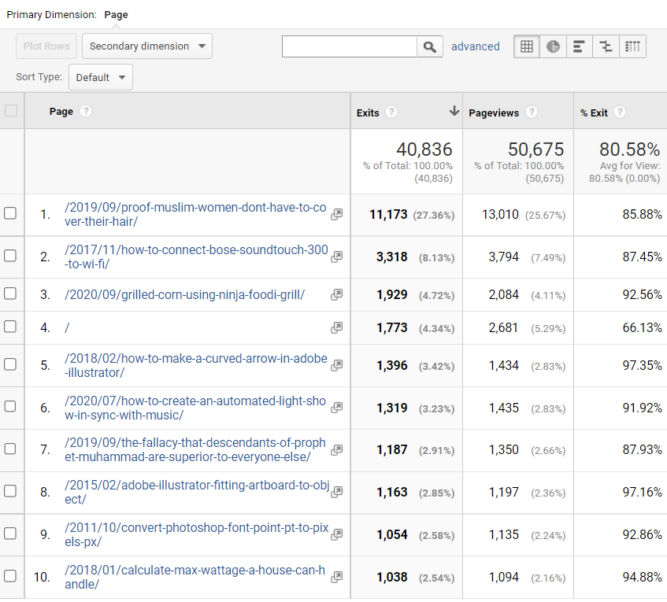
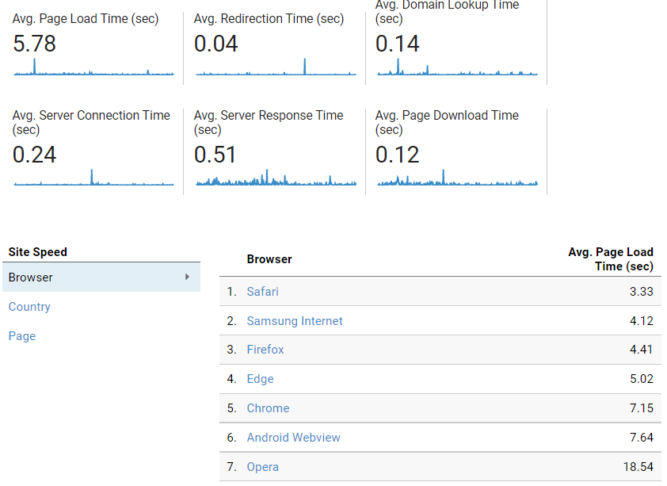
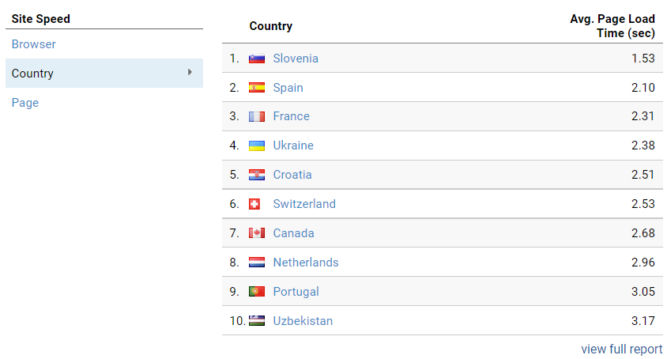

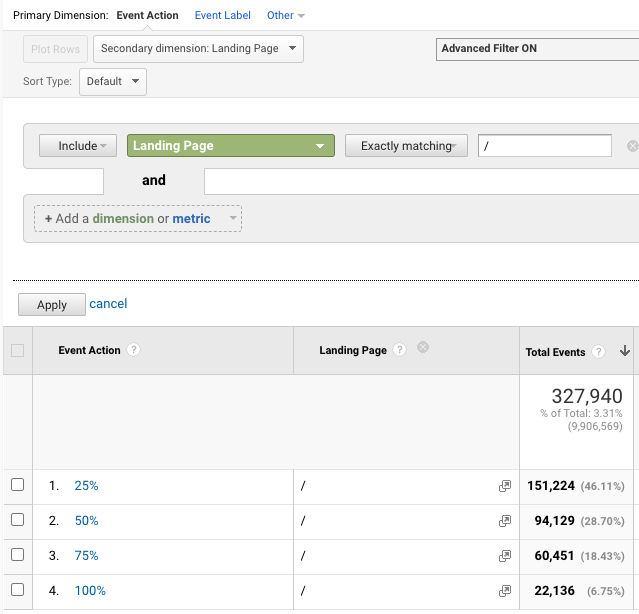
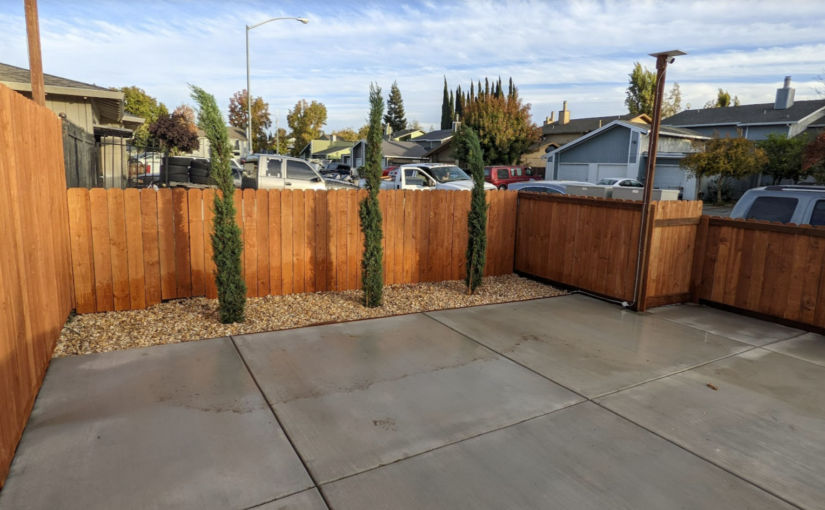

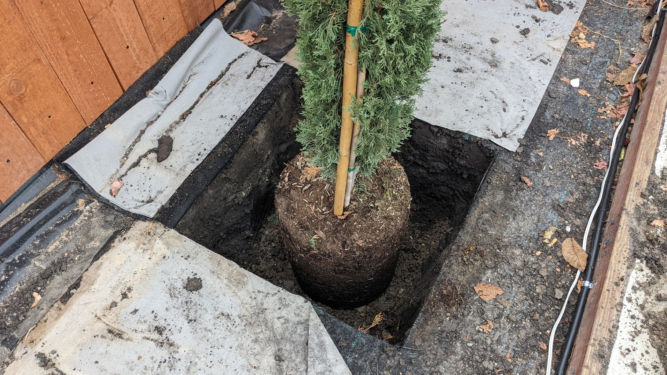
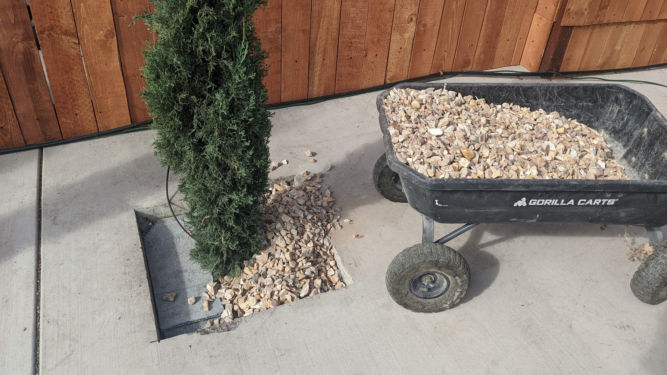

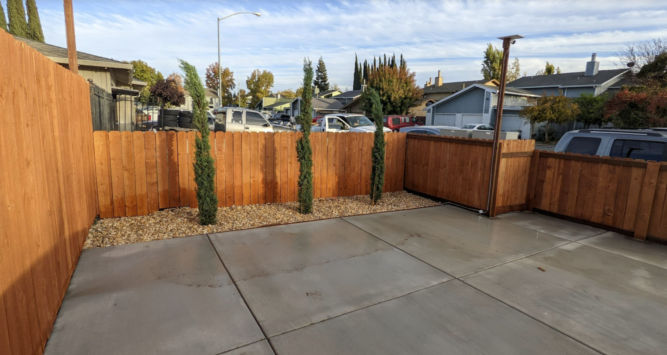
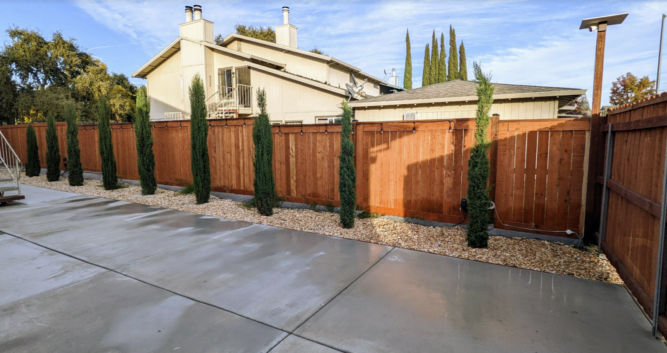

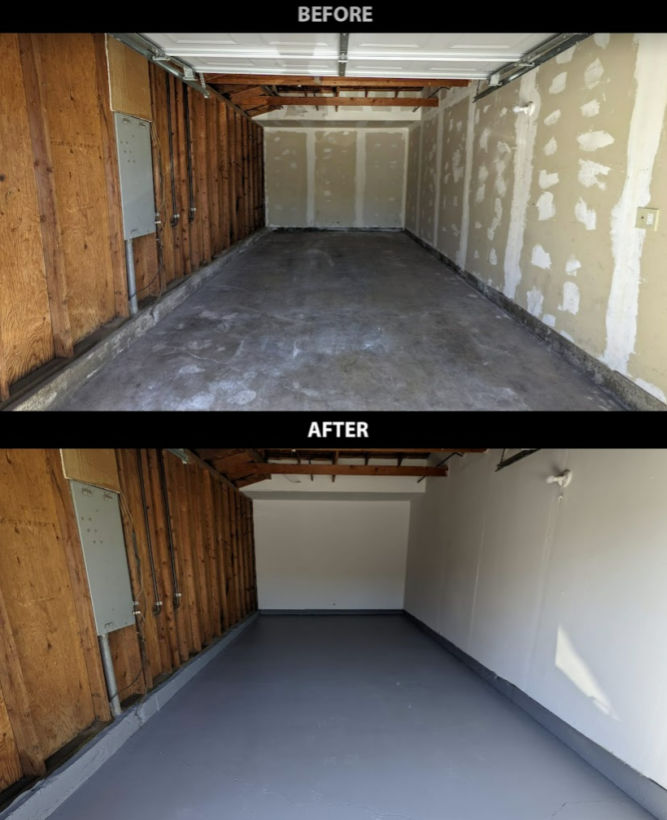
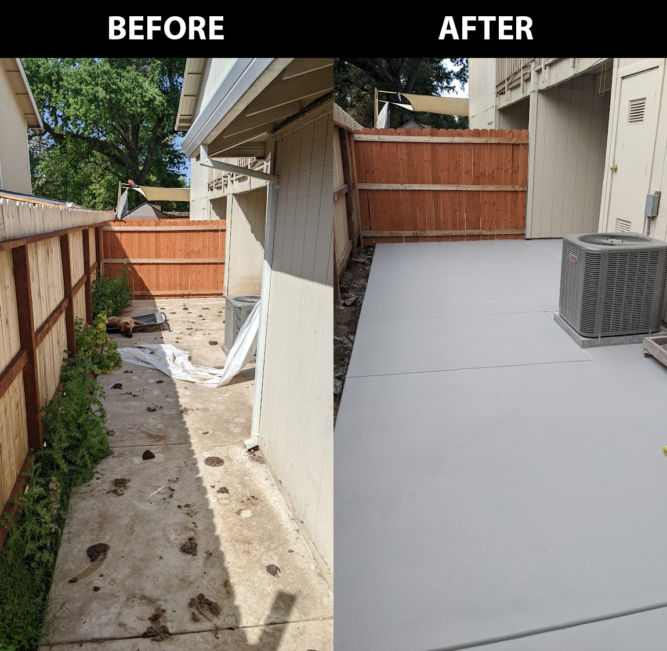


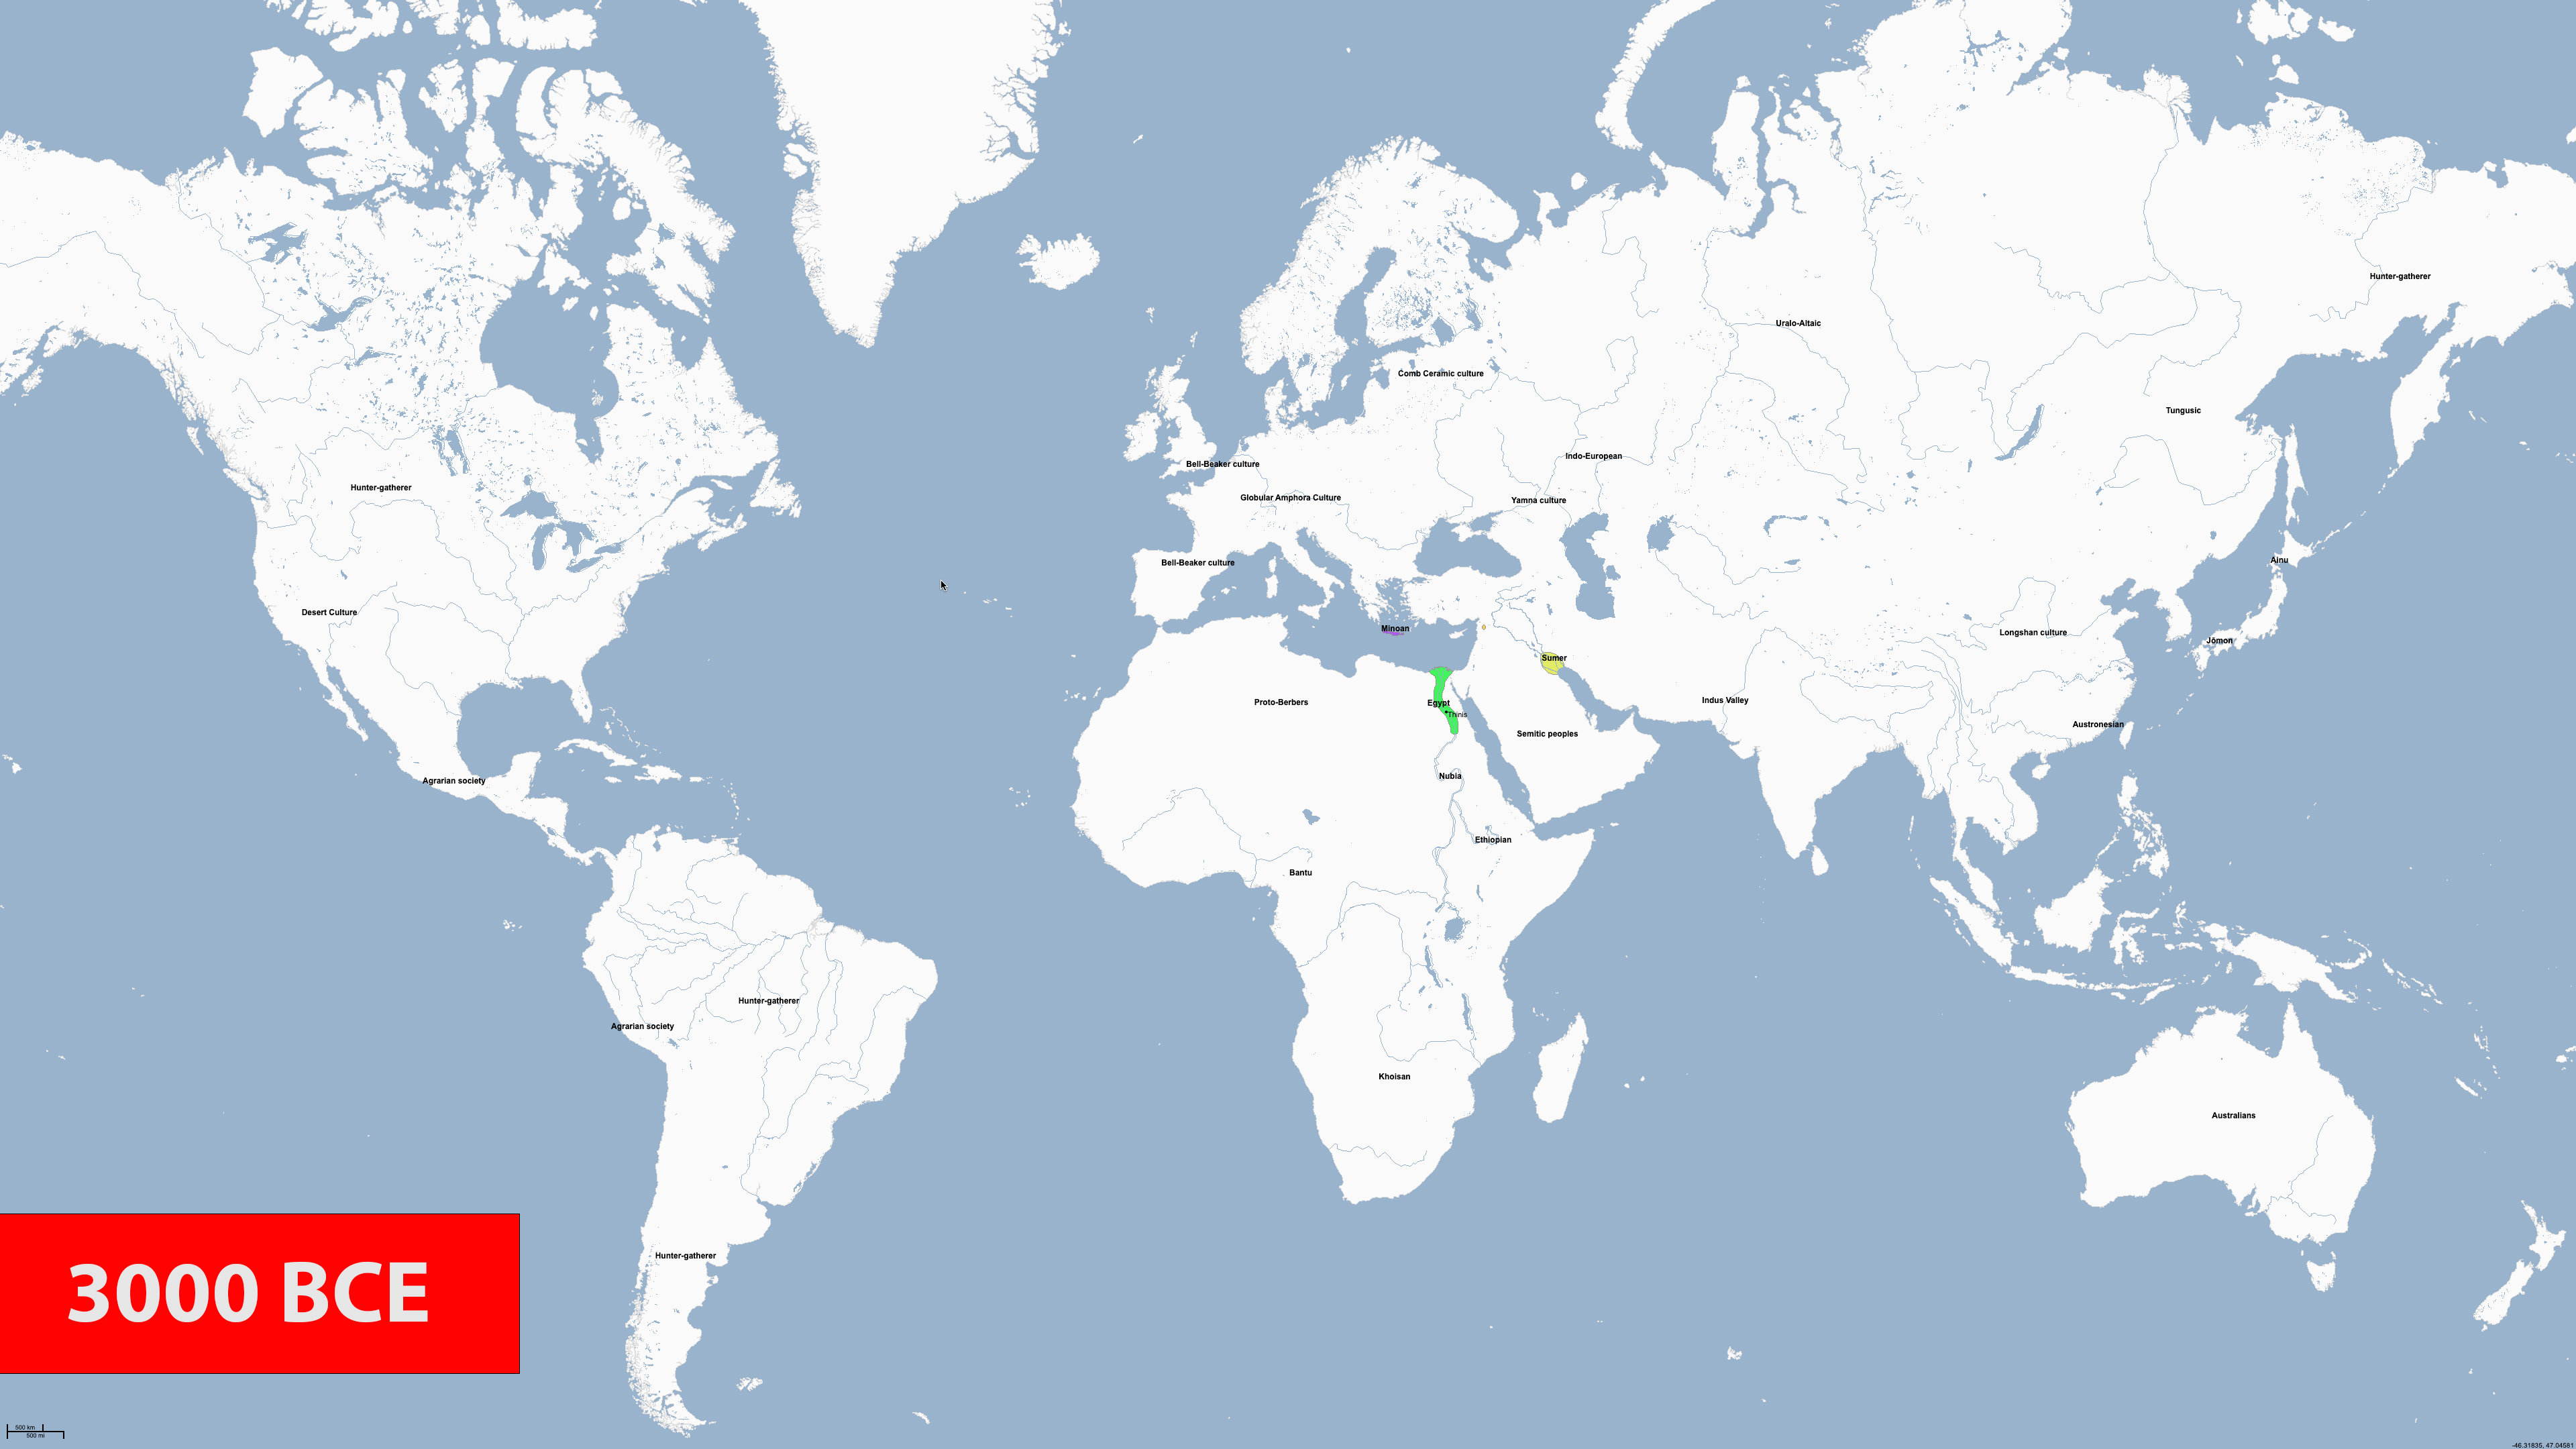
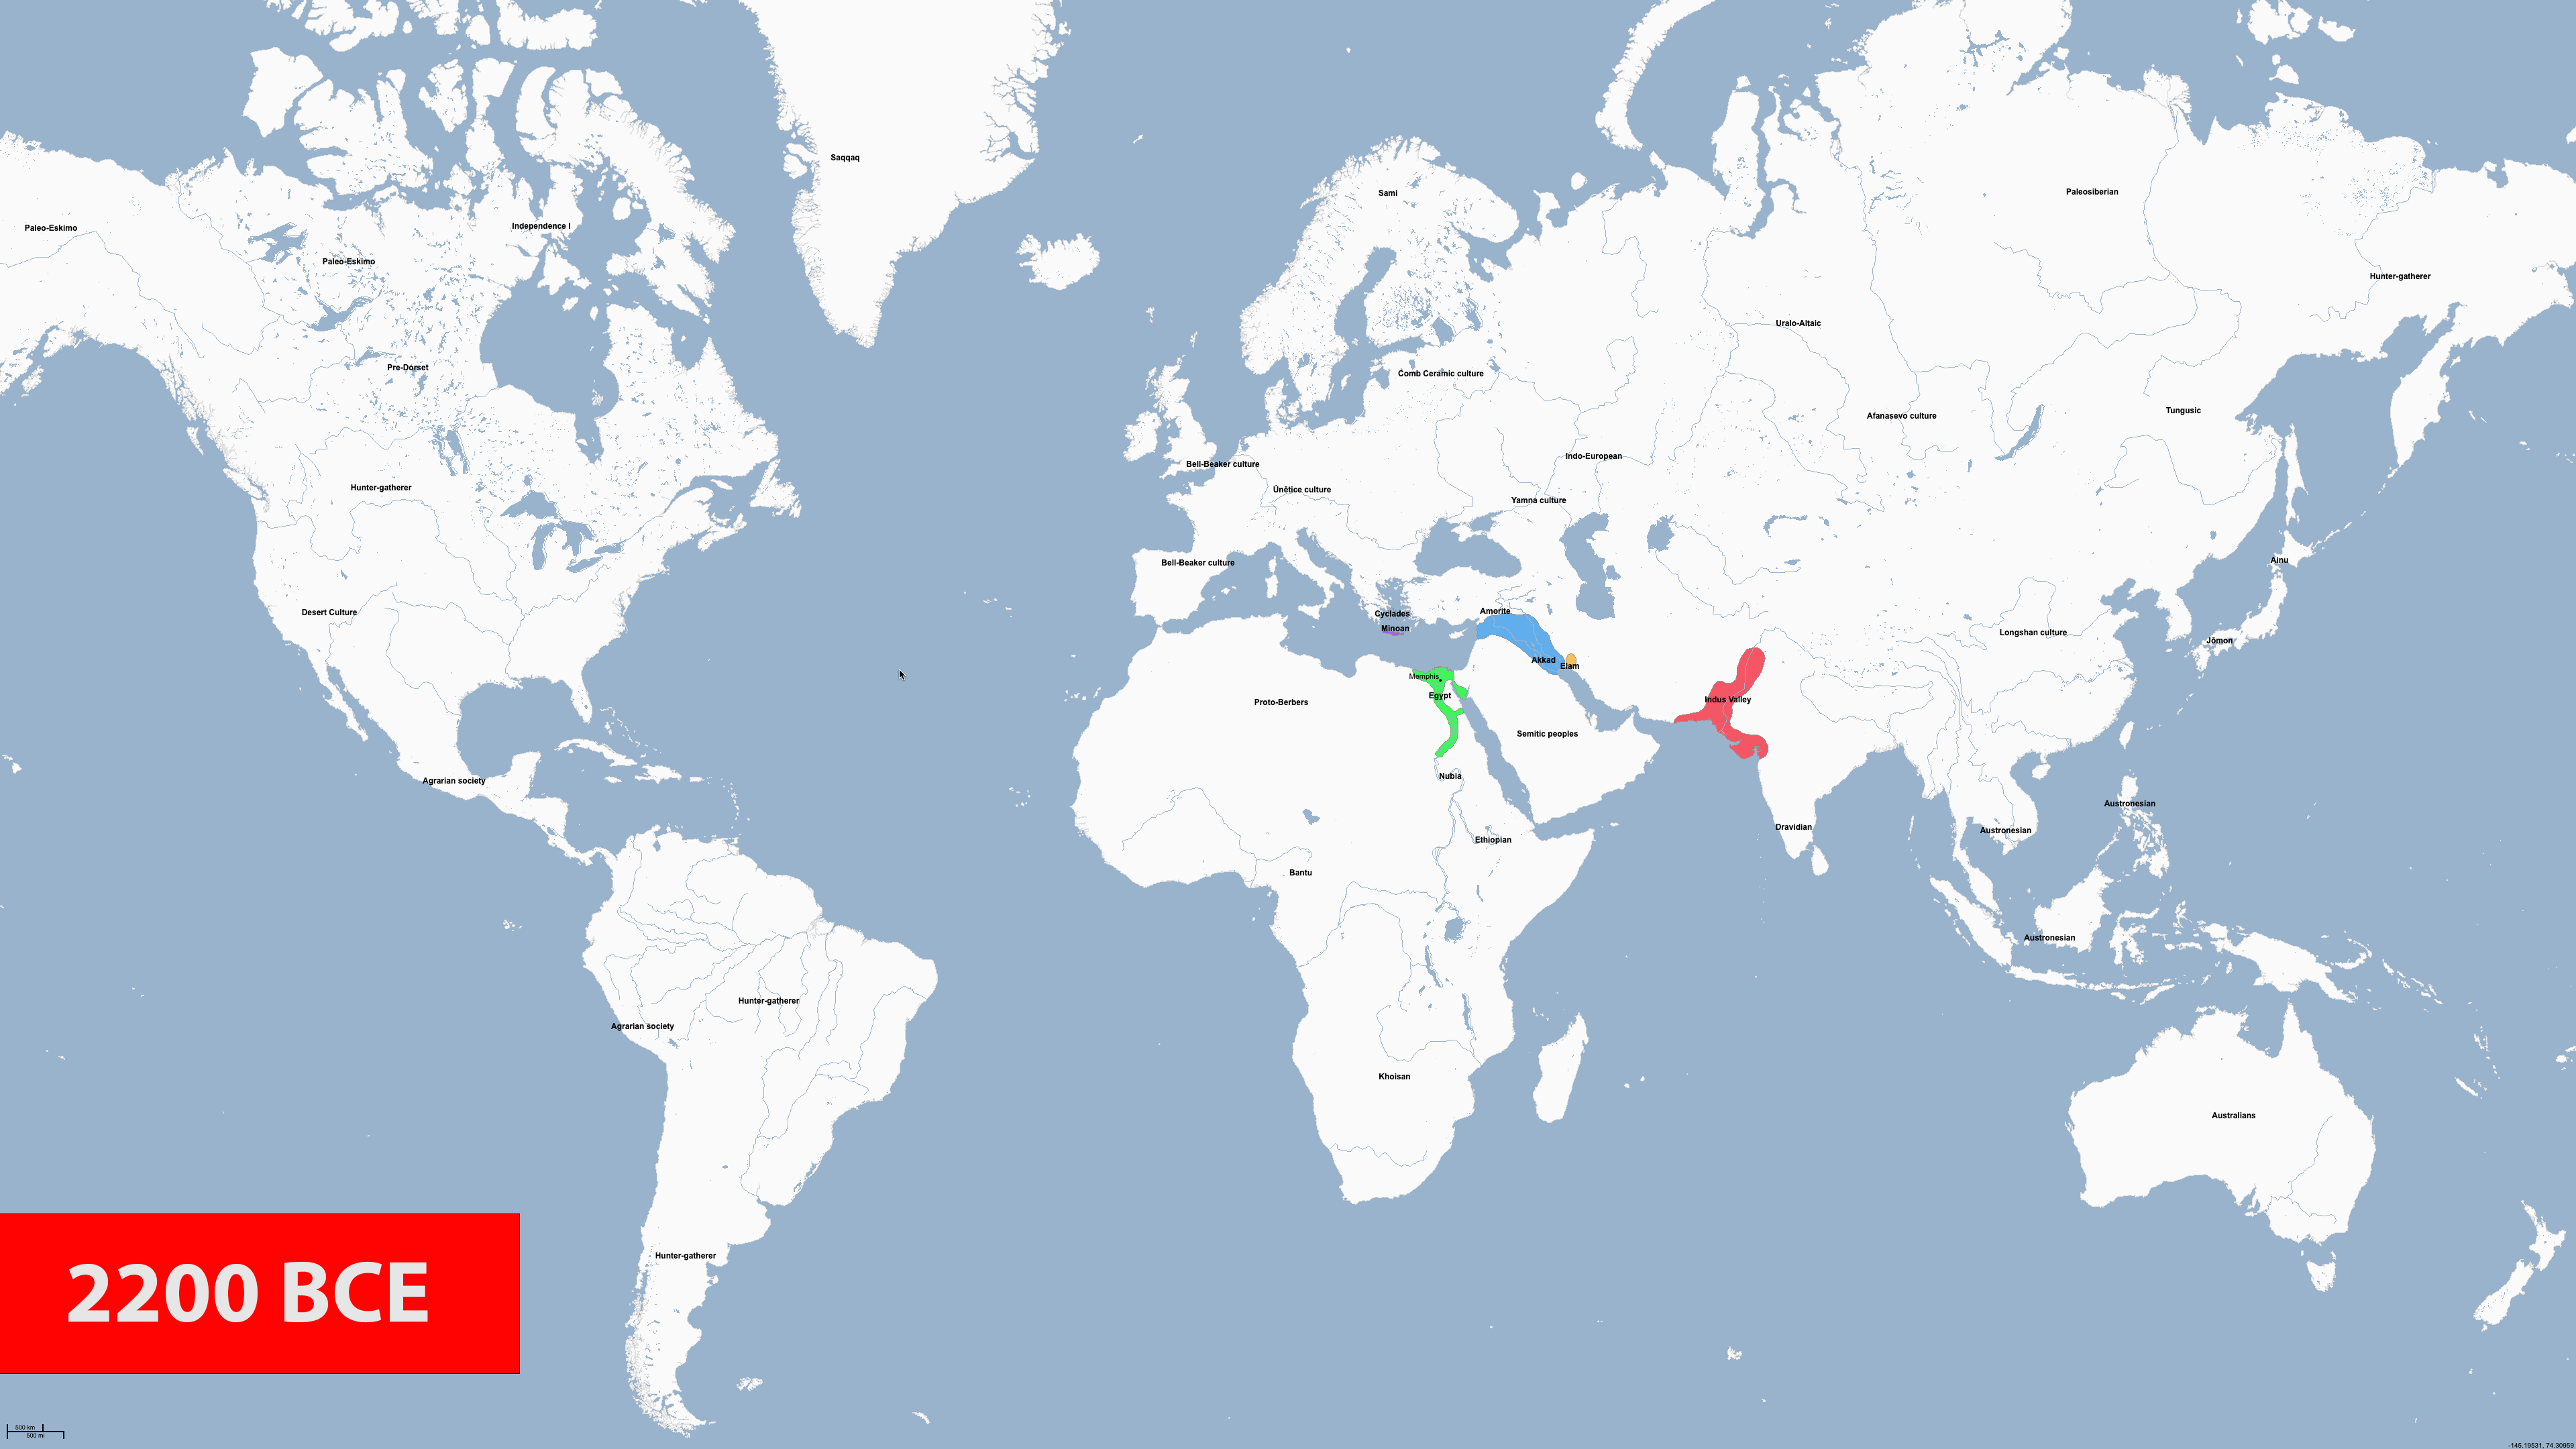
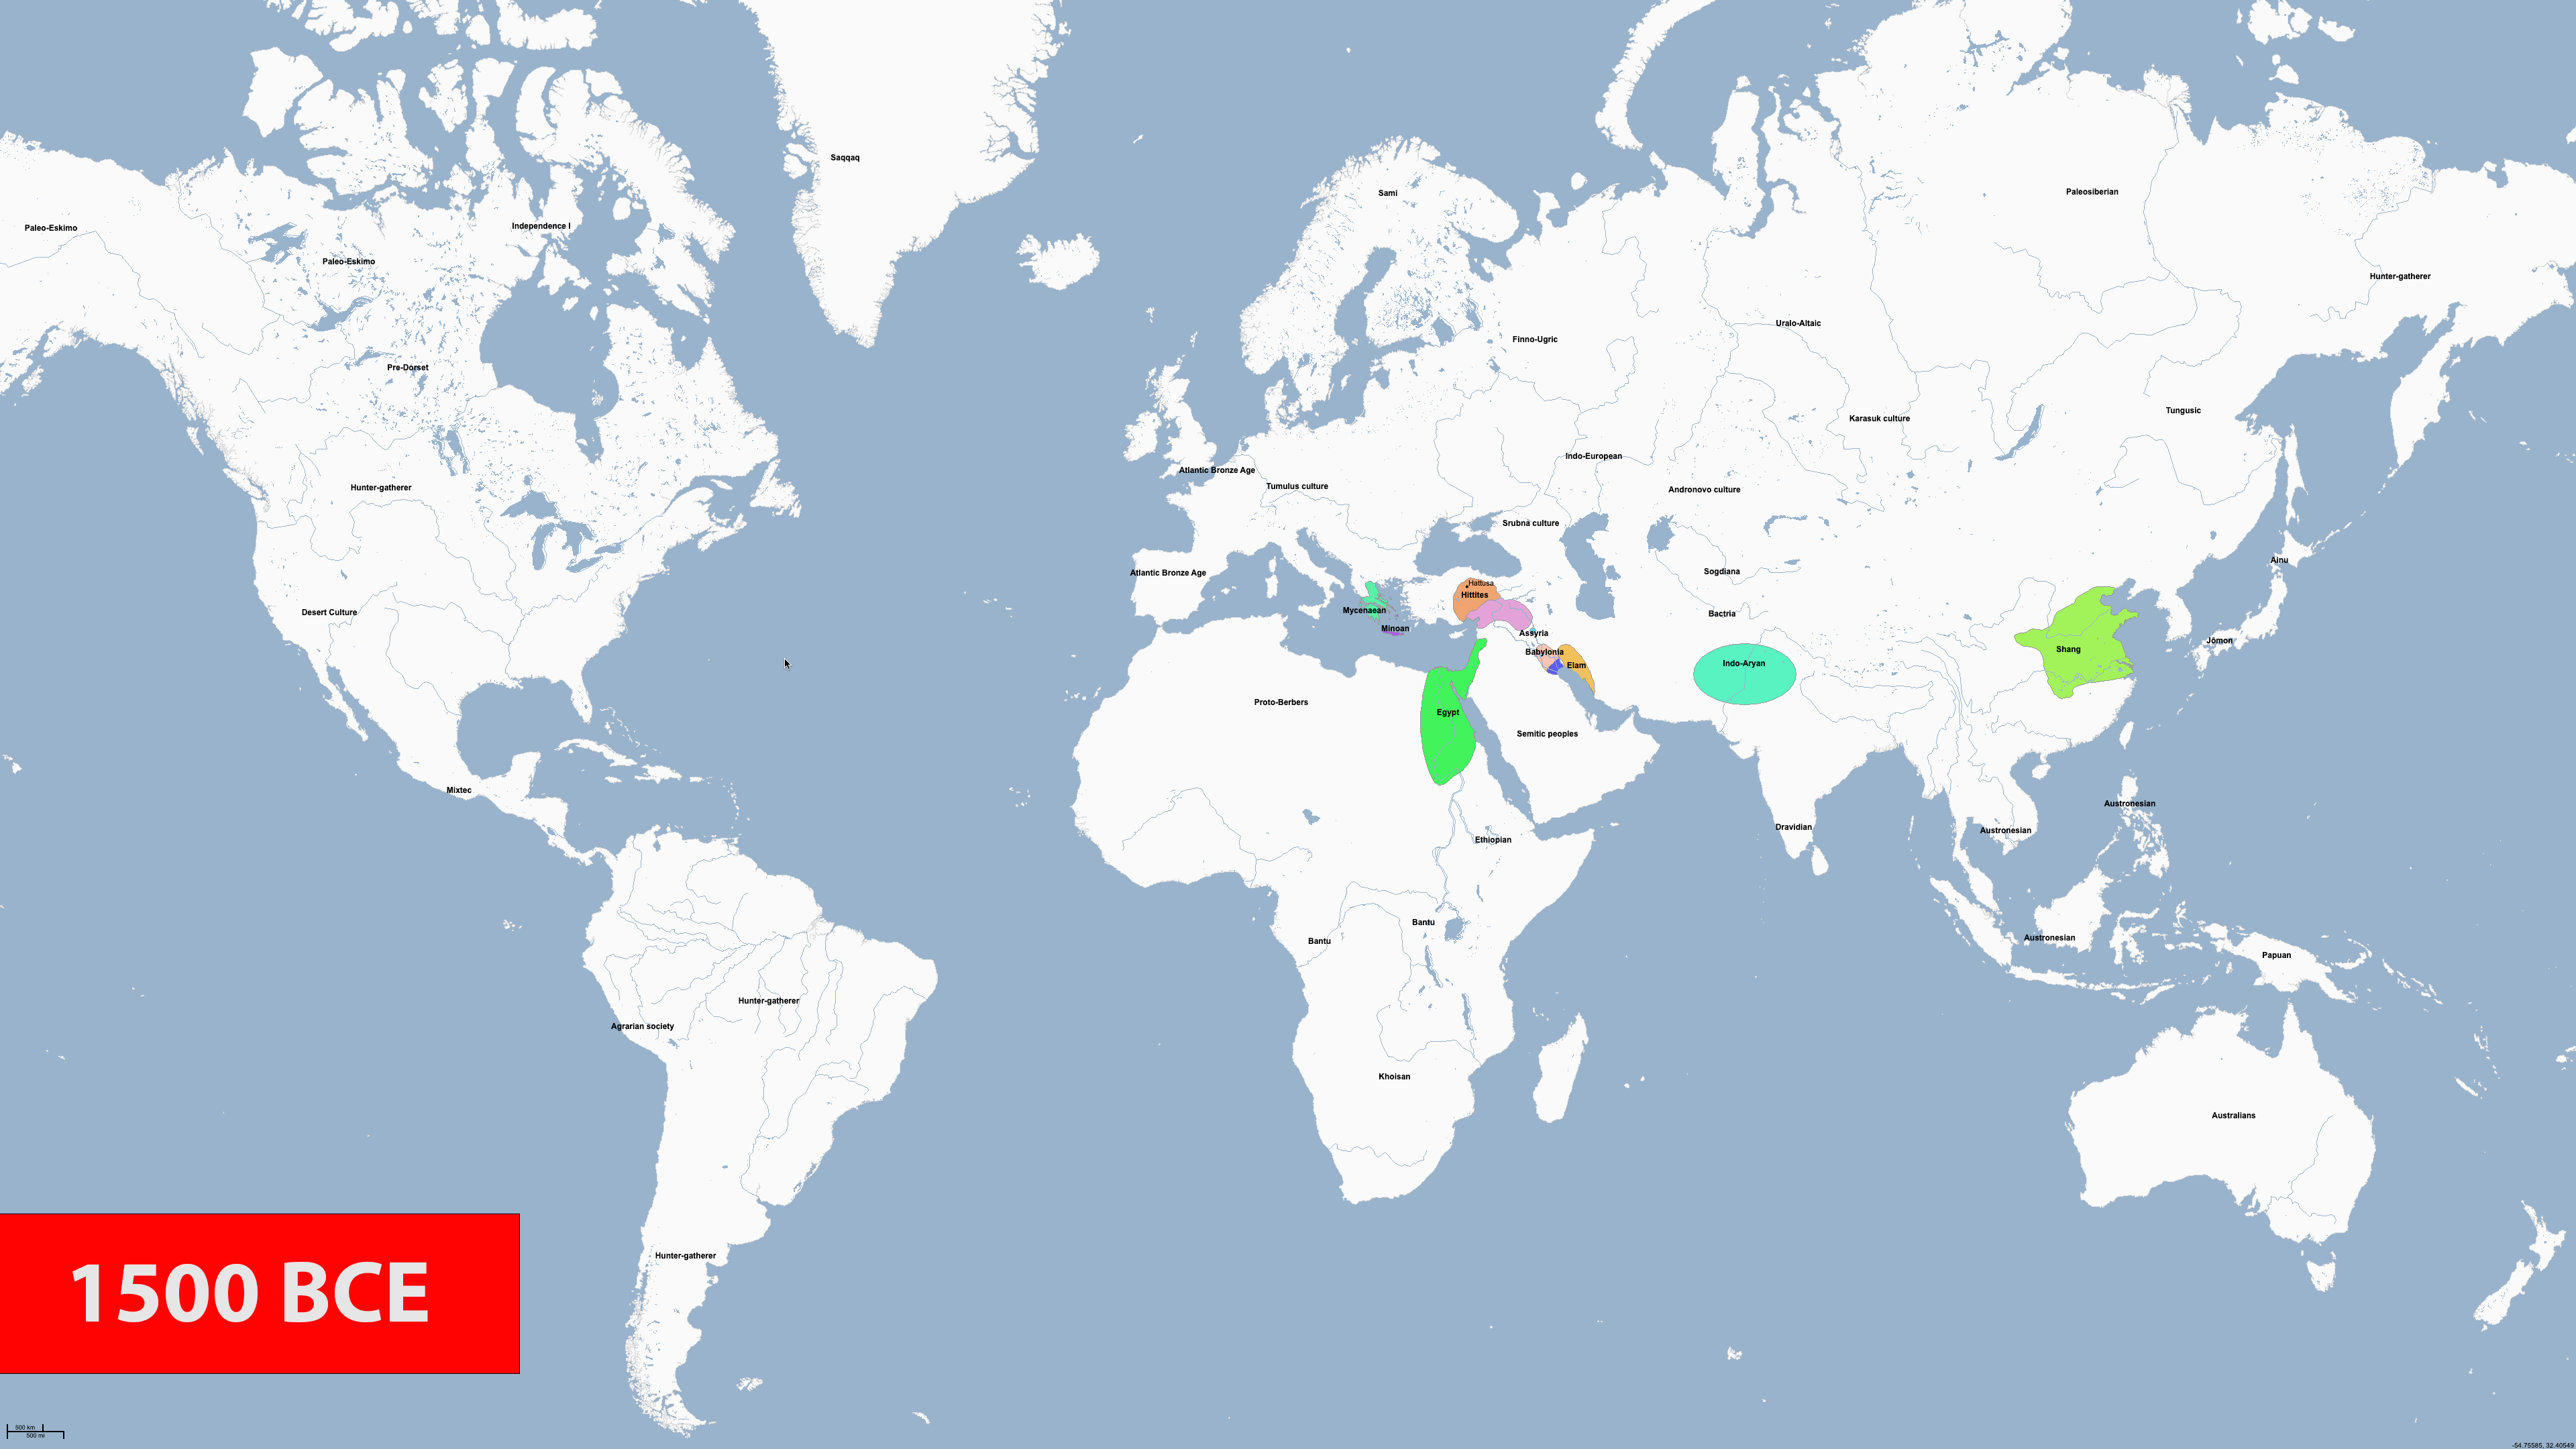
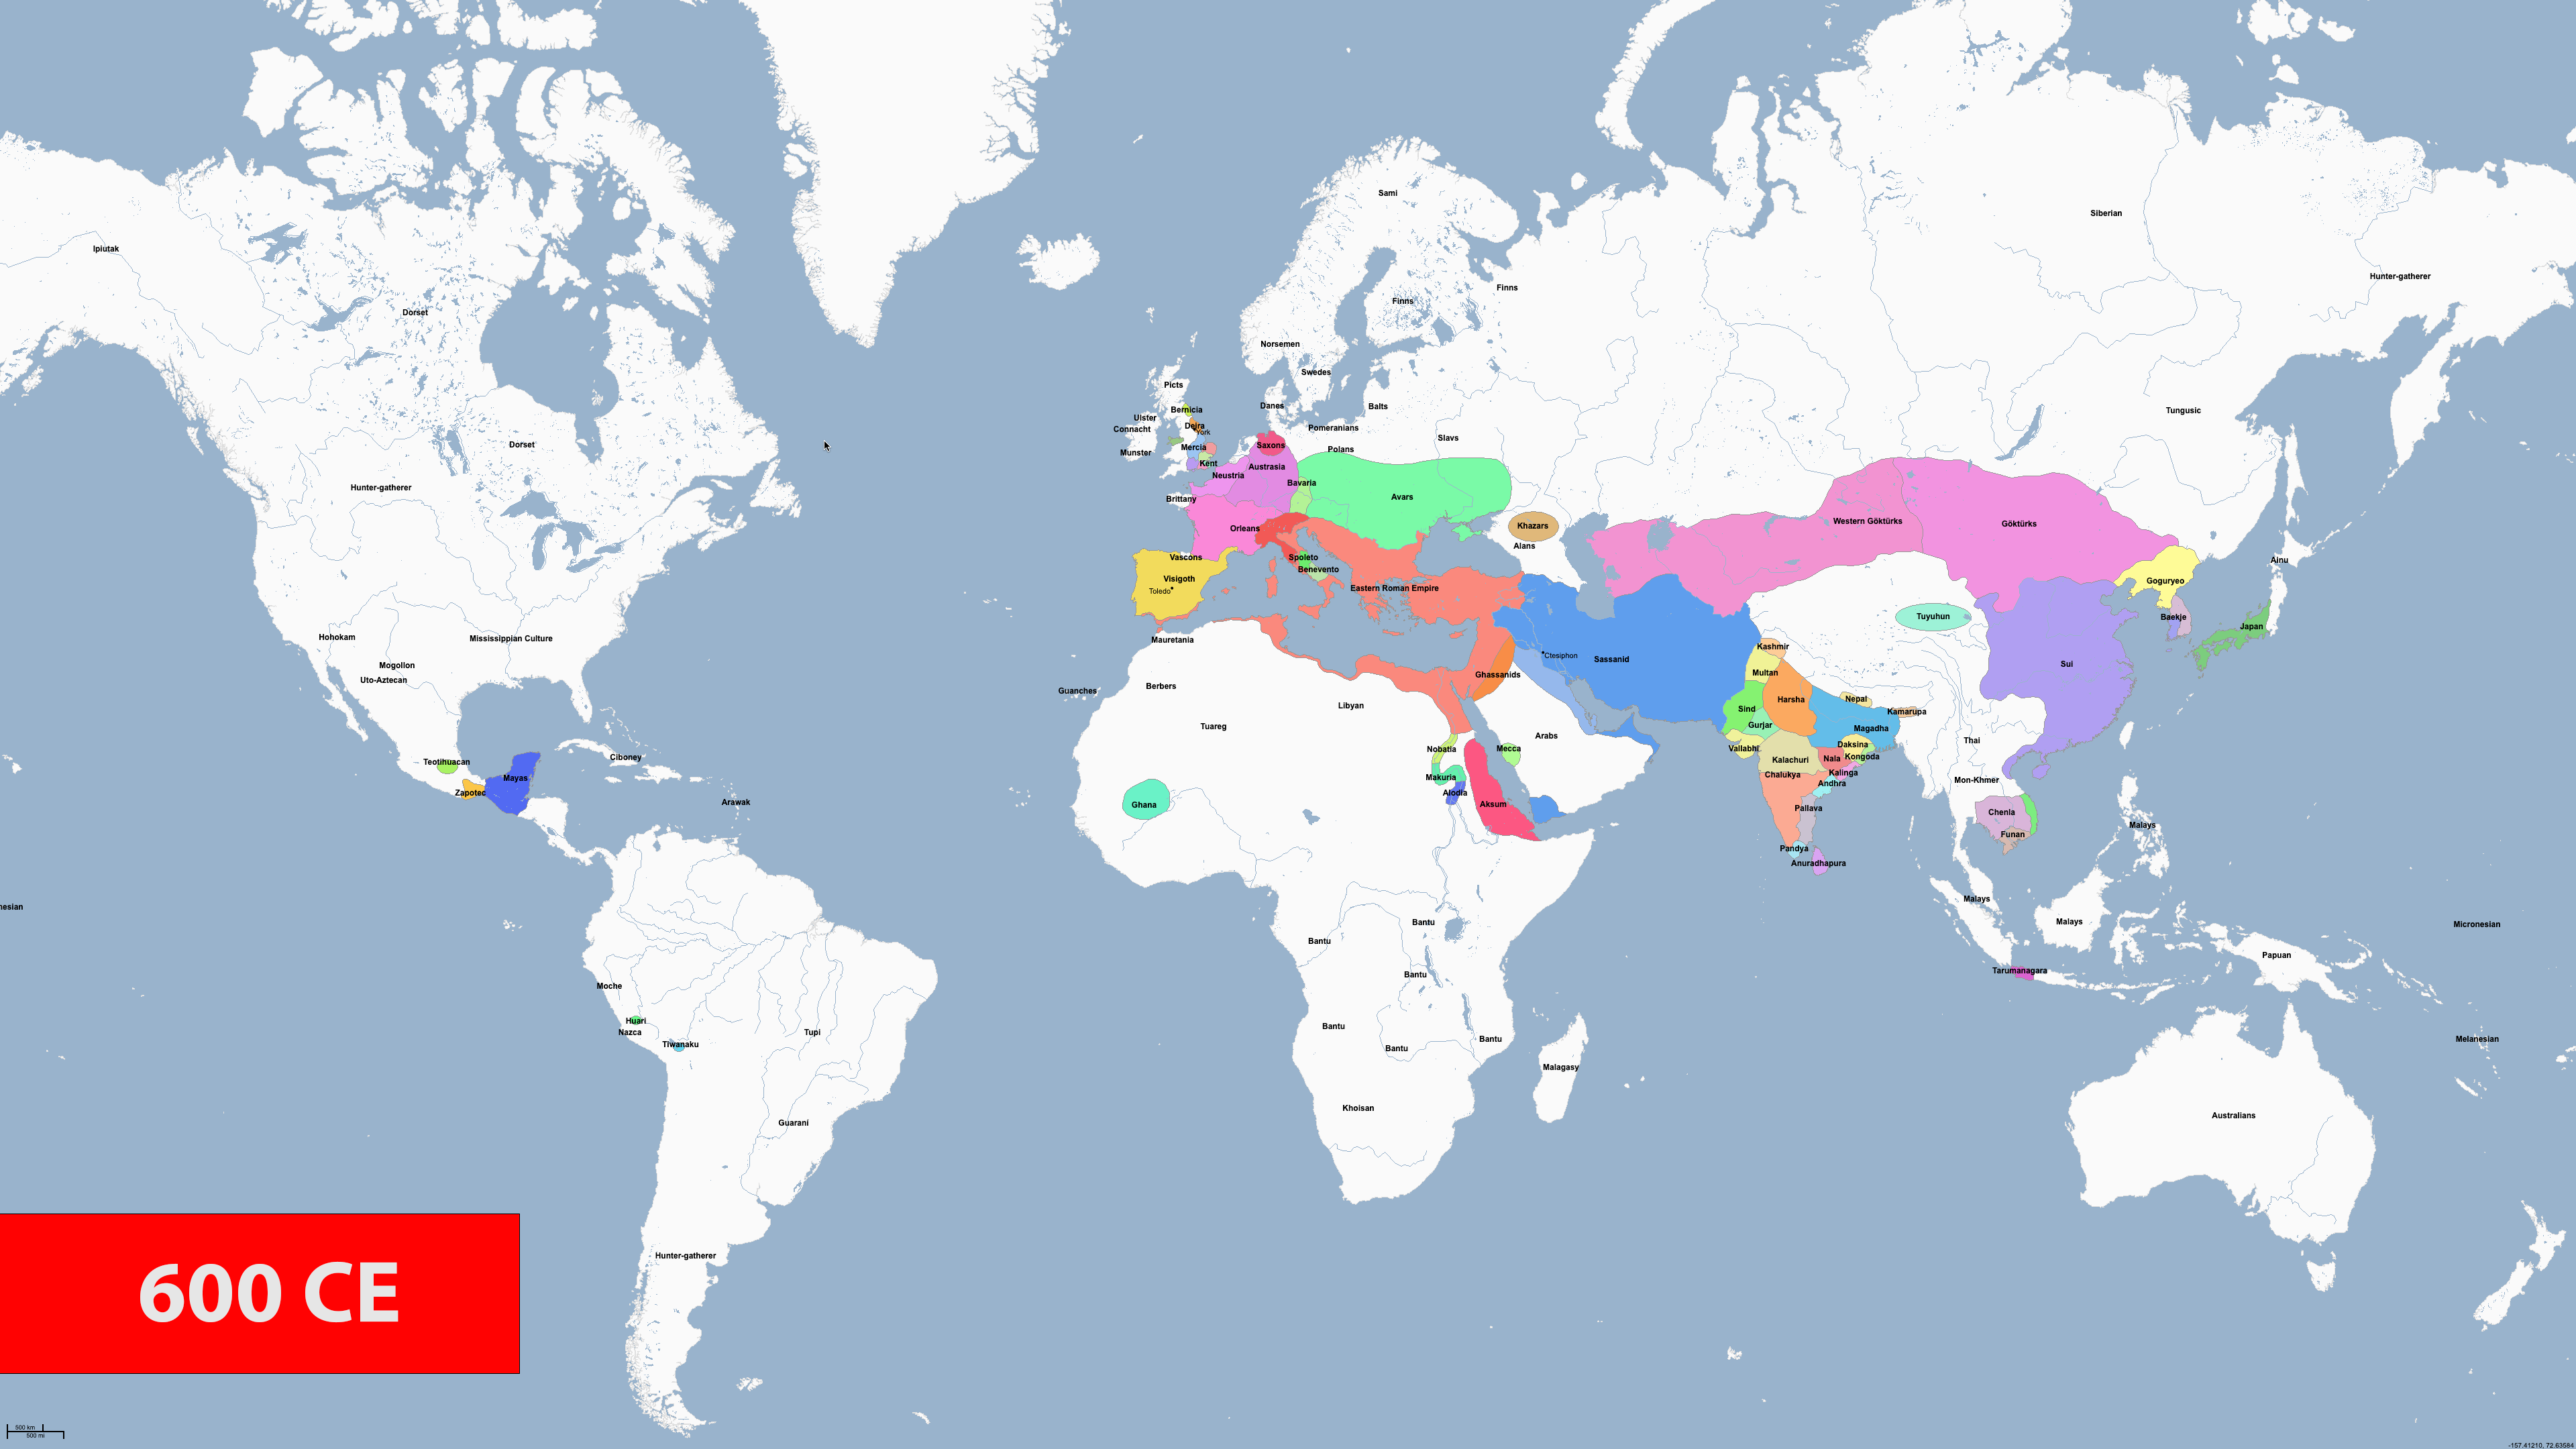
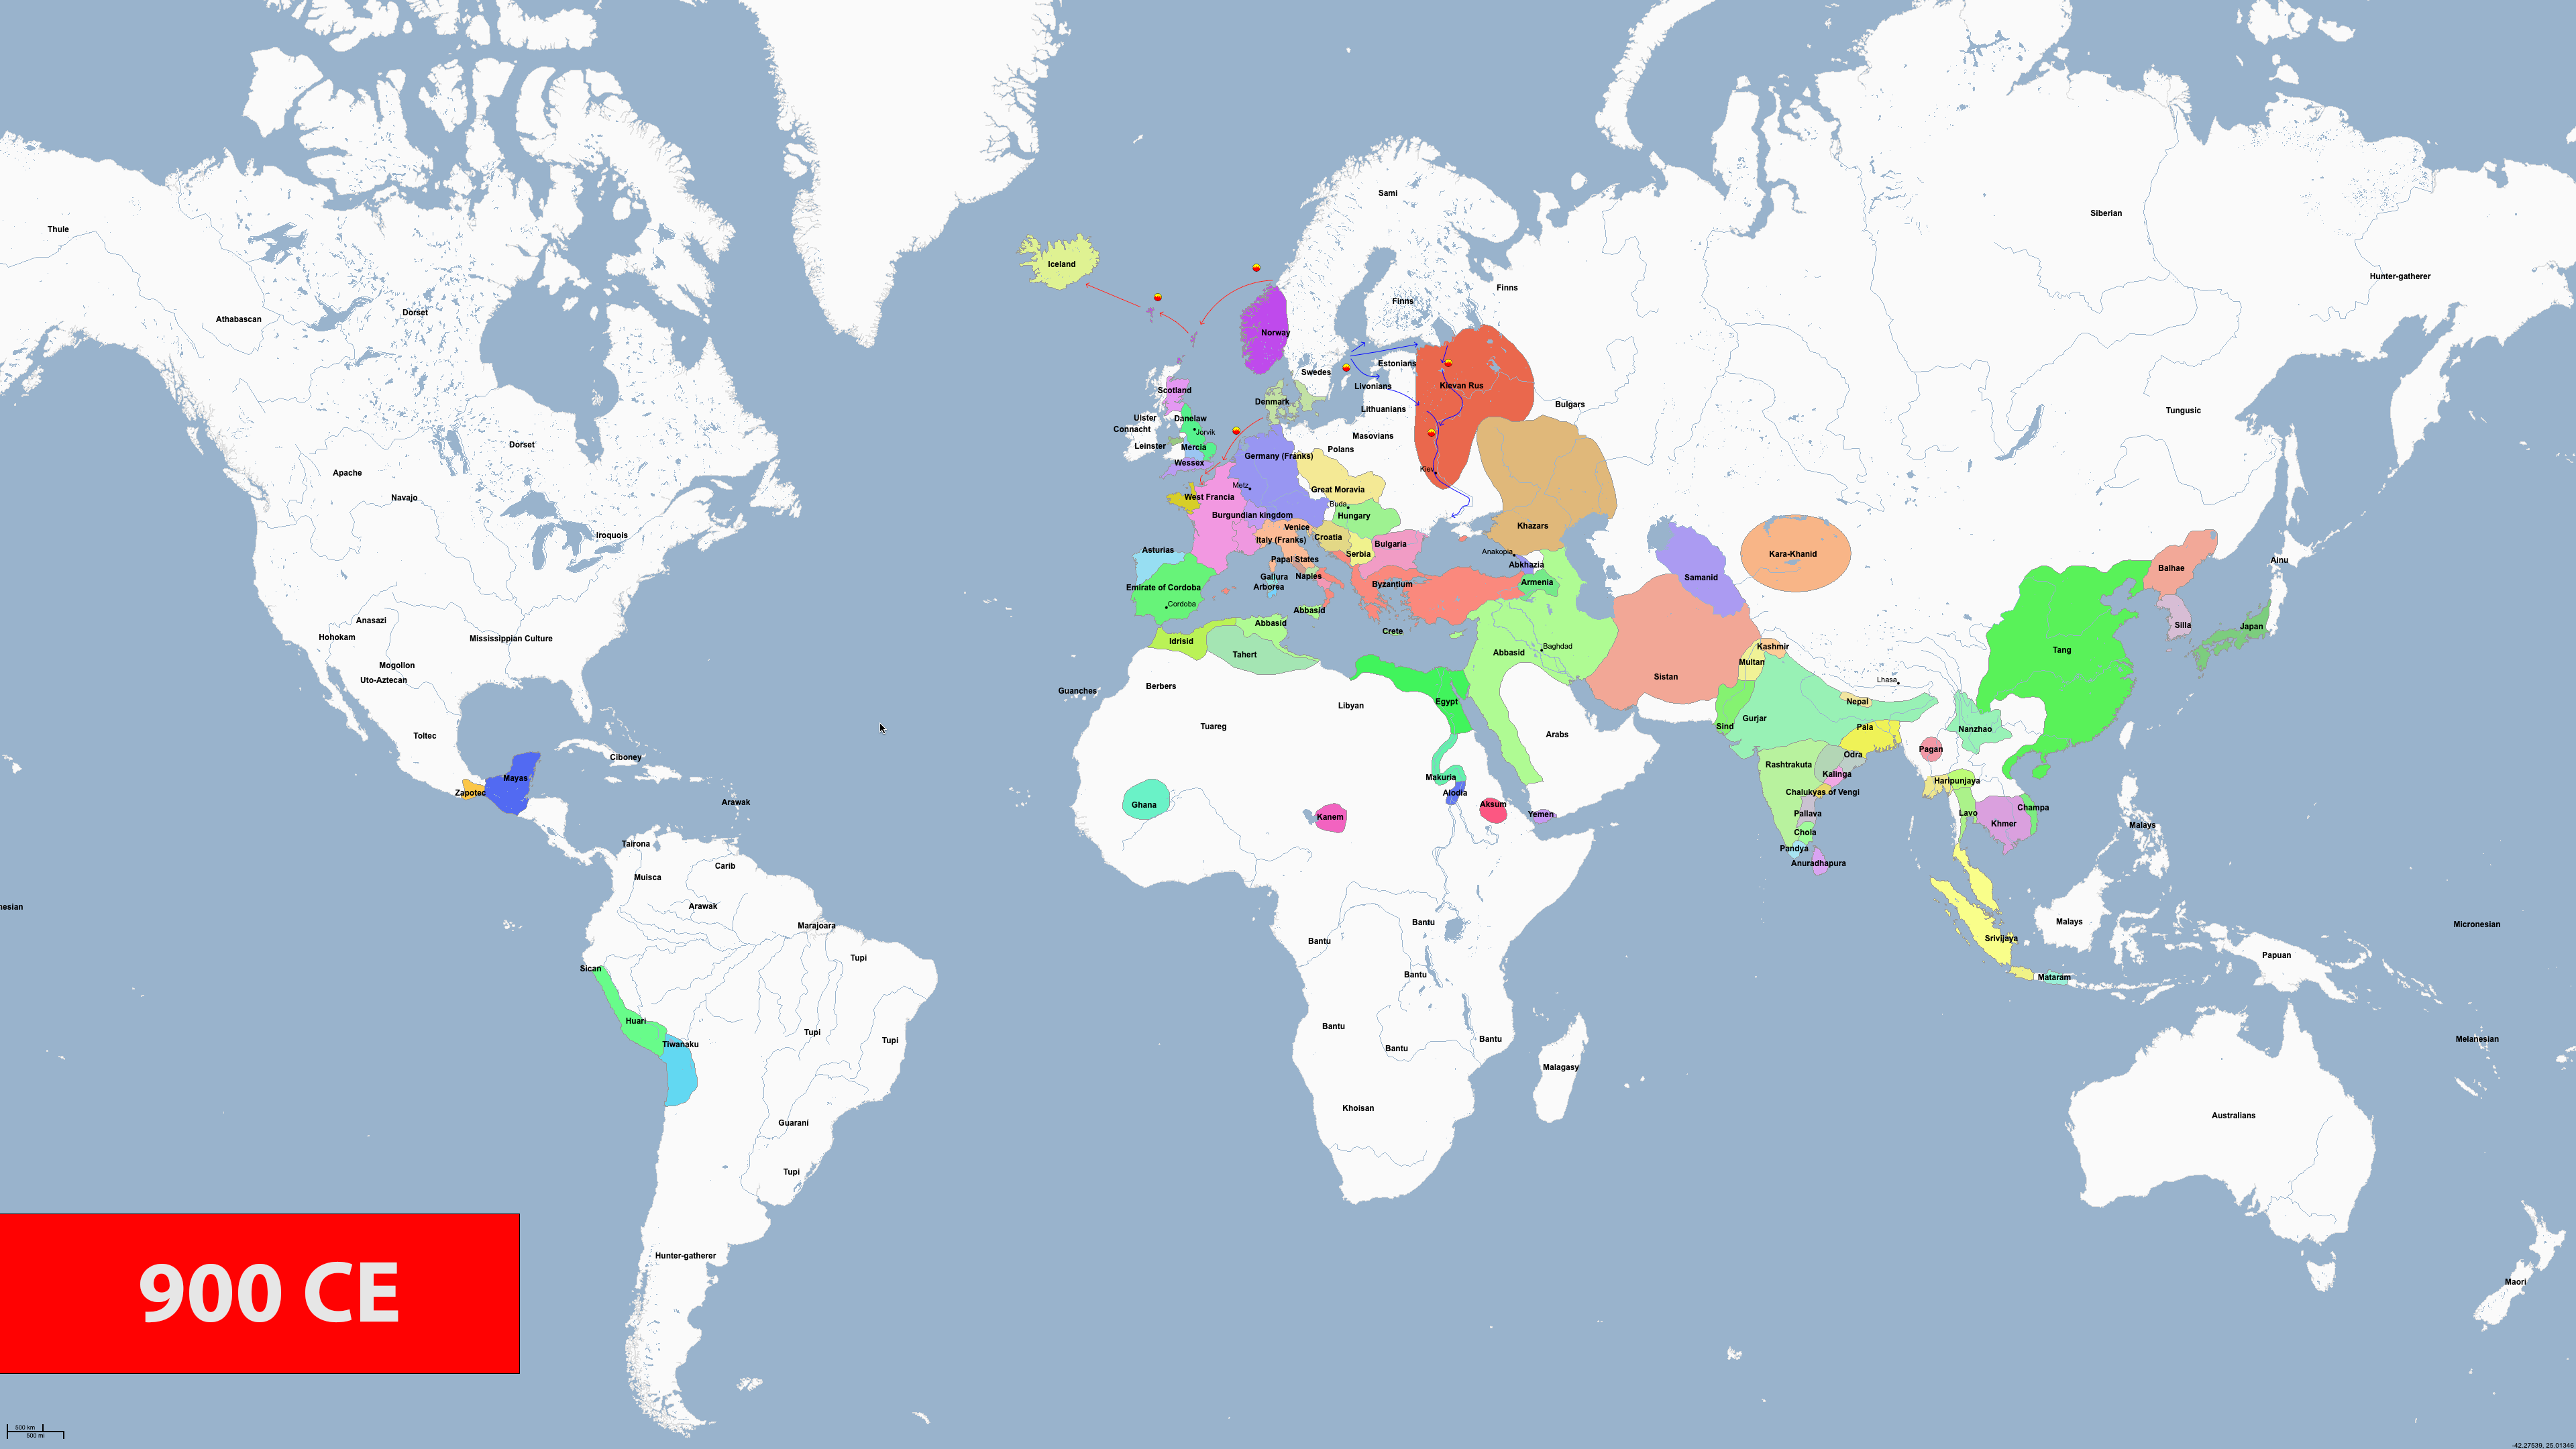
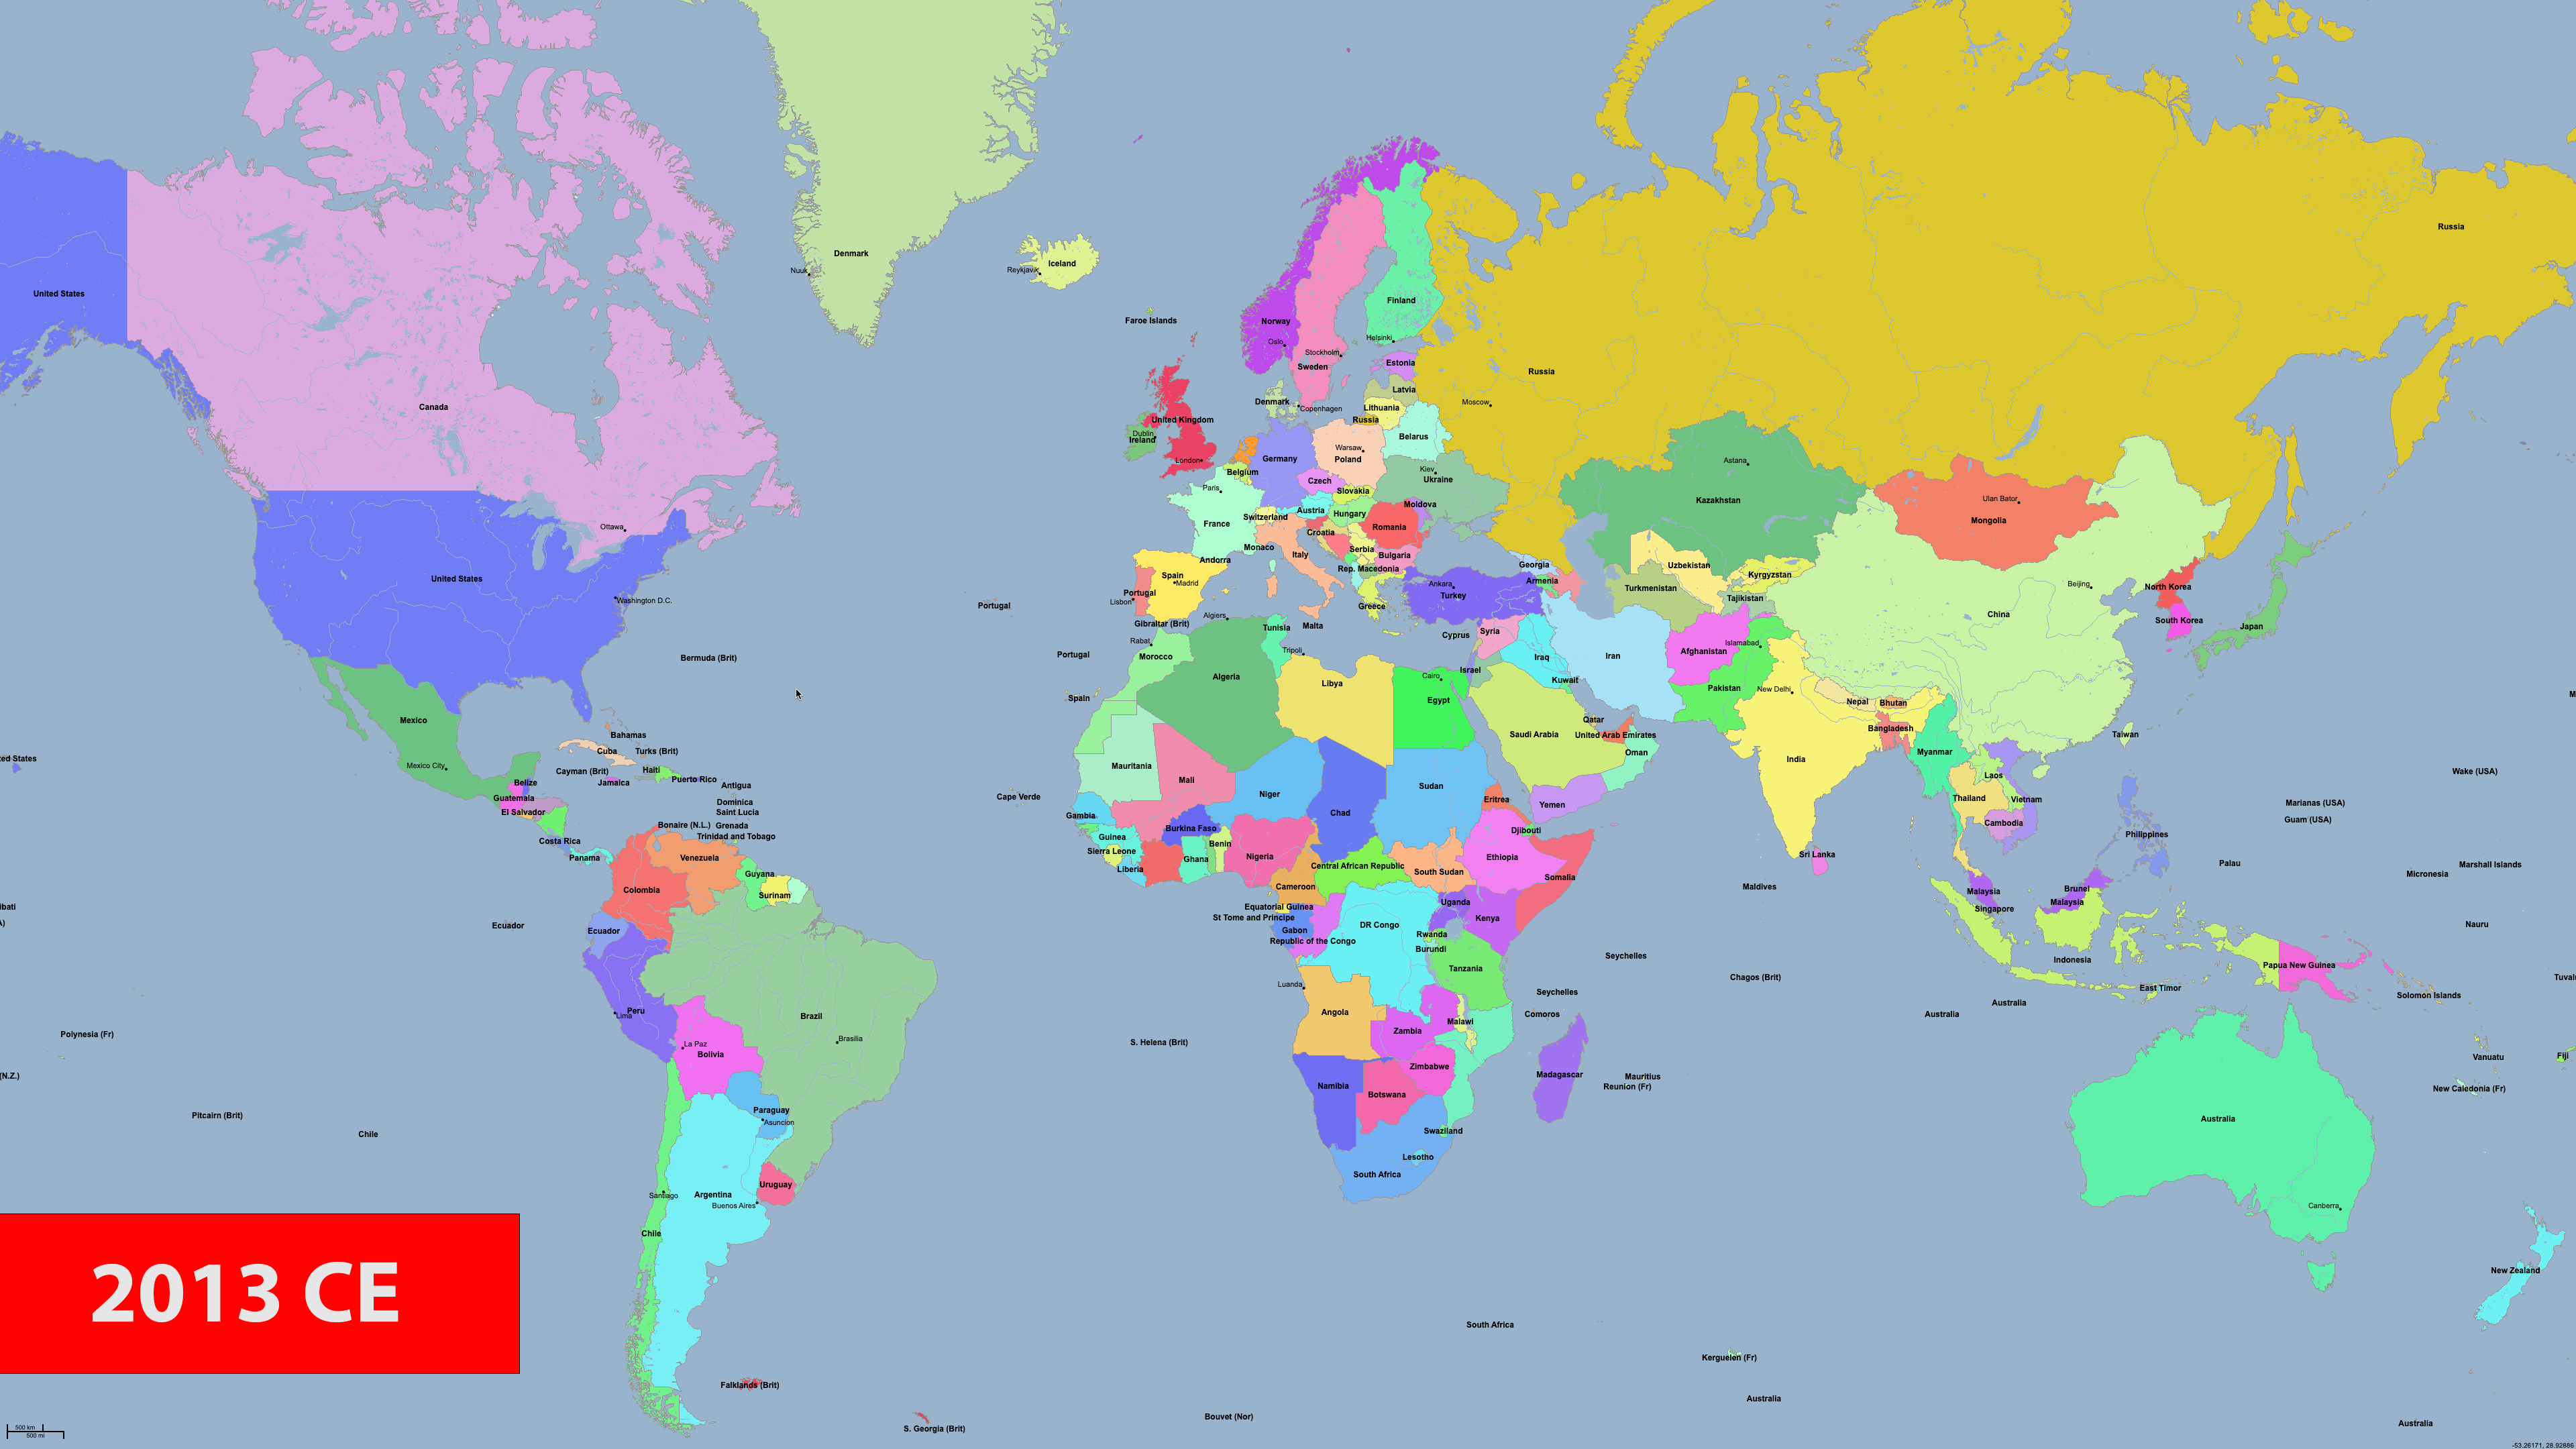