License Plates


Shirts


Sources:
- https://geek-t-shirts.com/collections/coding-t-shirts
- https://www.zazzle.com/code+tshirts
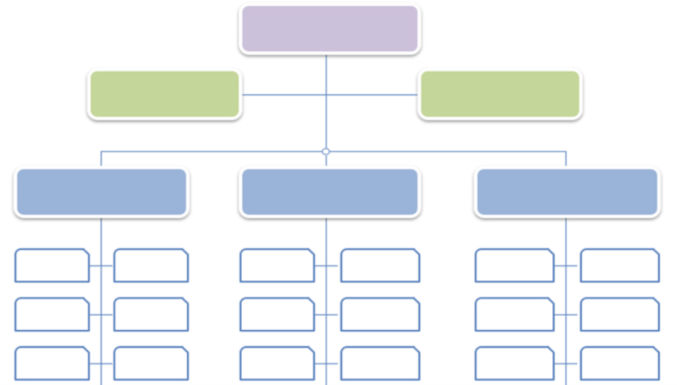
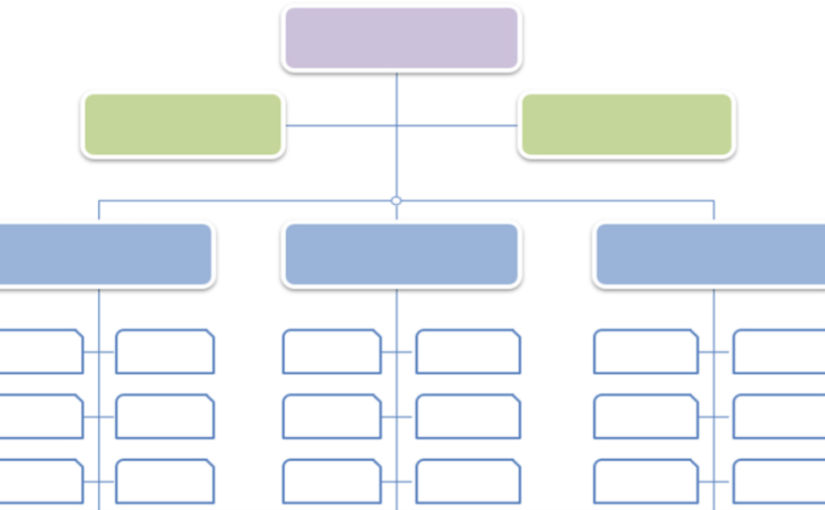
In my 12 years working in Marketing, I’ve see a few different organizational structures at both low and high levels. And in my particular role, I’ve had to work with pretty much everyone, which has given me exposure to many issues that often go unnoticed. While there are many ways you can structure an organization, whatever way you come up should always make sense based on your particular organization’s needs. Following is a structure that I think makes sense based on my experience. The specific job titles (chief, VP, director, manager, senior vs junior, etc) are just an example. The important thing is that the structure and hierarchy groups people by function, commonality and importance. The structure below is for a 2000+ employee organization. Obviously, if your organization is much smaller or larger and has more or less dependencies on particular functions, some positions and groups can be removed or consolidated or even divided and expanded.
This functional group primarily deals with marketing activities that involve text content. Since a big part of SEO involves text content, I put SEO Expert in this group.
This functional group primarily deals with marketing activities that involve visual design. Brand has to do with a company’s external public image, which relates to both public relations and design. Depending on your preference, this role could be under this “design” group or the “content” group above.
This functional group primarily deals with marketing activities that involve websites. Due to the criticality and complexity of today’s websites, significant dependencies that all functional groups often have on a company’s website, and unique technical skills that members of this group have, I made this group a standalone group rather than a subset of another group. Also, since email marketing is very effective, and because HTML emails contain code like that used on a website, I put HTML Email Expert(s) in this group. Though many marketing automation tools like Marketo include an email builder tool, I’ve found that they are limited in features and produce emails that don’t look professional unless the user has web development skills.
This functional group primarily deals with marketing activities that involve marketing automation tools like Marketo, revenue attribution tools like Bizible, data analysis and reporting tools like Tableau and Google Analytics, customer relationship management tools like Salesforce, lead processing and routing, etc.
This functional group primarily deals with marketing activities that fall under certain channels like events, e g. virtual or in-person conferences, partner marketing, etc, and demand generation activities like advertising campaigns such as Google Pay Per Click (PPC), email marketing, digital media marketing, print advertising, etc.
This functional group primarily deals with product management and product-specific marketing. For example, many tech companies have multiple products. Each product requires a specific subject matter expert, as it may be uncommon to find someone who is an expert in multiple products. Each product expert (commonly called “product manager”) basically is responsible for their own product, from understanding their product’s customers’ needs, making product feature decisions, helping market a product, e.g. by writing product page content, product-related blog posts, giving product-related webinars, etc.
There is one role that doesn’t quite fit in any of the categories above. Needless to say, many marketing activities require the collaboration of multiple functional groups, but each of these groups specialize in their own areas. There’s no such thing as a person or group who specializes (or is even interested) in everything. One big issue I often see is how certain marketing activities with a specific hard deadline, e.g. due to an earnings release or predetermined and pre-marketed event taking place, results in chaos, with many people working nights and weekends due to lack of planning, ownership and project management. That’s why there’s a particular title called Project Manager (PM) or Project Management Professional (PMP) and a certification where people can get a PMP certificate. These people don’t specialize in the various components that go into a project, but rather they keep a project on track to avoid delays, mistakes, oversight, etc. Sometimes, they have the boring task of having to keep reminding people to do their part to avoid delays caused by blocking subsequent tasks. Assigning a random person to be a temporary project manager may work for small projects involving few people, but for large projects involving many people, a “real” project manager who actually specializes in project management is needed.
Here’s a title hierarchy commonly used in many companies.

| Awakening at Wynn | 5/5 |
| Chris Angel Mindfreak | 4.5/5 |
| Vegas! The Show | 3/5 |
| America’s Got Talent Superstars | 3/5 |
| “O” by Cirque du Soleil | 2.5/5 |
| Ka by Cirque du Soleil | 1.5/5 |
UPDATE: I watched the Sphere Experience “Postcard from Earth” show at the Sphere in June 2025. It was just okay. I’d give it a 3.5/5.
| Buffet at Wynn | 5/5 |
| Buffet at Caesars Palace | 4/5 |
| Buffet at Palms | 3/5 |
| Buffet at SouthPoint | 2/5 |
Note: Though the food at the SouthPoint Garden Buffet was just 2/5 on average, the prime rib was delicious. As one the cheapest buffets in Vegas, if you like prime rib like I do, then this buffet is worth it for $36.

Vegas can get really hot in the summer, which may make you want to go to a water park.


This is just a small selection of unique buffets. Scroll further down for buffets at each hotel.


Note: This is not a complete list of hotels and attractions.


(various shows)

Shark Reef Aquarium
Daily 10:00 AM – 8:00 PM
Last Admission 7:00 PM
$29

Cirque du Soleil Michael Jackson ONE
Daily, 7 pm, 9:30 pm, $70

The Shoppes at Mandalay Bay
(wave pool, lazy river, etc)

Take free tram to Luxor and Excalibur or walk through the enclosed walkway


Take pictures of Egyptian architectural theme

Titanic Artifact Exhibition
Apr 27 – Sep 4 | 11 AM – 8 PM; Last admission 7 PM
Sep 8 – Nov 12 | 11 AM – 6 PM; Last admission 5 PM
Nov 13 – Dec 31 | 11 AM – 8 PM; Last admission 7 PM
$32

Bodies… The Exhibition
Apr 27 – Sep 4 | 11 AM – 8 PM; Last admission 7 PM
Sep 8 – Nov 12 | 11 AM – 6 PM; Last admission 5 PM
Nov 13 – Dec 31 | 11 AM – 8 PM; Last admission 7 PM
$32

Discovering King Tut’s Tomb
10 AM – 8 PM | Last Arrival 7 PM
$20

Carrot Top Comedy Show
Mon – Sat 8:00 PM
From $40

Blue Man Group
Mon – Sun 5 PM & 8 PM
From $49

America’s Got Talent LIVE
Wed, Sat & Sun | 6 PM & 8:30 PM
Thu & Fri | 7 PM
From $49

The Buffet at Luxor
MON – TUE: Closed
WED – SUN: 8 AM – 3 PM
Price Range: $


Ultimate 4-D Experience
Daily | 12 PM – 11 PM
Last Show | 20 min before close
From $12

The Australian Bee Gees show
Mon, Wed, Thu & Sun | 7 PM
Fri & Sat | 5 PM
From $40

The Buffet at Excalibur
MON – SUN: 7 AM – 2 PM
Price Range: $


Ride the Big Apple Coaster
Mon – Thu | 11 AM – 11 PM
Fri – Sun | 11 AM – Midnight
From $25

Stroll through Greenwich Village
MON – THU, SUN: 7 AM – 2 AM
FRI – SAT: 7 AM – 3 AM
Price Range: $

See Terry Fator
Sun – Thu | 7:30 PM
From $35

Mad Apple by Cirque du Soleil
Fri – Tue | 7 PM & 9:30 PM
From $25


Eataly (huge Italian-inspired dining destination)
MON – THU, SUN: 7 AM – 10 PM
FRI – SAT: 7 AM – 2 AM
Price Range: $


Eat at Block 16 Urban Food Hall

Eat at Wicked Spoon buffet
Breakfast: $38
Mon – Fri | 8 – 11AM
Lunch: $45
Mon – Fri | 11AM – 3PM
Brunch: $49
Sat & Sun | 9AM – 4PM
Wicked Spoon Menu (PDF)

Have breakfast at Eggslut
Mon – Thurs | 7AM – 2PM
Fri – Sun | 7AM – 3PM


Walk Through the Bellagio Conservatory
Summer
5/27/2023 – 9/9/2023
Harvest
9/16/2023-11/4/2023
Holiday
11/11/2023- 1/6/2024

Watch the Fountains of Bellagio
M-F: Every 30 min from 3 pm to 6:30 pm, every 15 min from 7 pm to midnight.
Sat, Sun, and Holidays: every 30 min from noon to 6:30 pm, every 15 min from 7 pm to midnight.

See Cirque du Soleil’s “O”
Wed – Sun | 7 PM & 9:30 PM
From $79

Eat at The Buffet at Bellagio
MON – SUN: 8 AM – 3 PM
WED – SUN: 5 PM – 9 PM
Price Range: $


Walk the Forum Shops

Eat at Bacchanal Buffet
Regular Brunch, $60, Thursday – Monday | 9 AM – 1 PM
Dinner: $80, must RSVP, very crowded


See Cirque Du Soleil’s Beatles LOVE show
7:30 PM, 9 PM
From $69

Watch Shin Lim – Limitless (magic show)
Mon, Thu – Sun | 7:30 PM
From $50

See Mirage volcano show
Every evening at 7 pm, 8 pm, 9 pm, 10 pm, and 11 pm.


Watch a show at Resorts World Theatre


Midway and Arcade (carnival games)
SUN – THU: 11 AM – 9 PM
FRI – SAT: 11 AM – 12 AM

Eat at THE Steakhouse
Mon – Fri, Sun: 4 PM – 9 PM
Sat: 4 PM – 10 PM
Price Range: $$$


SkyPod observation deck
10am – 1am Daily, $20

Big Shot
Daily 2pm – 10pm, $31

Insanity
Daily 2pm – 10pm, $31

X-Scream
Daily 2pm – 10pm, $31

Eat at Top of the World Steakhouse (floor rotates)


Take the Las Vegas Monorail to get to other hotels


See Lake of Dreams (free show)

See “Awakening” show
Sun & Mon at 7 pm
Tue, Fri & Sat at 7 pm and 9:30 pm
From $99


See Cirque du Soleil’s Mystere
FRIDAY – TUESDAY*
2 Shows | 7 p.m. & 9:30 p.m.
Arrive 30 mins early for pre-show entertainment
Actual performance time is approximately 90 mins
$64 – $135


Take a gondola ride
$39

Visit Madame Tussauds Wax Museum
10 AM – 8 PM


High Roller Observation Wheel
Daytime (Daily 12 PM to 7 PM)
Adult $23.50
Night (Daily 7 PM – 12 AM)
Adult $34.75

FlyLINQ Zipline
4 PM – 12 AM
$35

Mat Franco’s Magic Show
7 PM
$49 – $108

Eat at Hash House a Go Go (huge portions)
SUN-THU: 7:30 AM-3 PM
FRI & SAT 7:30 AM-10 PM

Walk the LINQ Promenade (food, shops, etc)


See the Wildlife Habitat
7 AM – 8 PM

Check out Piff magic show
Mon, Thurs-Sun: 7pm
From $50


Grab a cheap snack at EatWell


Check out “Real Bodies”
Starting at $29.50

Check out Grand Bazaar Shops out front of Horseshoe

Istanbul Mediterranean in Grand Bazaar shops


Take in a Great View from the Eiffel Tower Observation Deck

Enjoy the Eiffel Tower Free Light Show


Eat and drink at the Miracle Mile Shops

See Criss Angel Mindfreak magic show
Wed-Sun: 7pm
$69 – $121


Check out Cirque du Soleil KA
Sat – Wed | 7 PM & 9:30 PM
From $69

See Jabbawockeez (dance show)
Mon, Wed – Sun | 7 PM & 9:30 PM
From $50

See David Copperfield magic show
Sun – Fri: 7:00 PM & 9:30 PMSat: 4 PM & 7 PM & 9:30 PM
From $72

Eat at the Buffet at MGM Grand
MON – SUN: 8 AM – 3 PM
Price Range: $


Visit the Sphere
$69 – $129
Opens in Oct 2023

The Grand Canyon
If driving, 4.5 hours from the Strip
Driving directions
Helicopter tours

Hoover Dam
9 AM – 4:15 PM Daily
Last tour departs at 3:45 p.m.
45 mins from the Strip by car
Directions

Watch Vegas: The Show
Nightly at 7 PM
75 mins
$100 – $160

Last week, I had solar panels installed on my roof. The installers secured their ladder to my roof / eaves using the Guardian Fall Protection “Ladder Stability Anchor”.

The way it works is you clamp the clamp onto your eaves, secure the hooks to the hole on the clamp, then wrap the straps around your ladder, securing it using the hook and loop velcro.

It’s a simple idea, but the price is $90. It just went on sale for $56, but that still seems overpriced. Not sure why Harbor Freight hasn’t created a cheaper alternative.

Anyway, you can probably make your own for much less by just using


For an easy-to-transport ladder, this telescoping ladder ($160) is great.
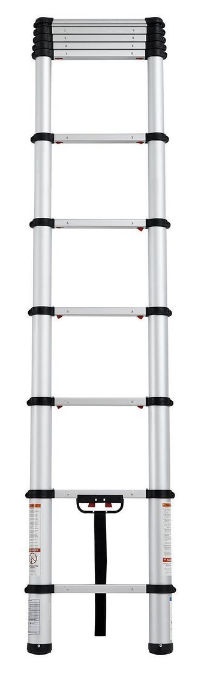
If you need this for your own home and there is one spot you would always use to get on the roof, and if you want a more secure solution, replace the C-clamp with a large screw eye or eye bolt with nut and use the ratchet straps instead of the cam buckle strap.


I’m currently migrating a large website from Handlebars to Nunjucks. Since the website is being updated daily, and because there are too many pages, I can’t convert the Handlebars syntax to Nunjucks syntax manually. To solve this, I started writing a script to convert the syntax programmatically using JavaScript (nodeJS). So far, it’s working very well. Here’s how I’m doing it, and how you can do something similar when confronted with a migration project.
Basically, the way it works is
Those are simple search-and-replace situations. There may be a situation where you’ll need an advanced search and replace, e.g. when replacing
{{> social-list
    dark="true"
    centered="true"}}
with
{% set dark="true" %}
{% set centered="true" %}
{% include social-list.njk %}
In this case, you can use a “replacer” function, which allows you to do much more to manipulate the output.
If you need to test regular expressions, https://regexr.com/ may come in handy.
When you’re all done and you’ve built the HTML files from both the handlebars templates and the nunjucks templates, you can write a script that recursively reads all HTML files in the build output folder and lists each HTML file path generated from each handlebars and nunjucks template along with their respective file size. The file sizes should be the same or almost the same. If some are not, then the migration script didn’t convert those templates correctly. Maybe something like:
| File Path | File Size (KB) (hbs) | File size (KB) (njk) | Difference (KB) |
|---|---|---|---|
| /index.html | 181.3 | 180.7 | 0.6 |
| /about/index.html | 153.2 | 23.5 | 129.7 |
| /products/index.html | 353.6 | 350.2 | 3.4 |
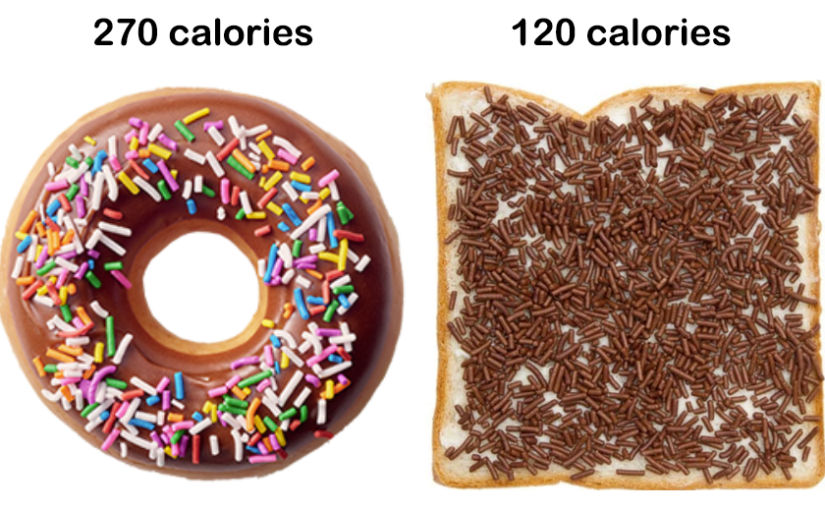
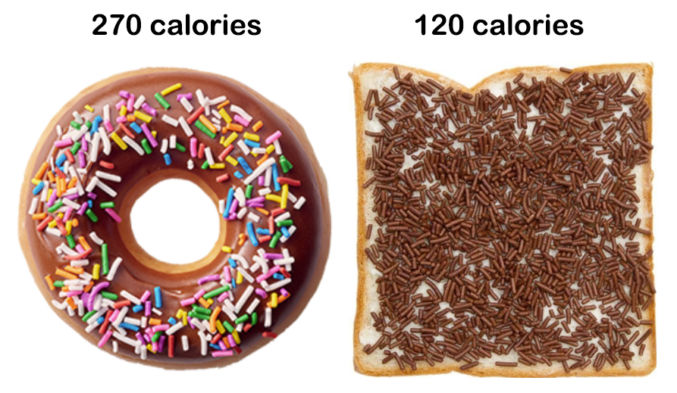
The average sprinkle donut has 260 calories.

For a similar low-calorie alternative, replace that with Dutch Hagelslag. The recipe below contains only 120 calories!

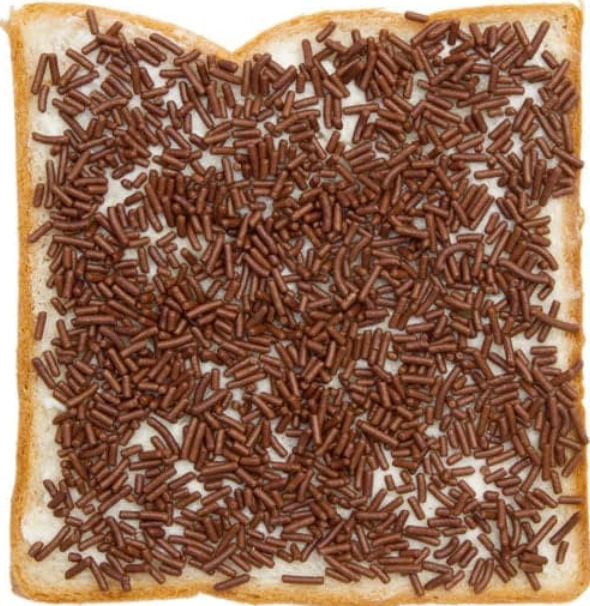
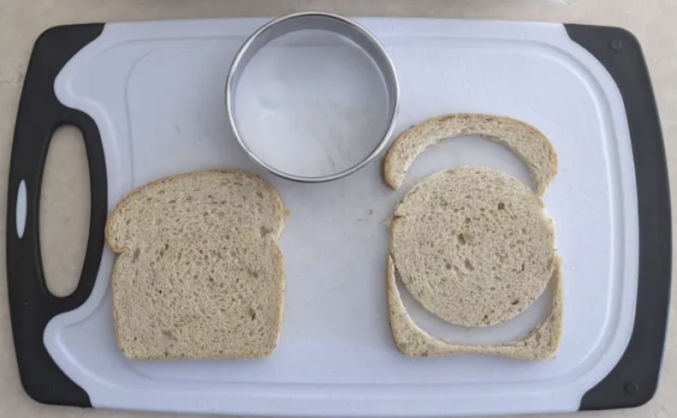
If you must have the shape be like a donut, you can use a large and small cookie cutter to turn the bread slice into a donut.

This post explains at a high level how taxation in the US works. This article only talks about federal taxes, not state taxes.

There are 2 types of income
When you file your taxes, you can choose from one of the following, depending on your situation:
| Income | Marginal Tax Rate / Bracket |
|---|---|
| Up to $11,000 | 10% |
| $11,000+ to $44,725 | 12% |
| $44,725+ to $95,375 | 22% |
| $95,375+ to $182,100 | 24% |
| $182,100+ to $231,250 | 32% |
| $231,250+ to $578,125 | 35% |
| Over $578,125 | 37% |
| Income | Marginal Tax Rate / Bracket |
|---|---|
| Up to $22,000 | 10% |
| $22,000+ to $89,450 | 12% |
| $89,450+ to $190,750 | 22% |
| $190,750+ to $364,200 | 24% |
| $364,200+ to $462,500 | 32% |
| $462,500+ to $693,750 | 35% |
| Over $693,750 | 37% |
For brevity, I omitted other tax filing statuses, including
The tax rates are also called “tax brackets” and “marginal tax” rates.
Historical US income tax rate brackets
| Income | Short-Term Tax Rate (same as ordinary income tax rate) |
|---|---|
| Up to $11,000 | 10% |
| $11,000+ to $44,725 | 12% |
| $44,725+ to $95,375 | 22% |
| $95,375+ to $182,100 | 24% |
| $182,100+ to $231,250 | 32% |
| $231,250+ to $578,125 | 35% |
| Over $578,125 | 37% |
| Income | Short-Term Tax Rate (same as ordinary income tax rate) |
|---|---|
| Up to $22,000 | 10% |
| $22,000+ to $89,450 | 12% |
| $89,450+ to $190,750 | 22% |
| $190,750+ to $364,200 | 24% |
| $364,200+ to $462,500 | 32% |
| $462,500+ to $693,750 | 35% |
| Over $693,750 | 37% |
If you have $90,000 in taxable income from your salary and $10,000 from short-term investments, then your total taxable income is $100,000.
| Income | Long-Term Tax Rate |
|---|---|
| Up to $44,625 | 0% |
| $44,626 to $492,300 | 15% |
| Over $492,300 | 20% |
| Income | Long-Term Tax Rate |
|---|---|
| Up to $89,250 | 0% |
| $89,251 to $553,850 | 15% |
| Over $553,850 | 20% |
The IRS offers individual tax filers the option to claim the standard deduction or a list of itemized deductions.
The standard deduction is a set amount that tax filers can claim if they don’t have enough itemized deductions to claim. For the 2022 tax year, individual tax filers can claim a $12,950 standard deduction ($13,850 for 2023). If you are married filing jointly, the standard deduction is $25,900 ($27,700 for 2023).
If you plan to itemize deductions rather than take the standard deduction, these are the records most commonly needed:
A tax credit will lower your tax liability (any taxes you owe). If you don’t owe any taxes, then you may or may not get a refund, depending on the tax credit details. Some tax credit examples are
Refundable tax credit: If your tax credit is refundable, then even if you have no tax liability, e.g. if you are retired, then you will still get a refund for the entire tax credit amount.
Non-refundable tax credit: If your tax credit is non-refundable, then you will only get the full credit if your tax liability is at least as much as the tax credit. For example, if your tax credit is $1000 and your total tax liability before applying the credit is $1500, then your updated tax liability is reduced to $500. However, if your total tax liability before applying the credit is $800, then your updated tax liability is reduced to $0 and you will NOT get a refund for $200. For that reason, you should ensure your tax liability is at least as much as the tax credit you want to apply.
The US has a progressive tax system, so your income is taxed at different rates. If your total annual income is $125,000 and your taxable income is $100,000 (income minus deductions and credits) and you are filing single, your tax liability would not be 24% of the entire $100,000. Instead, it would be $17,400. In this case, your “effective” or “average” tax rate is $17,400/$125,000 = 13.9%, which is much lower than 24%.
| Short-Term Income | Marginal Tax Rate | Tax Liability ($) |
|---|---|---|
| Up to $11,000 | 10% | $11,000 x 10% = $1,100 |
| $11,000+ to $44,725 | 12% | ($44,725 – $11,000) x 12% = $4,047 |
| $44,725+ to $95,375 | 22% | ($95,375 – $44,725) x 22% = $11,143 |
| $95,375+ to $182,100 | 24% | ($100,000 – $95,375) x 24% = $1,110 |
| $182,100+ to $231,250 | 32% | N/A |
| $231,250+ to $578,125 | 35% | N/A |
| Over $578,125 | 37% | N/A |
| Total | $17,400 |
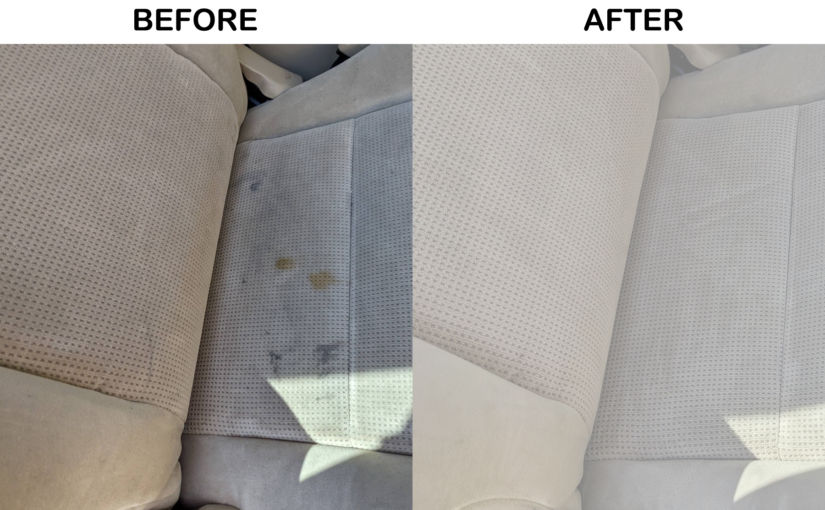
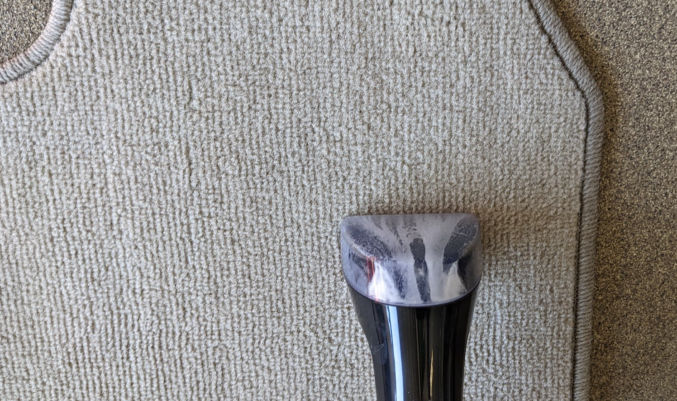
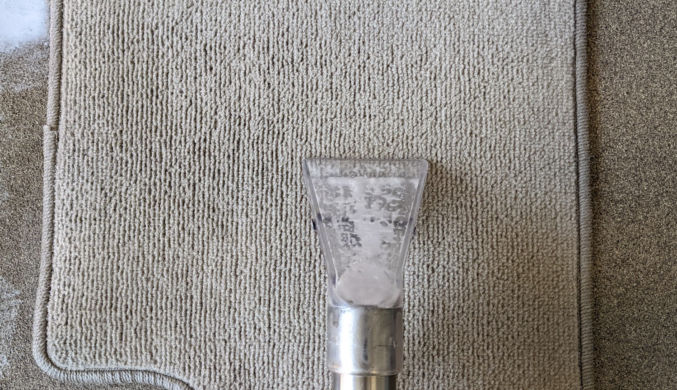
If your car seats, floor mats and furniture are made of upholstery, they will eventually get dirty. Fortunately, cleaning them isn’t too hard if you use the right tools and technique. I recently cleaned an old car seat and floor mats. The process was simpler than I thought. Here’s a before and after pic.
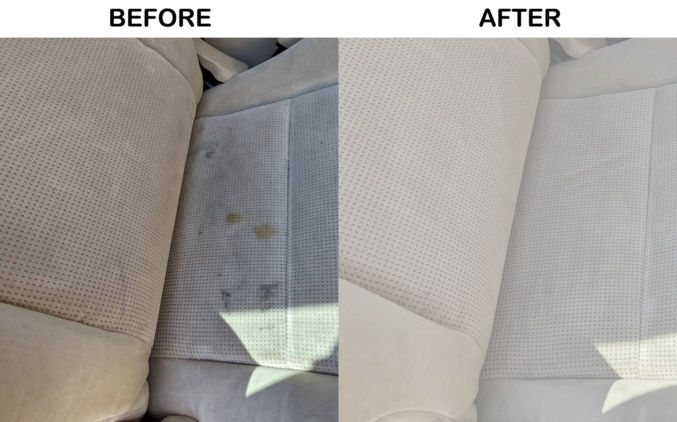
And here’s how to do it.
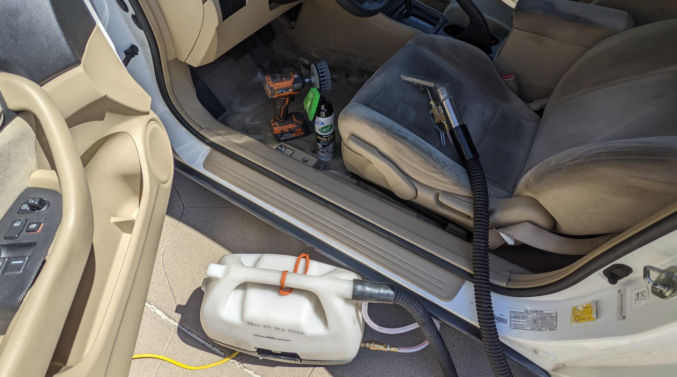
I have the Bissel SpotClean Pro.

I also rented the Karcher Carpet Cleaner and Detailer from Home Depot to compare it to the Bissel.

Both of these tools have 2 functions;
You could also just use a spray bottle to squirt the cleaning solution.
You can also use a wet shop vac, but it’s helpful to have a hose head that is transparent so you can see if any water is left in the upholstery. Here’s a transparent extractor nozzle designed to fit all shop vacs.

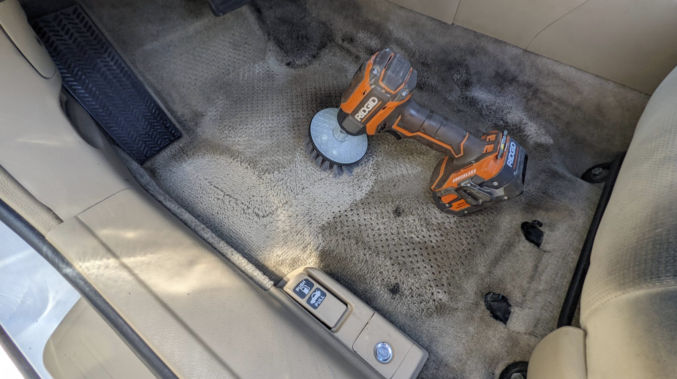
The Bissel nozzle includes a brush, but it’s better to use a drill brush. For the drill brush, I went with this one on Amazon. Make sure to choose brushes designed for upholstery.

This one includes 4 items:

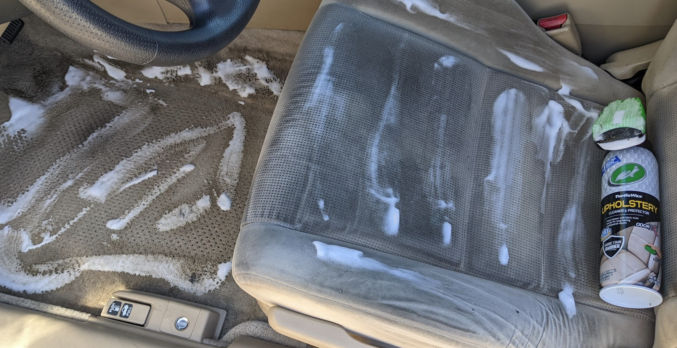


When cleaning upholstery in this way, not a lot of water is needed. After sucking the water, very little is left, so it doesn’t take long for the material to dry.
According to RocketMortgage, the average mortgage term is 30 years and the average length is under 10 years. This is because homeowners will either refinance their home, like I did to get a much lower interest rate, or because they want to move. Refinancing your mortgage to get a lower interest rate makes sense if the new rate will be much lower such that you’ll end up saving money. You’ll just have to keep in mind that if you’ve had your mortgage for 10 years, for example, and you refinance, the clock resets and you’ll have 30 years to pay off your mortgage instead of 20. For this reason, I personally continue to pay the same monthly payments at the higher interest rate so that I pay less interest and the mortgage is paid off sooner.
But what if you sell your home to buy a new one within 10 years? What many people may not realize is that by doing this, they will lose a lot of money because their home loan is an amortized loan rather than a simple interest loan. Amortized loans favor lenders, like banks, instead of borrowers. Unlike a simple interest loan, where you’re paying the same amount towards principal and interest each month, when you get a mortgage, most of your monthly payments go towards interest in the beginning and less near the end of the 30-year term.
Consider an amortization schedule for this loan:
| Loan Amount | $400,000 |
| Interest rate | 6.731% |
| Loan Term | 30 years |
| Total principal payments | $400,000 |
| Total interest payments | $532,165 |
Note that your total interest payments over 30 years is more than the loan amount.
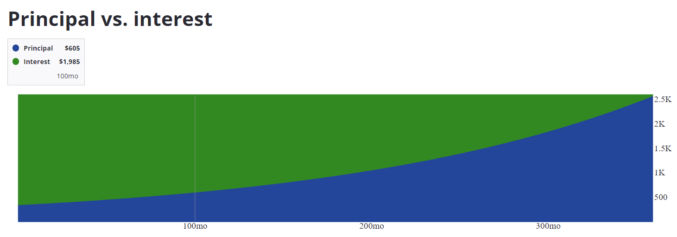
Let’s take a few points in time and compare how much of your monthly payment goes towards principal and interest.
| Principal | Interest | Percent Towards Interest | |
|---|---|---|---|
| First mortgage payment | $346 | $2244 | 86.64% |
| Mortgage payment at month 100 (8.3 years) | $605 | $1985 | 76.64% |
| Mortgage payment at month 200 (16.7 years) | $1058 | $1531 | 59.13% |
| Mortgage payment at month 236 (19.7 years) | $1294 | $1295 | 50% |
| Mortgage payment at month 300 (25 years) | $1851 | $738 | 28.51% |
| Mortgage payment at month 360 (30 years) | $2578 | $14 | 0.54% |
As you can see, in the first 10 years of your mortgage, the bulk of your monthly payments goes towards paying interest. Your equity from paying down the principal is very little. Therefore, if you sell your house within the first 10 years and buy a new one, you’ll have little equity from your mortgage payments and, when you get a new mortgage for your new home, you’ll start over from month 1, when most of your new monthly payments will go towards interest again.
Of course, your house could appreciate significantly in 10 years, in which case the equity you gain from appreciation could outweigh the equity from paying off the principal. However, that is not always the case.
If you’re planning on selling your home within 10 years and buying a new one, it may not be worth it since you may lose a lot of money from having mostly just paid interest.
A collection of points of interest south of San Francisco

| * | San Jose – Santa Cruz Highway 17 (Scenic) |


| * | Monterey / Fisherman’s Wharf / Cannery Row |


| * | El Torito (Mexican) |


| * | Crepes on the Row |

| * | Pebble Beach / 17-Mile Drive |


| * | Carmel-by-the-Sea |

| * | California Highway 1 Scenic Route / Pacific / Gold Coast |
WARNING: Check for road closures


| * | Hearst Castle |