Many people wonder why their website doesn’t rank high for a particular keyword. Let’s take cybersecurity as an example because I am familiar with that space. A cybersecurity company usually has products and events, and a need to market them. One type of product is a tool to manage vulnerabilities. The industry refers to the topic as “vulnerability management” or “VM”. Marketers would then often ask, “why isn’t my VM product page showing up at the top of Google when people search for “vulnerability management”. Likewise, if the company has an annual user conference with session talks about cybersecurity, marketers will again often ask why their conference website doesn’t show up for the keyword “cybersecurity”. The main reason lies in search intent.
Search Intent
When people search for “vulnerability management” or “cybersecurity”, they are most likely not searching for a VM product or a cybersecurity conference. These generic terms likely indicate that they are searching for information about them rather than a tool or a conference. Consequently, search results for those terms show informational pages containing content explaining what they are as if a user searched for “what is vulnerability management” or “what is cybersecurity”.
There are 4 types of search intent:
- Navigational intent: Users want to find a specific page (e.g., “reddit login”)
- Informational intent: Users want to learn more about something (e.g., “what is seo”)
- Commercial intent: Users want to do research before making a purchase decision (e.g., “best coffee maker”)
- Transactional intent: Users want to complete a specific action, usually a purchase (e.g., “buy subaru forester”)
Therefore, for the VM tool and cybersecurity conference examples above, the correct search terms to check would be something like
- (best) vulnerability management tool
- cybersecurity conference
The qualifiers “tool” and “conference” make it clear what people’s search intent is so they find content relevant to what they are actually looking for. But how do you know what keywords people are searching for? This is where keyword research tools come in.
Keyword Research
To do keyword research, you can use a free tool like Google Keyword Planner or a paid tool like Semrush. I’ll use Google Keyword Planner. You can use it to
- discover new keywords and
- get keyword search volume and forecasts.

Continuing with our example, let’s see how many people search for the following keywords:
- vulnerability management
- vulnerability management tool
- cybersecurity
- cybersecurity conference
I enter those keywords as shown below…

and Google spits out the following data
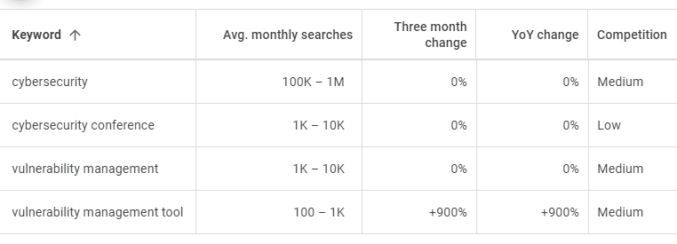
The keyword “vulnerability management” gets many more searches per month compared to “vulnerability management tool”. But, since people searching for “vulnerability management” are probably not looking for a tool or software, people will likely ignore your VM product page even if it does show up in the #1 spot. The keyword “vulnerability management tool” gets fewer searches, but ranking for it will at least match your product page with a targeted group of interested people. Therefore, you’ll want to optimize your page for the keyword “vulnerability management tool”, e.g. by adding the word “tool” to your page copy, and monitor your Google page rank for that keyword.
As for the conference example, though the keyword “cybersecurity” gets a huge number of searches per month, it’s such a generic term that most people are probably not looking for a cybersecurity conference when they search for “cybersecurity”. On the contrary, the keyword “cybersecurity conference” is more specific / targeted and gets a decent search volume. Therefore, that is the term you should optimize for and monitor your page rank for.
In addition to the keywords you may already know about, you can using Google Keyword Planner to discover other relevant keywords. For example, if I enter “vulnerability management tool”…

I get the following results.

It looks like some companies like “Qualys” and “Rapid7” are known for having vulnerability management tools, so people looking specifically for their respective product pages just use the company name as a qualifier. However, there are some non-brand keywords that get a decent amount of searches as well, including “vulnerability management program” and “vulnerability management process”. While these keywords can be included in a VM product page, they may deserve to have their own pages.
How Long to Rank High
Now that you know what keywords to target, another misunderstanding people have is that adding keywords to a page will result in a higher page rank in just a matter of weeks. First of all, keywords are just one of many factors that affect page rank. SEO is a long-term strategy. Unless you’re looking to rank high for a long-tail keyword – a keyword so specific that there is very little competition – don’t expect immediate results.