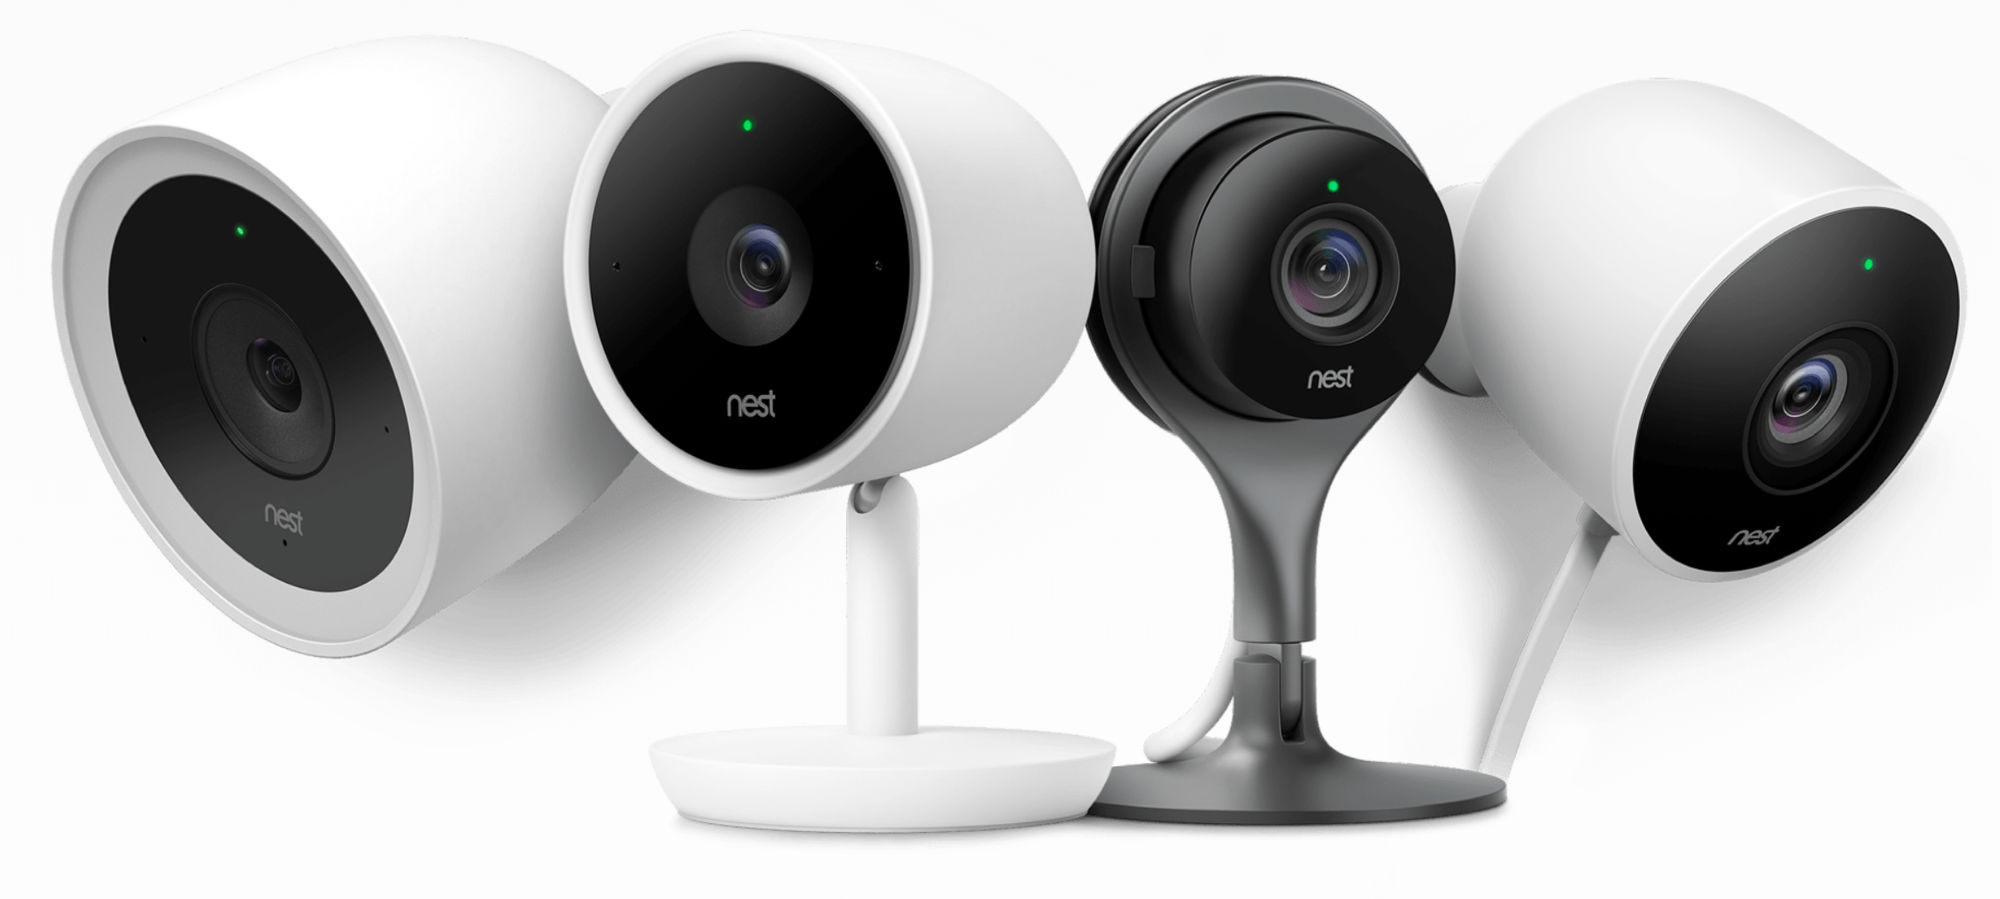
I don’t like monthly fees so when home security companies offered their services to me, I quickly said no. Instead, I bought a security camera. Now I have 3 brands of security cameras and they all have their pros and cons. If you’re in the market for a security camera, I think any one of the 3 below will do you well.
So, I’ve been trying to get more out of my music in terms of sound quality and experience. 6 years ago, I thought $30 Sony in-ear earphones were just as good as $200 earphones. Clearly my ears were not trained to know any better. As time went on, I slowly began to notice the difference between quality speakers and crappy ones. I still wanted earphones for their small size and I eventually settled on the BeatsX (bluetooth) which cost $109. The BeatsX are definitely much better than my $30 Sony earphones. Then, as time went on, I noticed that music played in my car sounded better than my BeatsX. One particular experience is the surround sound feeling you get from music in your car. With 6 separate speakers, the sounds from different instruments would appear to come from different directions in a very harmonious way. Since I wanted that experience at home, my research led me to a sound factor called soundstage. The soundstage is a speaker’s or headphone’s ability to add spatiality to the music you’re listening to. Rtings.com explains soundstage in detail and sorts headphones by soundstage. You can see the explanation and ranking at
With this ranking, I just went down the list and picked the best headphones in my budget. Here are the prices for the top 4 headphones as of this writing:
Note: I tried recording to an old 2013 Lenovo ThinkPad laptop and the sound was crappy.
Steps
Open Audacity and use the following settings
MME
Mic: Audio Technical 2100
Microphone Volumne: 80% or max, if you can
Record your voice in Audacity using the mic
There will be some hissing in the beginning and ending of the track. So, select a part of the hissing and hit Effects > Noise Reduction. Then, select the entire track, hit Effects > Repeat Noise Reduction.
Select the entire track and, in the Effects menu, click Amplify
Select the entire track and, in the Effects menu, click Truncate Silence
Select the beginning and end of the track which is before and after the vocal section.
Delete or remove sound from the beginning and ending of the track
If you linked your Google Account with your phone, if you lose your phone, you can go to the Google Android Device Manager and 1) lock your phone and 2) locate it on Google Maps so you can get it. If necessary, you can also erase the data on the phone as well.
Enable USB Debugging in Developer Mode
USB debugging allows you to transfer data between a computer and your phone. It’s handy if you broke your phone’s screen or otherwise can’t get into your phone to back up data. Many backup utilities only work with USB debugging enabled.
Back Up All Data including App Data to Google Drive
If you back up all your data such as photos and WhatsApp messages to Google Drive, then if you lose your phone, you’ll still be able to access your data.
Install WheresMyDroid
Install a app like WheresMyDroid to be able to control your phone from other another phone or computer. This can be handy when you want to unlock your phone, make your phone ring, etc.
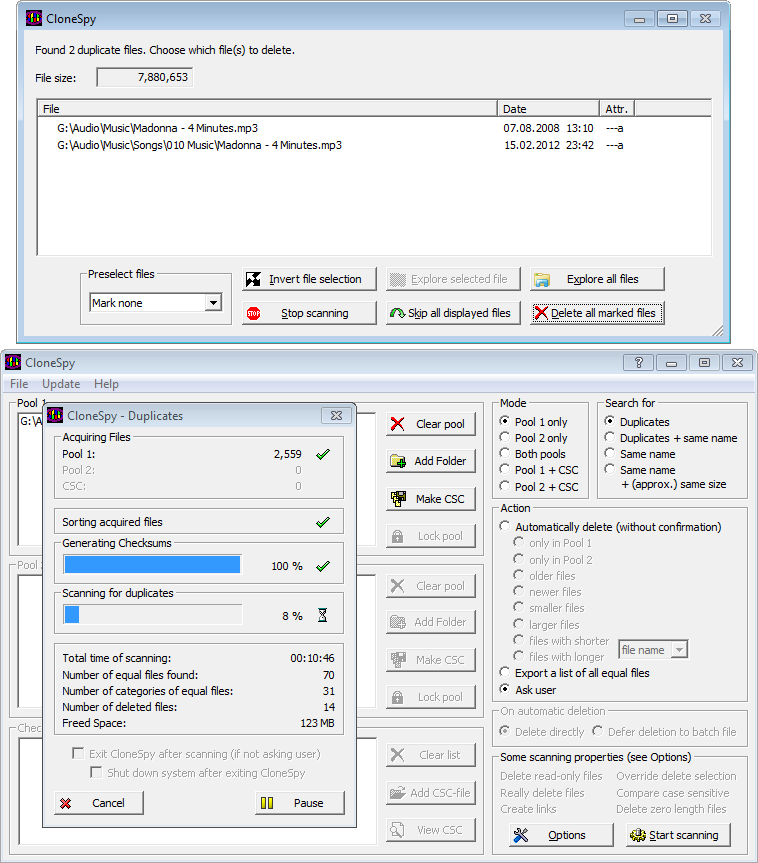
As time goes on, you may find that you have many duplicate files on your computer whether they’re music files, photos, or documents. One program I found that is free and does a great job and finding and giving you various options for handling duplicate files, including deleting them, is CloneSpy. I’m currently using is to deduplicate mp3s and it works great. I set it to ask me what to do for each duplicate file match so I can checking and manually choose which duplicate files to delete. Below is a screenshot.
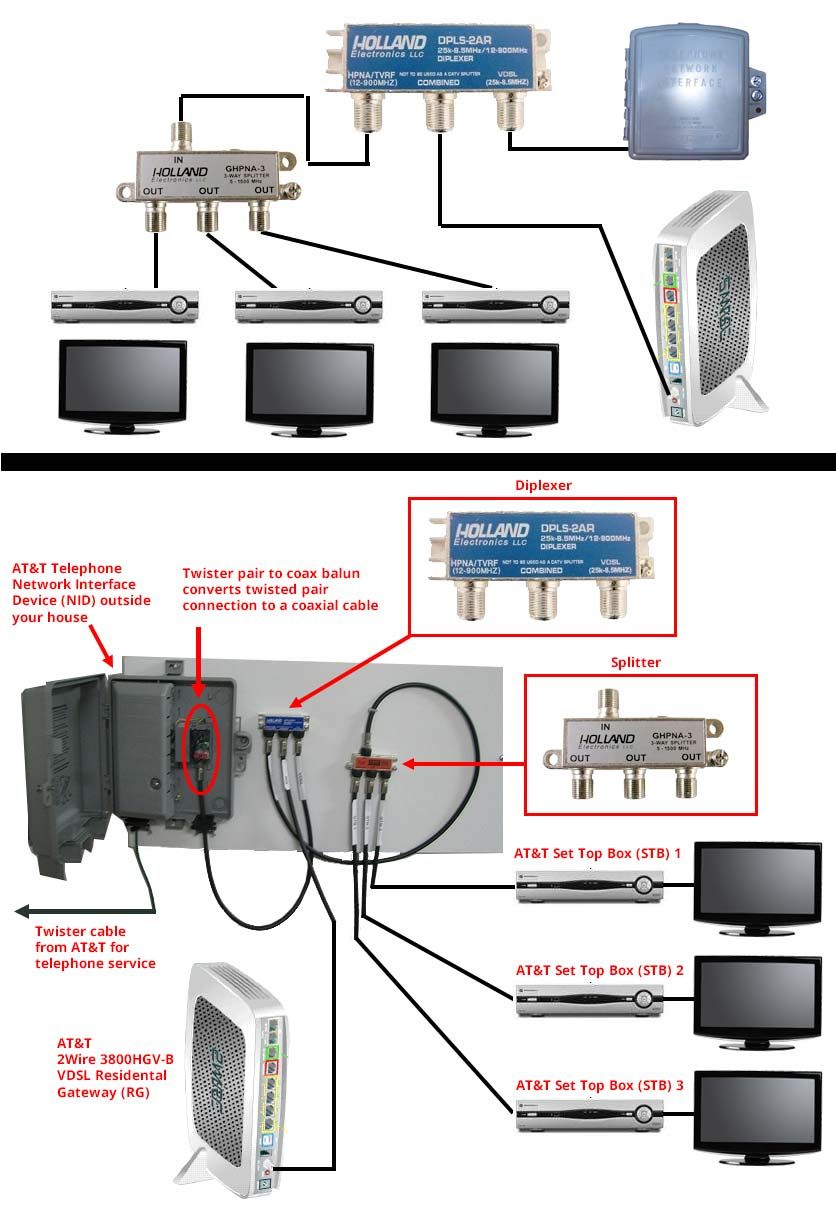
Twister pair phone wires come to the AT&T Telephone Network Interface Device (NID) outside your house
In the NID box is a balun that converts twister pair to a RG6 coaxial cable
The RG6 coaxial cable from the balun connects to the VDSL input of a Holland Electronics DPLS-2AR Diplexer
A RG6 coaxial cable is run from the “Combined’ output of the diplexer to the coaxial input on your AT&T 2Wire 3800HGV-B VDSL Residential Gateway (RG) modem / router
A RG6 coaxial cable is run from the “HPNA/TVRF” output of the diplexer to the input of a Holland Electronics GHPNA splitter
A RG6 coaxial cable is run from each of the outputs of the splitter to your AT&T set top boxes (STB)
Recently I wanted to take a picture of one of my bathrooms. Unfortunately, the half bathroom is a bit small and my phone’s camera couldn’t take a shot that could show most of the bathroom. Even though my phone, a Samsung Galaxy Note 3, has a pretty impressive panoramic picture feature, it only creates horizontal panoramas. Fortunately, though, there is a free program called Panorama Plus which can take a series of photos and stitch them all together. Below are the individual pictures I took of the bathroom from different angles and below them is the panorama of all of those pictures stitched together. Not bad!
I have had AT&T U-Verse internet for some time now and my current plan is supposed to allow me to achieve download speeds of up to 24 Mbps. However, when I’d test my speed using SpeedTest, my speed would fluctuated and sometimes be as low as 9 Mbps. I was testing over wi-fi which wouldn’t give you the same speeds as over ethernet cable but still, 9 mbps was a lot less than 24. An AT&T technician came to replace the power supply brick for my modem. I asked him to check my speeds and to fix them to achieve the correct speeds. He had a special device that allowed him to see how many wi-fi networks my laptop was picking up as well as what channel they were one. To improve performance, he suggested we change my modem’s wi-fi channel to one that wasn’t currently being used by neighboring networks, I guess to minimize or eliminate collisions. By logging into your modem from a browser, you can see your current channel and be able to switch to another channel.
I was on channel 11, which no one else was on, but we changed it to channel 3, which no one else was on either, and retested the speed. The speed was better but still not great and although we were sitting right next to the modem, we weren’t getting a strong signal. We then tried channel 5, as shown above, and retested the speed. Now, I’m getting always 21+mbps down, as you can see below.
Conclusion: if you’re not getting the speeds you’re paying for, try changing your wi-fi access point’s channel. There are 11 channels in total. If you don’t know what channels your neighbors are on, you can try changing the channel from 1 to 11 and testing the speed at each channel until you find a speed that is close to what you’re paying. You can also install NetStumbler to see what networks are available and what channels they are on. Even though your access point should auto-select a free channel, that channel may still not give you the speeds you expect. Also, test you connection speeds using a direct ethernet connection as this is what AT&T uses to determine connection speed.