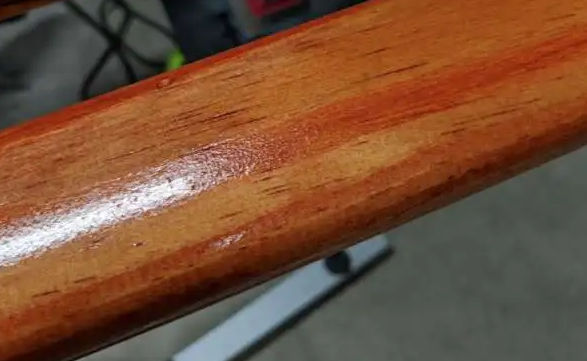
Starting a Small Engine Equipment with Choke Control

tl;dr

  • Put the choke in the off position.
  • Pull the start the engine.
  • If the engine doesn’t start after two pulls, put the choke in the on position and pull to try to start the engine again

Normally

  • when the engine has been off for a long time, e.g. after storage, you need to choke the engine by turning the choke to the on position and then pulling the rope to turn the engine on.
  • when the engine has been running and you temporarily turn it off for, say, 15 minutes, then the engine is still warm and you don’t need the choke to be on to restart the engine. if you restart a warmed-up engine with the choke on, the engine won’t start because there will be too much fuel going into the engine.

Continue reading Starting a Small Engine Equipment with Choke Control

Calculate Max Wattage a House Can Handle

If you open your circuit breaker, you’ll see a bunch of breakers with tabs. Each breaker controls a circuit for a certain part of your house, e.g. a circuit for the kitchen, a circuit for the bathroom, etc. Each breaker has a max amp rating, e.g. 15A or 20A. If you multiply the amp rating by 120 volts, you’ll get the max wattage the circuit can handle. e.g. 20×120 = 2400 watts. So if you have 14 circuit breakers that each can support a maximum of 20 amps (or 2400 watts), then your entire circuit breaker panel for your house can handle 14 x 2400 watts = 33,600 watts. However, this is all theoretical. If someone replaced a 15A breaker with a 20A breaker, you’ll have problems, e.g. a possible fire.

Continue reading Calculate Max Wattage a House Can Handle

How to Calculate Electric Costs

Calculate Energy Cost For a Device

  1. Read the wattage on the label of the device
    If the device doesn’t have a label, you can buy a wattage measuring device, such as the Kill A Watt.
  2. Calculate Watts Per Day
    To calculate energy consumption costs, simply multiply the unit’s wattage by the number of hours you use it to find the number of watt-hours consumed each day. For example, let’s say you use a 125 watt television for three hours per day. By multiplying the wattage by the number of hours used per day, we find that you are using 375 watt-hours per day.125 watts X 3 hours = 375 watt-hours per day
  3. Convert to Kilowatts
    But electricity is measure in kilowatt hours on your electricity bill. Since we know that 1 kilowatt is equal to 1,000 watts, calculating how many kWh a particular device uses is as easy as dividing by 1,000.375 watt-hours per day / 1000 = 0.375 kWh per day
  4. Calculate Usage Over a Month Period
    Now to find out how much that’s actually going to cost you on your electric bill, you’ll have to take the equation a bit further. First you’ll need to figure out how many kWh the TV uses per month.375 watt-hours per day X 30 days = 11.25 kWh per month
  5. Calculate Monthly Cost
    Next, pull out your last electric bill and see how much you pay per kWh. For this example, let’s say you pay 10 cents per kilowatt hour. To find how much the TV is costing you in a month, multiply your electricity rate by the kWh per month that you calculated above.
    11.25 kWh per month X $0.10 per kWh = $1.13 per month

Continue reading How to Calculate Electric Costs

Test Lighting in a Room

When deciding on lighting for a particular room, it helps to see how light from different types of light bulbs placed at different locations will look, e.g. do you want a bunch of spot lights or a few flood lights? Below is a simple setup showing how you can attach lights to your ceiling for testing purposes.

Buy these long pendant lights. They’re available on Amazon for $13 for a pack of two.

Continue reading Test Lighting in a Room

Home Sound System Setup Using Bose

I recently experimented with sounds for my living room and came up with the following setup. Here’s my setup and the reasons for it.

Components:

  • Bose SoundTouch 300 Sound Bar: $700
  • Bose Acoustimass 300 Subwoofer (Bass Module): $700
  • 1 Pair of Bose SoundTouch 10 Speakers: $330 (at Costco)
  • 1 Pair of SoundXtra Wall Mounts For Bose SoundTouch 10 Speaker: $70 (on Amazon)

Sub-Total: $1800
Tax: 10% ($180)
Total: ~ $2000

Note: I haven’t bought the Acoustimass yet because it’s pretty expensive. However, I have tested it and it sounds great when your sound source contains bass.

Continue reading Home Sound System Setup Using Bose

Energy Star Light Bulbs

Light bulb wattage doesn’t always result in the same brightness. If you buy light bulbs, find EnergyStar ones were the lumens are within the following ranges

Learn more at https://www.energystar.gov/products/lighting_fans/light_bulbs/key_product_criteria

Rated Wattage of the Referenced Incandescent Lamp (watts) Light Output (Lumens)
25 250-449
40 450-799
60 800-1,099
75 1,100-1,599
100 1,600-1,999
125 2,000-2,549
150 2,550-3,000
200 3,001-3,999
300 4,000-6,000

Stereo vs Surround Sound

A lot of people don’t really understand the difference between stereo and surround sound and usually just assume that surround sound is better. Based on my research, here’s a summary of the differences.

Surround Sound

  • Intended to hear some sounds at different places around you, e.g. an ambulance zooming by in which case you’d hear the siren begin from one side of a room and end on the other
  • Most surround sound systems involve 5 speakers and 1 subwoofer (5.1 system). For long rooms, there may be 7 speakers and 1 subwoofer (7.1 system).
  • Surround sound is most often noticeable in action movies, e.g. you can hear explosions behind you. Surround sound is subtle in drama movies, e.g. you might hear the leaves moving in the background and some traffic in the distance.

Stereo Sound

  • Very little music is recorded in surround sound.
  • Stereo systems require a front left and front right speaker.
  • Stereo creates a sound-field that, more or less, is shaped like a performance stage that is situated in front of you–as if you’re sitting in a theater. Surround sound does too but adds sound at the top, back and sides of you.

Continue reading Stereo vs Surround Sound

Easy Way to Texture Walls and Hide Imperfections

I hate texturing walls. Not because I don’t like how most textured walls look (knockdown texture), but because I can never texture a wall to look close enough to how the pros do it and I don’t like having to wait some period of time and trying to knock down the texture compound using a trowel or knockdown tool. After researching various ways to texture a wall, I conducted an experiment and came up with a process and set of tools that I think make it really easily to texture a wall and have it look nice and close enough to professional knockdown-textured walls.

Materials:

Experiment:

I used a drill attachment to mix the texture compound until it became creamy. Then, I painted the texture compound on the test 2’x2′ drywall using each type of applicator.

texture1

Continue reading Easy Way to Texture Walls and Hide Imperfections