If you want to learn a language, you will probably feel overwhelmed as there is a lot to understand and memorize and there are many different approaches to learning. Below is one approach that I’d argue makes sense and will allow you to be able to communicate as soon as possible.
Step 1: Grammar
Grammar is like a language’s formula. Understanding a language’s grammar will allow you to understand a language’s structure and build words and sentences based on a particular formula. There are many grammar resources available and you simply need to find one that you like.
Step 2: Vocabulary
When it comes to building your vocabulary, you don’t want to overwhelm yourself with thick vocabulary books as that will be discouraging and non necessarily useful. Instead, it’s more useful to initially focus on a language’s most popular words. For English, following are the most popular words grouped by part of speech.
Step 3: Read Dialogues and Essays / Short Stories
Once you’ve reached this step, you can proceed to reading dialogues and essays. Reading dialogues is important because when you speak to people, you are having a dialogue with them. Reading essays such as short stories is also important because when you communicate with people, you will often be telling a story, whether written or verbal. One online resource that contains thousands of dialogues and essays is Zabuun.
Step 4: Write
At this point, you should be able to put together sentences and write stories. You can write about anything although it’s probably better to just write about yourself since when you meet people, you will often talk about yourself. When you come across a word you don’t know, look it up and make a list to improve the chances of you remembering.
Step 5: Listen to Dialogues, Watch Movies & Talk to People
The purpose of this step is to practice pronunciation and hearing how native speakers speak. You can play audio dialogues, e.g. phone conversations or interviews while driving to work. There are many movies online that offer subtitles in your target language. If you are at an advanced level, you can try following the news.
Language Tools
- TransOver Chrome Extension
This extension will allow you to see a translation of a word you click or hover over on any web page. It’s handy.
- Google Translate
This site will allow you to translate website, words, phrases, and more.
- Google Translate App
This phone app allows you to use your phone’s camera to see a translation of any text you point it at in real time. Pretty amazing.
Language Resources
Language Difficulty Levels
According to the Defense language Institute (DLI), following are the difficulty levels of various languages for English speaking people. One primary factor is the difficulty in learning the writing system (different alphabet).
| Difficulty Categories |
Duration of instruction |
Languages |
| I |
26 weeks |
French, Italian, Portuguese, Spanish |
| II |
34 weeks |
German, Indonesian |
| III |
48 weeks |
Dari/Persian Farsi, Hebrew, Hindi, Russian, Serbian/Croatian, Tagalog, Thai, Turkish, Uzbek, Urdu |
| IV |
64 weeks |
Arabic (Levantine, Iraqi), Chinese, Japanese, Korean, Pashto |
Audio Speed Changer
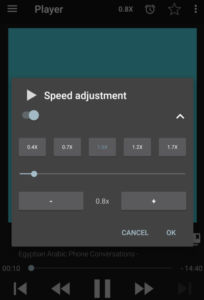
Some people, like Egyptians, talk really fast. This can be frustrating as a learner. If you’re watching a YouTube video, you can slow the playback speed in the player controls. If you are listening to MP3s, you can also slow playback. For example, the Podcast Addict app allows you to load a one or more mp3s in a folder and adjust the playback speed.


