UPDATE: A better alternative to Heroku is Render. Your code repo is in GitHub and you don’t need to download any CLI like you do with Heroku. Render also supports static site generators like Netlify. Render is like Netlify + Heroku.
I’ve decided to move my PHP-based websites from GoDaddy shared hosting to Heroku (PaaS / Platform as a Service). Here are the steps I followed so if I need a quick reminder of how I did it, I can just look here. I decided not to go with IaaS (Infrastructure as a Service) options like AWS, Azure, and GCP (Google Cloud Platform) because they are overkill for my needs, are more complicated, and, as a developer, I want to focus on development, not infrastructure.

1. Get PHP Locally
Download PHP. Since I’m on Windows, I downloaded the VS16 x64 Thread Safe (2022-Dec-06 16:15:24) Zip file. I then extracted it to C:\php-8.2.0-Win32-vs16-x64
2. Update Path
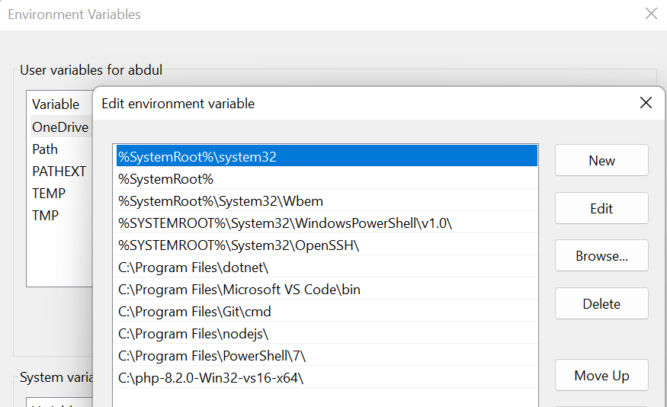
Add the PHP path to your system PATH or user environment variable.

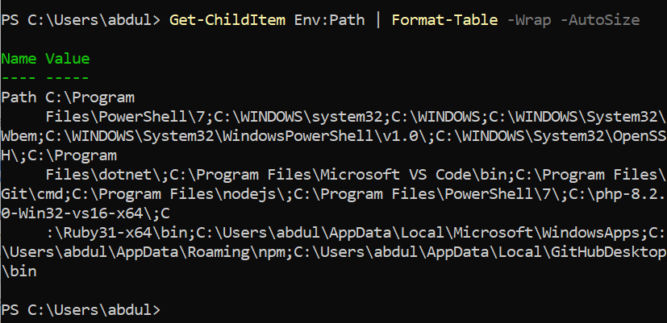
Verify the updated Path environment variable is loaded by running the following command on the command line.
Get-ChildItem Env:Path | Format-Table -Wrap -AutoSizeIf you see the PHP path in the output, then the updated Path environment variable has been loaded. If you don’t see it, then restart Explorer or your computer (there may be easier ways to load updated environment variables).

Test PHP by checking the version on the command line. Run the following command:
php -v
If you see the PHP version, then PHP is working.
3. Start a web server
PHP comes with a built-in web server. In your project folder, run the following command.
php -S localhost:8000
You can then open your PHP website in a browser at http://localhost:8000/.
4. Install PHP Composer
Composer is a dependency manager for PHP. Even if you don’t need it, it’s required by Heroku. Heroku will know that your website runs PHP by detecting the presence of the file composer.json.
Since I’m on Windows, I’ll download and run Composer-Setup.exe. It will install the latest Composer version and set up your PATH so that you can call composer from any directory in your command line. Follow the instructions to install Composer. Then, verify it is loaded by running the following command to check its version.
composer -v
5. Add composer.json file
Create a file in the root of your project folder called composer.json. In my case, I don’t need any dependencies so I will just add {} to the file which is an empty JSON object. (In my case, I guess I didn’t really need to install composer since my composer.json file is empty).
6. Commit to git
This step assumes you have git installed. In my case, I will also commit my project to GitHub.
- Create a new repository in GitHub
To avoid errors, do not initialize the new repository with README, license, orgitignorefiles. You can add these files after your project has been pushed to GitHub. - Initialize the local directory as a git repo. Run
git init -b mainin our project folder. This will create a hidden.gitfolder.

- Add the files in your new local repository. This stages them for the first commit.
git add .- Commit the files that you’ve staged in your local repository.
git commit -m "First commit"- At the top of your repository on GitHub.com’s Quick Setup page, click to copy the remote repository URL. In the Command prompt, add the URL for the remote repository where your local repository will be pushed.
$ git remote add origin <REMOTE_URL>
# Sets the new remote
$ git remote -v
# Verifies the new remote URL
5. Set tracking information for the main branch
git branch --set-upstream-to=origin/main main6. Push changes to GitHub
git push origin main
7. Add gitignore file
Create a .gitignore file in the root of your project folder and add the following lines.
vendor/
.env
That way, when you commit files, you will not commit the .env file, if any, and any files in the vendor folder, if any.
8. Create a procfile
Create a file in the root of your project folder called Procfile. It should not have an extension. Add the following line to it.
web: vendor/bin/heroku-php-apache2This will tell Heroku to set up a web server using Apache and PHP. If you want nginx instead of Apache, add the following line instead.
web: vendor/bin/heroku-php-nginx9. Install Heroku CLI
The Heroku CLI (Command Line Interface) is necessary to push (publish) changes to your website to Heroku. Since I’m on Windows, I’ll download the Windows installer. The installer will add Heroku to the Path environment variable.

To load the updated environment variable, close all Explorer and command line / PowerShell windows. Reopen a command line / PowerShell and type enter the following
heroku login
A browser tab will open asking you to log in to Heroku CLI. Log in.

Once you’ve logged in you, you can close the browser tab and return to the command line.

The command line will get updated to show that you’ve logged in.

10. Deploy your website
Create an app on Heroku, which prepares Heroku to receive your source code. Run the following command.
heroku create
When you create an app, a git remote (called heroku) is also created and associated with your local git repository.
Heroku generates a random name (in this case sharp-rain-871) for your app, or you can pass a parameter to specify your own app name.
To deploy your website, run the following command.
git push heroku main11. Run the app
Now that the website has been deployed, ensure that at least one instance of the app is running. Run the following command.
heroku ps:scale web=1
12. View the website
heroku openThe website will magically open in a browser.
13. Make changes
Whenever you make changes to the website, commit and push them to Heroku. To simplify deployments, you can tell Heroku to use GitHub instead of the Heroku CLI.


