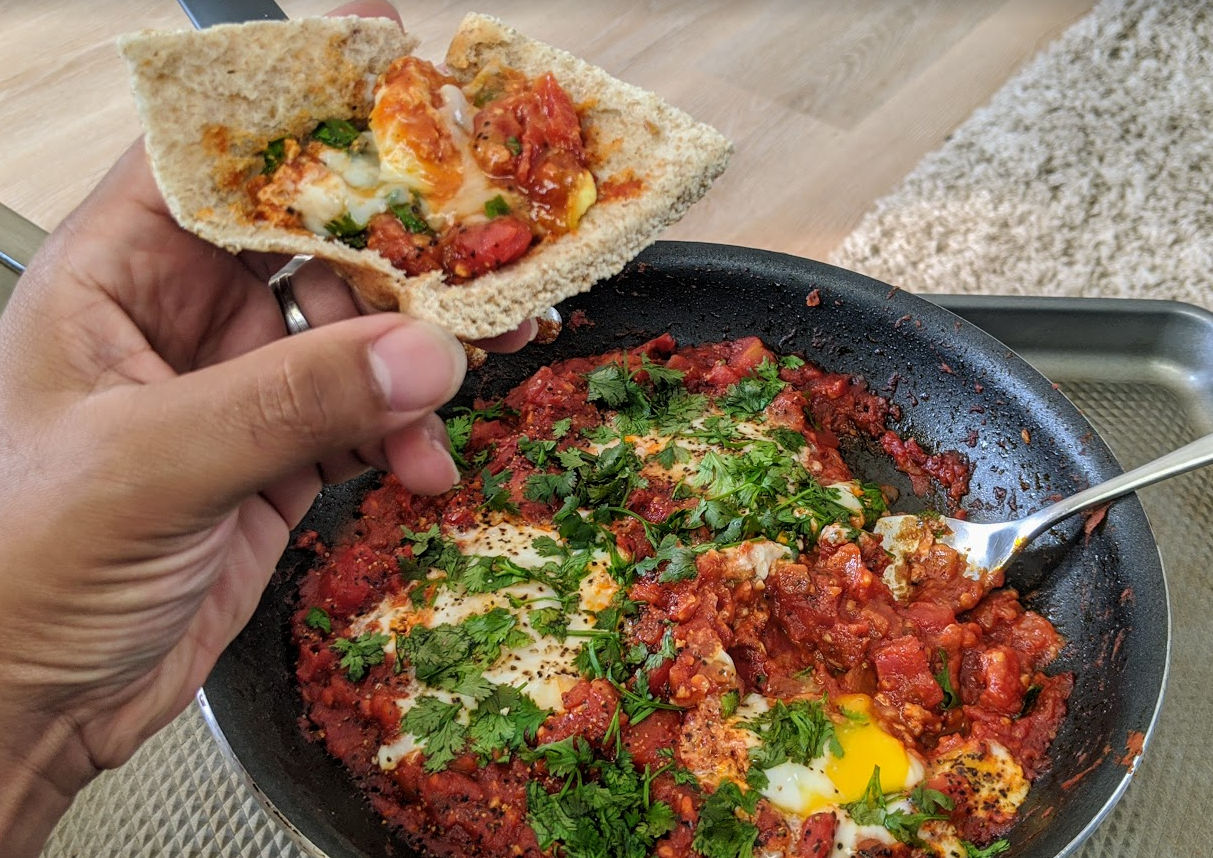
Moroccan Shakshouka and Turkish Menemen are very similar. Here’s my version of these dishes.
Ingredients
3 eggs
1 8oz can of fire-roasted diced tomatoes (Target / FoodMaxx)
2/3 cup frozen diced onions (Smart n Final)
1//4 cup cilantro for garnish
2 tbsp wet minced garlic
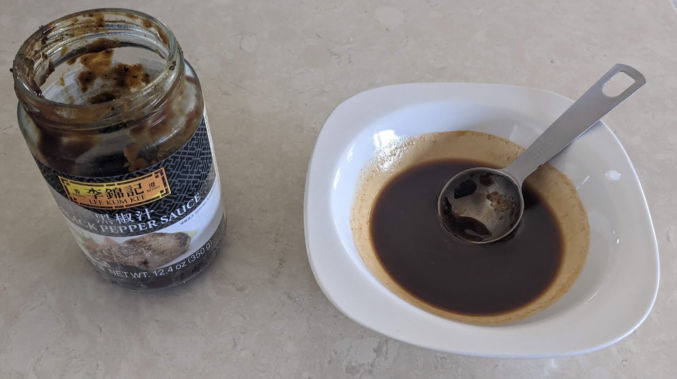
10 tbsp olive oil
Smoked paprika (not regular paprika)
Salt and pepper
2 tbsp tomato paste (optional)
Pita bread
Instructions
Pour olive oil in medium 10″ pan on medium-high heat
Fry onions and garlic until slight brown
Pour in diced tomatoes and sprinkle in smoked paprika, salt and pepper to taste (optionally, add tomato paste)
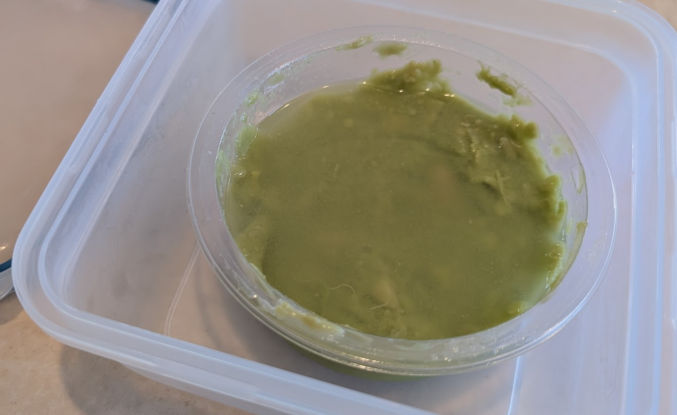
When mixture is not too runny, make 3 deep dimples in the pan and crack each egg into them
Cover and poach on low heat until egg white changes from translucent to white. Turn off heat so that egg yolk is still runny.
Garnish with cilantro
Cut some pita bread in quarters and warm for 15 seconds in microwave
Eat
Fry diced tomatoes and garlic in olive oilCook fire-roasted tomatoes with smoked paprika, salt and pepper and optionally tomato pasteMake dimple in mixtureCrack eggs into dimples without breaking yolkCover and poach eggs on low heat until egg whites are white, not transparentLike thisGarnish with cilantro and warm up pita quartersEat directly from pan
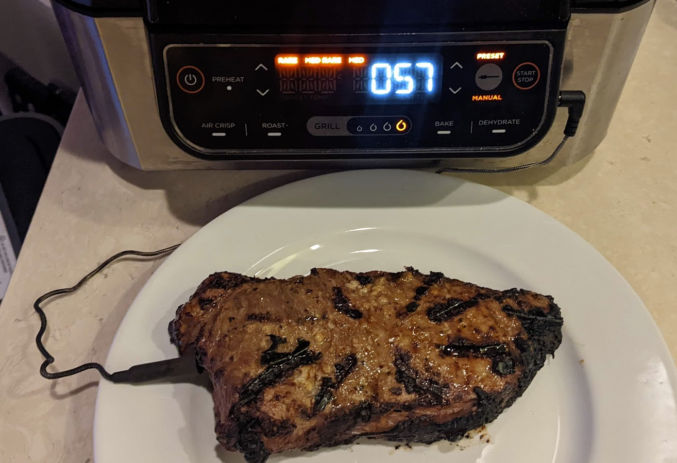
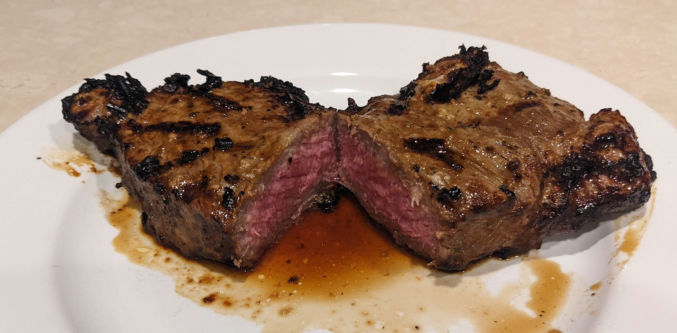
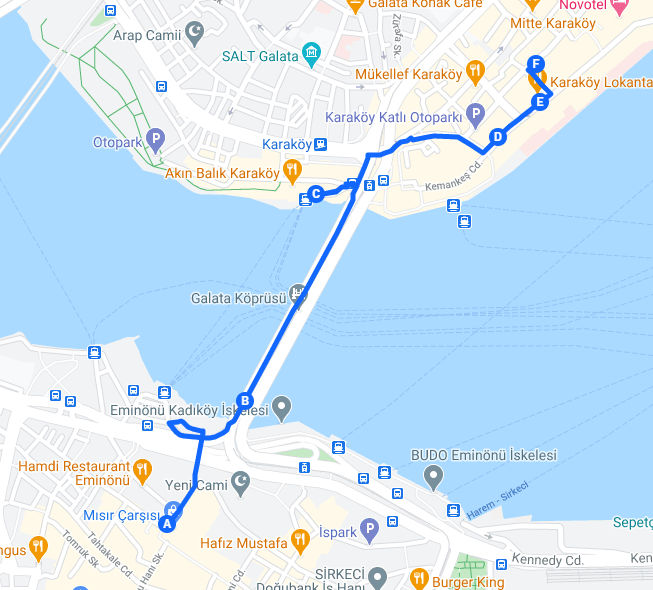
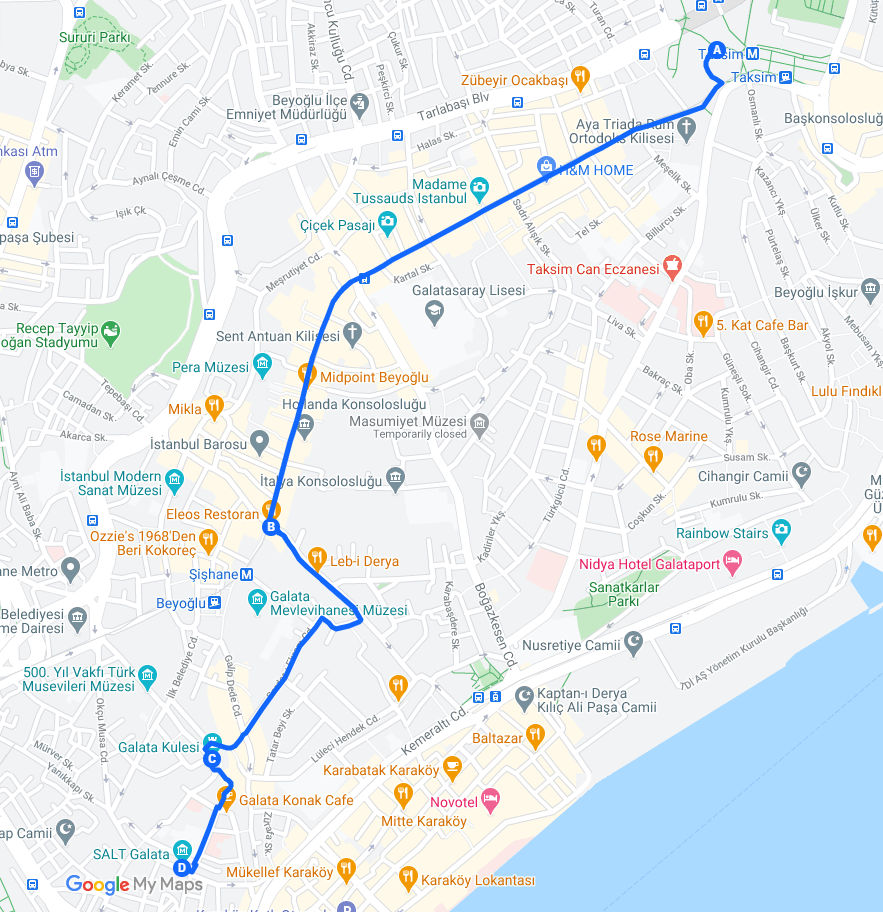
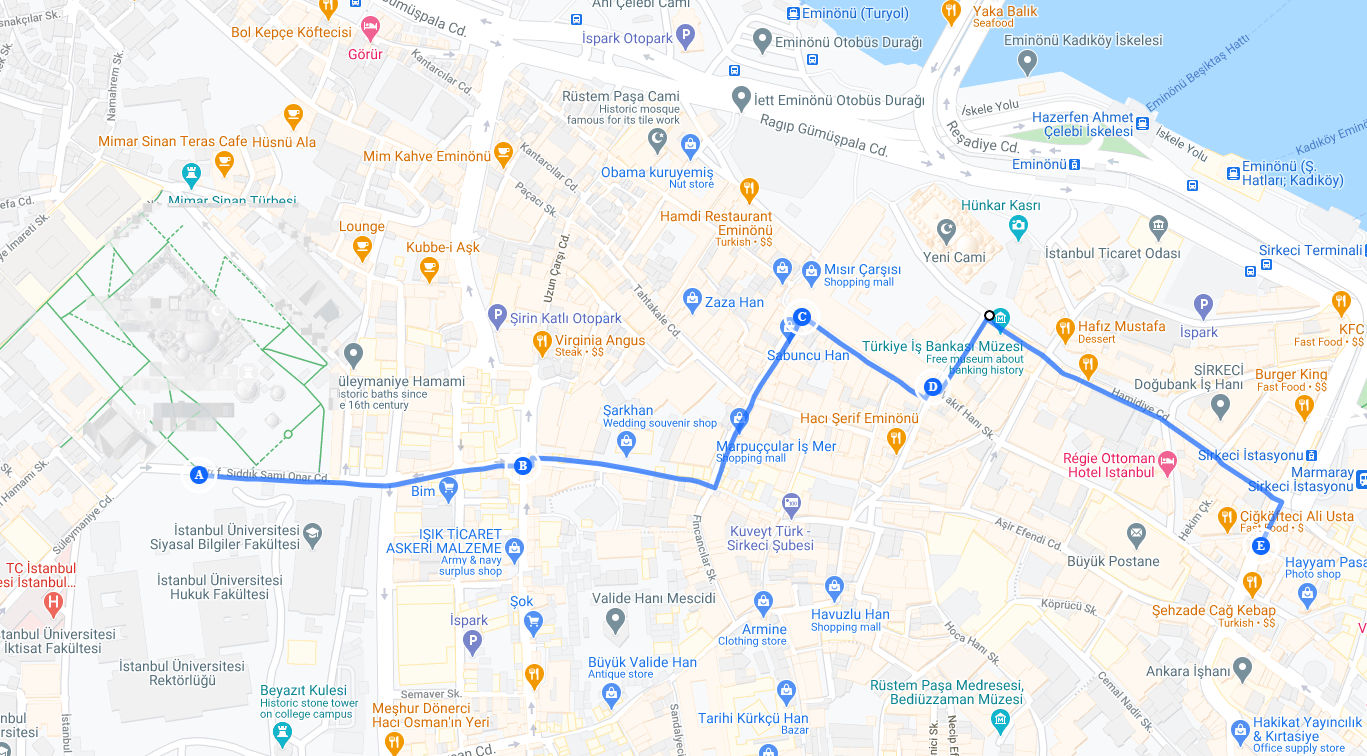
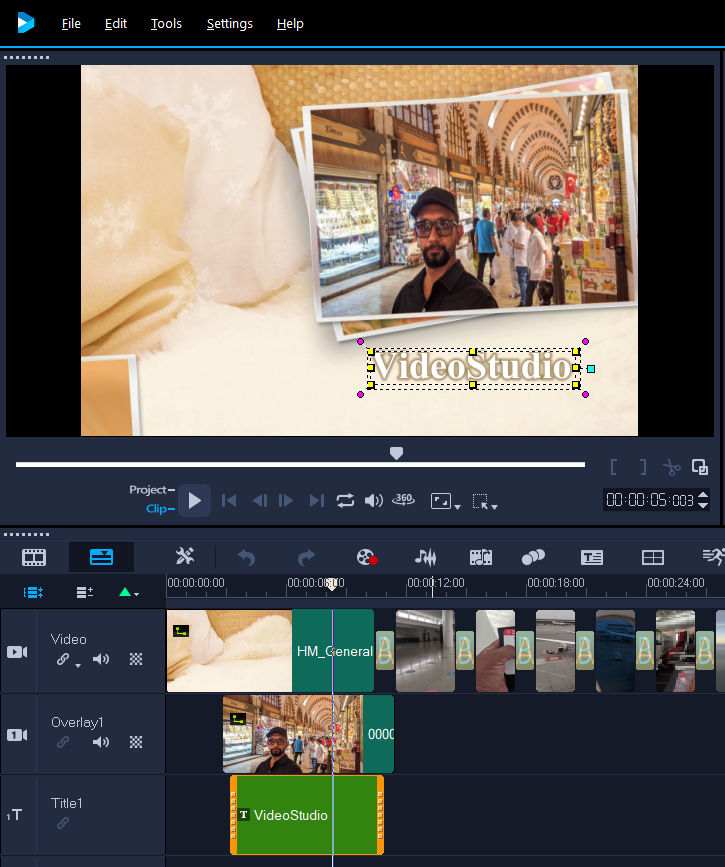
So, I just got the Ninja Foodi Smart Indoor Grill which doubles as an air fryer and mini oven. I have another cheaper indoor grill but tends to produce smoke and always triggers my smoke sensor. So far, though the Ninja grill is larger, it hasn’t emitted any smoke nor triggered my smoke sensor and produces better grill results.
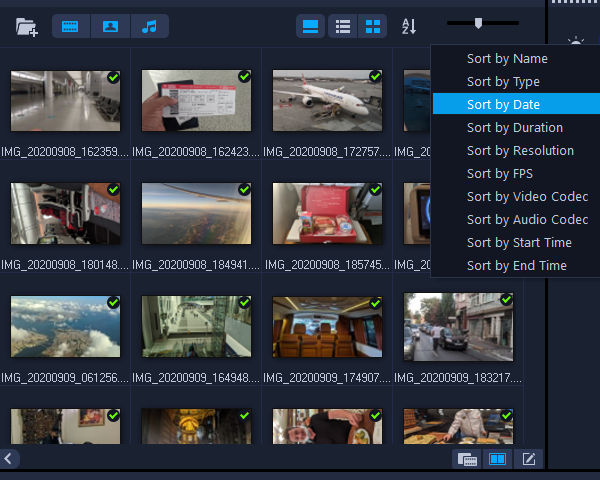
Sort the photos as desired, usually by date, so they appear in chronological order.
2. Select and drag photos to video track
All photos will be added to the video track
3. Change duration of each photo
If the duration of each photo is too short or long, select all photos, right click and click on “Change Photo Duration …”. This will change the duration for each and all photos.
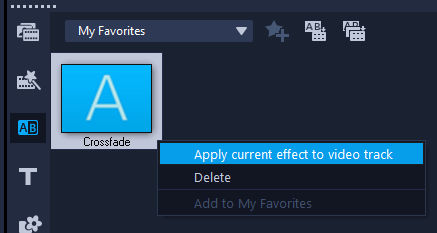
4. Add a transition effect
Choose a transition (a simple “crossfade” is the best”), right click and click on “Apply current effect to video track”.
This will result in the transition being applied to all photos.
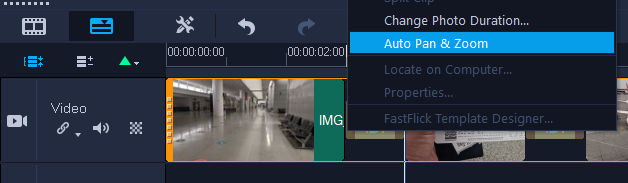
5. Add Pan and Zoom effect
Select all photos, right click and click on “Auto Pan & Zoom”.
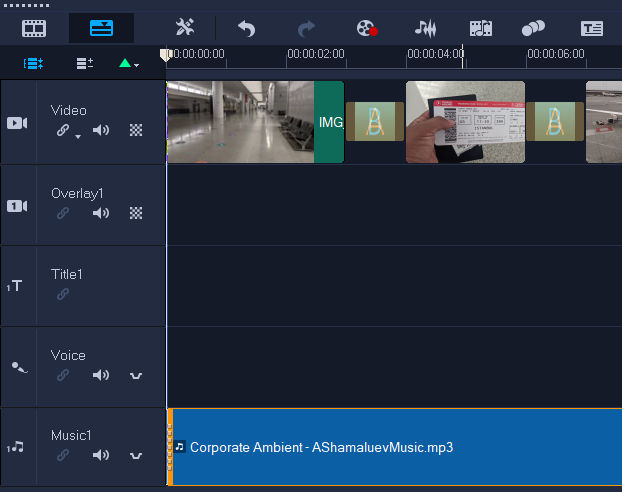
6. Drag audio file to music track
You can find some background music from Sound Cloud.
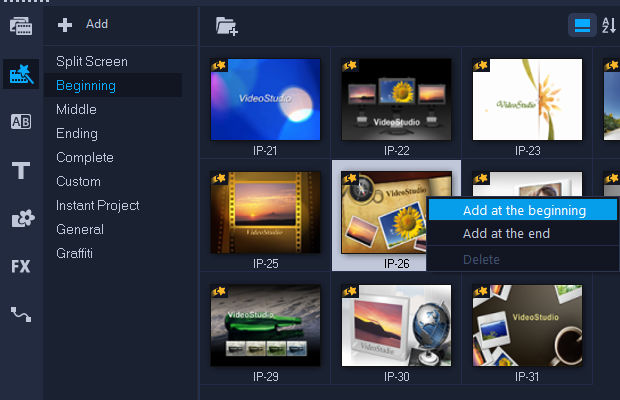
7. Add intro slide
Click “Instant Project” icon, click on “Beginning”, choose a template, right click and click on “Add at the beginning”.
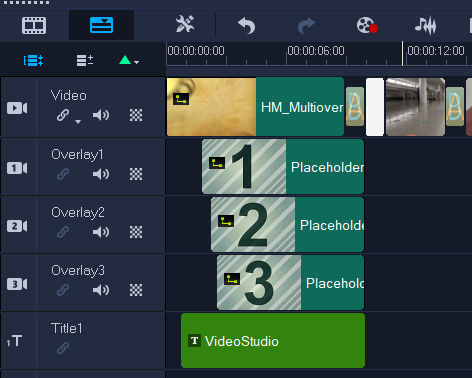
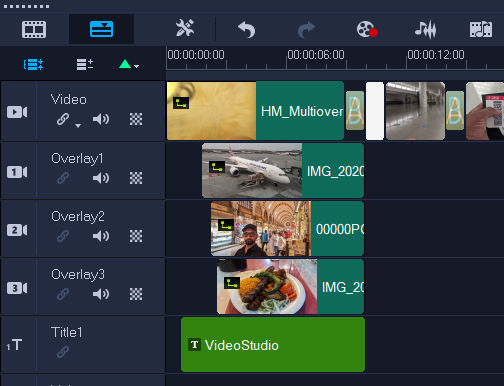
8. Edit intro slide
Since the intro slide is a template, you will see placeholder content.
Drag a photo to the placeholder clip and hold “Ctrl” to replace the clip. This will cause the photo to be formatted to fit the template.
Double-click the text clip to edit the text of the intro template.
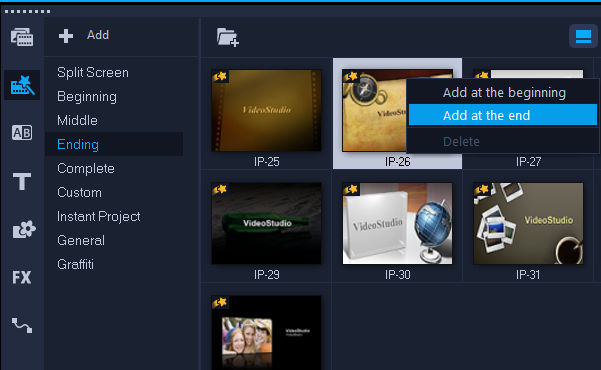
9. Add end slide
This process is the same as for adding the intro slide but click on “Add at the end” instead.
10. Add text to some photos
Click “Title” and then pick a title template. The one with a semi-transparent background is good. Drag it to the Title track where you want the text to appear.
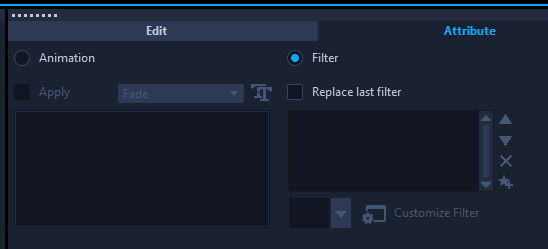
11. Change text and background color
This title template animates the text.
Convert it to a simple fade in and out by clicking on the “Attribute” tab in the Options Panel for the title, click on “Attribute” tab, click on “Animation”, and disable animation by unchecking the “Apply” checkbox.
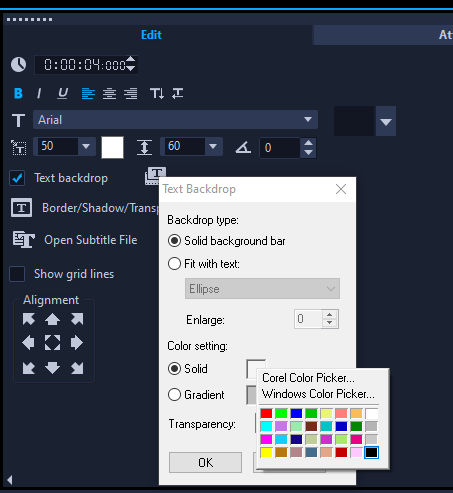
The background of the text is too light so let’s darken that semi-transparent bar. Double-click on the title clip and in the Options Panel, click the “Edit” tab, and click on the black color in the Text Backdrop context menu as shown in the screenshot below.
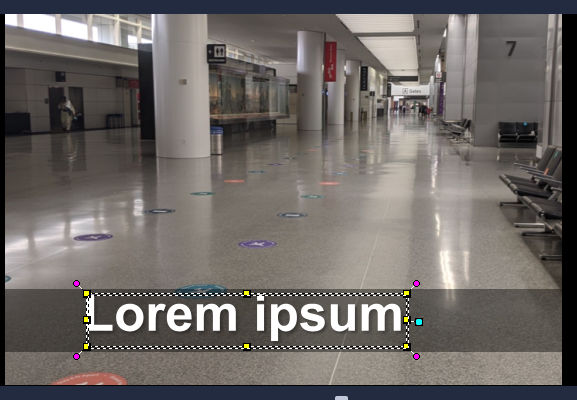
Double-click on the title clip again and edit the text.
12. Add more text
Copy and paste the text clip to other photo clips and edit the text.
13. Render video
Click the “Share” tab, choose a setting, and click “Start” button.
Have you ever needed to do search and replace multiple times against the same file or set of files. If so, the Batch Replacer extension for VisualStudio Code makes this very simple.
Open a folder or file in VisualStudio Code
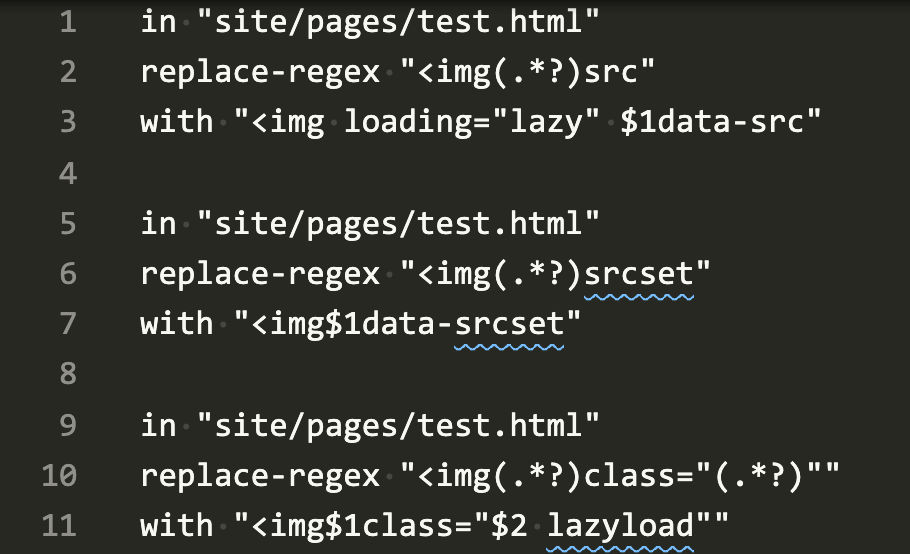
Create a new file (no need to save it) and enter some search and replace instructions, e.g.
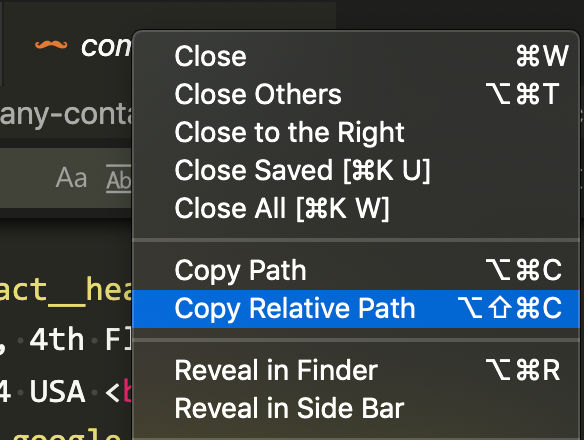
In the example above, I want 3 different replacements done in the order shown and I only want the replacements done to a specific file. The “in” command is followed by the path of the file relative to the root of the workspace open in VS Code. If the file is open, you can get it by right clicking on its tab and selecting “Copy relative path”.
3. Execute the replacer script
To run the batch replacements, you active tab must be the tab containing your replacement instructions. Then, hit CTRL+SHIFT+P -> Batch Replace. A status window will appear in the bottom right corner telling you how many files have been modified. If you want to batch replace across all files in your workspace, don’t include the “in” instruction.
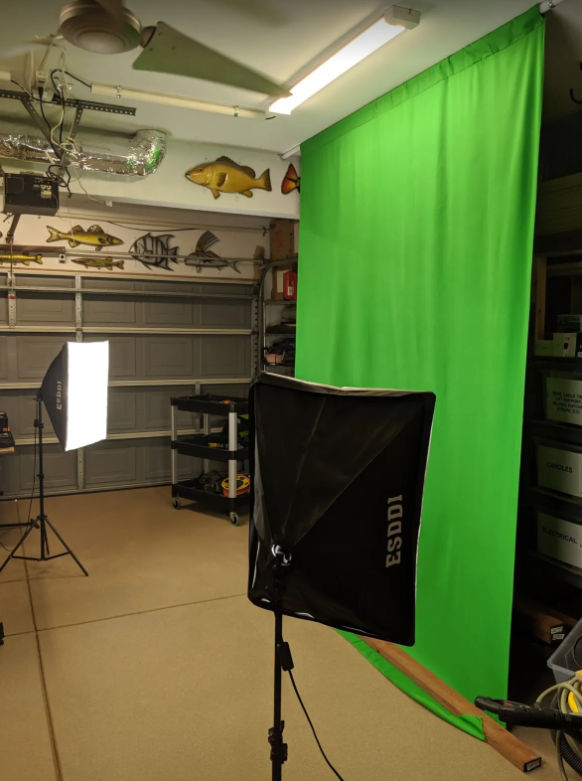
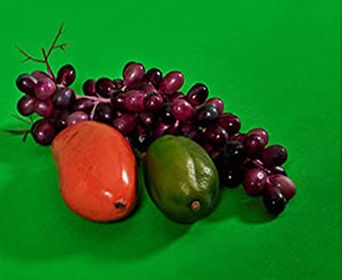
I bought a 7’x10′ green screen. I got just the fabric because I semi-permanently attached it to my garage ceiling since I don’t plan on using anywhere else.
Create presentations slides and export them as images
Record video
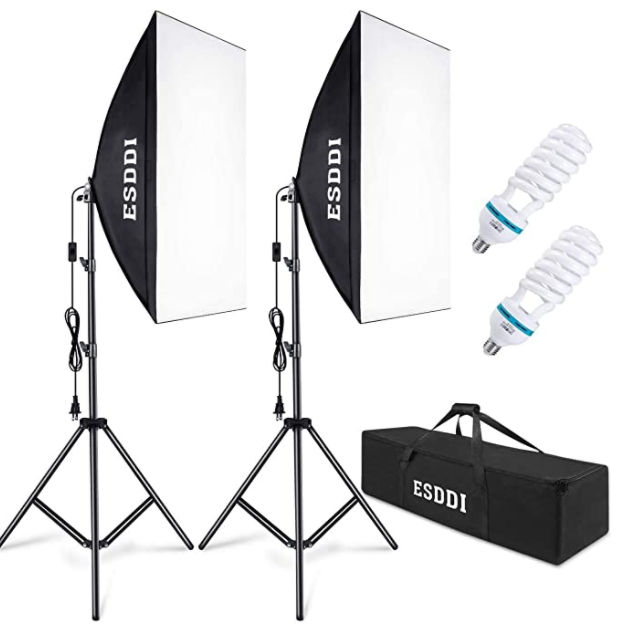
Stand in front of the green screen with softbox lights on
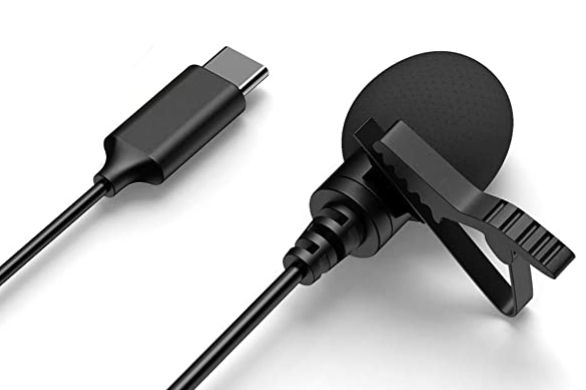
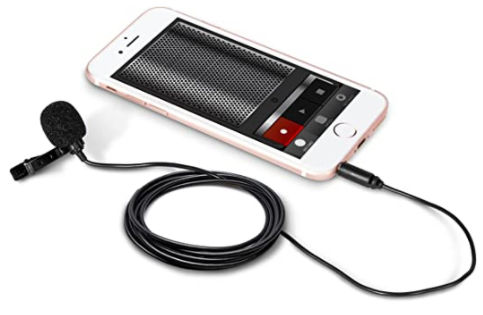
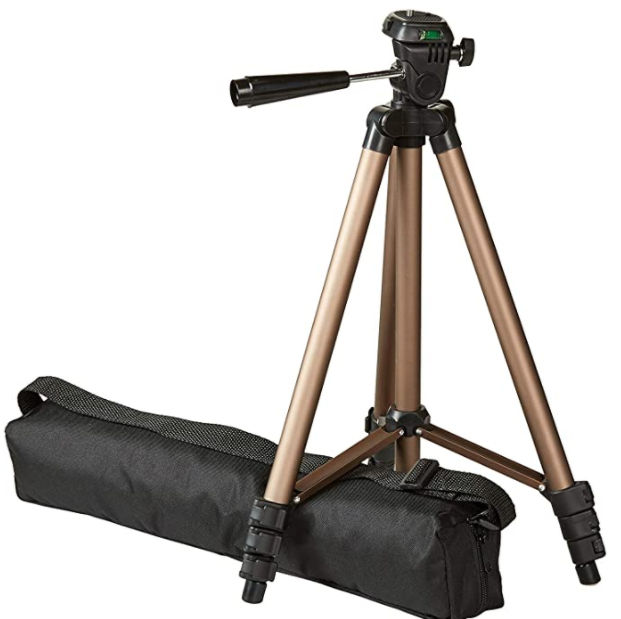
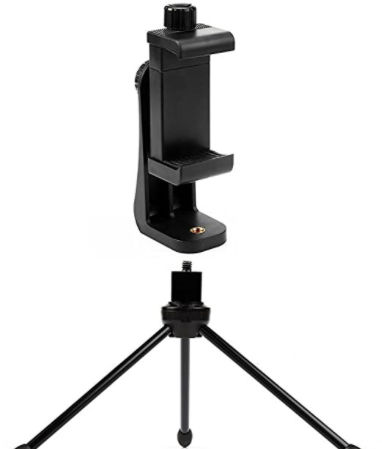
Clip lavalier mic to shirt and connect it to smartphone on tripod (if necessary, using USB extension cables and an adapter).
Place laptop on laptop stand outside the camera field of view
In video recording app, ensure audio source is set to “external mic”.
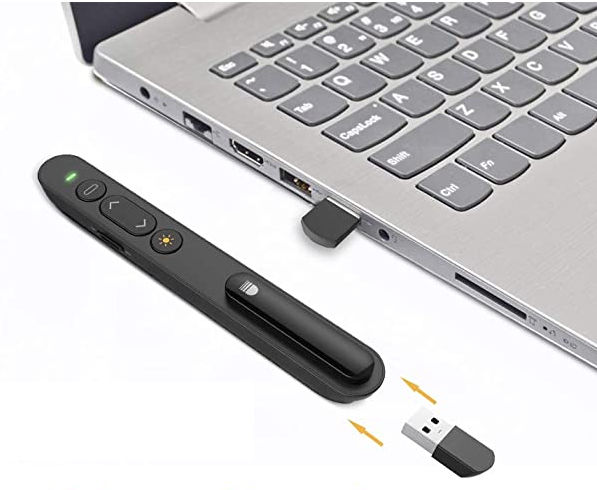
Press record and speak while reading and changing slides remotely using the wireless presenter pen
Create final presentation video
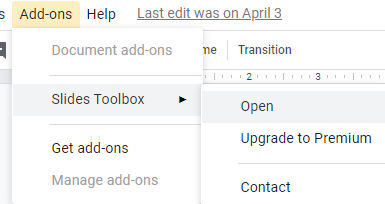
Google Slides Tips
Export all slides as images
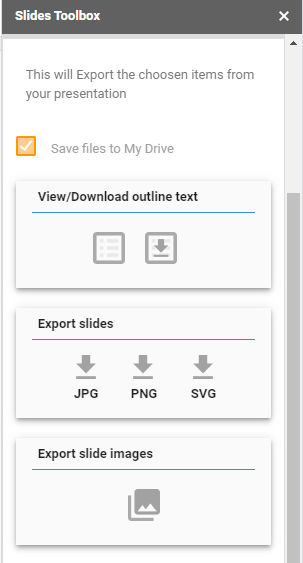
Creating slides in Google Slides is very similar to how you create them in other presentation apps like MS Powerpoint. In Google Slides, however, if you want to export all slides as images, you need an add-on. I use Slides Toolbox by Digital Thoughts. Once you’ve added that add-on, you can open it
and choose to export all slides as JPG or PNG images.
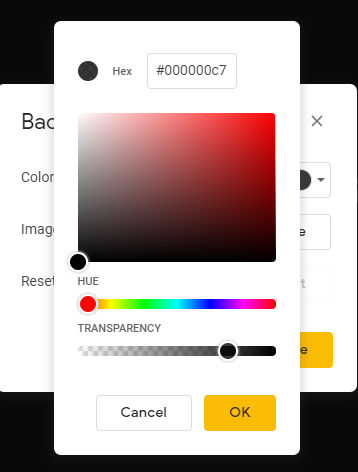
Set a background with transparency
Notice how in my final rendered video, the background video shows through the slides.
That was accomplished by setting the transparency of the background in Google Slides to around 70% opaque (30% transparent). If you want a semi-transparent background, then you must export the slides as PNG images rather than JPG images.
Test Slides
Download a sample presentation with semi-transparent background in ODP (OpenDocument Presentation) format which you can import into Google Slides.
Position the lavalier mic such that you don’t hear the sound of you breathing.
Stand far from the camera to record more of yourself. You can always crop the video later.
If you have a fast computer with plenty of SSD space, record your video in 4K for ultra hi definition (UHD) resolution. Otherwise, record at 1080p hi definition (HD).
Using the softbox lights, and other lights, if necessary, eliminate as many shadows as possible. For example, the picture below shows dark shadows which will be difficult to remove when you’re editing the video.
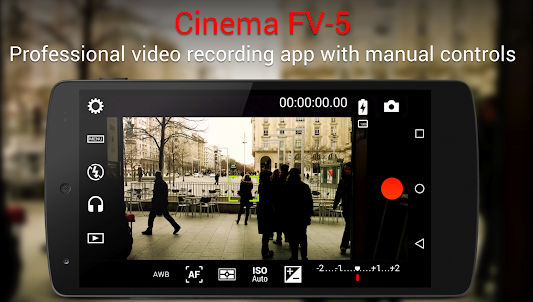
In the Cinema FV-5 video recording app, set audio source to “external mic”. When you push the cable into your phone, the wired microphone icon near the top-right corner appears in the app. This tells me the audio source will come from the external mic.
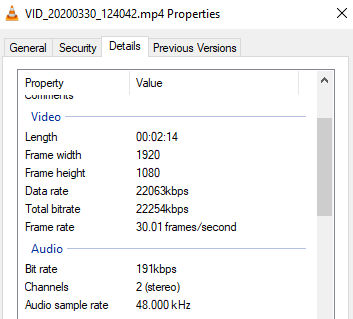
When you export the video, you will have many settings and export presets to choose from. For each preset, you can see the estimated output file size. There’s no point in choosing a high quality output if the source video is low quality. In Windows Explorer, right click on the foreground video and click Properties > Details to see the video specs. The screenshot below shows that my foreground video taken on my phone was 1920×1080 with a bit rate of 22254 kbps (~22 Mbps) and a frame rate of 30 frames per second (fps).
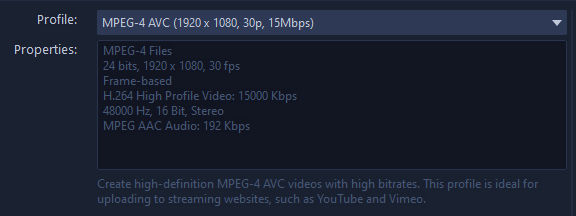
For this, I chose the following spec which gave an estimated output file size of 252 MB for a 13 minute video.
Workflow
In VideoStudio, my workflow is
Create a new project
Add all assets (videos, slides, etc) to the project
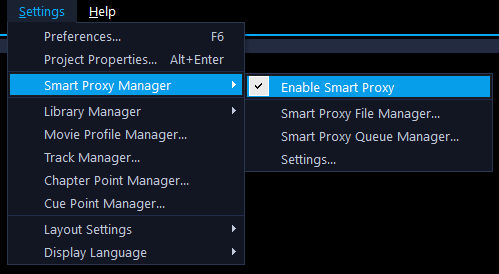
Verify SmartProxy is enabled
Add an overlay track so that I have 2 overlay tracks
Drag the background video to the Video track
Drag the slides to the Overlay 1 track in order
Drag the foreground video with the green screen to the Overlay 2 track
Crop the foreground video as necessary
Using NewBlue FX Chroma Key filter, remove the green background so that it’s transparent
Copy and paste the background video multiple times to span the duration of the foreground video
In the Preview panel, drag the foreground video to the left
In the Preview panel, drag the slides to the right and line them up using the grid that appears
Preview the composite video and make changes, as necessary
Most people take pictures by just manually taking a shot when they are ready. Since many things could go wrong with taking just a single shot, e.g. the subject blinks or yawns, a car drives by, etc, then some people will take multiple shots manually – maybe 2 or 3. However, this still doesn’t necessary offer the best shot because the subject may not like how they look in a particular stance or the lighting may not be at their particular angle. Also, photos of people just looking straight at the camera or posing often look boring, as opposed to photos that appear to be taken randomly or without the subject knowing.
Snapshot from Video
To resolve this, you could take a 4K video from your mobile phone, open the video in a video play like VLC, scrub through the video and when you are on a frame you like, take a snapshot (not a screenshot).
Pros:
many frames to choose from (usually 30 frames per second)
Cons:
large file size
must open video and scrub through and pic from you like
videos are generally more compressed than images
Series of Still Images Taken Automatically
To get around the cons of the video approach, you can take a series of still images and just pic the ones you like. This is sometimes called “burst” mode. Ideally, you would be able to
set a delay timer (if you will put the camera down and be in the picture yourself)
set how many pictures to take, e.g. a max of 5 or 10 pictures or unlimited if you want to stop taking pictures when you push a button
an time interval between which photos will be taken, e.g. take a picture every 0.5 seconds, 1 second, 5 seconds, etc.
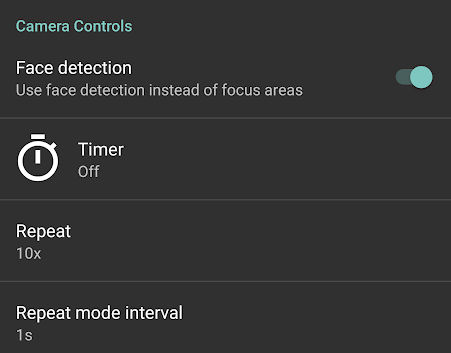
One app that meets these requirements is Open Camera. It’s free and looks well made. In the screenshot below. I enabled Face detection so that if the subject moves, like when you’re taking a video, the subjects face should always be in focus. I set Repeat to 10x to take a maximum of 10 pictures and I set Repeat mode interval to 1s so a picture will be taken automatically every 1 second.
In this example, I’d end up with 10 pictures. I could then just pick the best one and delete the rest.
Comparison
To compare the picture quality of this method verses taking stills from a video, consider the following photos.
From videoFrom a series of still images
If we zoom in to 100% and focus on a small section, you’ll notice there are more artifacts and blurriness in the still taken from the video, not to mention the contrast and color looks much better in the still shot.
From video
From a series of still images
If I enlarge the images, the artifacts in the video snapshot become much more apparent.
From videoFrom a series of still images
If you set the Repeat to Unlimited and Repeat mode interval to No delay, the app will take as many pictures as it can until you push the stop button. For comparison, a 10 second 4K video consumed 61 MB whereas 10 seconds of unlimited, no delay pictures produced 23 images totaling 45 MB.
The next time you want to take a picture, you may want to try Open Camera and take a series of many pictures as your subject walks around or behaves naturally.
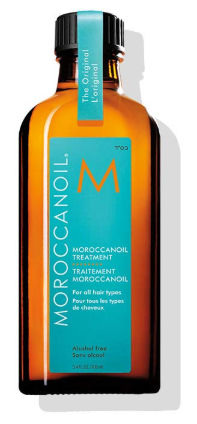
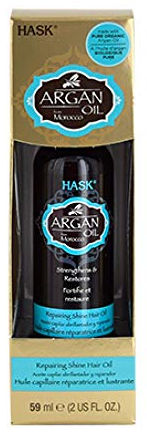
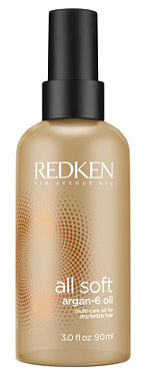
A few years ago I tried a product called Leave-in Hair Treatment with Argan Oil by HSI Professional. It came in a red box and bottle.
You just dab a little in the palm of your hand and massage it through your hair and it instantly makes your hair look and feel better. The ingredients are
Unsurprisingly, it got many good reviews on Amazon.
Unfortunately, this product has been replaced with a similar but slightly different product. It’s good but definitely not as good as the original formula.
To understand the difference and find products that are just as good, if not better, here is a list of products that have similar ingredients. Note that the percent amount of each ingredient is in descending order.
Phenyl Trimethicone reduces the tendency of finished products to generate foam when shaken. It also enhances the appearance and feel of hair, by increasing hair body, suppleness, or sheen, or by improving the texture of hair that has been damaged physically or by chemical treatment. Phenyl Trimethicone slows the loss of water from the skin by forming a barrier on the skin’s surface.
Keratin Amino Acids
Used for conditioning, moisturizing, known to make hair glossy, give it more body, and also for its marketing appeal (natural ingredient as well as hair is made from this). It’s a strong humectant, and pulls water into the hair.
Peg-4 Laurate, Peg-4 Dilaurate
They also clean the skin and hair by helping water to mix with oil and dirt so that they can be rinsed away.
Lodopropynyl Butylcarbamate, Phenoxyethanol
Prevents or retards bacterial growth, thereby protecting cosmetics and personal-care products from spoilage.
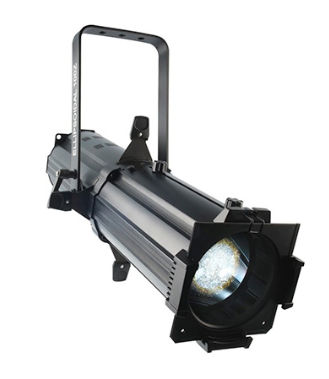
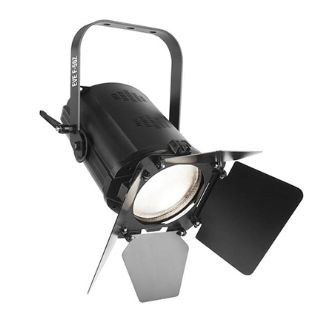
This type of light is used to highlight certain subjects or stage pieces with a relatively narrow beam angle.
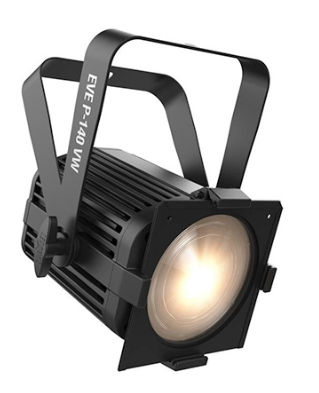
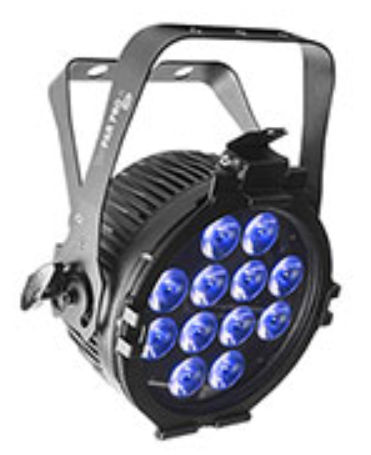
Parabolic reflectors (PAR)
This type of light is used to light up large areas. They come in a variety of lens types to get different beam angles. This light doesn’t have zoom or focus options. This is the most common fixture because it’s the cheapest.
Fresnel
This type of light is a happy medium between a PAR and an ERS. They have a zoom function but not a focus and usually cast a much “softer” light than ERS light fixtures.
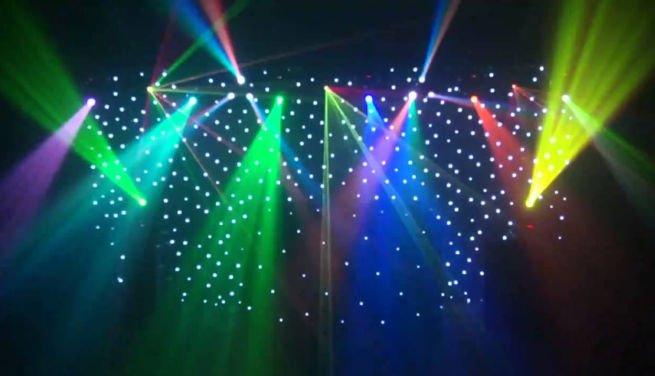
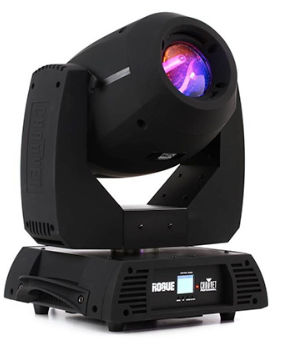
Moving Head
This type of light can move. It offers different beam angles for spot (narrow), wash (wide), beam (laser) and hybrid light effects. It is the most versatile stage lighting option.
Above are only some of the more common types of lights.
To hang your lights, you can get a lighting stand with T-Bar.
DMX Interface
DMX (Digital Multiplexing) or, officially, USITT DMX512, is a unidirectional serial data protocol, meaning the signal leaves the controller (computer or lighting board) and travels through all lighting fixtures in a daisy-chain. It was standardized in 1986. DMX networks typically only have one master device on the network, usually the DAW software / controller, and many slave devices — the lights.
DMX Cable
The 5-pin XLR the standard connector.
The reason for five pins is that pin 1 would be the ground, pins 2 and 3 would be data link 1, and pins 4 and 5 were reserved for data link 2 and/or proprietary data. Over the years, the second pair of pins (pins 4 & 5) on the connector stopped being used, since 3-pin DMX proved to be very reliable. This is why you may sometimes see fixtures with a 3-pin, 5-pin, or both connectors on the fixture.
DMX vs Audio/Mic XLR Cables
Some DMX cables are 3-pin cables. Don’t confuse them with 3-pin audio or mic cables. DMX cables use roughly 110-ohms whereas microphone cables are typically around 45 ohms. The different impedance between these cables matters with lighting networks and can cause your lights to either not respond or respond sporadically.
Number of light fixtures per DMX cable
You cannot have more than 32 devices connected on a single chain. If you have more than 32 light fixtures, you would need to use an Opto-Splitter. A splitter like the Chauvet DJ Data Stream 4 will allow you to have 32 devices connected to each DMX output connector. You cannot use Y-cables, as this approach does not electrically isolate the DMX lines and would cause data reflections.
DMX Channels / Universe
A DMX line is limited to a total of 512 channels, which is also called a universe. Each lighting fixture you have uses a number of DMX channels depending on how many parameters the fixture has. Lights can also have multiple personalities, or profiles, depending on how much or how little control you want. Note that the 512-channel limit is independent of the 32-light fixture limit.
Let’s say you have 40 lighting fixtures that use three channels each: you are only using 120 channels total. You can fit these all in the same universe of control, however, if you have more than 32 devices. You would implement an Opto-Splitter and split your devices up among the outputs in whatever configuration you would like, as long as each DMX leg has less than 32 devices on it.
Example
Let’s look at the Chauvet DJ SlimPAR Pro H.
This light has three different personalities, or profiles. It can be used in a 6-, 7-, and 10-channel mode, and again the more channels a fixture uses, the more control you have. Let’s look at 7-channel mode:
Channel 1: Dimmer
Channel 2: Red
Channel 3: Green
Channel 4: Blue
Channel 5: Amber
Channel 6: White
Channel 7: UV
Each DMX parameter on a fixture operates independently. Say I was to make this fixture a magenta color. I would turn up channel 2 (Red) and channel 4 (Blue) until I got my desired shade of magenta. However, turning up just these channels on the fixture (2 & 4) would not put out any light. I would also need to turn up channel 1, which is my dimmer that controls the overall intensity. On moving fixtures, this control becomes even more complex, because there are other parameters available, such as Pan and Tilt or gobos, again all independent.
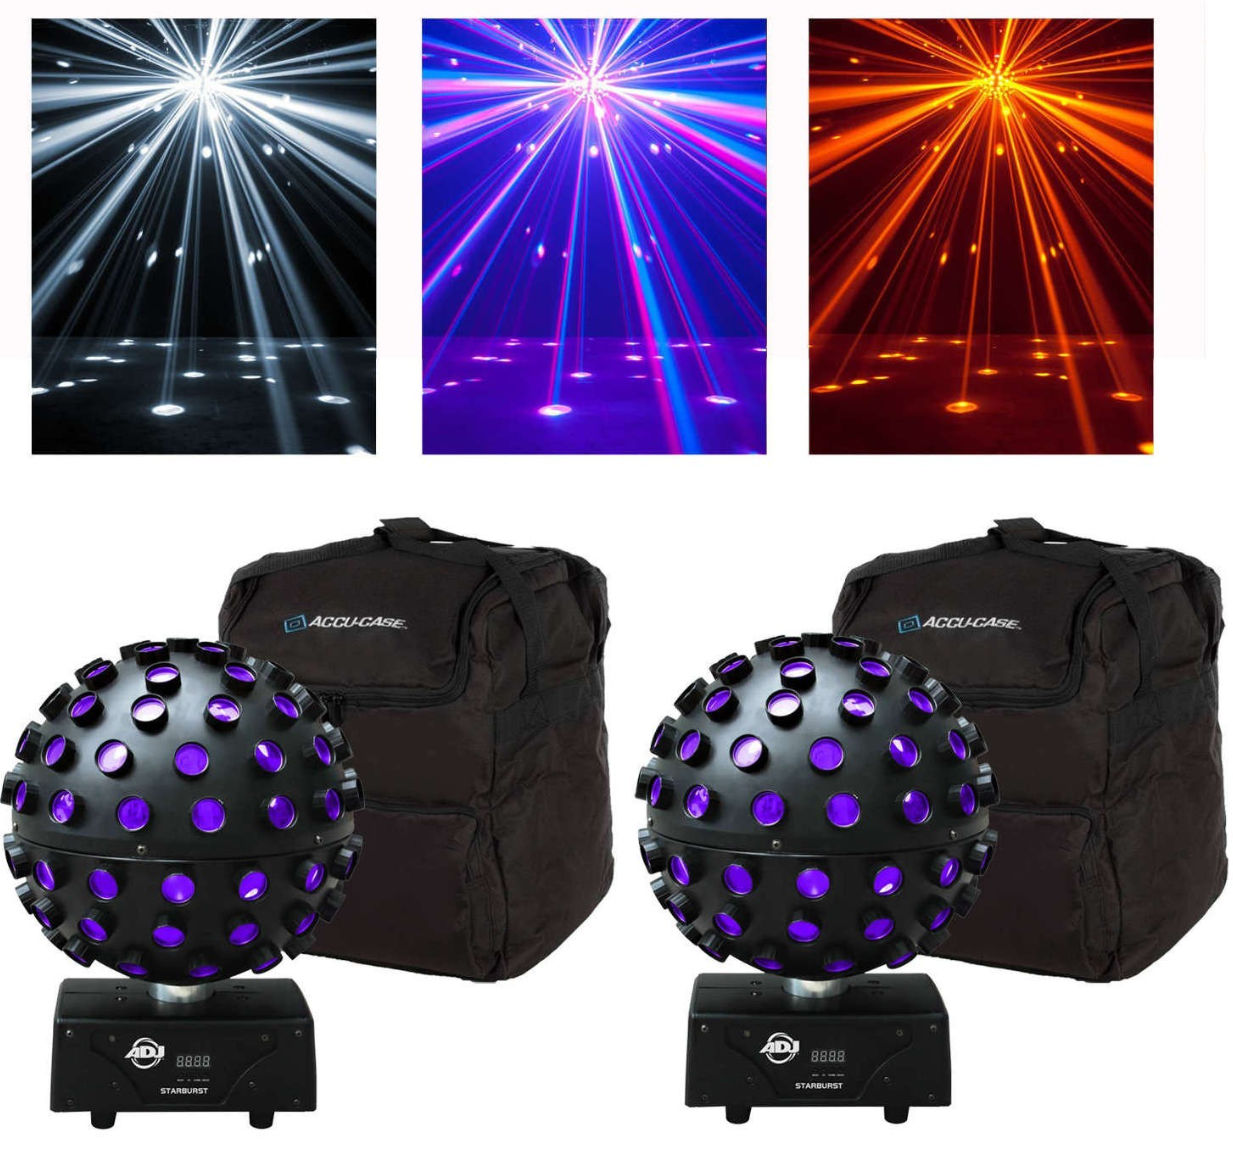
The best way to understand a light’s capabilities is by checking its DMX assignments. For example, the ADJ Starbust’s manual shows this.
Addresses
When setting up a lighting rig, each light fixture needs to be assigned a starting address. If I have four of the same fixture mentioned above in the same personality (7-channel mode), their addresses would be 1, 8, 15, and 22. All 512 channels of data flow through every fixture in a DMX lighting chain so each fixture needs to know which channels control it based on channel addressing.
There are many different DAW software, for example, Ableton Live and Pro Tools. They can be used to create music and control lights. This article isn’t about creating music but just controlling lights in sync with existing music. Therefore, the software we’ll use is Show Buddy.
Setup
To sync light effects with music (e.g. an existing mp3 file), we’ll use this setup.
USB to DMX Controller Interface to connect laptop to lights
DMXIS software to control lights / create light effects
Unlike cheaper USB to DMX interfaces, DMXIS has an on-board controller to generate data into DMX format which is much more reliable than letting the computer generate the data.
Show Buddy software to sync light effects with music – $119
DMXIS light controller software is required to run Show Buddy
Terminate the DMX cable chain by inserting a DMX terminator into the DMX Out port of the last light fixture.
DMXIS Software
Important terminology
Show (group of songs) You can create multiple shows. A show typically is the name of a list of songs, e.g. Yanni Concert
Bank (a song) You can create multiple banks per show. A bank can be the name of a song, e.g. Santorini
Preset (a light effect) You can create multiple presets per bank. A preset can be the name of a light effect. You can create multiple presets (light effects) for a bank (song) in order of when you want the preset (light effect) to occur during song playback. You can drag presets up and down to order them.
Workflow
Add a light fixture If the light fixture you want to add isn’t in the DMXIS library, you can search for it at http://fixtures.dmxis.com/ where you can download user-uploaded DMX light fixes for importing into DMXIS. If you don’t find your fixture there, you can create and upload DMX light specs for your particular fixture. It is just a text file defining channel.
Assign each light fixture to a starting address, e.g.
PAR light 1 (3 channels) starts at DMX address 1 (channels 1-3)
PAR light 2 (3 channels) starts at DMX address 4 (channels 4-6)
PAR light 3 (3 channels) starts at DMX address 7 (channels 7-9)
PAR light 4 (3 channels) starts at DMX address 10 (channels 10-12)
Create a “show”, e.g. “Instrumental Songs”
Create a “bank”, e.g. “Santorini”
Create a preset, e.g. “Red”
Adjust the sliders for one or more light fixtures, e.g. by making them show red light
This software allows you to load audio files (e.g. mp3s) and for each song, place a preset (light effect) created in DMXIS at certain points in the song. Light effects can fade out over a specified amount of time.
Workflow
Add audio files (songs / mp3s) to the Track Library
Choose the DMXIS show to use in the DMXIS show dropdown
Choose a DMXIS bank to use in the list of banks
Choose a DMXIS preset to use in the list of presets
Drag the preset to the wave form at the point you want the preset (light effect) to run
Repeat steps 2-5 as much as needed
Resources
Capture Software
This software allows you to preview light effects.
Workflow
Create a 3D stage
Add one or more light fixtures to the 3D stage
Patch light fixtures (assign them to DMX addresses)
If the light fixture address assignment in Capture matches that in DMXIS, then DMXIS can control the light visualizations in Capture


