a long-established custom or belief that has been passed on from one generation to another. of customs or beliefs from generation to generation
a doctrine believed to have divine authority though not in the scriptures.
(in Christianity) doctrine not explicit in the Bible but held to derive from the oral teaching of Jesus and the Apostles.
(in Judaism) an ordinance of the oral law not in the Torah but held to have been given by God to Moses.
(in Islam) a saying or act ascribed to the Prophet but not recorded in the Koran.
Many people uphold and follow tradition as if it were some sort of law. Many traditions have nothing to do with religion yet people continue to follow them. Some traditions don’t have negative consequences if not followed, but others can be outright ridiculous and even life-changing. Following are some outrageous and even deadly traditions that still happen today.
Based on caste system in India Dalit is a name for people belonging to the lowest caste in India, characterized as “untouchable”. They are discriminated against on many levels and even murdered.
Killing Babies and Infants
In Ethiopia Children born out of wedlock and children with perceived and true physical abnormalities are considered ritually impure. These children are disposed of either through drowning, putting soil in their mouths and strangling or leaving infants in the forest.
In India Baby girls are being killed in the Tamil Nadu area of India, so their poverty-stricken parents can avoid paying large dowries when their daughters marry.
Face Mutilation
Marked The Documentary In Nigeria, the Yoruba tribe scars the face of its people, including babies.
Foot Binding
Foot binding was the Chinese custom of breaking and tightly binding the feet of young girls in order to change the shape and size of their feet; during the time it was practiced, bound feet were considered a status symbol and a mark of beauty.
Leblouh (Arabic: البلوح, romanized: lə-blūḥ) is the practice of force-feeding girls from as young as five to nineteen, in countries where obesity was traditionally regarded as desirable.[1][2][3] Especially prevalent in rural areas and having its roots in Tuareg[4] tradition, leblouh is practiced to increase chances of marriage in a society where high body volume used to be a sign of wealth. The practice is being done in several African countries, such as Mauritania, Niger, Uganda, Sudan, Tunisia (specifically Jewish people), Nigeria, Kenya and South Africa.
Dowry deaths are deaths of married women who are murdered or driven to suicide by continuous harassment and torture by their husbands and in-laws over a dispute about their dowry, making the women’s homes the most dangerous place for them to be. Dowry deaths are found predominantly in India, Pakistan, Bangladesh, and Iran.
Bride burning is a form of domestic violence practiced in countries located on or around the Indian subcontinent. A category of dowry death, bride-burning occurs when a young woman is murdered by her husband or his family for her family’s refusal to pay additional dowry. The wife is typically doused with kerosene, gasoline, or other flammable liquid, and set alight, leading to death by fire.[1][2] Kerosene is often used as the cooking fuel for dangerous small petrol stoves, so it allows the claim that the crime was an accident. It is most common in India and has been a major problem there since at least 1993.
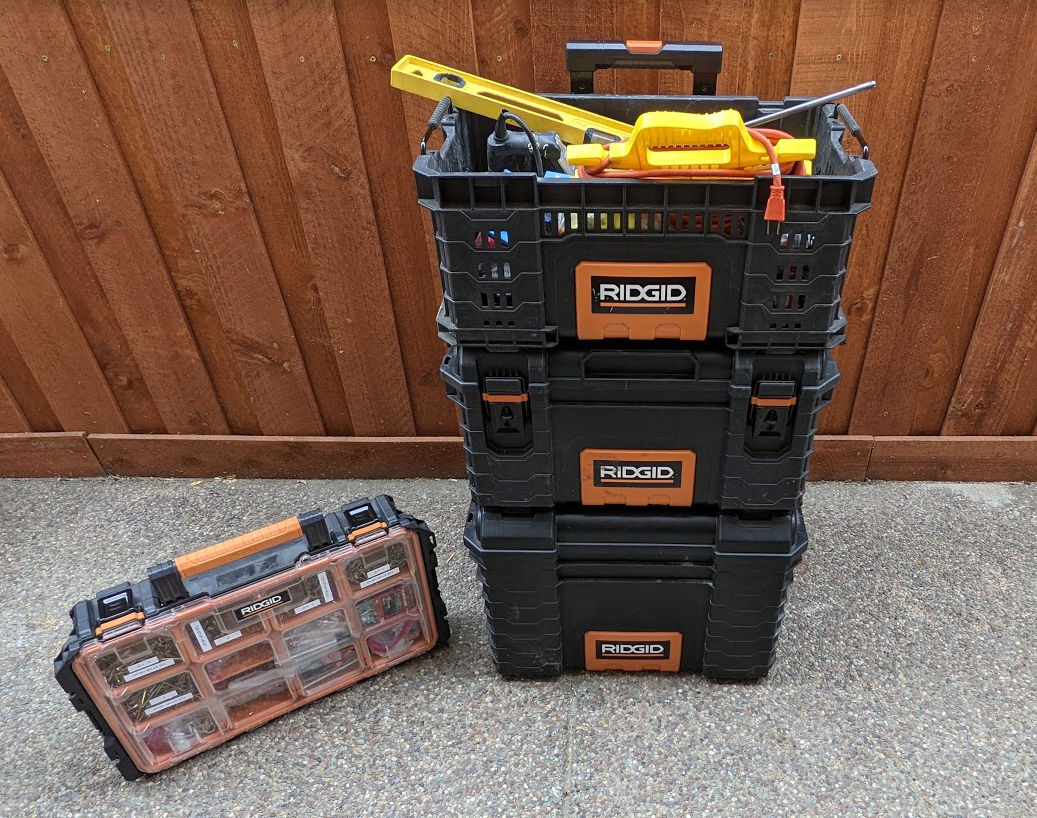
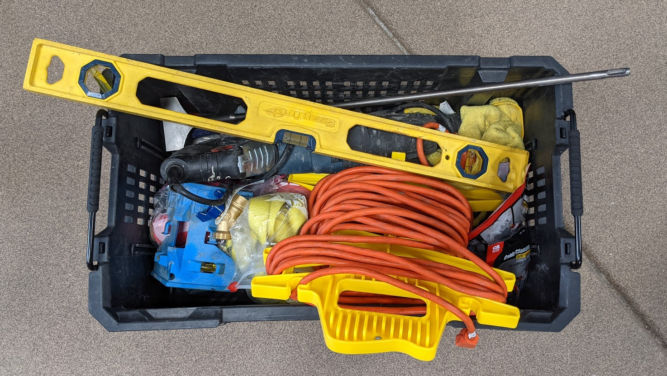
Let’s say you want to do some home improvement somewhere besides your, e.g. at one of your rental properties. You may be tempted to just bring a few tools related to the job you’re going to work on. What often happens, though, is you end up realizing you need another tool that you didn’t expect to need. Once you do that a few times, you then realize you need a way to just bring ALL your tools so you don’t waste time going back and forth. But how can you bring all your tools? Below is how I bring most tools to a remote worksite. I find this setup works very well.
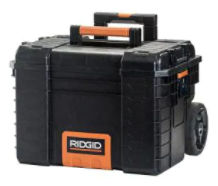
Heavy Duty Stackable Tool Boxes with Wheels
There are many toolboxes on the market but some are overpriced. I went with the Ridgid ones below.
In the photo above, I have stacked four boxes. The problem, though, is the handle is below the top-most box and it tends to hit your hand which is painful. So, I just stack 3 boxes and the small parts box is lightweight enough to carry by hand.
Following is a description of each box.
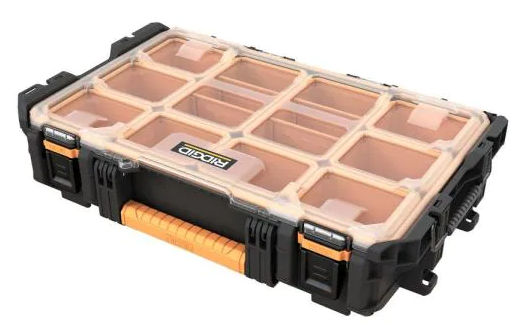
Small Parts Box
Unlike other small parts boxes, this one has a robust locking mechanism so when you carry it around, the latch doesn’t accidentally open and spill all your parts everywhere.
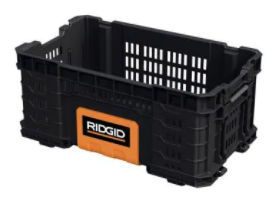
and for items specific to a particular task, e.g. if I’m building a new fence, I put string, plumb level tool, knee pads, etc.
In the toolbox below, I put various small tools grouped by category in 12″ x 12″ 6 Mil Zip Lock clear bags. These are relatively thick plastic bags so they don’t puncture easily. In the tray, I put things that don’t fit into the other categories, e.g. because they are too long. The categories of items are
Every now and then I come across a documentary that shows extreme poverty in many places around the world. I can’t help but wonder why many of these countries don’t appear to be progressing whereas others that used to be poor, like China and Singapore, have become rich in a relatively short period of time. This article examines some of the reasons that prevent countries from growing.
Inclusive vs Extractive Institutions
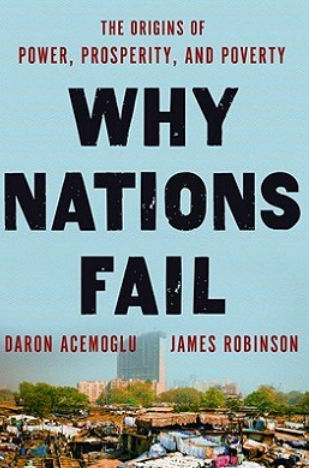
In the book, “Why Nations Fail: The Origins of Power, Prosperity, and Poverty”, the authors argue that nations fail because of their institutions (judicial, economic, political, etc). A given country’s prosperity is determined by its economic institutional landscape – the systems and regulations that direct economic behavior within its borders. That landscape includes property laws, the strength of public services and access to finance.
Inclusive economic institutions stimulate economic success and are designed to encourage participation in economic activities. They also nurture economic freedom. Examples of countries with inclusive institutions are the US and South Korea.
Extractive institutions derive incomes from groups within society for the benefit of other groups. Examples of countries with extractive institutions are North Korea and Sierra Leone.
The main characteristic of inclusive political institutions is pluralism. This means that various groups in a given society are politically represented, therefore power is shared between them. For institutions to be truly inclusive, it’s also essential that they are centralized. Centralization of power results in the rule of law being upheld; there is no need for these different groups to fight each other for superiority.
This 544-page book is available on Amazon. You can read a summary of it in 30 minutes on Blinkist.
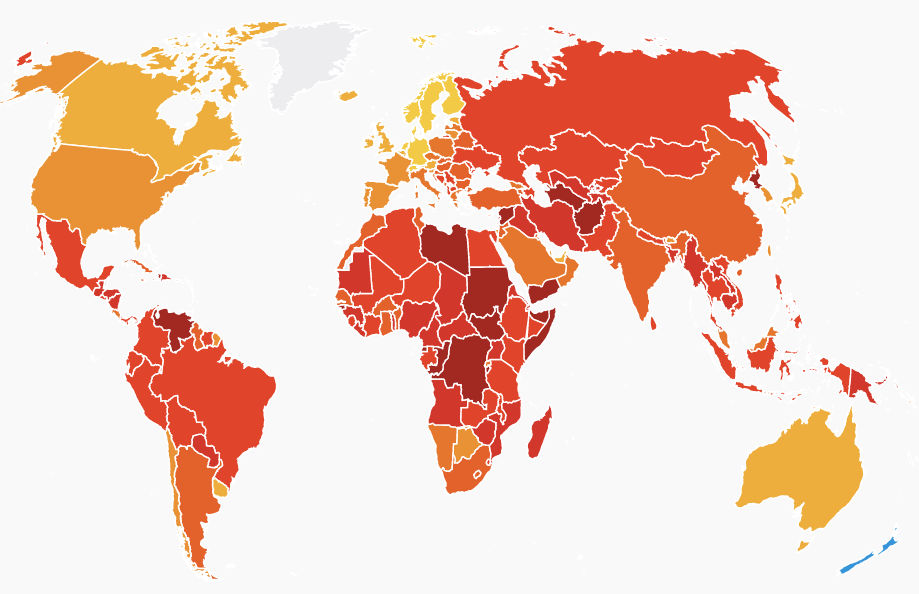
High Levels of Corruption
According to Transparency International, there tends to be less corruption in rich countries and more corruption in poor countries. This makes sense since growth would be limited if governments steal their people’s money.
The problem with corruption is if you elect a new leader / president who isn’t corrupt, they will have a hard time eliminating corruption if other government officials are used to being corrupt. You likely need to sack all government officials and hire new ones who hopefully aren’t corrupt.
No Access to Education
According to this UNESCO study, it’s clear that there’s a correlation between poverty and education.
Pupil-to-Teacher Ratio
If we look at the countries ranked by primary school pupil-to-teacher ratio, we find, unsurprisingly, that there tends to be a smaller percentage of teachers in poor countries than in rich ones.
Source: UNESCO Institute for Statistics (http://uis.unesco.org/)
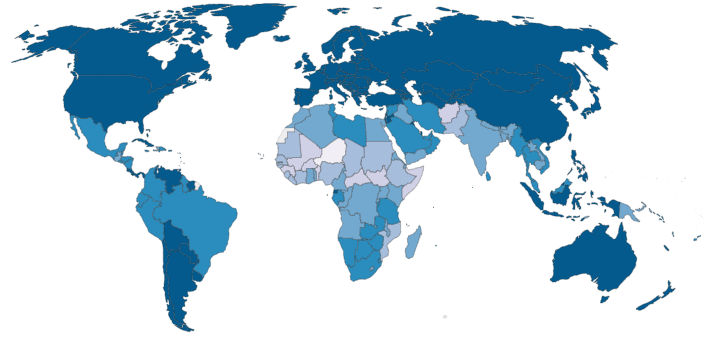
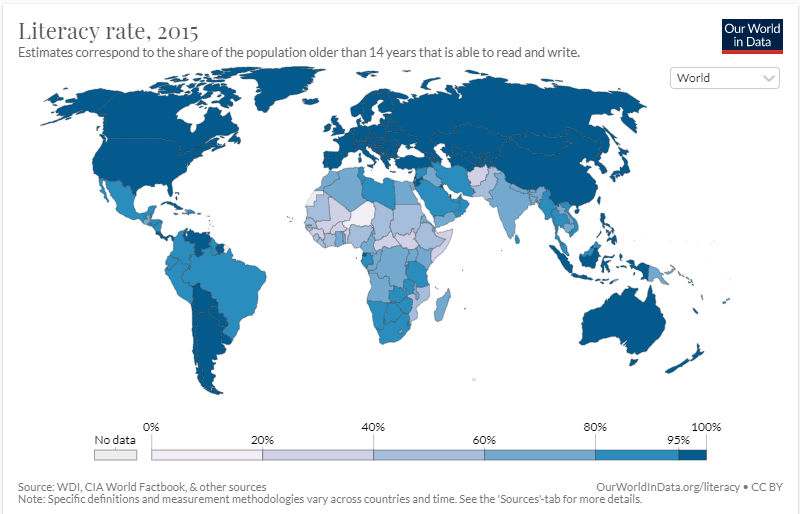
Literacy Rate
Another interesting metric is literacy rates. According to this map, we see consistent results showing poorer countries tend to have more illiterate people.
Another issue is the cost of education. While most countries offer free primary school education, most require tuition for a college education. Many rich European countries offer free college education and some, like in the U.S., offer very affordable college tuition. U.S. students can also get free money (grants) and low-interest loans to help pay for college.
High Population
In high-population countries, there aren’t enough resources (jobs, schools, teachers, etc) to support the large population. This situation becomes one of supply and demand where there is a large supply of unskilled workers and a short supply of resources. This results in a large percentage of the population becoming poor because, for example, they are unavailable seats to a nearby school or they are unavailable jobs.
According to this article by the World Economic Forum, there is a correlation between population size and a country’s wealth. In rich countries, people tend to have fewer children whereas in poor countries, people tend to have more children.
There is also a correlation between population size and education. Education leads to lower birth rates and slows population growth. This makes it easier for countries to develop. A more-educated workforce also makes poverty eradication and economic growth easier to achieve. Of course, economic growth brings with it another problem: increased consumption.
In one study, it was found that uneducated Malian women gave birth to almost 7 children whereas educated ones only gave birth to 4.
In order to slow population growth, some countries have tried to limit the number of children born. However, when China did this, it just turned a problem of population growth into one of an aging society.
According to an article on the US National Library of Medicine National Institutes of Health website, fertility rates tend to be higher in poorly resourced countries. In developing countries children are needed as a labor force and to provide care for their parents in old age. In these countries, fertility rates are higher due to the lack of access to contraceptives and generally lower levels of female education. When children are put to work, e.g. by selling water or tissue at busy intersections, they are not in school and end up following in their parents’ footsteps, i.e. having many kids to make them work. Also, couples don’t expect help from the government when they’re old so they have kids who they expect will take care of them later on in life.
Human Capital
Human capital—the knowledge, skills, and health that people accumulate over their lives—is a central driver of sustainable growth and poverty reduction. More human capital is associated with higher earnings for people, higher income for countries, and stronger cohesion in societies. Unsurprisingly, the developed countries tend to be the ones with a high human capital index (HCI) value. Here’s a subset and the ranking.
Rank
Economy
HCI Value
1
Singapore
0.88
2
Hong Kong
0.81
3
Japan, South Korea, Canada, Finland, Macao, Sweden
Low tax revenues means that a government can only fund basic services such as policing, the courts and the armed forces. In order to provide universal healthcare, education, and a social safety net for all of a country’s residents, higher tax revenues are required. According to the UN, this can be achieved if a country’s tax revenues are at least 20% of their GDP [1]. If achieved, this would result in an increase in a society’s quality of life. The Human Development Index (HDI) [2] is a ranking of a society’s quality of life by country. The index groups countries into 4 categories. Following is a 2016 listing of those categories with a sampling of countries. The listing also shows each country’s 2015 tax revenue-to-GDP ratio [3]. Each country’s estimated 2017 GDP per capita per the International Monetary Fund (IMF) is also listed to give an idea of the average individual’s annual income for that country [4]. In addition, I note whether a country is an Islamic country.
Interestingly, the top 10 countries with the highest quality of life are the countries that collect the most tax from their residents.
If we take the average tax revenue as a % of GDP for all countries in each category, we get the following table.
Country Group
Average Tax Revenue as % of GDP
Top 10 Very High Human Development
36.75
Very High Human Development
31.92
High Human Development
22.08
Medium Human Development
17.09
Low Human Development
15.08
Based on the two tables above, it appears that, in general, the more taxes a country collects (higher tax-revenue as % of GDP), the higher the quality of life of its residents.
In addition to higher taxation, tax policy should be progressive such that the poor do not may as much or more as middle and upper-class people. Also, corporations and rich people should not be able to evade taxes using loopholes.
GDP Per Capita From 1960 to 2020
Below is a graph of the change in GDP per capita of a few countries. Singapore was able to catch up to the US in a short period of time. China and India have many similarities, e.g. two of the most populated countries. Both countries started growing around the same time but clearly China grew rapidly whereas India barely grew.
China has 1.4 billion people. 1/5th of all humanity. Chinese was successful up until the 17th century when China closed its doors and decided it didn’t need Western gadgets. Many people ended up dying due to starvation. 14 million Chinese people died in WWII. Mao Tse Dong ruled China and closed all universities. Deng Xioping had a vision to make China prosperous. His slogan was “To be rich is glorious”. Like Mao, he believed that to ensure stability and to prosper, you needed one-party rule. When Mao Tse Dong died in 1976, Deng asked to be in charge of China’s education and science. Deng allowed everyone to take university exams for free. The first exams started in December of 1977. 5.7 million people applied for exams but only 5% could be admitted. In 1978, Deng emerged as preeminent leader. In 1978, Deng went with a delegation of 30 people to Europe. He witnessed how advanced Europe was and how far back China had fallen behind. Deng then went to Singapore and Japan. He noticed that trains in Japan could travel at 210 kph whereas those in China could only go up to 60 kph. He saw robots making cars in Japan. Deng wanted Chinese people to see how people in Japan and Singapore lived so he showed them on TV. Chinese people were in shock to see Japanese people work and have their own refrigerators at home. China embarked on an economic and social experiment – mixing the Communist command economy with the energy of capitalist enterprise. Chinese students were sent to foreign universities. There was a concern that Chinese students may not want to return to China. There was a huge investment in primary and secondary education – especially for women. By the early 80s, the signs of reform were everywhere from the schools to the cars on the streets where there were once only bicycles. The rural population of China had been moving to the cities at a rapid pace. In just 4 years, China’s agriculture, education and industry were reformed. Private business was allowed to flourish. China’s low production costs offered huge opportunities to the outside world. With its fast, expanding urban workforce, China’s GDP would increase nearly 70 times in 40 years. The Chinese way was a marriage of one-party rule with capitalist enterprise. China didn’t want to be dependent anymore on outside people for technology.
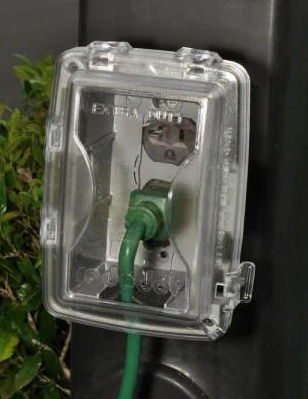
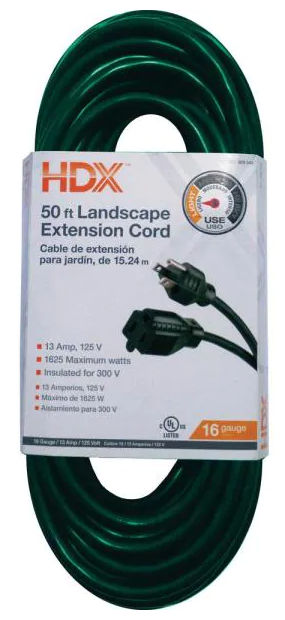
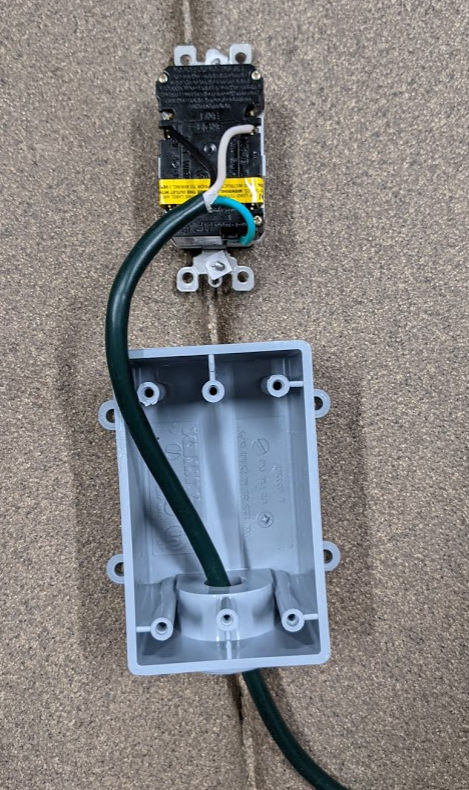
Many homes come with one or, if you’re lucky, two exterior outlets. Depending on the shape and layout of your house, this may not be enough. You can pay someone to add exterior outlets but that could be pricey. Instead, here’s a simple way to add exterior outlets using components rated for outdoors.
Note that this plastic electrical box only has an opening on one side unlike others that have a open on the top and bottom. Since we don’t water to get in, we use this single hole box and install it such that the hole is at the bottom.
strip about 3 inches of the green outer jacket to expose the 3 wires (green, white, black) inside,
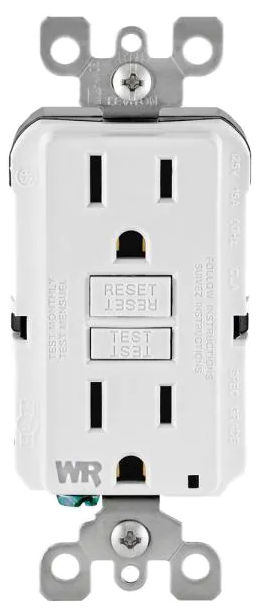
strip 1/2″ of the 3 wires and screw them into the appropriate terminals on the outlet.
screw the outlet into the electrical box
screw on the outlet cover
if you have an existing exterior outlet, you can simply plug the other end (male end) into that outlet. Otherwise, you can cut off the male end, drill a hole through the exterior wall where an interior outlet is and connect the wires to the interior outlet. WARNING: Turn off power to the interior outlet before doing this to avoid electrocution and a short circuit.
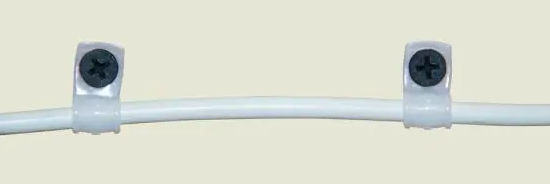
Secure the extension cord to the exterior of the building using the cable clamps. Or, bury the extension cord under dirt or rocks. Or, put the cord into a gray outdoor-rated PVC pipe and clamp the pipe using the gray plastic clamps.
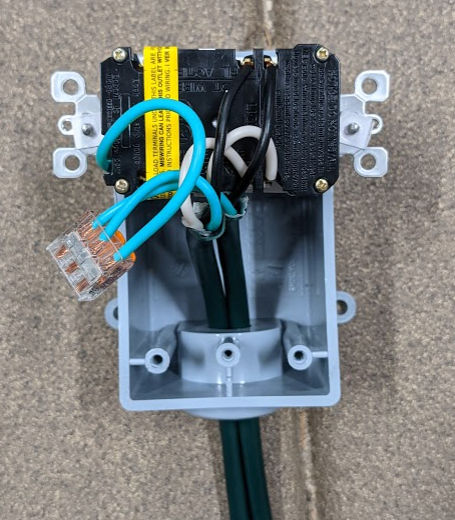
Two exterior outlets in series
In this case, one of the electrical boxes will have two extension cords coming into it as shown in the picture below.
In this case, strip the wires again and connect them as usual. The outlet I’m using supports two wires for each black and white terminal so that was straightforward. The green (ground) terminal, however, only support one wire so I made a jumper wire, connected it to the green terminal, then connected the 3 open green wire ends to a 3-terminal Wago connector as shown below.
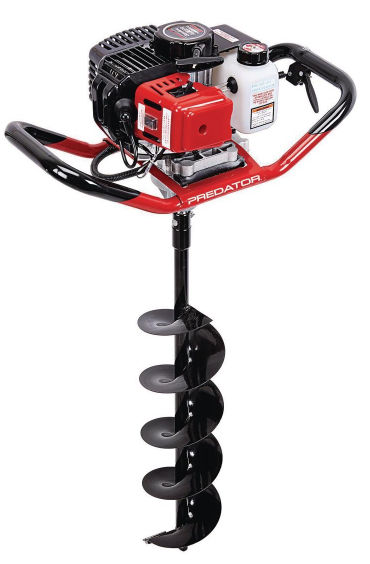
If you need to dig a hole to, say, plant a tree, there are a few different tools available to get the job done. Depending on the size and number of holes you need to make, here are some tools to consider.
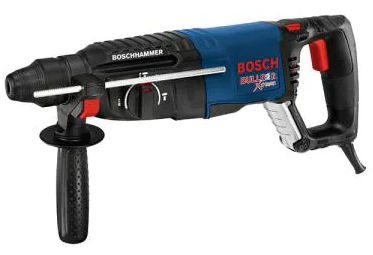
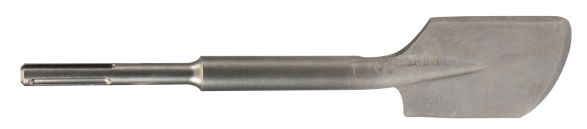
SDS Plus Hammer
An SDS Plus rotary hammer uses an SDS Plus bit. It has 3 functions
drill
hammer drill
hammer
You can use the hammer function with an SDS spade bit to break up hard soil. I have the Bosch Bulldog xTreme which is a popular SDS Plus rotary hammer.
Next up would be a full on 1-1/8″ Hex Shank Jackhammer. This is normally used for breaking concrete. This is only a hammer. It cannot drill. For example
It comes with a 6 in. diameter x 31 in. long auger bit and offers 45 ft. lbs. of torque and fast drilling speeds up to 320 RPM.
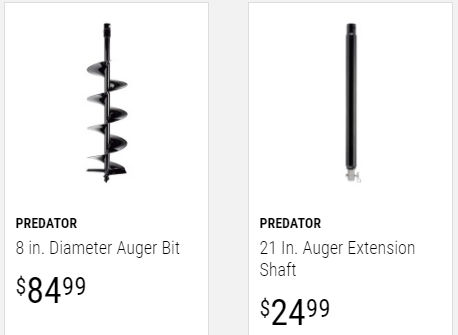
There are different bit sizes as well as an bit extension available.
If you use an auger, or any digging method for that matter, it’s important to soak the ground with water first. You can create a small hole first and then fill it with water so the water will seep down to soften the ground you want to remove.
When using an auger, drill to your desired depth and then leave the auger in the ground until you remove the dirt that it brings to the surface. If you remove the auger right away, the dirt will fall into the hole you just made.
Also, for large holes, you’ll need to make multiple small holes. In the photo below, I made 4 holes in each corner and after making one hole, I’ll cover the hole with wood to prevent dirt from falling into them while drilling a new hole.
Once you’ve drilled 4 holes, you can use the auger or a jack hammer to break the remaining dirt and scoop it out using a shovel.
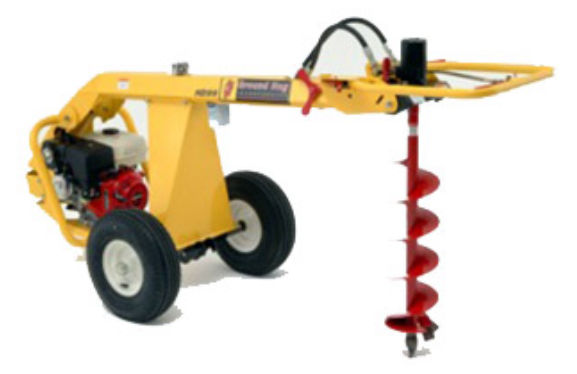
You can also rent this towable auger for $118 per day but I found it very heavy and difficult to use.
You can also rent a mini skid steer with auger attachment. They cost $300 per day from the Home Depot.
Excavator
You can also rent a mini excavator from the Home Depot for $300 per day.
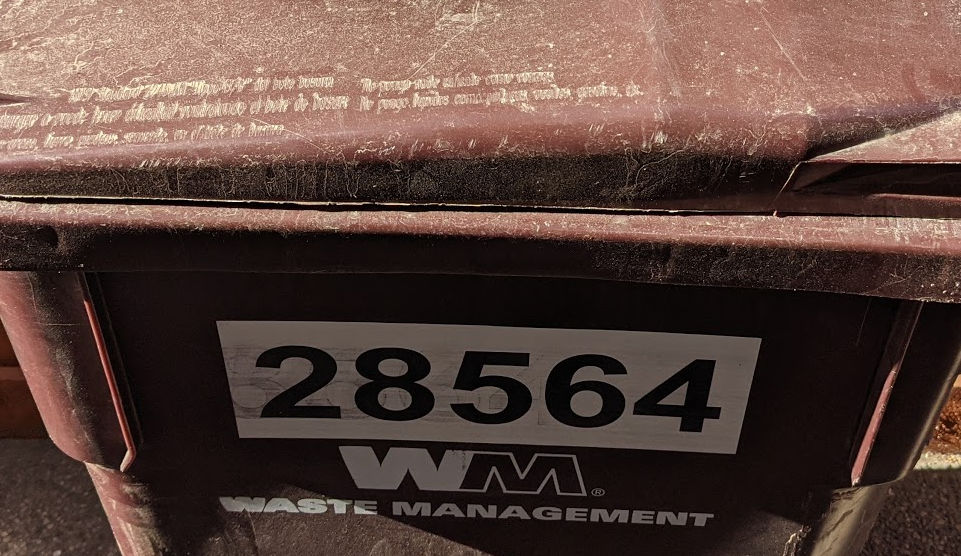
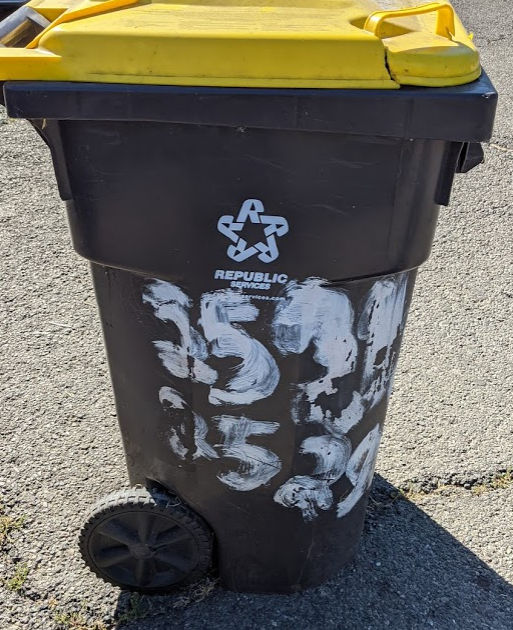
Sometimes you might find a need to label your garbage cart, e.g. if you own a multi-family rental property and your tenants can’t remember which cart belongs to them. They may try to use their creative skills to label their carts themselves but the carts might come out like below which is illegible and makes the cart itself look like garbage.
You can try using a stencil and spray painting or hand painting the numbers on the cart but stencils are expensive and the results are usually not good either. Notice the blotchy edges below.
Use Google Docs to create a document with large address numbers on it. Print it on the vinyl decal sheets, ideally using a laser printer. Then, to reduce the possibility of the ink evaporating from the sun and increase waterproofness, spray a few coats of clear, glossy paint. Don’t spray thick coats at once since otherwise the clear paint will cause the ink to run. Just do multiple thin coats.
You can the just peel and stick the number on your garbage carts. In the picture below, my ink toner was low so the print results weren’t good. That went away after replacing the toner.
1 container (150 grams) Dannon Oikos Triple Zero Vanilla Greek Yogurt (15 g protein, 0 g added sugar, 100 calories) – Target
A little bit of Kefir (Lifeway Kefir cultured lowfat milk 1% milkfat plain unsweetened) (1 cup / 240 ml / 110 calories, 0 g added sugar, 11 g protein) – Smart n Final
Handful of mixed berries (strawberries, blueberries, raspberries)
½ cup granola (Kirkland Signature Organic Ancient Grain Granola) – Costco
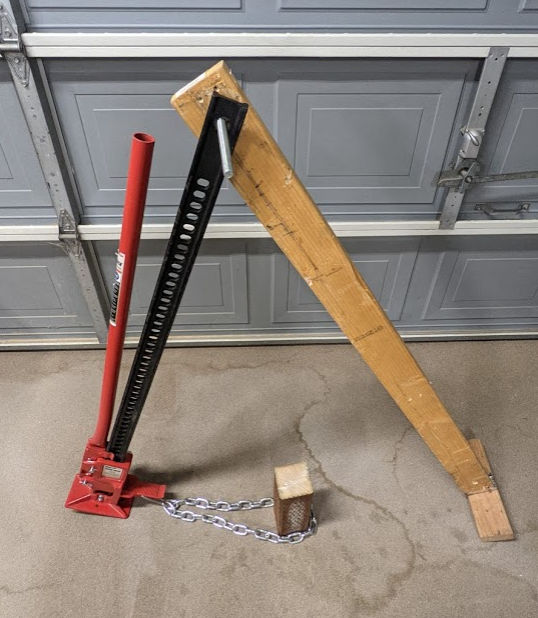
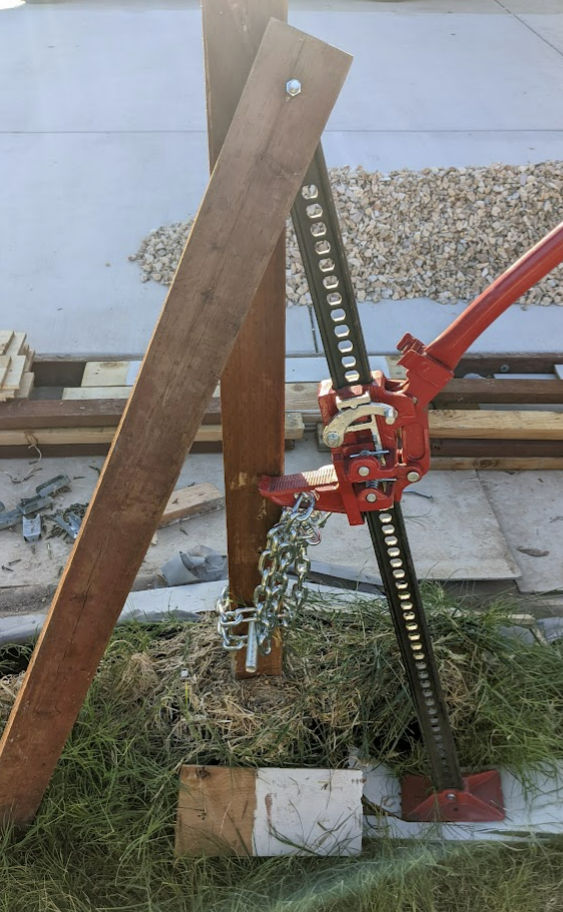
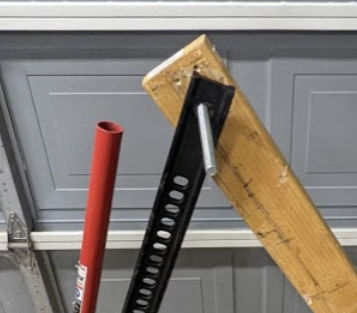
Drill a hole in one end of the 2×4 using a spade bit.
Insert the bolt into 2×4 and through the top hole on the farm jack and secure using a nut
Drill a hole near the bottom of the fence post using a 7/8″ spade bit and insert the threaded rod through the hole
How to Use
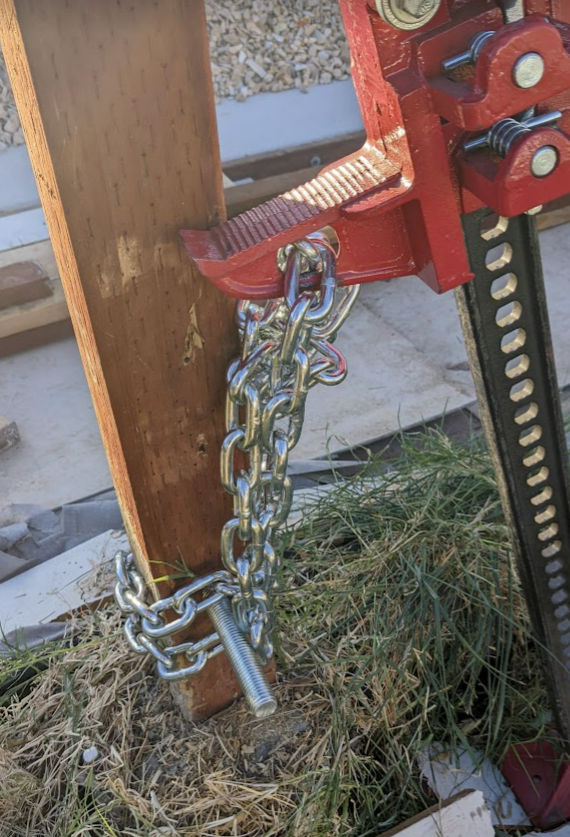
Tilt the farm jack and the 2×4 such that the post is in the middle. This is necessary as the post will try to pull the farm jack towards it. The 2×4 acts to prop the farm jack in place.
Put a piece of plywood under the farm jack to make a solid base so the farm jack doesn’t get pushed into the dirt
Insert one end of the chain through the hole near the bottom of the farm jack
Loop the other end of the chain around the fence post and around the threaded rod. Weaving the chain around the rod helps lock the chain in one place along the vertical length of the post.
Tie a knot using both ends of the chain
Crank the jack up until it lifts the fence post and concrete footing above the ground
Crank the lever up and down to raise the chain until the post come up out of the ground
Don’t secure the chain to the farm jack using a carabiner or other tool because those tools will just break.
Removing a wood fence post
Removing a steel fence post
Update 2024
You don’t need the 2×4. Instead, place a 4×4 piece of wood between the farm jack and the post you want to remove. Doing so will keep the jack straight and parallel to the post and prevent it from hitting the post. When placing the 4×4 wood, you may need to place it at an angle such that the end against the jack is lower than the end against the post. That way, when you crack the jack up, the wood will rotate and be pushed against the post.
Also, if the ground is soft like dirt or grass, screw the base of the jack into a 12″ x 12″ piece of wood that is 2″ or 3″ thick to prevent the jack from being pushed into the ground.
Fry ground beef, onions, jalapeno pepper and garlic until slightly brown
Pour in diced tomatoes and sprinkle in smoked paprika, salt and pepper to taste (optionally, add tomato paste) and cook for 5 minutes. Optionally add cheese.
Put 5 slices of sour dough bread in toaster and toast until slightly hard
Add eggs being careful not to break the yolk
Cover and poach on medium heat until egg white changes from translucent to white. Turn off heat so that egg yolk is still runny.
Garnish with cilantro
Eat by scooping up Shakshouka with spoon and chase it with a bite of the bread