Design for Developers

Roots of UI/UX Design

Refactoring UI

In this tutorial, I’ll explain how you can easily create a website using pre-made components.

Note that the following is just one of many ways you can do this.
Parcel in a simple, zero-configuration build tool. Here are some of its features.
Tailwind CSS is a utility-first CSS framework.
Instructions on how to install both Parcel and Tailwind CSS.
If you will have CSS files separate from Tailwind CSS, in your tailwind.config.js file, make sure to add “css” as a file option.

Add a source and scripts to your package.json by copying the source and scripts to it so that it looks like below. Remove the “main”: “index.js” if it exists. Note that we’re using the glob ./src/**/*/index.html to tell Parcel to build all HTML files in all directories.

Run npm run build to test building the pages.

Run npm start to start a local dev server.

Open a browser and go to the server URL provided to verify the test page loads. Make a change to the HTML and Tailwind CSS classes to verify that changes are processed and the page auto-refreshes in the browser.
git init to initialize a new local git repo.node_modules
.parcel-cache
.env
distgit add *
git commit -m "first commit"
git branch -M main
git remote add origin git@github.com:javanigus/test-tailwind-site.git
git push -u origin mainAll files in your GitHub repo should be there except for the ones in the .gitignore file.
Install the gh-pages package by running npm install gh-pages --save-dev.
Add the following scripts to your package.json file:
"predeploy": "rm -rf dist .parcel-cache && parcel './src/**/*.html' build --public-url ./",
"deploy": "gh-pages -d dist"
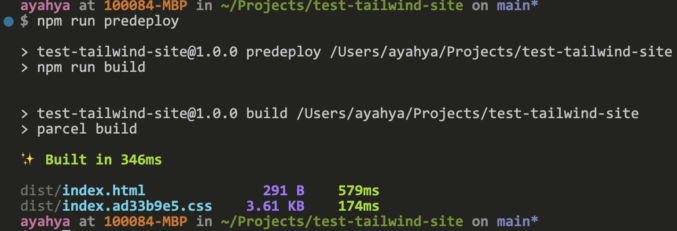
The predeploy script will run the npm run build command before deploying to ensure that the latest production-ready files are used. You need to clear the cache by deleting the .parcel-cache folder first. Also, since GitHub Pages publishes your website in a folder below the root domain, you need to add a “public-url” flag to tell Parcel to remove the slash (/) for relative dependencies like CSS and JS files to avoid getting a 404 error.
Run npm run predeploy
The deploy script will use the gh-pages package to deploy the contents of the dist directory to the gh-pages branch of your GitHub repository.
Run npm run deploy
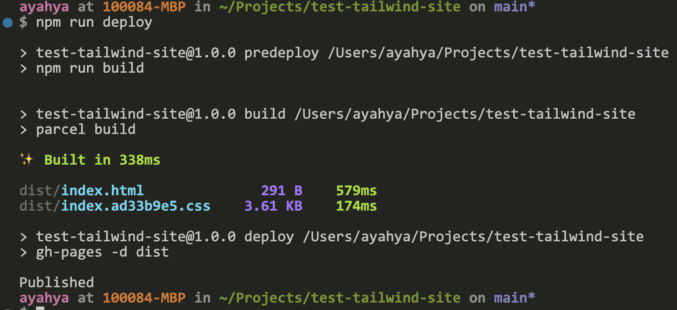
View your site at https://<username>.github.io/<repository>/. In my case, that’s https://javanigus.github.io/test-tailwind-ui-site/.
In GitHub, if you go to Settings > Pages, you’ll see that the commands above configure GitHub Pages for you.

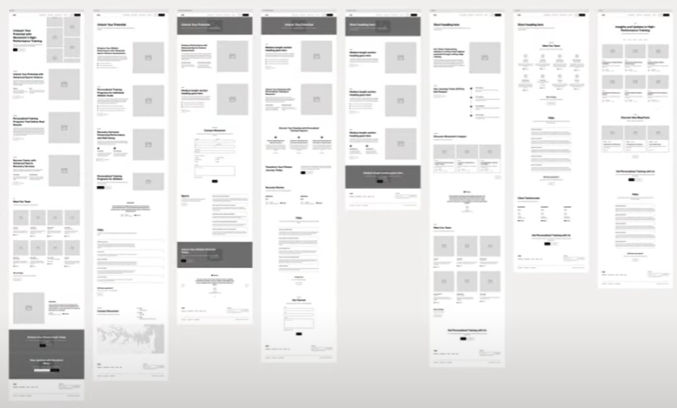
Relume.io makes it very easy to create a website sitemap.

You can edit the name and description of each section of each page in the sitemap.
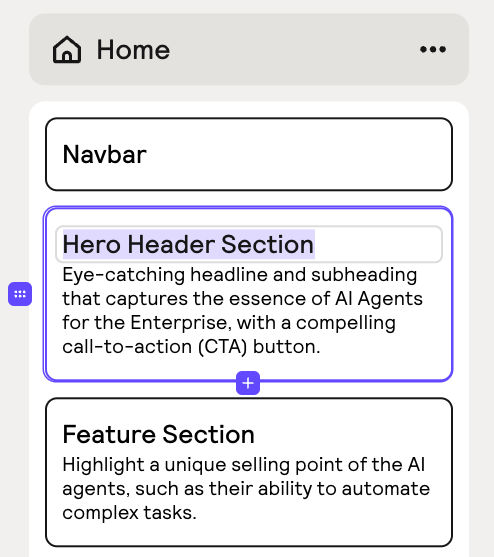
Relume.io also makes it very easy to create a wireframe for each page.
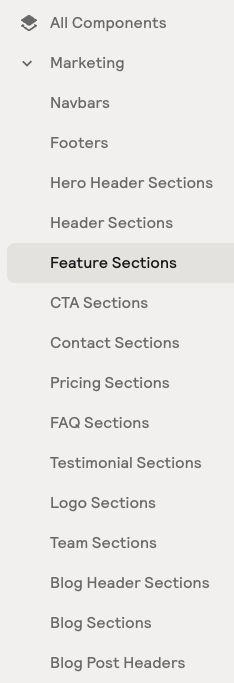
There are numerous components to choose from.
For each section, you can edit the content to match your actual content.

You can use Tailwind UI to copy and paste a bunch of sections like header, footer, hero, contact us, etc.
https://tailwindui.com/components
You can also get Tailwind components from
You can also use Material Tailwind to copy and paste a bunch of elements like buttons, cards, accordions, lists, tables, etc. You’ll first need to add the Material Tailwind CSS and JS to your HTML pages first.
Ripple Effect
<!-- from node_modules -->
<script src="node_modules/@material-tailwind/html@latest/scripts/ripple.js"></script>

<!-- from cdn -->
<script src="https://unpkg.com/@material-tailwind/html@latest/scripts/ripple.js"></script>
Icons
<!-- Material Icons Link -->
<link
  href="https://fonts.googleapis.com/icon?family=Material+Icons"
  rel="stylesheet"
/>

<!-- Font Awesome Link -->
<link
  rel="stylesheet"
  href="https://cdnjs.cloudflare.com/ajax/libs/font-awesome/5.15.2/css/all.min.css"
  integrity="sha512-HK5fgLBL+xu6dm/Ii3z4xhlSUyZgTT9tuc/hSrtw6uzJOvgRr2a9jyxxT1ely+B+xFAmJKVSTbpM/CuL7qxO8w=="
  crossorigin="anonymous"
/>Easily add icons from FontAwesome or SVG Repo.
Find and load fonts for free from Google Fonts.
Your page sections will look boring if they are just plain white. Here are some background ideas:
For example, I use this gradient background animation for the announcement banner commonly found stuck to the top of websites. You can find free images at Unsplash. You can find SVG backgrounds from svgbackgrounds.com. I also used one of the button styles from here. I also used one of the button styles from here. You can also use AI to create abstract backgrounds.
I like anime.js. The documentation is clear and integration is simple. Just add a reference to the animeJS library on a cdn like CDNJS. Then, add write some JavaScript that uses animeJS in your main JavaScript file. If you want your animations to run when users scroll to a particular section of your site, you can add the Waypoints library from a CDN as well. In my example website, I first hide all elements by setting their opacity to 0. Then, I use Waypoints + AnimeJS to animate different elements. Here’s my code. I ended up loading jQuery, animeJS and Waypoints along with my main JS file at the bottom of the <body> element.
<script src="https://cdnjs.cloudflare.com/ajax/libs/jquery/3.7.1/jquery.min.js" integrity="sha512-v2CJ7UaYy4JwqLDIrZUI/4hqeoQieOmAZNXBeQyjo21dadnwR+8ZaIJVT8EE2iyI61OV8e6M8PP2/4hpQINQ/g==" crossorigin="anonymous" referrerpolicy="no-referrer"></script>

<script src="https://cdnjs.cloudflare.com/ajax/libs/animejs/3.2.2/anime.min.js" integrity="sha512-aNMyYYxdIxIaot0Y1/PLuEu3eipGCmsEUBrUq+7aVyPGMFH8z0eTP0tkqAvv34fzN6z+201d3T8HPb1svWSKHQ==" crossorigin="anonymous" referrerpolicy="no-referrer"></script>

<script src="https://cdnjs.cloudflare.com/ajax/libs/waypoints/4.0.1/noframework.waypoints.min.js" integrity="sha512-fHXRw0CXruAoINU11+hgqYvY/PcsOWzmj0QmcSOtjlJcqITbPyypc8cYpidjPurWpCnlB8VKfRwx6PIpASCUkQ==" crossorigin="anonymous" referrerpolicy="no-referrer"></script>

<script src="main.js"></script>Whenever you’re done making a change, just run the following deployment commands.
npm run predeploy
npm run deploy
Here’s a test site I created. Not too bad for a day’s work.
https://javanigus.github.io/test-tailwind-ui-site
Next steps:

Things have definitely moved around and look different in the UI for GA4 (Google Analytics v4) vs UA (Universal Analytics). If you’re looking how to find pages that link to a particular page (previous page path), then you need to use Path Exploration.
Explore > Path Exploration


If you see an existing path exploration, click “Start Over”. Then, click “Ending Point” and choose an option. I prefer to choose “Page path and screen class” since page paths are easy and unique to get.

You can then choose one of the available paths or click the magnifying glass to type in a path, e.g. /resources/.

You will then see how often people click on a link on a page that takes them to your ending point (page) within a particular time range.

In the Variables section on the left, you can change the date range and other variables.


Let’s say you’ve inherited a large website that uses some home-grown static site generator (SSG) and there’s no documentation. Your build and release infrastructure is fragile and also custom. Your git repo is massive with content from two decades, including lots of binary files. You want to migrate this massive piece of shit to a popular SSG like Eleventy and you want to use a reliable deployment system like GitHub + Netlify. Let’s say you can’t migrate all source files because there’s no easy way to do so between your custom SSG and Eleventy. If you’re willing to sacrifice most of your layouts and partials (includes) and just migrate everything all of the built static files to Eleventy with one partial for the header and one for the footer, then here’s one way to do it.
If you don’t have access to the SSG and the web servers, you can download the whole website from the internet using wget.
If your website is on WordPress, install the Simply Static plugin and export your site to a zip file (free).
Let’s say your HTML looks something like this.
<html>
<head>
	...
</head>
<body>
<header class="header">
	<div>Logo</div>
	<ul>
		<li>Link 1</li>
		<li>Link 2</li>
	</ul>
</header>
<section>
	<p>Hello, World!</p>
</section>
<footer class="footer">
	<p>Copyright 2024</p>
	<div>blah blah blah</div>
</footer>
</body>
</html>
In this case, you can create separate files like this:
/includes/header.njk
<header class="header">
	<div>Logo</div>
	<ul>
		<li>Link 1</li>
		<li>Link 2</li>
	</ul>
</header>
/includes/footer.njk
<footer class="footer">
	<p>Copyright 2024</p>
	<div>blah blah blah</div>
</footer>For simplicity, let’s say that your HTML looks something like this:
<html>
<head>
	...
</head>
<body>
<div class="header">
	<div>Logo</div>
	<ul>
		<li>Link 1</li>
		<li>Link 2</li>
	</ul>
</div>
<section>
	<p>Hello, World!</p>
</section>
<div class="footer">
	<p>Copyright 2024</p>
	<div>blah blah blah</div>
</div>
</body>
</html>
If your header and footer code blocks don’t use unique HTML tags like “header” and “footer”, then you may have a problem searching and replacing these code blocks. For example, in VS Code, if I try to select the header block beginning with <div class="header">, I can’t do so due to the nested div tag.
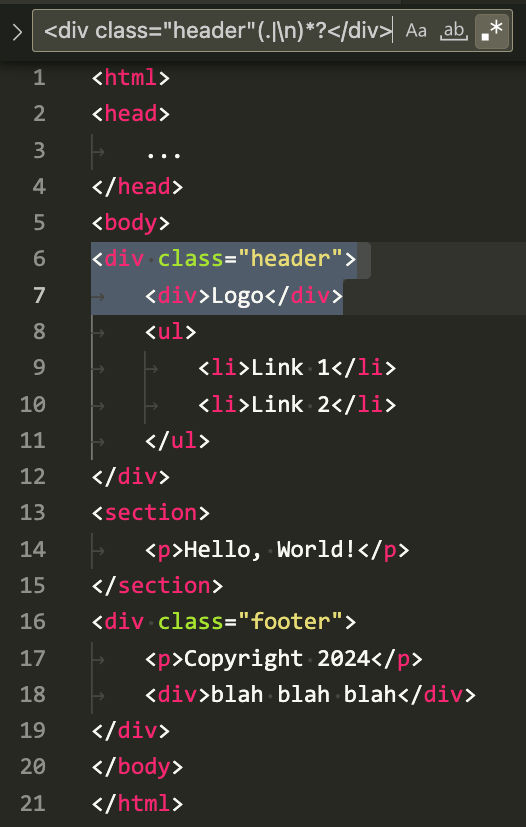
Using the regex
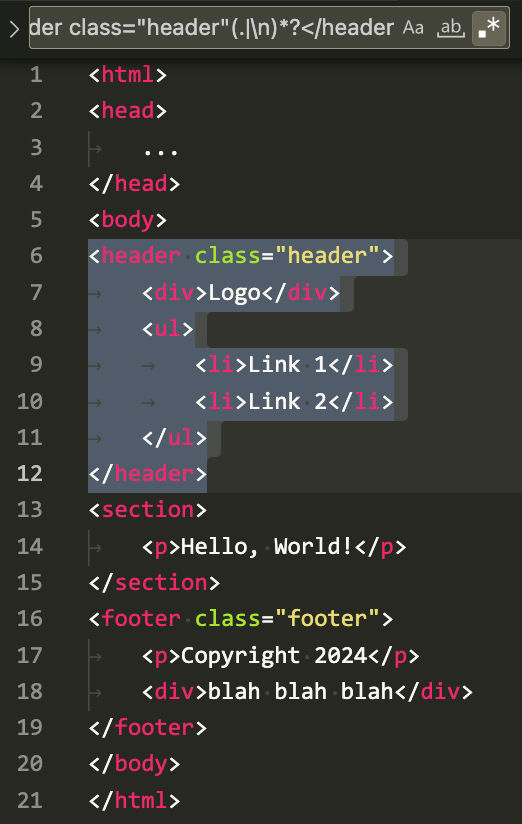
<div class="header"(.|\n)*?</div>notice how the selection ends prematurely at the closing nested div tag. In this situation, you can update your source code to replace the open and closing div tags with the standard <header> tag. You can do the same with the footer by using the <footer> tag. After updating the source code, you can rebuild your static HTML pages and then use a regex like
<header(.|\n)*?</header>
<footer(.|\n)*?</footer>
to search and replace the header and footer code blocks with a code reference that includes those code blocks using whatever template engine you want to use.
If you want to use the Nunjucks template engine, for example, then you can replace those code blocks with something like
{% include "header.njk" %}
{% include "footer.njk" %}Rename all HTML files so their extensions are .njk instead of .html.
brew install rename
find . -name "*.html" -exec rename 's|\.html|\.njk|' {} +Create a new folder and install an SSG. In this case, I’ll install Eleventy.
mkdir mysite
cd mysite
npm init -y
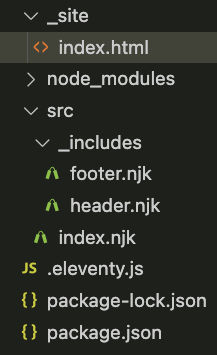
npm install --save-dev @11ty/eleventyMove your website files to your new Eleventy project. To follow Eleventy’s default conventions, your folder structure should look something like this.
Note that we put the header and include partials in the “_includes” folder under the “src” folder. Therefore, our header and footer include references should be updated to look like this
<html>
<head>
	<title>Home Page</title>
</head>
<body>
{% include "src/_includes/header.njk" %}
<section>
	<p>Hello, World!</p>
</section>
{% include "src/_includes/footer.njk" %}
</body>
</html>If you don’t create an Eleventy config file, then Eleventy will use all of its defaults and output built files to a “_site” folder and it will build the partials as well.

Since we don’t want to build the partials, let’s create an Eleventy config file.
In the project root, create a file called .eleventy.js with the following content.
module.exports = function(eleventyConfig) {
	eleventyConfig.addPassthroughCopy("src", {
		//debug: true,
		filter: [
			"404.html",
			"**/*.css",
			"**/*.js",
			"**/*.json",
			"!**/*.11ty.js",
			"!**/*.11tydata.js",
		]
	});

	// Copy img folder
	eleventyConfig.addPassthroughCopy("src/img");

	eleventyConfig.setServerPassthroughCopyBehavior("copy");

	return {
		dir: {
			input: "src",
			// ⚠️ These values are both relative to your input directory.
			includes: "_includes",
			layouts: "_layouts",
		}
	}
};
If you rerun Eleventy, you’ll see that the partials are not built and copied to the output folder.

If you want your page content to be wrapped in other content, you can create a layout. This is called template inheritance. Both Nunjucks and 11ty have their own template inheritance mechanism. With Nunjucks, you inherit a parent template using
{% extends "parent.njk" %}. With 11ty, you inherit a parent template using front matter, e.g.
---
layout: parent.njk
---
Nunjucks supports template blocks natively, but it doesn’t support front matter. 11ty supports front matter, but it doesn’t support template blocks natively. Learn more about creating a layout using 11ty’s template inheritance mechanism.
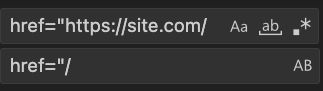
If you have absolute links to the same site, you should replace them with relative ones, e.g.
https://www.mysite.com/products/ -> /products/
You can do this easily in VS Code’s search and replace feature.
If your website images are local, I would move them to AWS S3 and then use the S3 URL as a custom origin to pull the images into an image CDN like ImageKit or Cloudinary. If your site is in WordPress, the images will be in the wp-content/uploads folder. You can then do a global search and replace to reference the image CDN URL.

Recently, I needed to clone a website and make a few minor changes to it. I wanted to publish a slightly modified copy of the website. Luckily, it’s easy to do that using wget. Here’s how I did it.
I’m on Mac, so I installed wget using Homebrew using the command
brew install wgetI wanted to download this small website. I used this command:
wget -p -r https://events.govexec.com/qualys-cyber-risk-conference/Note that wget will crawl a website to download pages and dependencies. If a page is not linked, whether directly or indirectly from the URL passed to the wget command (an orphan page, it will not get downloaded. One option is to make a list of all URLs (one per line) by getting them from the websites sitemap, assuming the sitemap is complete, and passing that list to the wget command, e.g.
wget -p -r --input-file=download-list.txtIf download stops, you can continue using the command
$ wget -p -r --continue --input-file=download-list.txtSince I downloaded a bunch of HTML files, if I wanted to replace a common element on multiple pages, the easiest way was to do a search and replace. Using VisualStudio Code, you can easily find all HTML blocks within a particular tag using a multi-line regex. Here are some example regexes:
<footer(.|\n)*?</footer><script(.|\n)*?</script><a class="popup(.|\n)*?</a>Note: these regexes only work if the tags don’t have any nested tags with the same name.
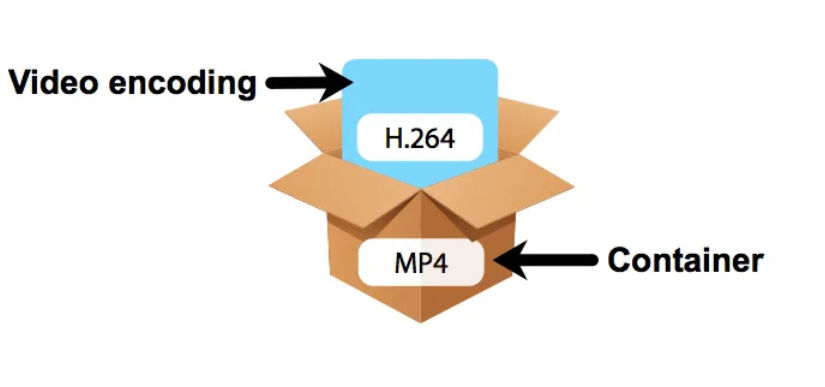
With so many video codecs and containers, it’s easy to get confused. Here’s a simple explanation.

Codec stands for coder-decoder. Video codecs are algorithms for encoding and decoding video data.
For simplicity, you can think of a video codec as the video format.
Examples of video codecs are H.261, H.263, VC-1, MPEG-1, MPEG-2, MPEG-4, AVS1, AVS2, AVS3, VP8, VP9, AV1, AVC/H.264, HEVC/H.265, VVC/H.266, EVC, LCEVC
Currently, the most popular codec is AVC/H.264.
With respect to video, a container is a data storage. It can include compressed video and audio sequences, subtitles, service information and metadata. It is a package or bundle.
For simplicity, you can think of a media container as the file format.
Examples of media containers are MPEG-1 System Stream, MPEG-2 Program Stream, MPEG-2 Transport Stream, MP4, MOV, MKV, WebM, AVI, FLV, IVF, MXF, HEIC
Currently, the most popular container is MP4.
There are many ways and tools you can enhance a photo. If you’re a professional photographer, then you’ll likely have advanced methods, but for the average person, you’ll probably just want some quick and easy solutions. Like most average people, my photos are mostly taken from my phone (currently, Google Pixel 8). However, when vacationing, I also take a lot of video using my Insta360 X3 camera, and I’ll occasionally want to take snapshots of a video frame to add to my photo collection. With this in mind, here’s my current (simple) workflow for upscaling and enhancing photos.
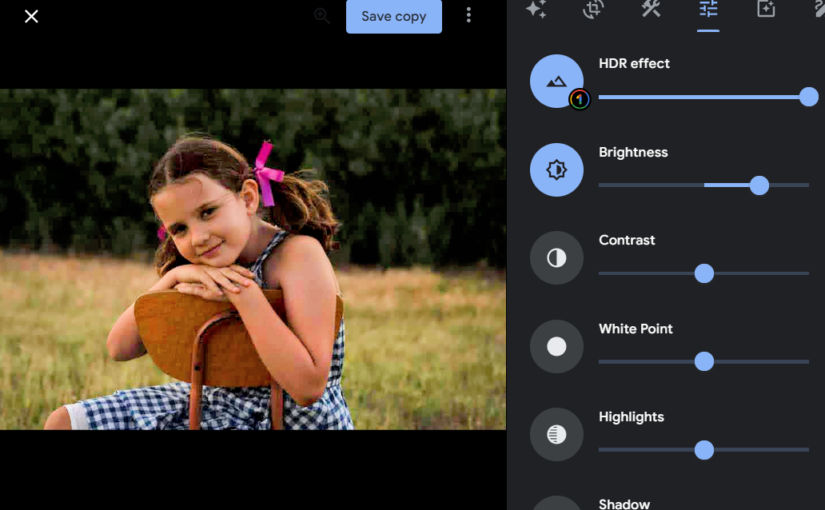
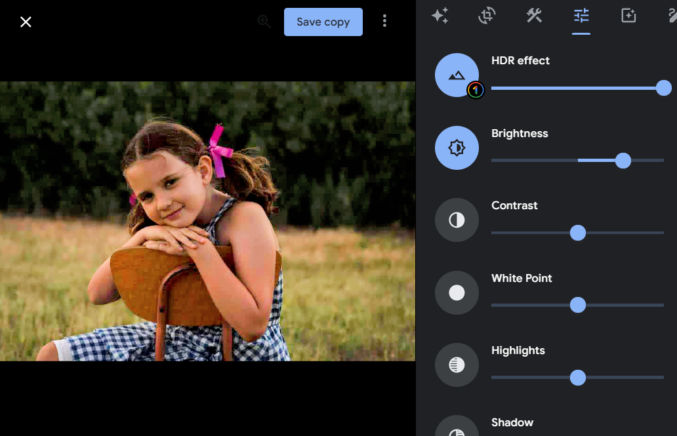
First, upload your photo to Google Photos. Then, use one of the presets to enhance the photo. Here’s an example photo without any enhancements applied.
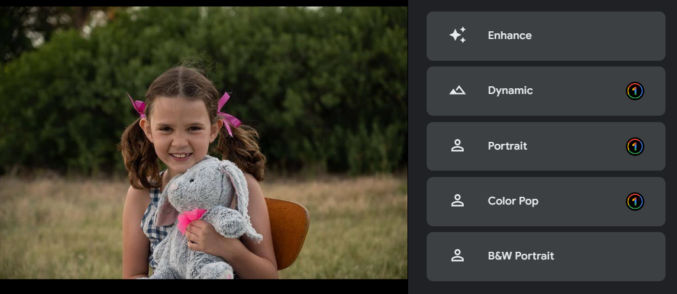
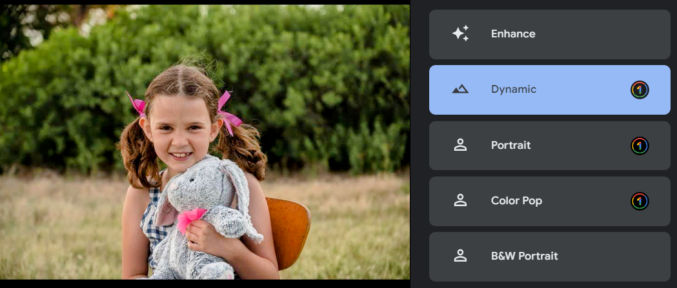
The average person might that the photo looks fine, but it can significantly be improved. Here’s how the photo looks when you click on each of the suggested improvement options.


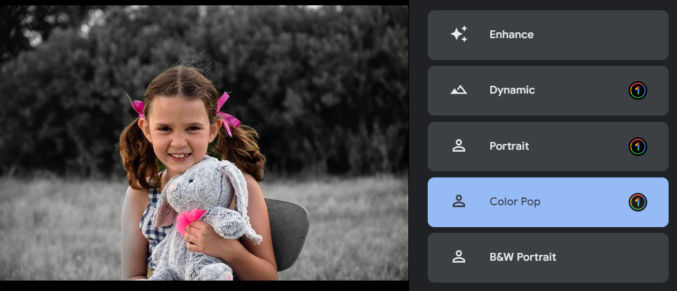
Note that Color Pop tried to isolate the subject and convert everything else to grayscale. It’s not perfect because the subject’s right arm is partially gray. To fix this, you could select the subject in Photoshop either manually or automatically, invert the selection, and convert the selection to grayscale.

Now, let’s say that you have a heavily underexposed (dark) photo. (Learn more about under and overexposed photos).
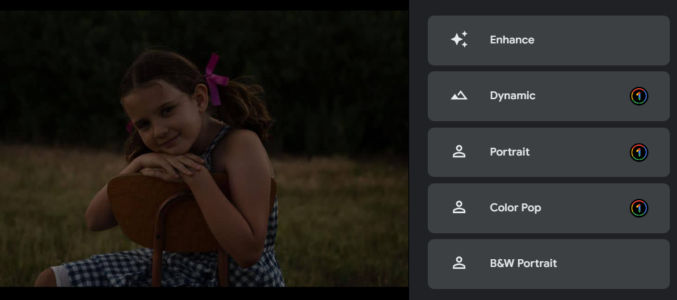
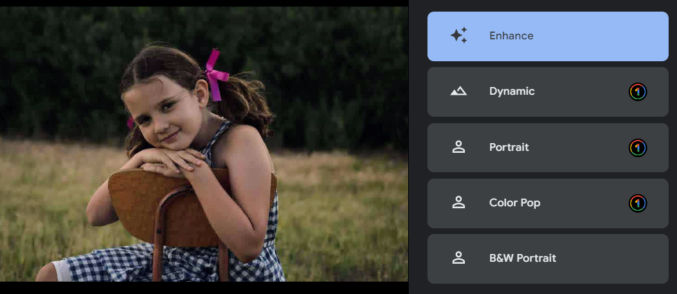
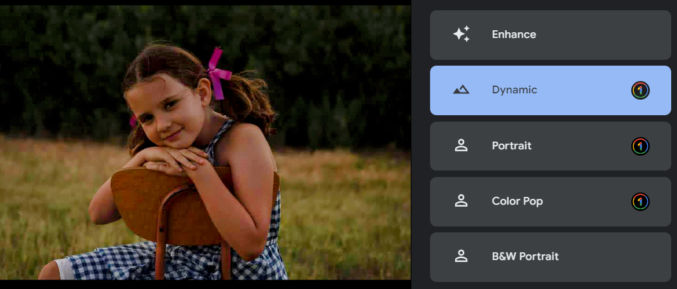
If you click the “Enhance” or “Dynamic” options, you’ll get this.
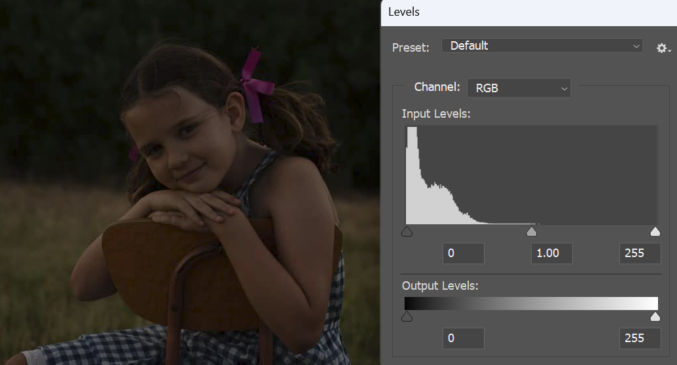
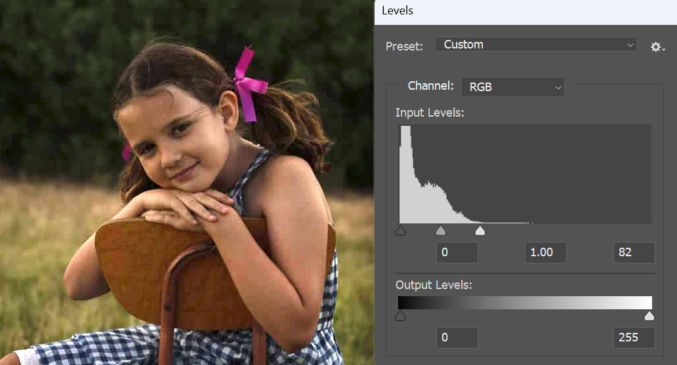
For comparison, here are the photo’s input levels in Photoshop.
If I were to manually correct the exposure in Photoshop, this is what I’d get.
The photo is significantly improved, but it doesn’t look exactly like it does using the Google Photos presets.
If the Google Photos presets don’t look good enough, you can make many adjustments in the Settings tab. In the example below, I started by choosing the “Dynamic” preset, and then in the Settings tab, I increased the brightness.
So, for the average person, using Google Photos to improve photos is easy and usually adequate.
Topaz Photo AI can do many things to a photo, including
You can also just run autopilot and let Topaz choose settings for you.
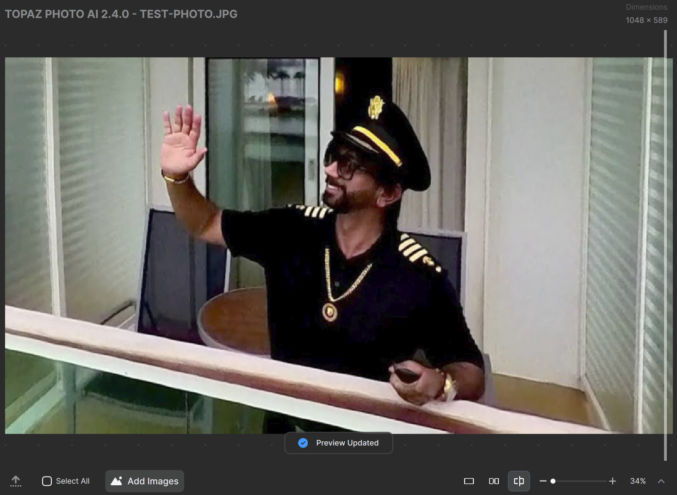
For me, I mainly use Topaz to enlarge (upscale) photos, remove noise, which can result from adjusting the levels of a heavily underexposed photo, and to sharpen photos. These improvements are particularly useful when I take a snapshot of a 1920×1080 video frame. For example, here’s a frame from a video.

I want to zoom in on the subject, crop it, enlarge it, and enhance it. Here’s the zoomed-in part cropped. The dimensions are 1048 x 589 px.

Now, I’ll drag it into Topaz and run autopilot to upscale and enhance the photo. It will take a minute to process. Here’s how the photo looks enlarged by 34% before enhancing it with Topaz.
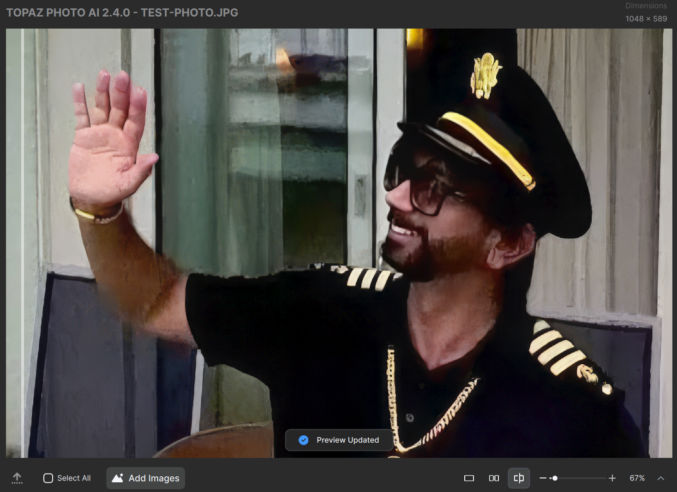
Here’s how it looks with Topaz enhancements applied.
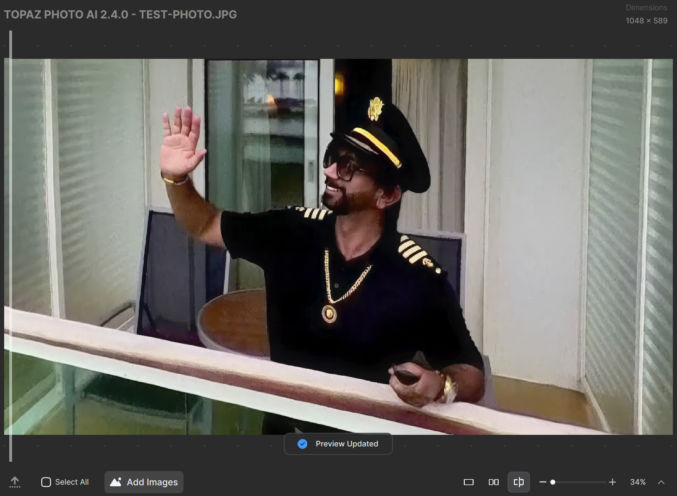
There is a difference, but it will be more obvious when you zoom in. Below is a comparison zoomed in at 67% before and after using Topaz.

At this point, you can copy the upscaled and sharpened photo from Topaz and paste it into Google Photos to enhance it.
Topaz Photo AI isn’t perfect, but depending on the original photo, it can often product amazing results.
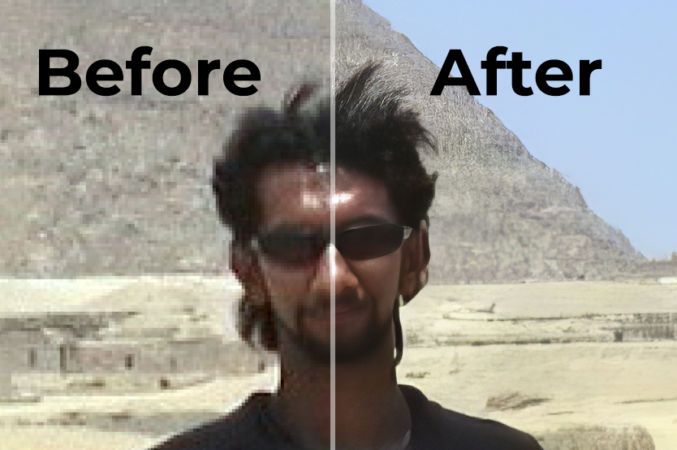
If you have old, low-res photos that you want to enhance and upscale or if you want to zoom in on a hi-res photo while preserving quality, you’ll be impressed with what artificial intelligence (AI) can do. Compare the following.
This photo was taken in Cairo, Egypt back in 1997. The original photo was 640 by 480 pixels. I’ve cropped it to focus on the subject. It’s now 238 px wide.

In Photoshop, you can increase the dimensions of an image. I’m going to enlarge it by 300% to 714 px wide.
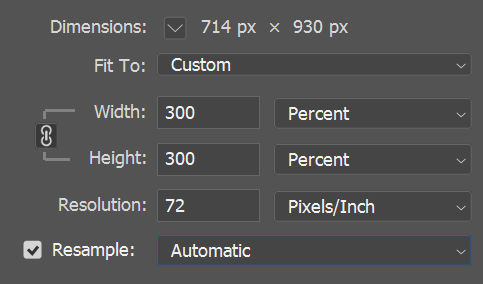
Here are the results using the “Automatic” resampling option. Notice the graininess.

Now, I’ll do the same using the “Preserve Details (enlargement)” option with a 50% noise reduction.
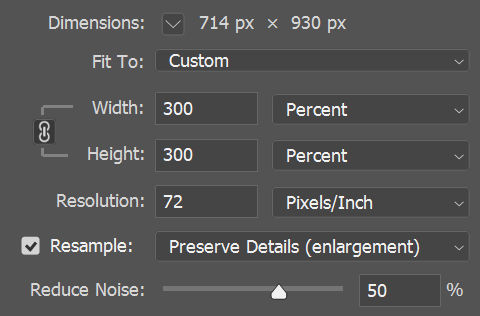
Here are the results. It’s less grainy, but still not sharp at all.

I’ll try one more time. Below are the results with 100% noise reduction. Still not great.

Let’s see how well Spyne AI image enhancer does.
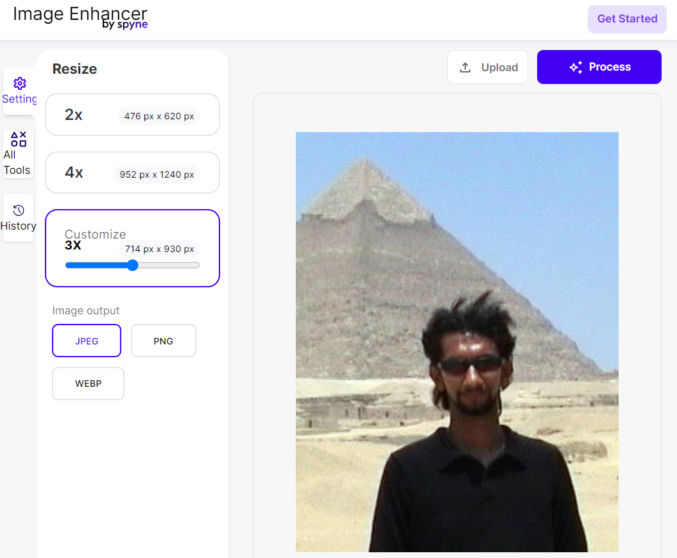
Here are the results. This is definitely an improvement compared to Photoshop.

Now I’ll try Topaz Labs Photo AI 2.4.0. This software costs $200, so I’ve just taken a screenshot of the preview. As you can see, the results are way better than both Photoshop and Spyne. There is no noise and everything is sharp, including the hair. If the face looks a bit too soft, you can sharpen it in Photoshop under Filter > Sharpen.

So there you have it. Successfully upscaling an image using AI with realistic results.
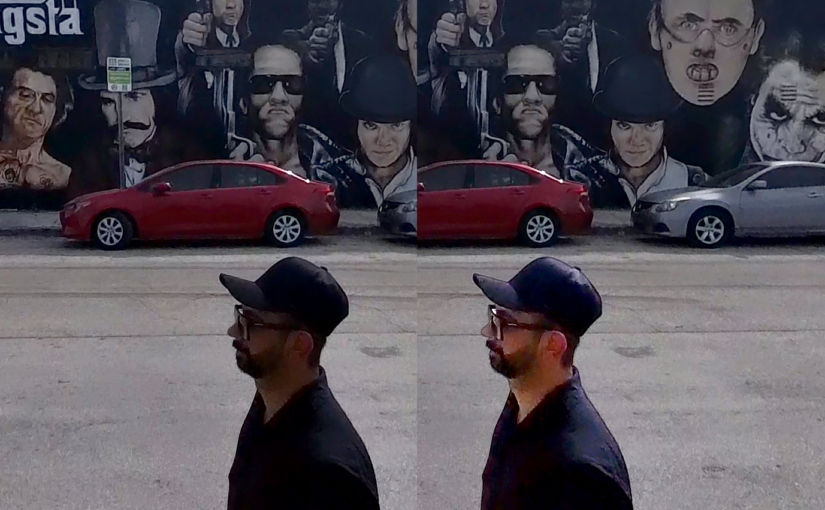
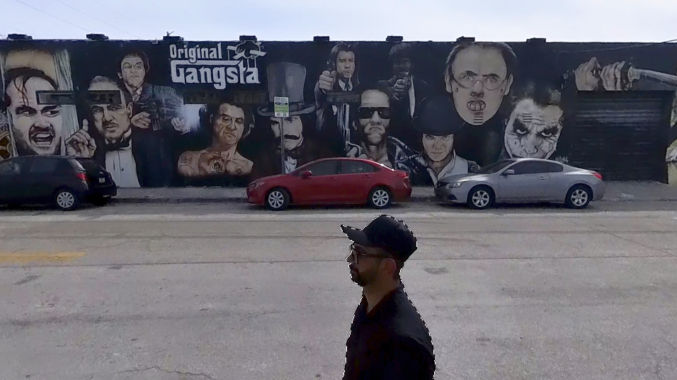
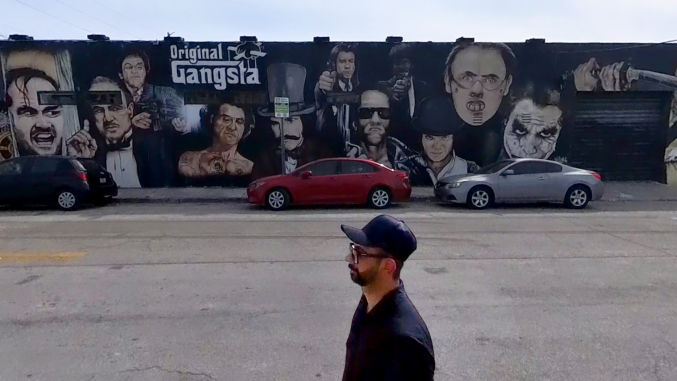
Chances are you’ve taken photos where the faces are too dark. This can be due to a low-quality camera and/or incorrect camera settings. Fortunately, there is a way to easily fix this using Photoshop. As an example, I’ll use this photo of me in the Wynwood district of Miami (below). Notice how my face lacks detail because it’s underexposed (too dark).

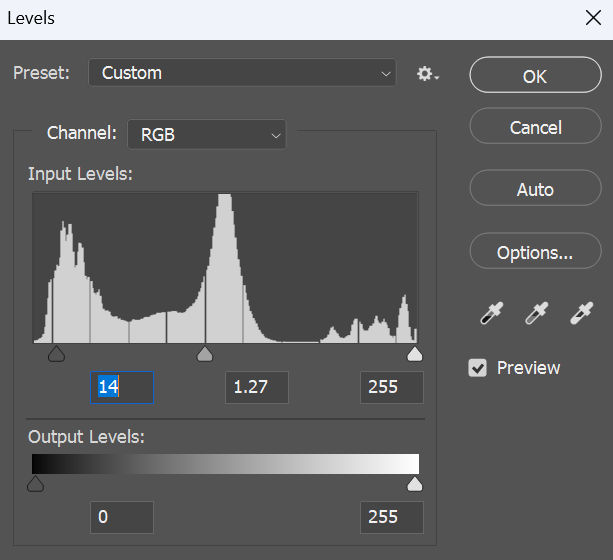
First, I like to check and adjust the levels for the image. Go to Image > Adjustments > Levels. You’ll see a histogram like this
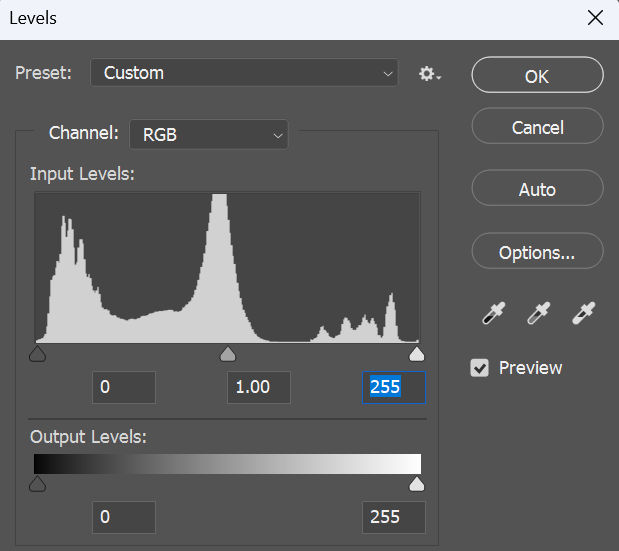
In the input levels, there are 3 markers from left to right
The left and right markers should touch the left and right edges of the histogram. In this case, there is a small gap between the right marker and the right edge of the histogram, meaning the image is a little underexposed. If we move the right marker to the right edge of the histogram, the image will become a little brighter.
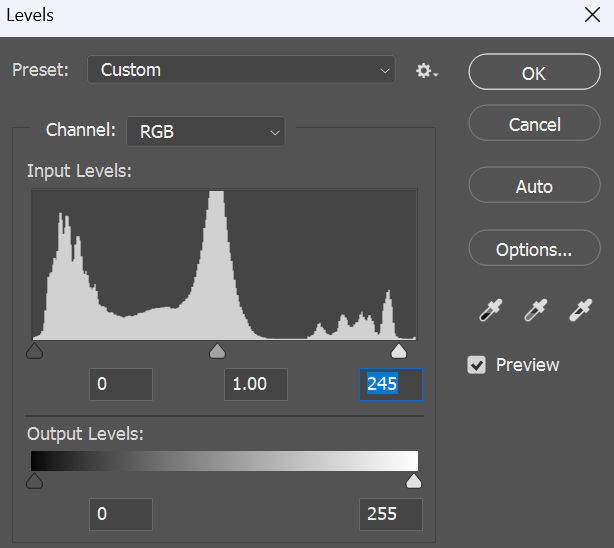
In this particular example, this adjustment isn’t significant. But, if there’s a big gap in the histogram like this
then adjusting the levels will make a big improvement to your image.
If adjusting the levels doesn’t brighten your subject’s face enough, you can adjust the exposure of just the face. First, make a circular selection around a face.

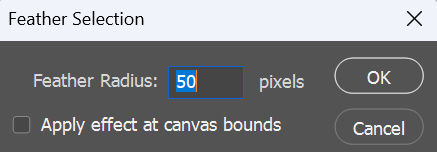
Then, add a feather to it. Select > Modify > Feather. For a 1920 x 1080 image, I create a 50-pixel feather.
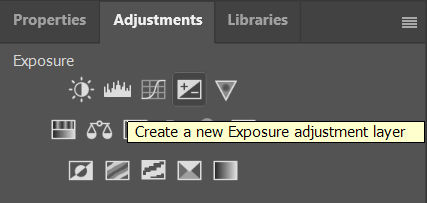
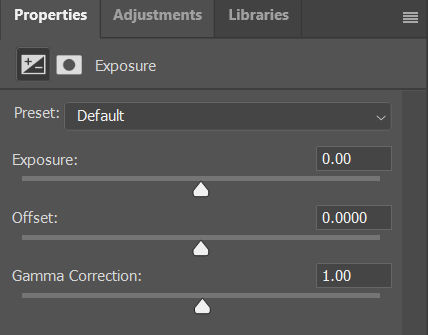
Then, adjust the exposure by going to Adjustments > Exposure
You will see a slider for Exposure. Drag it to the right to increase the exposure.
Notice how the face is brighter.

If I increase the exposure too much, the face will look nice and bright, but it won’t look natural against the darker surroundings.

The problem is there appears to be a white glow around the face. In this case, I can select just the subject or the subject’s face to limit the exposure adjustment area. In this case, no feather is needed.
Now, only the subject is brightened.
I can also tweak the levels by adjusting the shadows and the midtones so that the subject doesn’t look unnaturally bright against a darker background.
As you can see in the before and after image below, my face looks much brighter while still appearing natural.