Everyone by now should now that regular white cane sugar is bad for you and contributes to weight gain, diabetes and other health problems. Following are some alternatives and an explanation as to why they are good or bad.
Honey
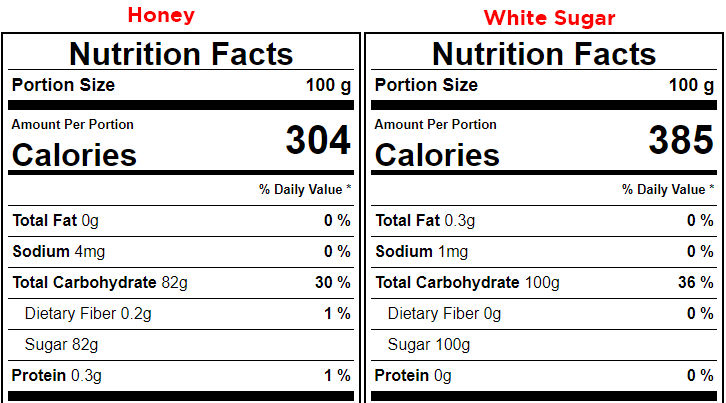
Many people think that there’s something special about honey that even though it’s high in calories like sugar, it’s better. While it’s true that there are some health benefits to consuming honey, from a weight loss point of view, it’s only slightly better. In order to understand why, we need to realize the fact that digestible non-fiber carbs simply get converted to sugar in the body so the following formula holds true.
CARBS = SUGAR*
* except for carbs from fiber and Erythritol (a sugar alcohol)
If we compare sugar to honey with the same portion size (100 g), we find that honey still has a ton of carbs (82 g) compared to sugar (100 g). Therefore, honey is not a good sweetener for weight loss.
Note: the sweetness of honey is higher than that of white sugar so you don’t need to use as much of it.
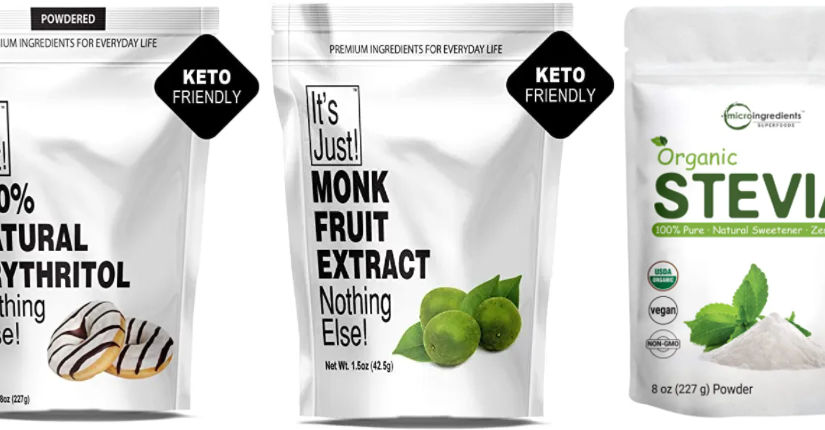
Erythritol
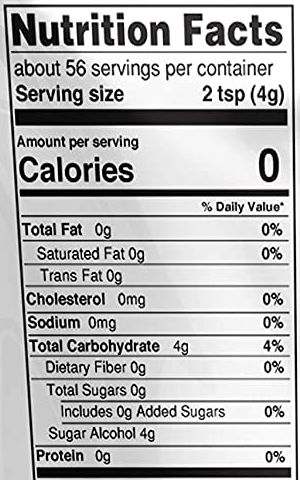
Pure Erythritol is a sugar alcohol. It is 70% as sweet as regular sugar. Unlike other sugar alcohols where half gets digested in the body, Erythritol does not get digested. Instead, it gets excreted through urine and feces like carbs from dietary fiber. For that reason, grams of Erythritol can be subtracted from total carbs. This makes Erythritol one of the best sweeteners. The texture is like fine sugar. I personally found the taste to be not bad but of course not as good as real sugar but that’s probably because I’m used to the taste of sugar.
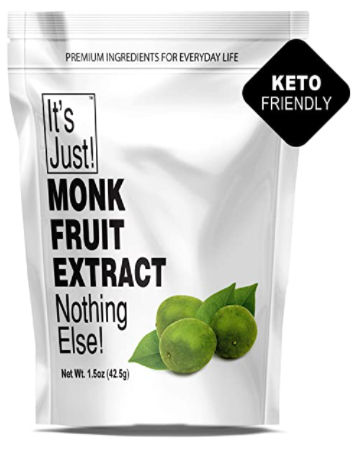
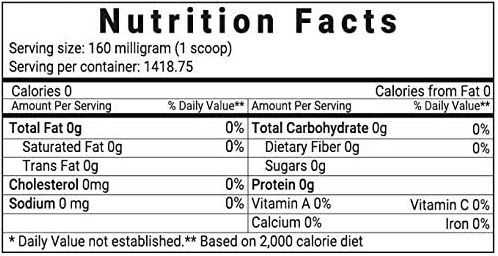
Monk Fruit Extract
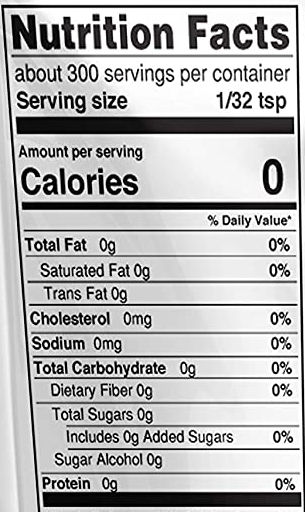
Pure Monk fruit extract contains zero sugars, carbs and calories. This makes Monk fruit extract one of the best sweeteners. However, it’s 150-250 times sweeter than table sugar so you have to be careful when adding it to avoid over-sweetening. Monk fruit extract is often mixed with other sweeteners so read the nutrition label to make sure that if it’s mixed, it’s mixed with an acceptable sweetener like Erythritol. The texture is like a very fine powder so it dissolves easily. I personally found the taste to be a bit fruity and not bad. I still prefer the taste of real sugar but that’s probably because I’m used to the taste of sugar.
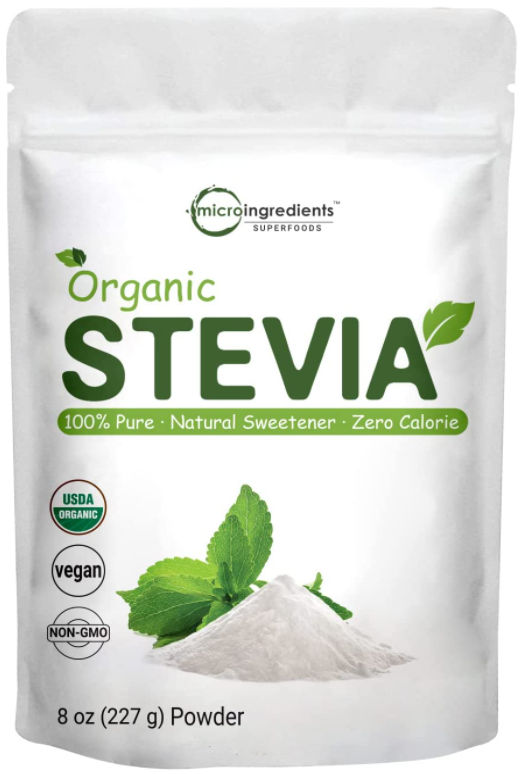
Stevia
Pure Stevia, like Monk fruit extract, is a zero sugar, carb and calorie sweetener which makes it a good sugar substitute. It is 200 to 300 times sweeter than sugar so you need to be extra careful when adding it to food and drinks. And, like Monk fruit extract, it often is found mixed with other sweeteners so make sure to check the ingredient list.
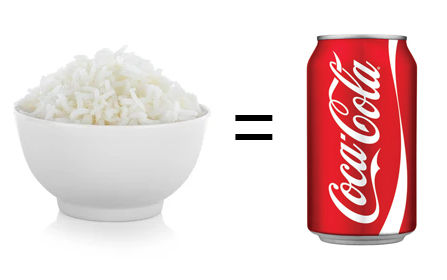
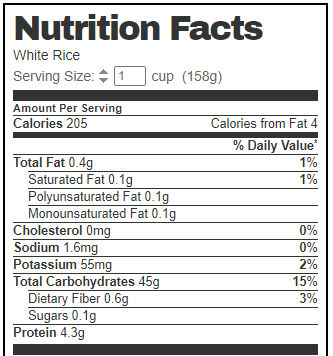
White rice is eaten by everyone all over the world. It’s probably the cheapest, most filling, readily-available type of food. Many people even have large plates of rice for breakfast. Though white rice may seem like an innocent, healthy food to eat, unlike sweets, it’s actually not healthy because it’s full of carbs which just gets converted into sugar in the body which leads to weight gain and health issues such as diabetes. So, just because white rice doesn’t taste sweet or look sweet, it’s just as bad as sugar. You might as well imagine you’re seeing sugar when you see white rice (or any carb like bread for that matter).
The nutrition profile for white rice shows that 1 cup of it contains 45 grams of carbs. If we subtract the insignificant carbs from dietary fiber (they just pass through the body), then you’re consuming 44.4 grams of carbs in 1 cup of white rice. 1 cup of white rice also gives you a whopping 205 calories.
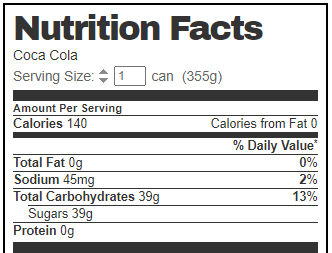
White Rice vs Coca Cola
Now this should surprise you. One cup of white rice has more carbs (45 g) than that in a can of Coca Cola (39 g). So, when you eat rice, it’s not much different from drinking a can of soda.
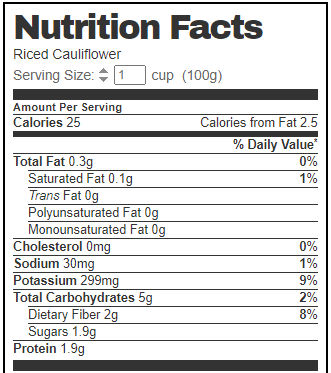
Riced Cauliflower
One healthy, low calorie alternative for white rice is riced cauliflower. Weighing in at just 5 – 2 = 4 digestable carbs per cup, it’s got a fraction of the carbs of white rice. And at only 25 calories per cup, it’s super low calorie compared to the whopping 205 calories per cup of white rice.
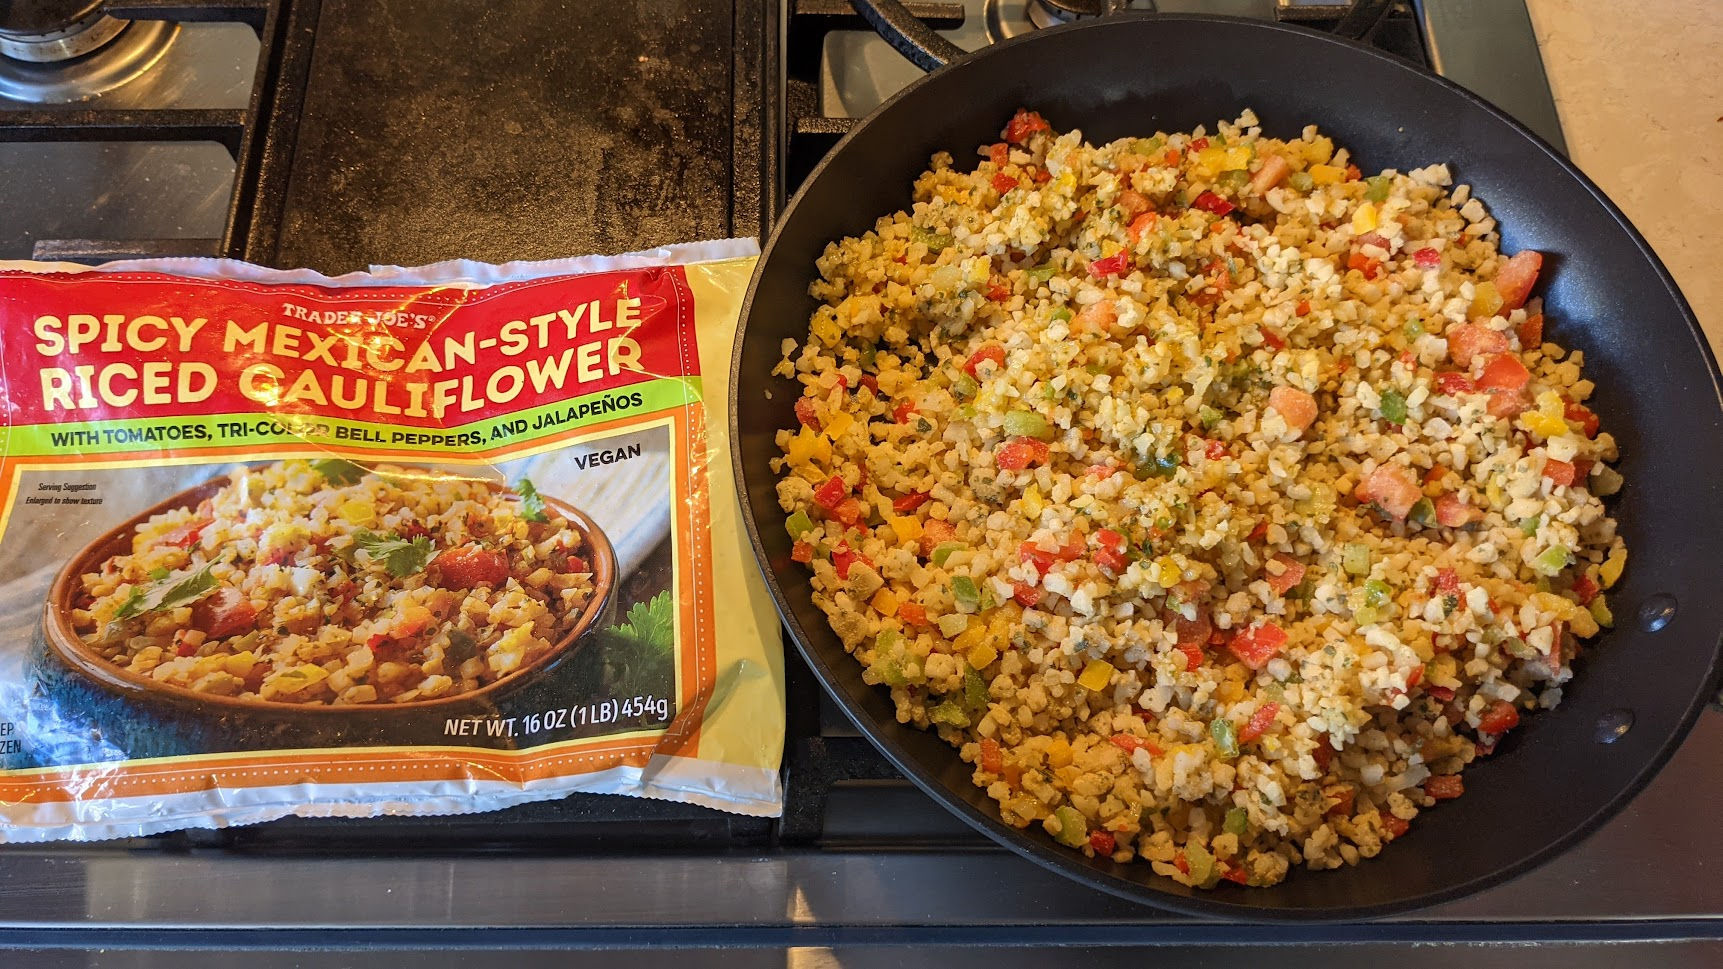
Spicy Mexican-Style Riced Cauliflower
If you a simple-to-cook, flavorful riced cauliflower meal, try Trader Joe’s Spicy Mexican-Style Riced Cauliflower. For $3, it’s cheap and personally, I found it to be very tasty. Optionally add some chicken breast for protein. It’s a bit spicy so if you can’t handle the spice, try the next option below.
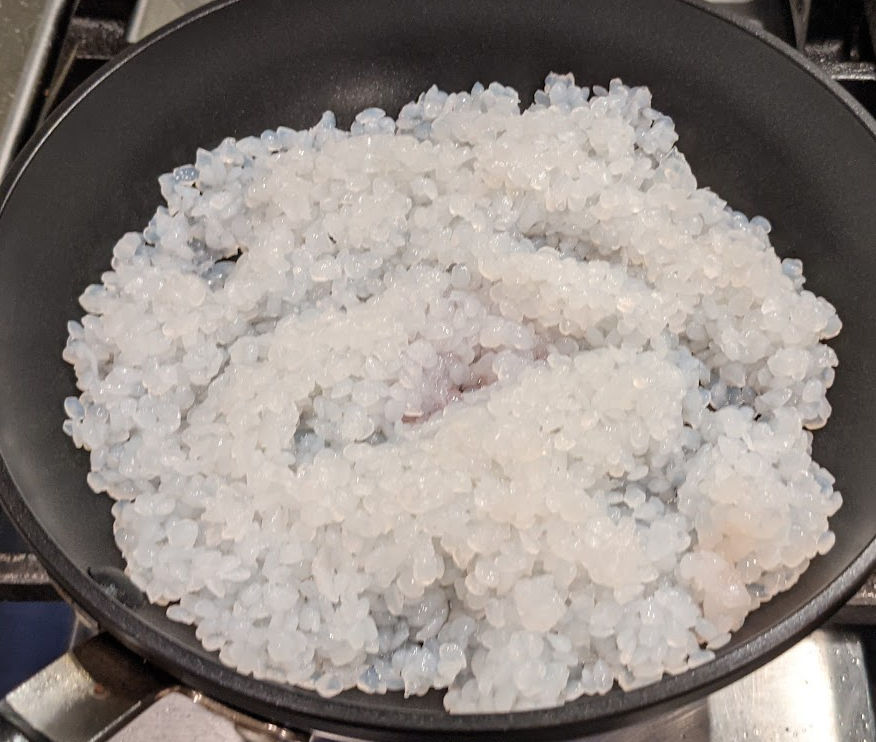
I haven’t actually tried this yet but Shirataki Konjac Rice is extremely low in calories. At only 5 calories per 140 grams and 3 – 3 = 0 digestable carbs, it’s completely carb (sugar) free!
I’ve tried a couple of diets and also just tried to count calories. But, it seems that the key to losing weight is more complicated than just a daily calorie deficit. After researching the Ketogenic diet, I have a feeling this particular diet may actually work, even though it calls for consuming more fat when the whole point of the diet is to lose fat. Here’s a summary of the Ketogenic diet.
Carbs vs Protein vs Fat
Carbohydrates, proteins, and fats supply 90% of the dry weight of a diet and 100% of its energy. All three provide energy (measured in calories), but the amount of energy in 1 gram (1/28 ounce) differs. There are
4 calories in a gram of carbohydrate or protein
9 calories in a gram of fat
Carbohydrates, proteins, and fats are digested in the intestine, where they are broken down into their basic units:
Carbohydrates into sugars
Proteins into amino acids
Fats into fatty acids and glycerol
These nutrients also differ in how quickly they supply energy. Carbohydrates are the quickest, and fats are the slowest.
Carbohydrates
According to the American Heart Association (AHA), the body does not need any added sugar to function healthily. Therefore, the body doesn’t really need carbs since carbs just get converted into sugar.
Protein
Proteins consist of units called amino acids. There are 20 amino acids. The body synthesizes some of them from components within the body, but it cannot synthesize 9 of the amino acids—called essential amino acids. They must be consumed in the diet.
Fat
Fats are complex molecules composed of fatty acids and glycerol. When the body needs fatty acids, it can make (synthesize) certain ones. Others, called essential fatty acids, cannot be synthesized and must be consumed in the diet.
Energy source priorities
Your body gets energy first from sugar (carbohydrates are converted into sugar in the body) and only when the sugar energy has depleted will your body turn to getting energy from fat.
In order to lose weight (fat), your body needs to enter a metabolic state called “Ketosis”. When this happens, your body becomes incredibly efficient at burning fat for energy. It’s like it becomes a fat-burning machine. If you consume too many carbs (bread, pasta, rice, sugar, etc), your body will never enter Ketosis mode because your body will always get more than enough energy from carbs (sugar). It’s no wonder why sugar is the real health enemy and one of the main causes of health issues like diabetes.
Once energy from carbs is depleted, your body enters a state of ketosis and burns fat to get energy.
The Keto diet
The keto diet is a low carb, high fat diet. As such, your body will have very little energy from carbs (sugar) and quickly resort to getting energy by burning fat. Specifically, you should consume macronutrients with the following proportions:
70% fat
20% protein
10% carbs
Now, if you are bodybuilding and want to build muscle, you need more protein. So, a slight variation of the standard keto diet calls for the following proportions:
60% fat
35% protein
5% carbs
Protein should be moderate, as a very high intake can spike insulin levels and lower ketones. Around 35% of the total calorie intake of protein is probably the upper limit.
Generally, achieving Ketosis involves limiting carb consumption to around 20 to 50 grams per day and filling up on fats, such as those from meat, fish, eggs, nuts, and healthy oils.
On Nutrition Facts food labels, the grams of dietary fiber are already included in the total carbohydrate count. But because fiber is a type of carbohydrate that your body can’t digest, it does not affect your blood sugar levels. You should subtract the grams of fiber from the total carbohydrate.
In the example nutrition label above, we see that the total carbohydrate count is 10 grams and the dietary fiber is 5 grams. Therefore, the net carbohydrate amount is 5 grams.
Carbs from Erythritol
If you see a nutrition label that shows Erythritol under the Total Carbs section, you can subtract it from the total carbs. Unlike other sugar alcohols where half gets digested in the body, Erythritol does not get digested. Instead, it gets excreted through urine and feces like carbs from dietary fiber. There are 3 types of sugar substitutes that contain zero carbs and are safe to eat: Erythritol, Monk Fruit, Stevia.
Looking at the nutrition label above, we see the number of fat, carbs and protein in grams. One serving of the food item contains 10 grams of carbs. But, 5 grams of those 10 grams can be ignored since they are dietary fiber which the body can’t digest and so it gets passed.
The nutrition label shows grams and % daily value, but it doesn’t show percentage for each of the 3 macronutrients. To determine that, we can perform these calculations.
Macronutrient
Grams (A)
Calories per gram (B)
AxB (C)
C / (C1 + C2 + C3) x 100%
1
fat
3
9
27
27 / (27 + 20 + 8) x 100% = 49%
2
carbs
5 (don’t include fiber carbs)
4
20
20 / (27 + 20 + 8) x 100% = 36%
3
protein
2
4
8
8 / (27 + 20 + 8) x 100% = 15%
So, the food for the nutrition label above has the following macronutrient proportions:
fat: 49%
carbs: 36%
protein: 15%
If that food was the only thing you ate all day, then it would not satisfy the goal of the ketogenic diet.
If you are targeting 1500 calories per day for weight loss and a maximum of 5% from carbs, then 5% of 1500 is 75 calories. And since 1 gram of carbs is 4 calories, you can consume a maximum of 75/4 = 18.75 grams of non-fiber carbs. Hmm…. that’s very low. If your target is 10% of carbs per day, then you can consume a max of about 40 grams of non-fiber carbs per day. According to Healthline, consuming less than 50 grams of non-fiber carbs per day will get you into Ketosis.
Ketosis Test
If you want to know whether your body is in a state of Ketosis (burning fat), there are tests available. This is great because you can actually measure and know whether your body is currently burning fat or not. Technically, you could test yourself before you go to sleep at night. If you test positive for being in a state of Ketosis, then you would literally be burning fat while you sleep!
I like original Coke. But the calories and amount of sugar added to it are just outrageous. A single 12 fl oz (355 ml) can of coke contains 140 calories and 39 grams of added sugar. Following are some healthier alternatives.
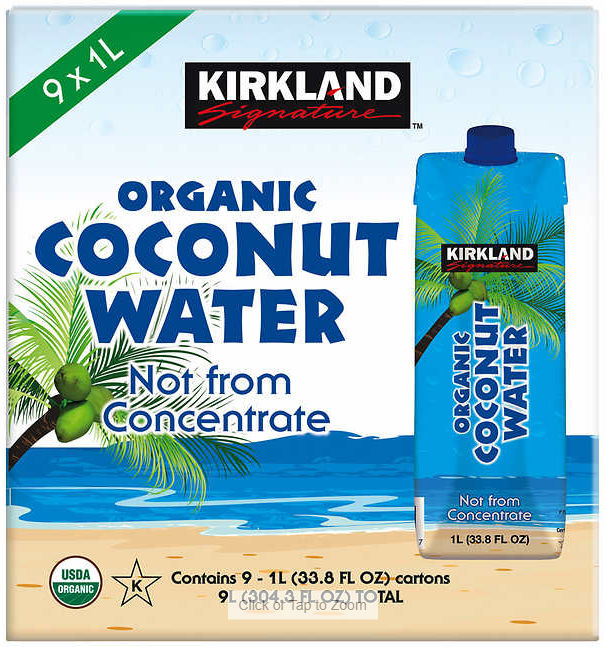
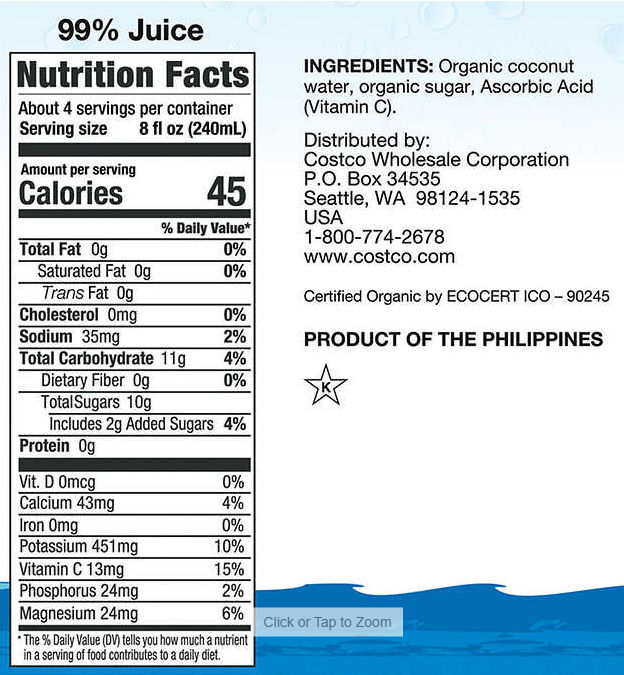
Costco Kirkland Organic Coconut Water
With only 2 grams of added sugar compared to 39 for Coca-cola, this is definitely a good alternative. At 45 calories for 240 ml (68 calories for 355 ml), it is 72 calories less than the same serving of a can of coke. However, if you are on the Keto diet, this is not a good choice where you need to limit carbs, this is not a good choice.
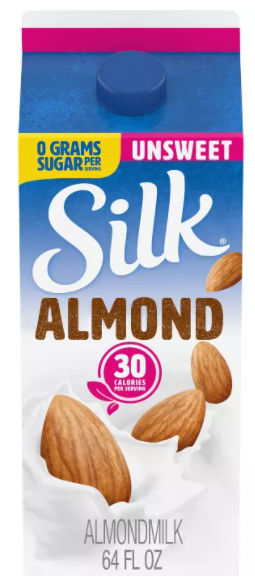
Unsweetened Almond Milk
At 30 calories per cup (240 ml), this is not a great alternative to soda, although the sweetened version (60 cal per cup with 7 grams of added sugar) does taste much better.
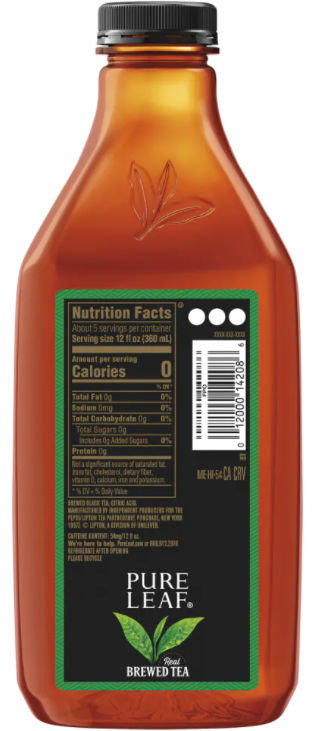
Unsweeted Iced Tea
At 0 calories, unsweetened iced tea is probably the best substitute for plain water.
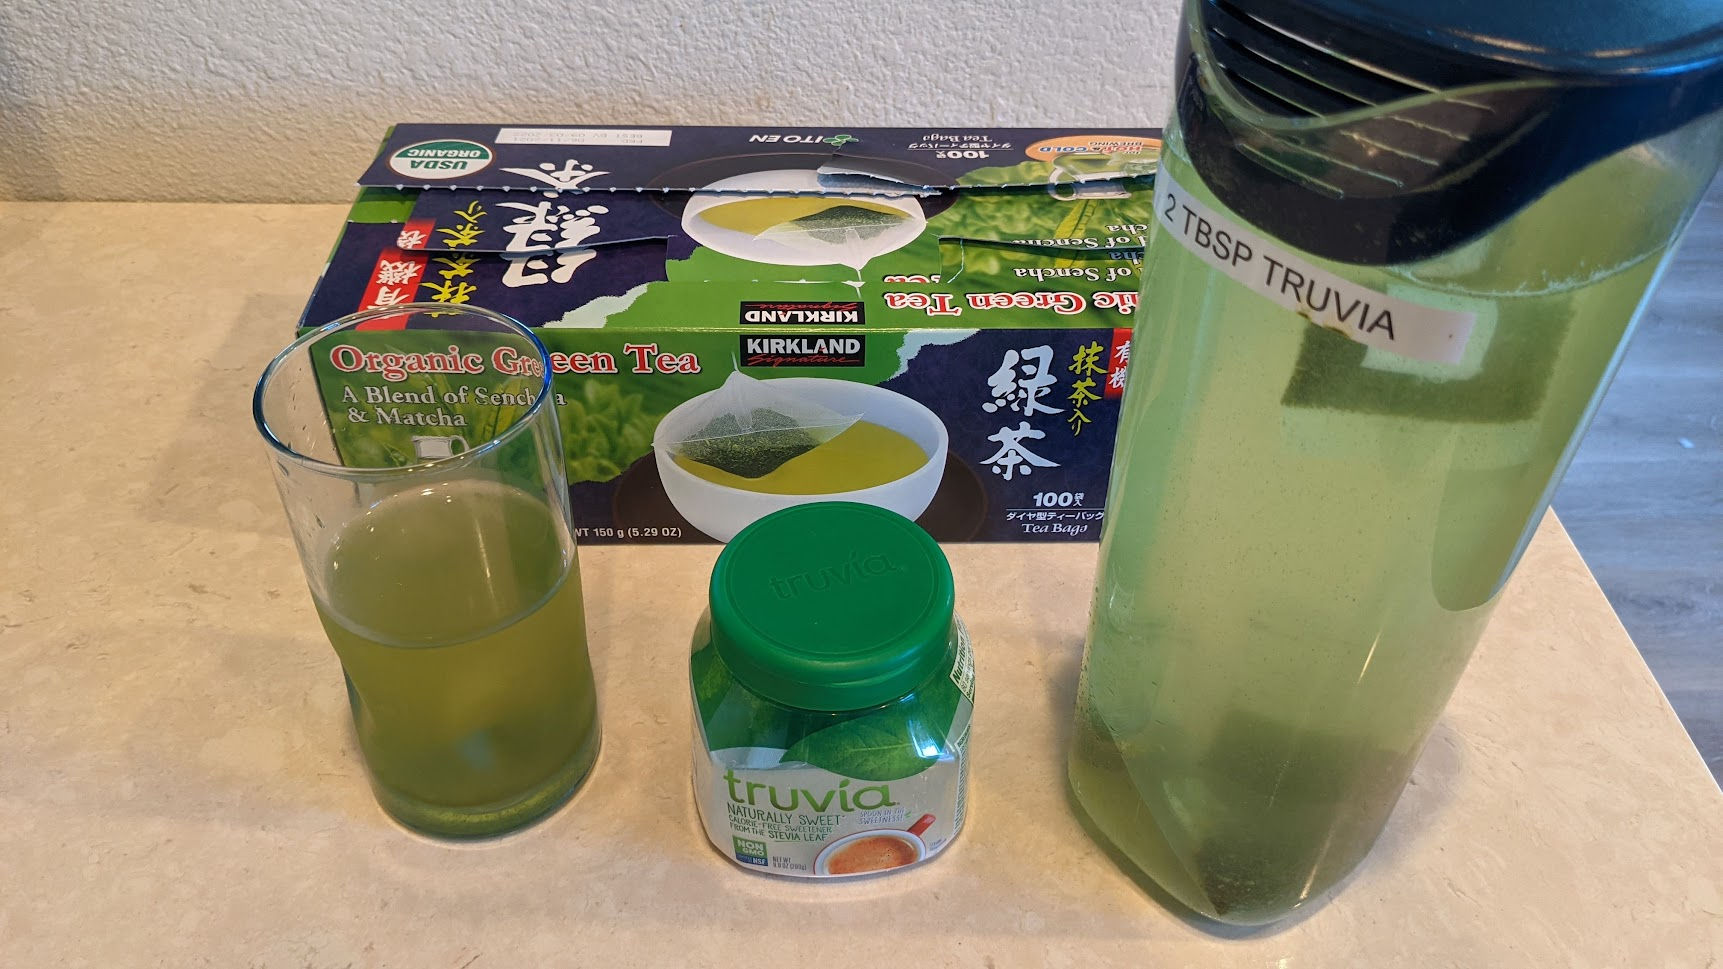
If you feel you need to make it sweet, you can try adding
Truvia is actually Erythritol, a sugar alcohol. Unlike other sugar alcohols, Erythritol is the only sugar alcohol which does not get digested by the body. Instead, it gets excreted in urine and feces. I consider it the ideal sweetener for drinks. It’s also ideal if you are on the Keto diet since it contains 0 carbs.
You can also cold brew green tea like pictured below.
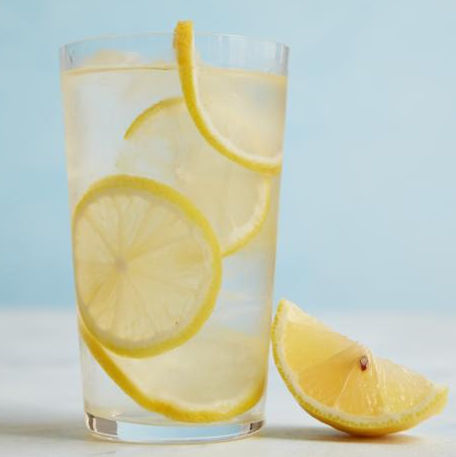
Iced Water With Lemon Slices
Lemon-infused water actually makes plain, boring water taste pretty good.
Bolthouse Farms Carrot Juice
At 70 calories per cup (240 ml), this has the same calories has Costco Kirkland coconut juice but with 0 added sugar.
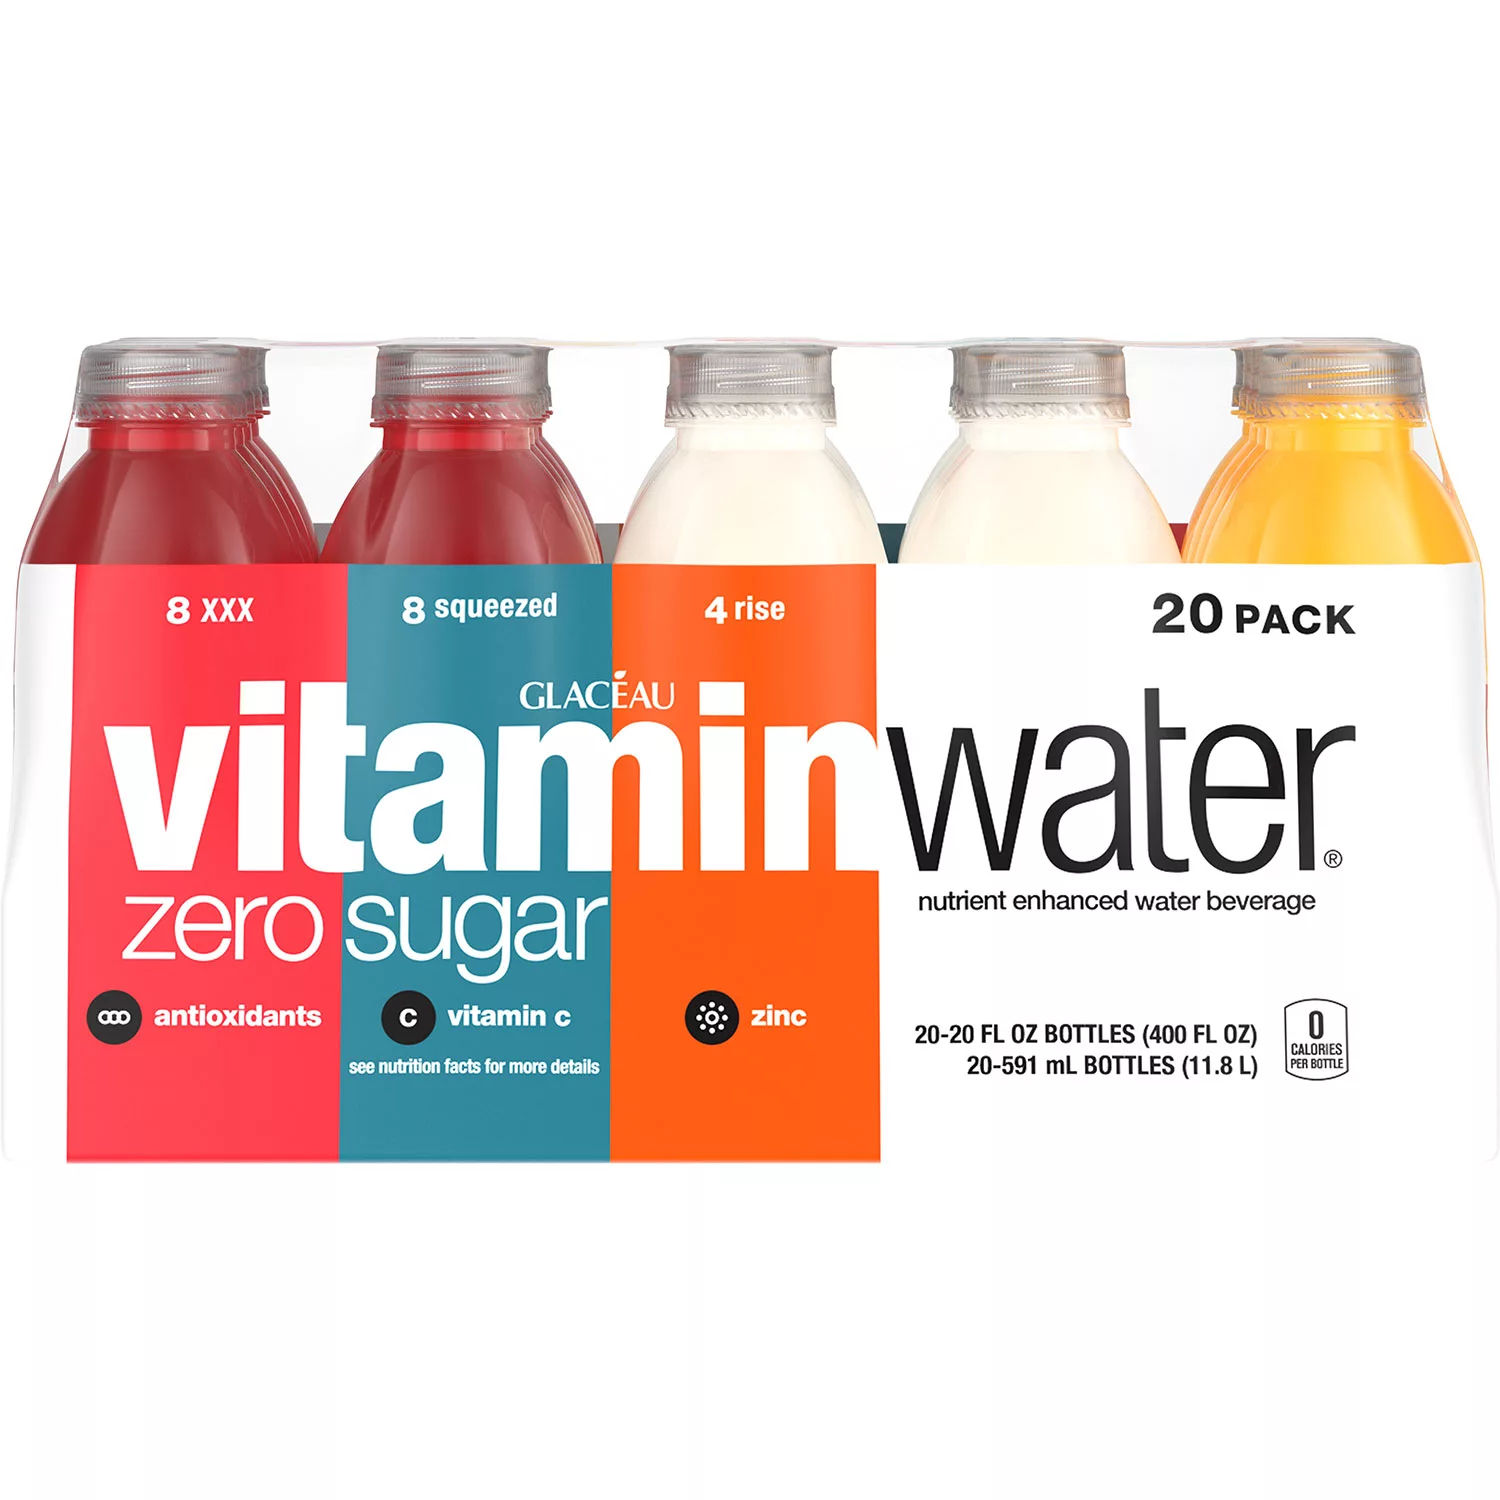
Glaceau VitaminWater Zero
Sweetened with erithrytol
Stur
This is a liquid water enhancer, sweetened with Stevia.
Following are some ways once can finance the purchase of real estate.
Conventional loan (mortgage)
Most people who buy real estate get a conventional loan and pay a mortgage for 30 years. They typically put a 20% down payment. Most banks, however, don’t want anything to do with a high-risk property that needs work. So to qualify for a conventional loan from a bank, a buyer / investor will first need to get the property up to a living standard.
Private lender
Private lenders are simply individuals, not businesses, who are willing to loan you money, e.g. family and friends. Sometimes, parents may gift their kids the down payment required to purchase a property but behind the scenes, make an agreement so that the kids pay back the money over a period of time. This is necessary since banks / lenders most likely would not allow the borrower to have multiple loans. Borrowing money in this way is easy because it doesn’t involve credit checks, appraisals, underwriting, etc.
Hard money lender
Hard money lenders are companies or funds that will loan you the money for a fee (interest). This process requires credit checks and includes underwriters who also determine the property’s value. Hard money lenders charge higher interest rates and the loans are for a much shorter period of time. The average is 6 months. Unlike private lenders, who often just trust that you’re making a good investment, hard money lenders will double check that your investment is reasonably sound since otherwise, they could lose money if you default.
House hack
House hacking is buying a property and renting a portion of it out to cover your expenses. You could be a 3 bedroom house and rent out 2 of the bedrooms. Or, you could buy a multifamily property (duplex, triplex, etc), and rent out the other units. In doing this, you significantly reduce your monthly expenses because you’ll have tenants paying for a big portion of your mortgage / loan.
Home equity loan
If you already own a home and have equity in it, then you could borrow money against it.
You borrow money against equity in your existing home
The interest rate is typically fixed
If you still have a mortgage, a home equity loan would be a second mortgage behind your first mortgage
You get the entire amount of the loan at once upon closing
HELOC
HELOC stands for Home Equity Line of Credit. If you already own a home and have equity in it, then you could borrow money against it.
You borrow money against equity in your existing home
The interest rate is variable and tied to prime
If you still have a mortgage, a home equity loan would be a second mortgage behind your first mortgage
You get to draw money from the line of credit multiple times (like a credit card)
Refinance
If you have a mortgage on your home, you can refinance the loan to replace it with another one. You typically do this if interest rates have dropped thereby lowering your monthly mortgage payments.
Cash-out refinance
This is like a regular refinance except you also get cash from the equity in your home. You could then use that cash to pay for purchasing another property, for example. The maximum cash you can get is 80% of the value of the home.
Flip
To flip real estate means to buy a fixer upper, renovate it, then turn around and sell it for a profit. houses. Can be mobile homes, single family, multifamily, etc.
Add Square Footage
Residential real estate (including multi-family properties with 4 or less units) is often valued by square footage. One strategy to increase the value of a property is by enlarging it, e.g. by adding bedrooms. If you know how to do this cost effectively, e.g. if you know how to do some or all of it yourself, you can add value and sell the property for a profit. Of course, this will depend a lot on where you live. For example, if you live in the Bay Area where the cost per square foot is very high, adding an addition to an existing property could be worth it.
BRRR method
BRRRR stands for “buy, rehab, rent, refinance, repeat.” With this real estate investment lifecycle, you could
buy a property (whether using a conventional loan from a bank, HELOC, private loan or a hard money loan)
rehab the property to increase it’s value (like fixing up a fixer upper)
rent out the property. Banks rarely want to refinance a property that isn’t occupied, so renting your house comes first.
refinance the property. This is actually a cash-out refinance using a conventional loan from a bank and get cash back. In this step, you would expect the property to appraise for much more than your purchase price because you rehabbed the place. The bank would require an appraisal. Once the appraisal is done, you could get 20% of the appraised value in cash and finance the remaining 80%. You may want to get pre-approved for the AVR before buying the property to ensure you will be able to refinance the property when the time comes.
Waiting for seasoning Many conventional and portfolio lenders require properties to “season” first. Seasoning means you’ll need to wait between six and 12 months before refinancing. If you’re using a private or hard money lender, it’s imperative to calculate exactly how much this period of time will cost you.
repeat. Using the cash you got from step 4, you would use it towards buying another property so you could repeat the entire process all over again
The key to the success of the BRRRR method is to
buy properties under market value
never investing more than 75% of the property’s after-repair value (ARV)
ensure that you can rent the property at a rate that will cover your expenses by looking a rental comps
Let’s say that you find a property that is in disrepair. It’s been on the market for a while because no one wants to fix it up. You determine that the repairs are mostly or all cosmetic and not structural (e.g. foundation, etc). You estimate the value of the property after you repair it to be $500K based on nearby comparables, Zillow Zestimates, etc. You also estimate it would cost you $60K to fix it up. Therefore, based on the following equation
purchase price + rehab costs = 75% x ARV
you determine that you should purchase the property for no more than
purchase price = 75% x $500K – $60K = $327,500
The reason for targeting 75% of the ARV is to give you a buffer in case your rehab costs are higher than you estimated.
Assuming your borrowed money from a hard money lender to purchase the property at $327,500 and then you refinance it at $500K while cashing out 75% ($375,000), you could turn around pay off the hard money lender and even have some money left over ($47,500).
Following are some things that don’t typically add value for a rental
Granite countertops
Brazilian hardwood floors
High-end stainless steel appliances
Bay windows
Skylights
Hot tubs
Chandeliers
Following are some things that do typically add value for a rental
Roofs. If you add a new roof, appraisers tend to give you back the money you spent in property value.
Unfinished kitchens. An outdated kitchen is ugly but still usable. A partially demo’ed kitchen makes a house ineligible for financing and, therefore, much easier to buy with cash.
Drywall damage. Drywall damage makes a property ineligible for financing while also scaring away most home buyers. The good news? Drywall isn’t super expensive to repair.
Horrific landscaping. Overgrown vegetation frightens the competition but costs very little to repair. You don’t need a skilled landscaper to hack down overgrown landscaping, so a few hundred dollars will take you farther than you think.
Outdated bathrooms. I routinely completely remodel bathrooms for $3,000 to $5,000. Most bathrooms aren’t huge, so the material and labor costs come in low. This allows your house to compare to much nicer homes in the neighborhood with higher ARVs.
Too few bedrooms. Homes with more than 1,200 square feet but less than three bedrooms offer easy ways to add value. Adding a third or fourth bedroom helps it compare to much more expensive properties, increasing your ARV.
When purchasing properties using the BRRRR method, you normally can’t or don’t want to borrow money the traditional way (from a bank) because
banks often don’t want to finance non-livable properties
banks are slow and picky so sellers may be more interested in selling to all-cash buyers
“Subject-to” investing
“Subject-to” investing is purchasing a property subject to the existing mortgage that is already in place. Essentially, this is when an investor comes in and makes back payments for a homeowner who is behind on their payments, as opposed to the home falling into foreclosure. The original owner then deeds the property to the investor and moves out — often to downsize into a more affordable living space — while leaving the loan in place and the property under the investor’s ownership. It’s an investing strategy ideal for investors low on capital. Buyers in this situation aren’t formally assuming the loan. The terms of the original note stay the same, including the name in which the loan was purchased. And the buyer takes on the responsibility of making sure the mortgage is paid on time until it’s renovated and resell the property.
Section 8
Section 8 is a housing voucher program. It is the federal government’s major program for assisting very low-income families, the elderly, and the disabled to afford decent, safe, and sanitary housing in the private market.
Many landlords don’t like to offer Section 8 housing – possibly because renters who get Section 8 support may be less desirable. However, there are advantages to accepting Section 8 renters like
guaranteed on-time partial or full rent directly from the government
potentially higher rent
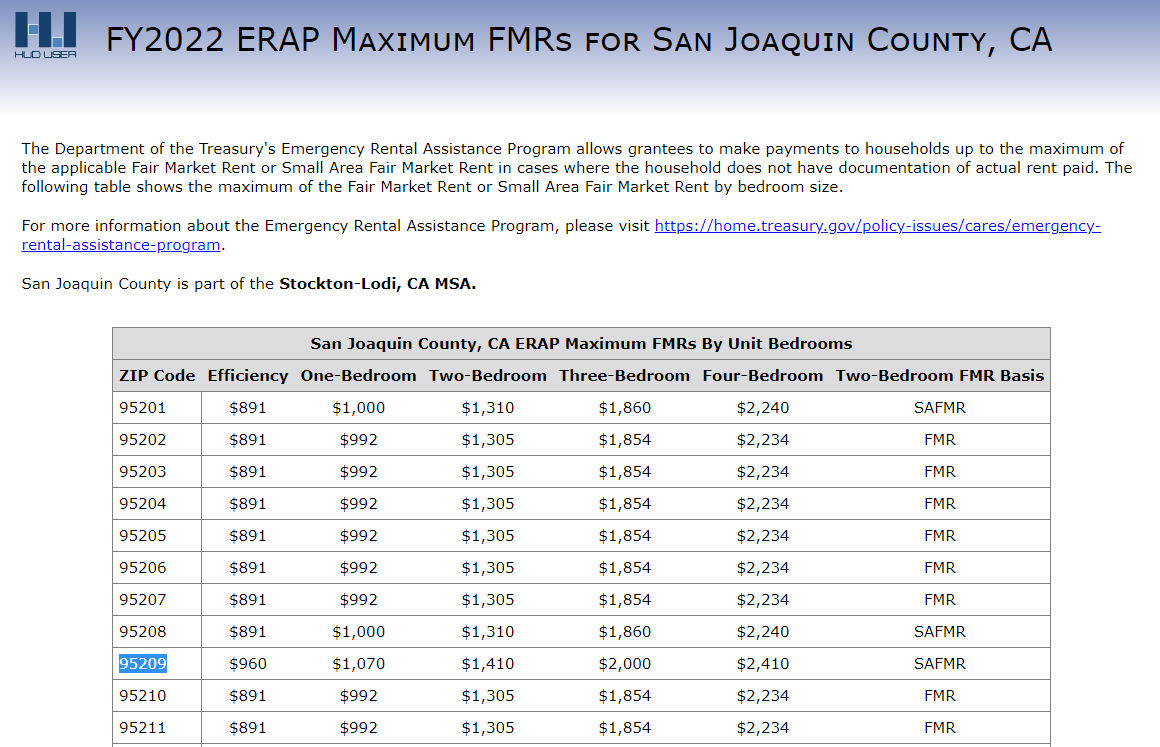
Many landlords get below-market rents for one reason or another. With Section 8, governments will pay rent for eligible tenants up to a certain amount based on zip code and number of bedrooms. The rent amount is called the Fair Market Rent (FMR). For example, one of my rentals in Stockton, California (San Joaquin County) is a triplex consisting of two 2-bedroom units and one 3-bedroom unit. It’s zip code is 95209. According to the table below, I could get
$1410 / month for each 2-bedroom unit
$2000 / month for the 3-bedroom unit
When I purchased the property, I inherited the tenants who were paying $1200 / month for a 2-bedroom unit and $1250 / month for the 3-bedroom unit. If the tenants leave, I could increase the rents to the FMR and accept Section 8 in case non-Section 8 renters are willing to pay the FMR. My total monthly rental income would increase from $3650 to $4820. That’s an increase of $1170 per month.
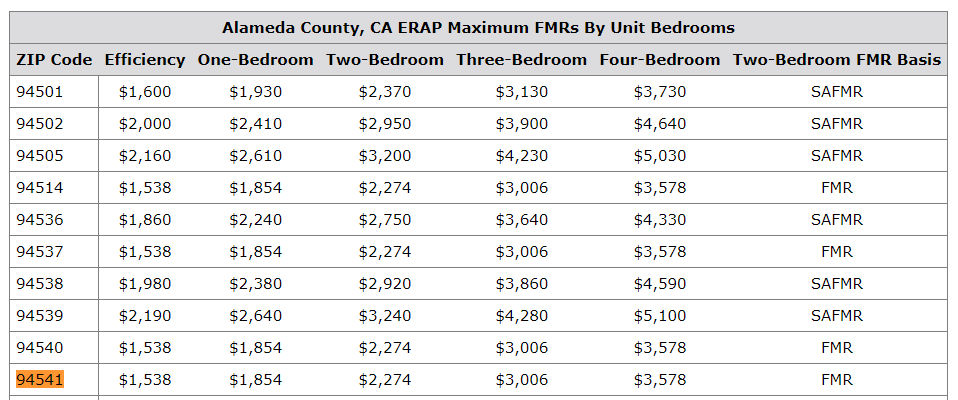
For my 3-bedroom rental in Hayward, California (Alameda County) / zip code 94541), the FMR is $3006 per month.
Add bedrooms
As you can see in the FMR charts above, homes with more bedrooms are more valuable as you can charge more rent. Some ways to add bedrooms is by
adding an addition to the existing property (this is expensive)
modifying walls in an existing property to make an extra bedroom (this is relatively cheap)
Let’s say you have a 1200+ sq ft house but it only has 2 bedrooms. Normally, you can easily fit 3 bedrooms in a 1200 sq ft house. The minimum area for a bedroom should be 120 sq ft. The average bedroom size is 132 sq ft. If you happen to have a super large bedroom, e.g. 250 sq ft, you can add a wall in between and turn a huge bedroom into two bedrooms.
Research
When deciding where to invest in a rental property, you often want to look at many factors such as population growth, income growth, appreciation of housing prices, and crime rates. You can find this information from City-Data.
Site-built homes are homes built on site. Most houses are site built. Manufactured homes are built in a factory and assembled on site. Manufactured homes are cheaper than site-built homes with excluding the cost of land. According to this article, the average cost per square foot for a manufactured home is $52 vs $115 for a site-built home. That a big difference.
If you buy a manufactured home and lease the land it’s on, you won’t be able to get a conventional loan / mortgage. Rather, you’d get a chattel loan which is like a loan for personal property (e.g. boat, airplane, etc) since the manufactured home is like personal property. If you buy a manufactured home and the land it is on, you can get a traditional loan / mortgage which offers better rates.
Depending on the cost of land, if might be cheaper to buy land and then buy a bunch of manufactured homes to put on it and then rent them all out rather than build a bunch of homes or a multi-family building on site.
AirBnB (short term) vs traditional (long term) renting
When you rent out your property, you have two options
long term (traditional)
short term (e.g. AirBnB)
Though long term rentals provide consistent long term cash flow, you can usually more more money from short term rentals, especially if you have a desirable property in a heavy tourist spot. For example, if you have a 3 bedroom home in downtown San Francisco (94103 zip code), the fair market rent is $4,120 per month. But, if you rent it out on a daily basis via AirBnB for $250 per night, you could get $250 x 30 = $7500 for one month. Of course, there are many other factors so you would need to consider all costs and expenses as well.
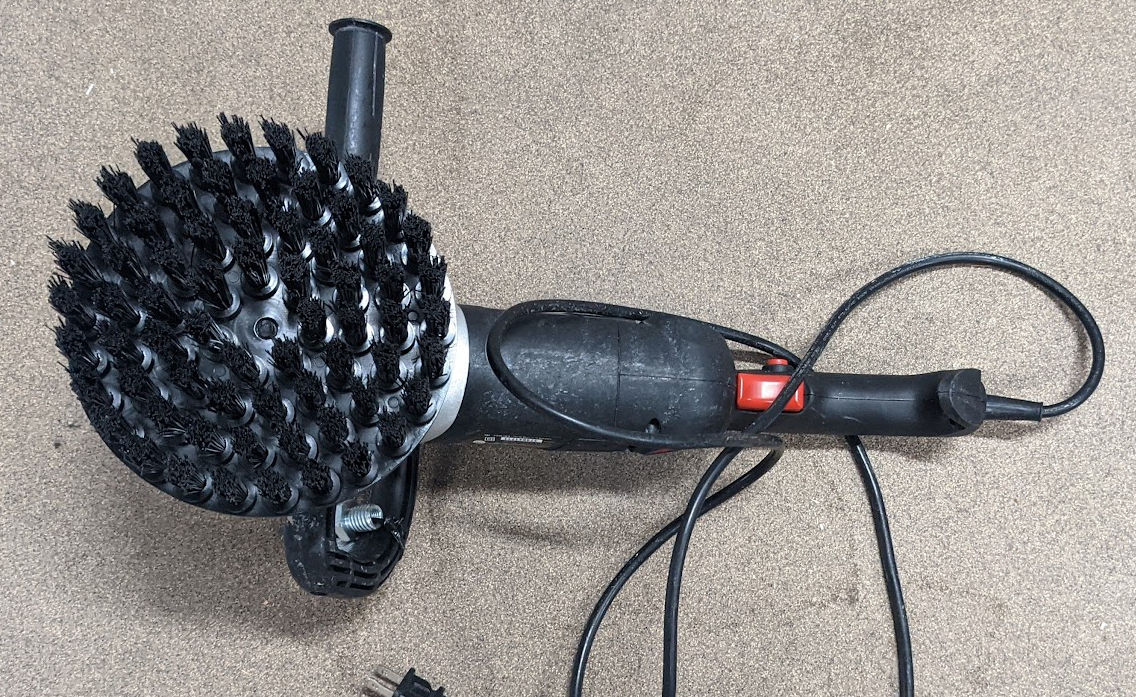
Shower floors easily get dirty with soap scum and dirt and sometimes mold. Cleaning showers floors like those made of tile can be difficult and tiring. Many people may think they have no choice but to manually scrub the floor. Fortunately, there’s an easier, effortless way using power tools.
In the picture below, you can see I have the corded polisher with a 7″ stiff bristle brush attachment.
There are 2 set screws you use to help secure the brush attachment to the polisher.
At 7 inches in diameter, the brush is large, which is fine for my custom walk-in shower.
I haven’t tested it out yet but I’m sure it’ll work. Previously, I hacked a brush onto an angle grinder which worked but the available brushes were too soft.
If you need to clean walls, this tool would be difficult to use. Since most of the dirt is on the floor, you can just use Clorox Disinfectant wipes for walls.
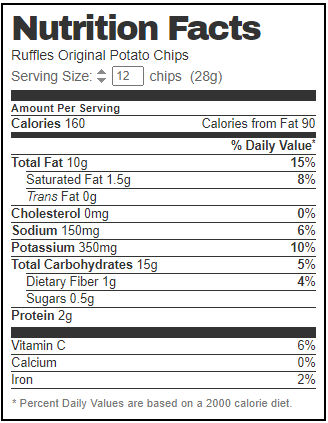
Many people will snack on something like potato chips. Personally, I prefer Ruffles Original. But, 160 calories from just 12 chips is unacceptable.
Here are some healthier and/or low calorie alternatives.
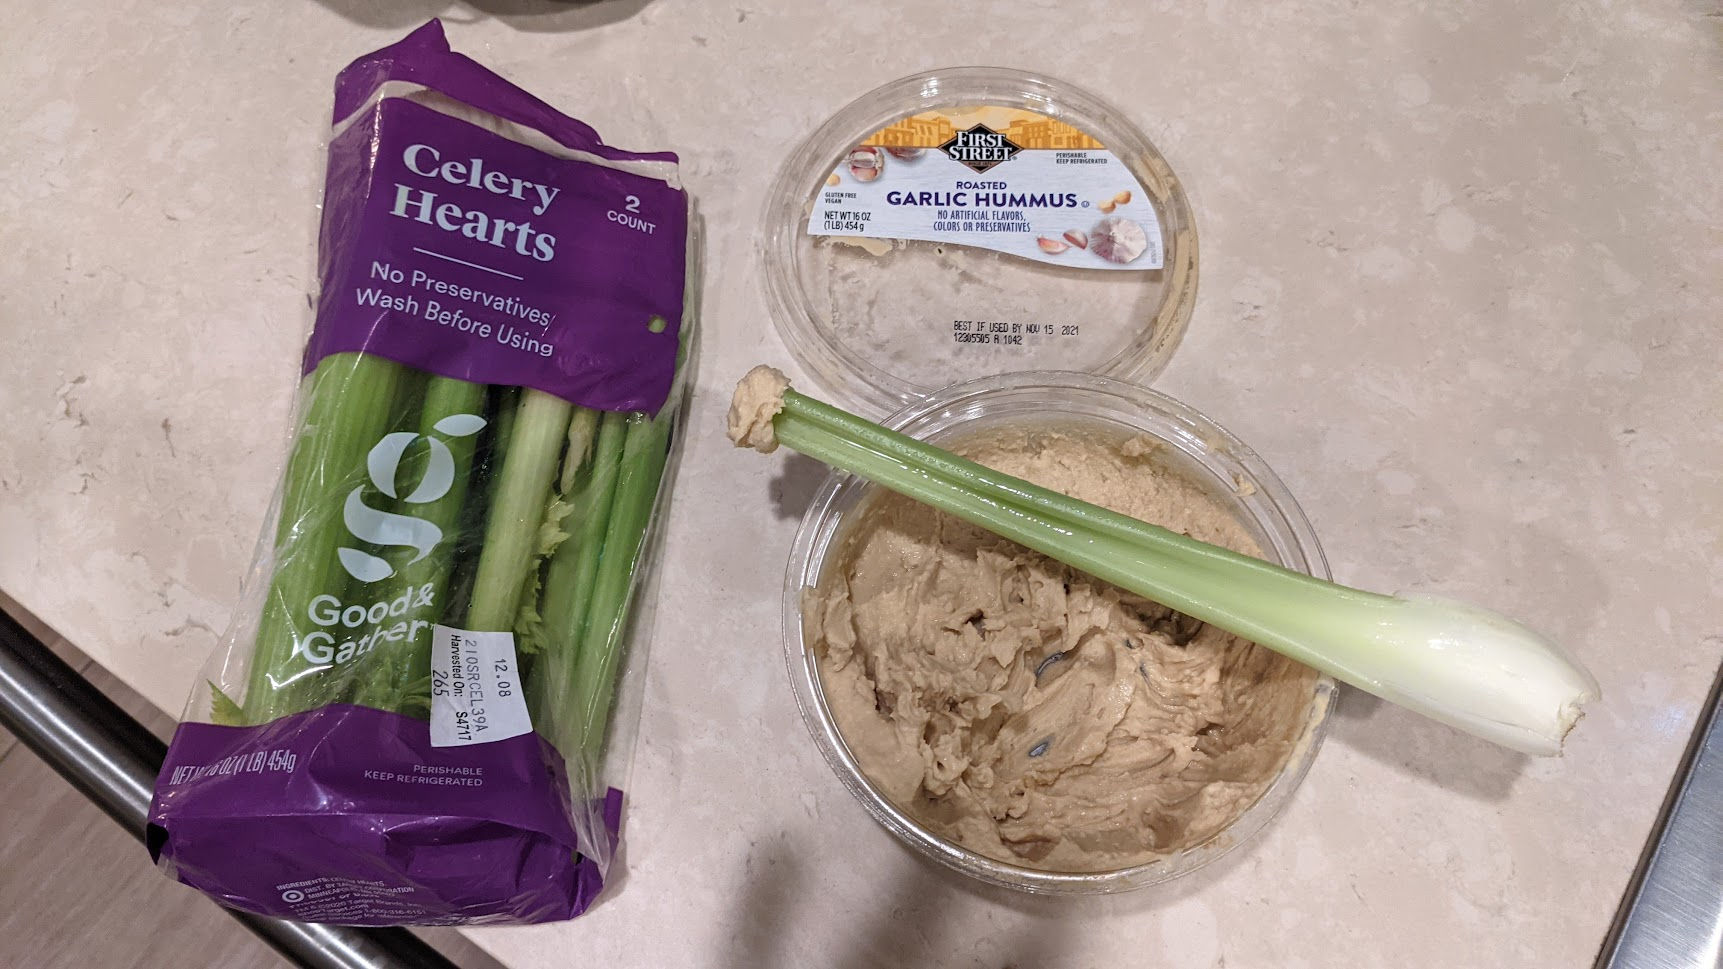
Celery Sticks with Garlic Hummus
The hummus comes in at 60 calories per 2 tbsp. That seems like a lot but at least they are healthy calories rather than empty ones. Celery sticks are only 7 calories per stick and they mostly contains water.
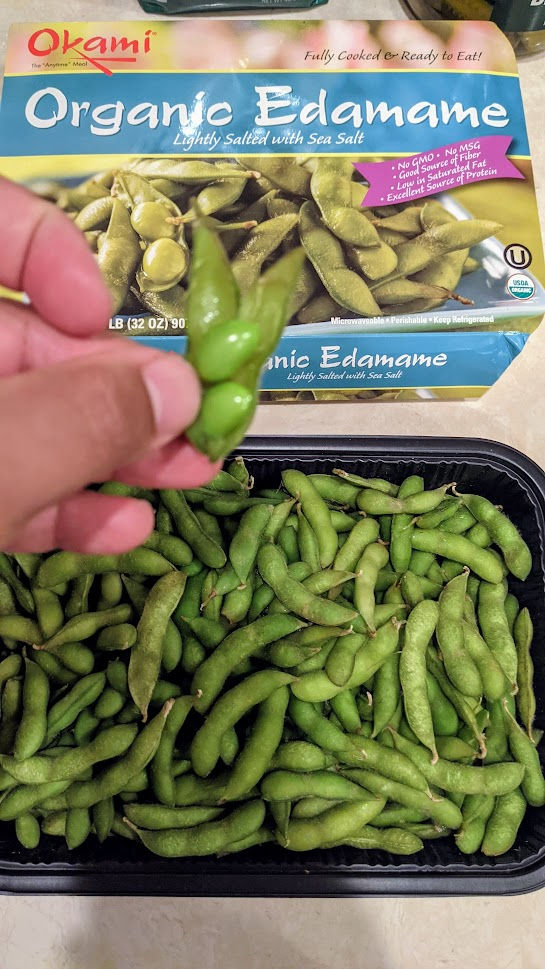
Edamame
This is an interesting type of food. It has the same amount of protein as meat. It often comes precooked so you just need to heat it up. Eating it involves removing the pod and eating the peas. The fact that you have to remove the pod can limit your consumption since it takes time. The taste is pretty neutral. Half a cup is only 94 calories.
Pasta can be a very filling and tasty meal to have. But, the pasta itself is high in carbs and calories. For example, angle hair pasta (my favorite) has 200 calories per serving.
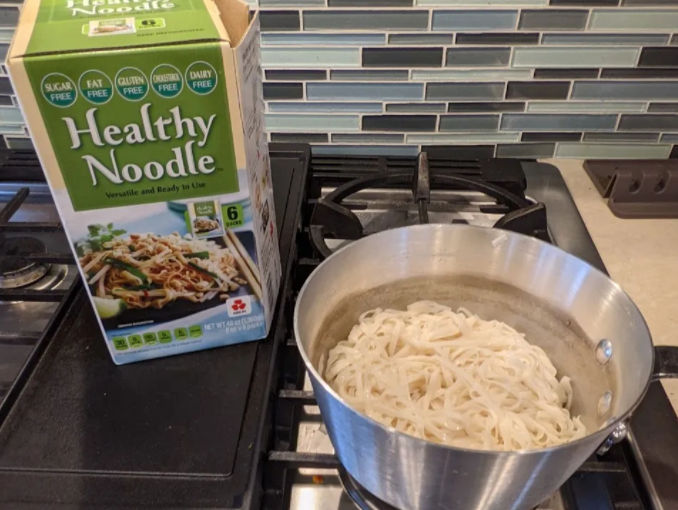
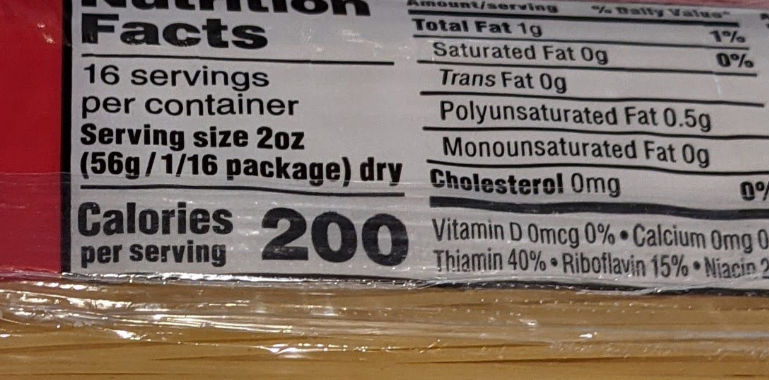
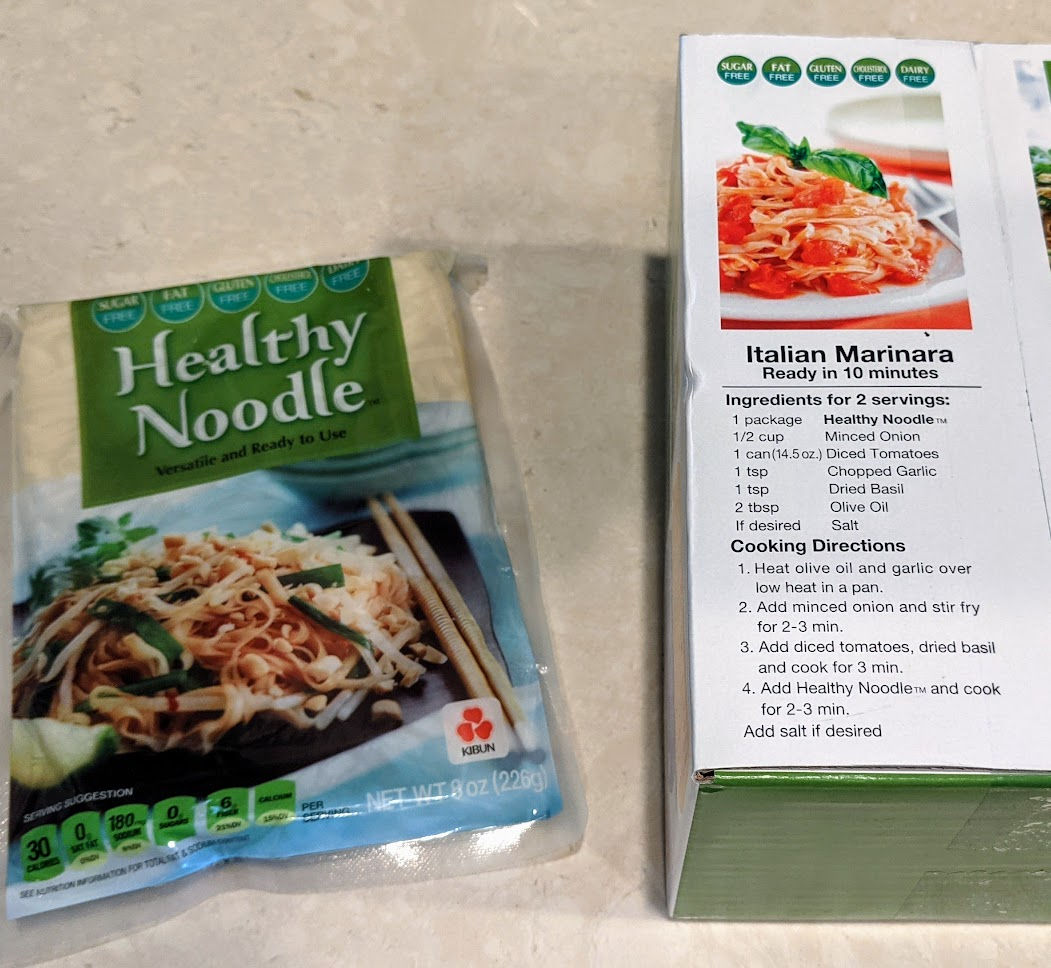
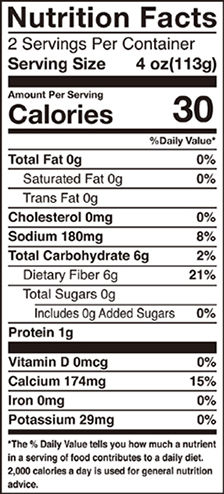
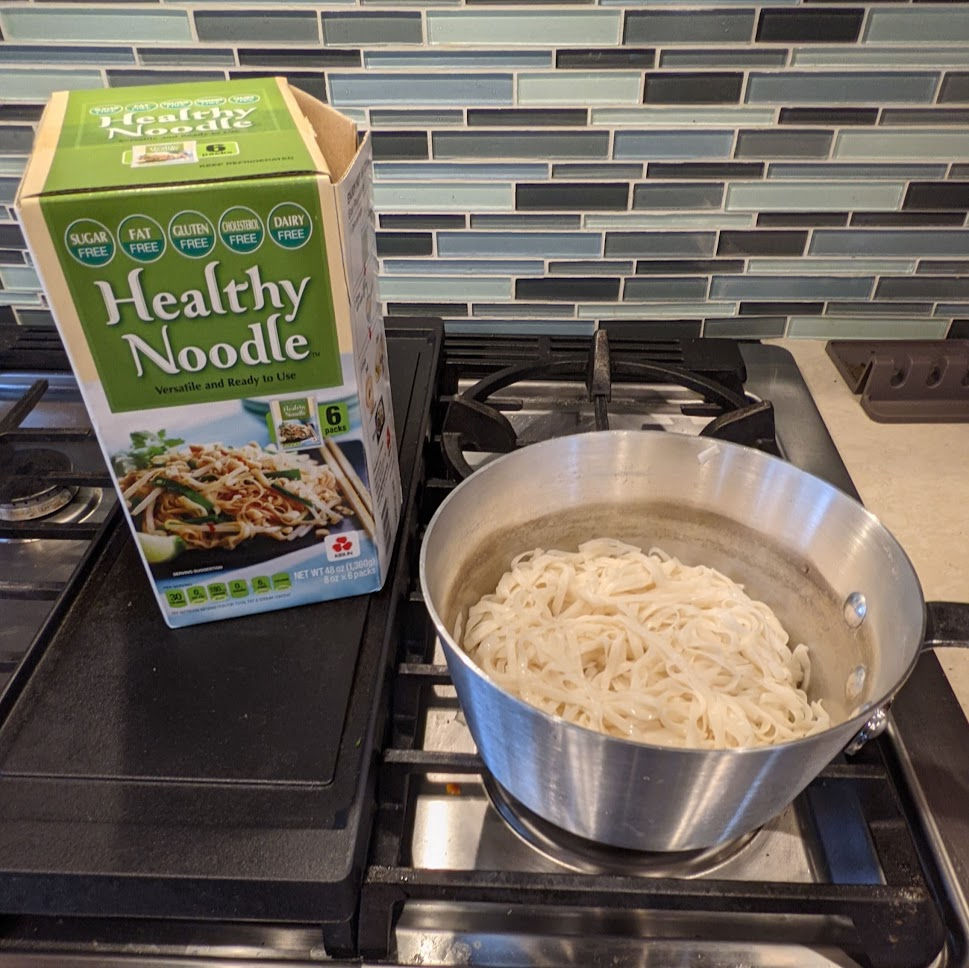
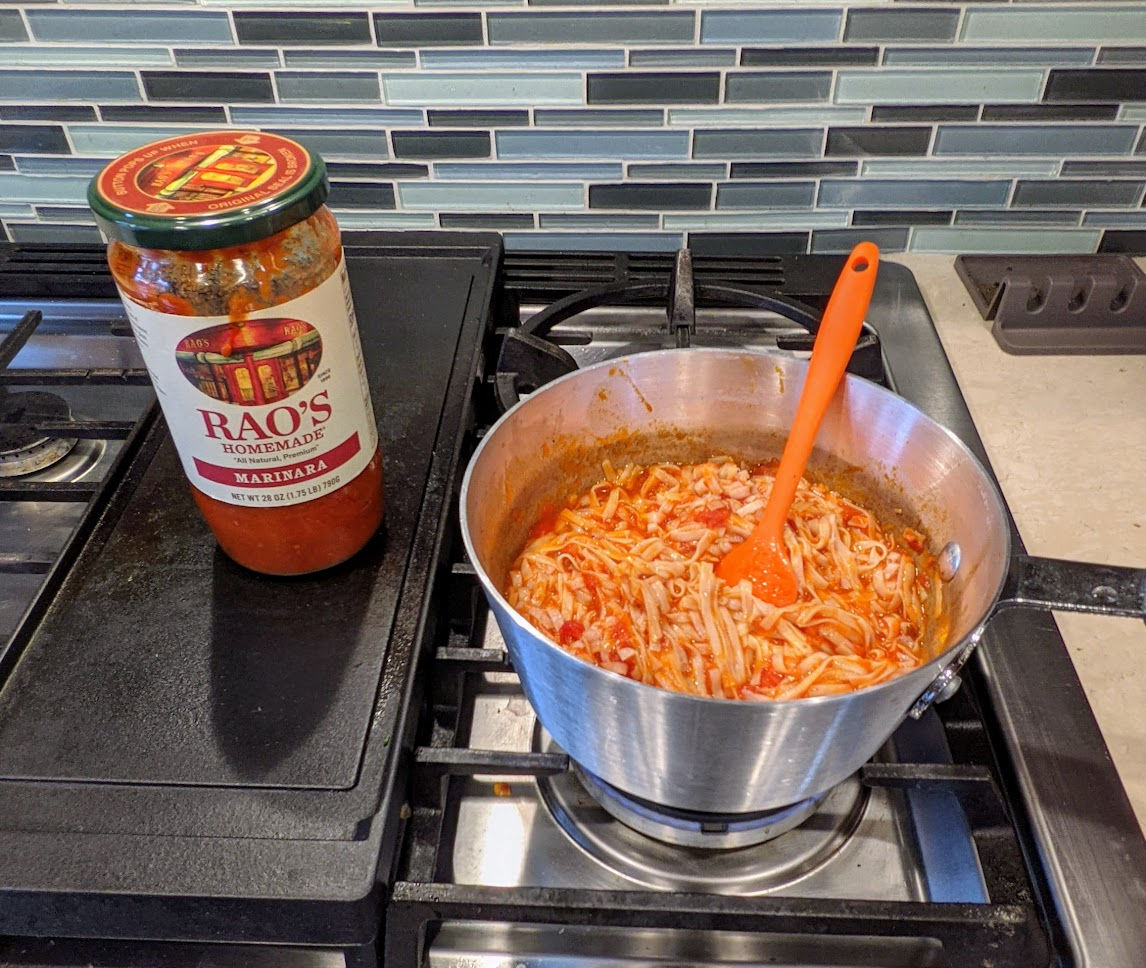
Fortunately, there are substitutes for pasta that taste almost exactly like pasta. For example, Costco sells Healthy Noodles. On the box, there’s a recipe for Italian Marinara using these healthy noodles. The noodles are precooked and each box contains 6 packs.
Nutrition-wise, they only contain 30 calories per serving. Plus, it’s got zero carbs because all of the carbs are from fiber which doesn’t get digested by the body and simply passes through. This is ideal if you are on the Keto diet.
Preparation is very easy. Just rinse the noodles and use them since they’re precooked. I tried this out with Rao’s marinara sauce and surprisingly, it tasted about 90% the same as regular pasta. I still prefer the taste of regular pasta, but for the calories saved by using Healthy Noodles, it’s worth the small difference in taste.
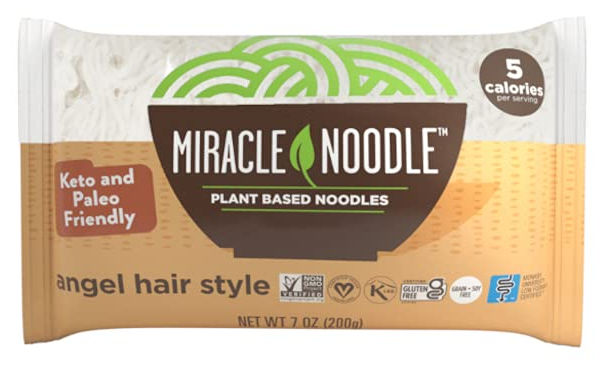
You can also try Shirataki Noodles by Miracle Noodle. They sell an angel hair style noodle containing only 5 calories per serving. No wonder it’s called Miracle Noodle!
UPDATE: I actually tried making pasta with Miracle Noodle Angel Hair style noodles. The shape wasn’t like angle hair pasta at all but more like spaghetti. More importantly, the texture wasn’t particularly good. It was too sticky. I think the Healthy Noodle option above tastes better.
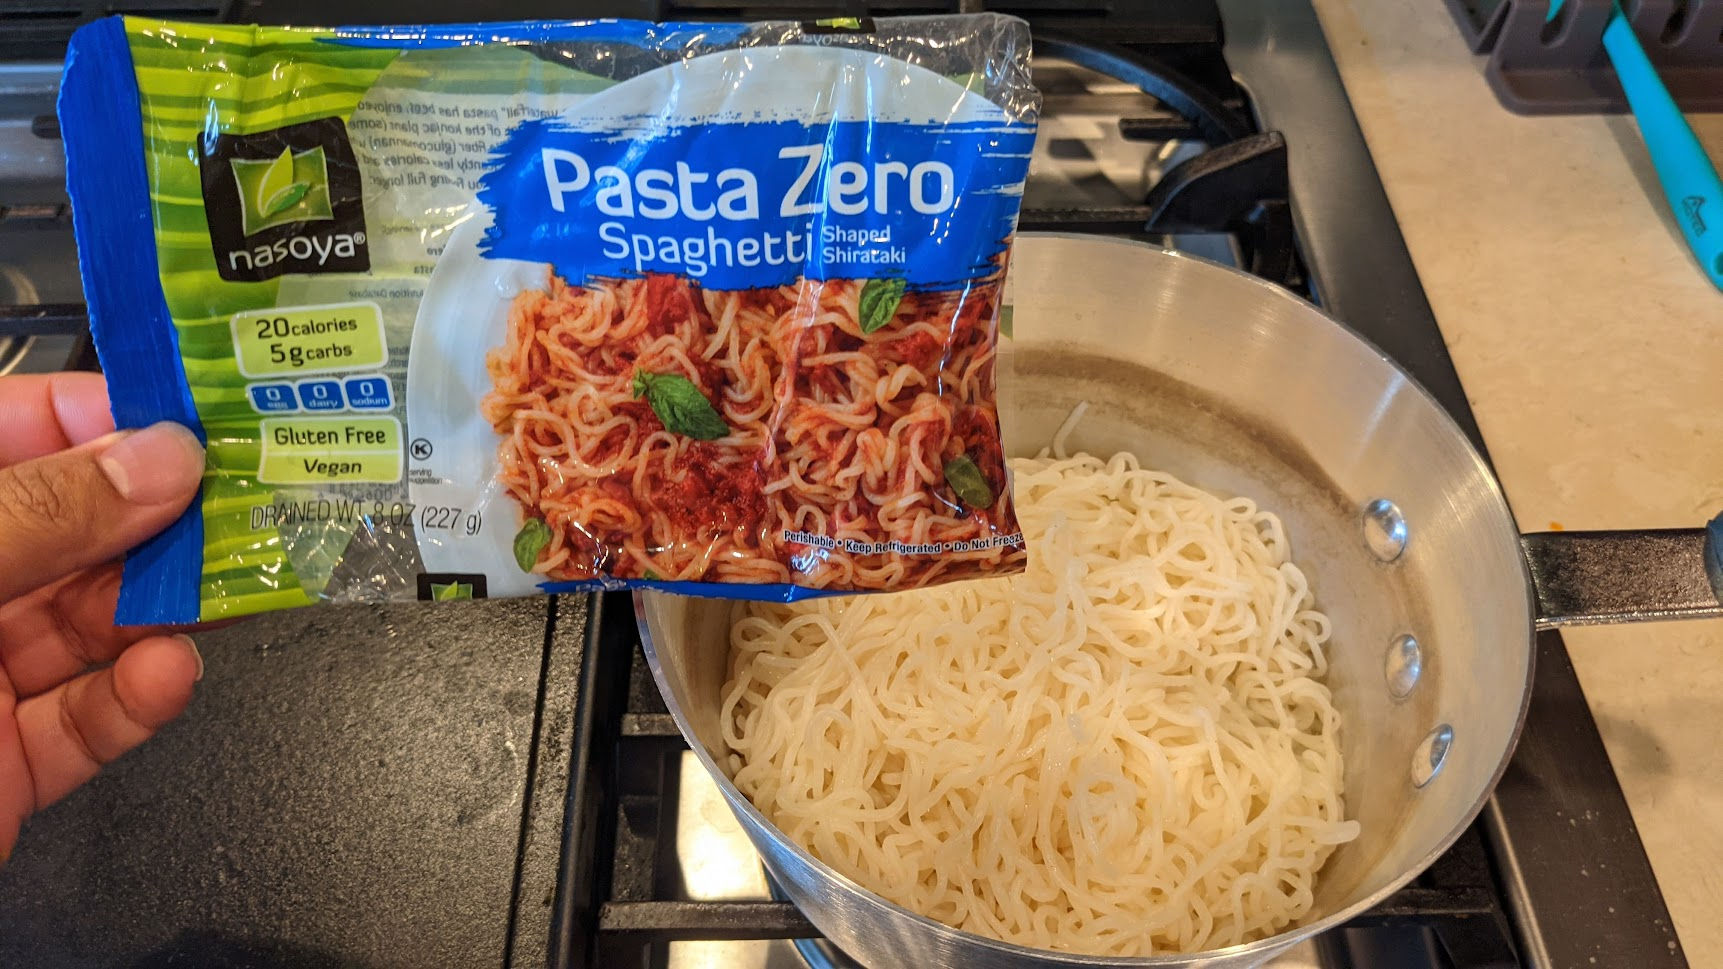
You can also Nasoya Pasta Zero spaghetti but like the Miracle Noodle Angel Hair style noodles, I didn’t care for the texture which tasted like rubber.
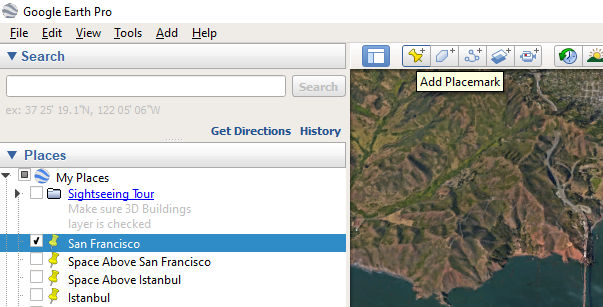
I just came back from Istanbul and wanted to make a video using my new Insta360 ONE X2 360-degree camera. To make viewers feel like they’re joining me on the trip, I wanted to include video clips showing movement from one place to another. This was easy to do using Google Earth Pro on desktop. Here’s are some examples.
In the video below, there are 4 “places”
San Francisco (zoomed in)
San Francisco (zoomed out to space)
Istanbul (zoomed out to space)
Istanbul (zoomed in)
Here’s how to make the video.
Add “Places”
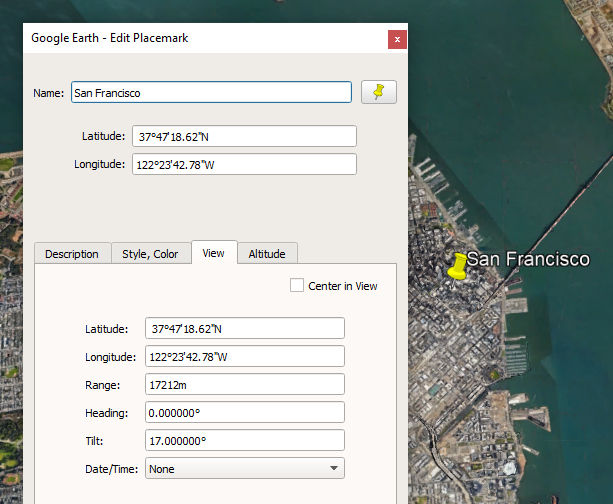
To add a place, you can search for the place using the Search field. Then, zoom in or out to your desired elevation. When you like the view of the place, click the “Add Placemark” button to add a yellow pin to the place. If you want the place label to appear in the map, check the checkbox beside the place name.
If you right click on a place under “My Places” and click on “Properties”, you can rename the place, change the camera elevation (range), etc.
Record a Tour
When you’re done adding places, click the Record a Tour button in the toolbar.
This will open a record.
Click on the first place (San Francisco) and then click the red Record button. Then, click on each place in the order you want them to appear in the video. Google Earth 3D will animate from one place to another as you are recording in real time. When you are done, click the Record button again to stop recording. You’ll then see a video player control bar.
Click the Play button to play the video. If you are happy with it, click the floppy disk (seriously, Google?) button to save the video. It will add a video item to the list of places.
Export the Video
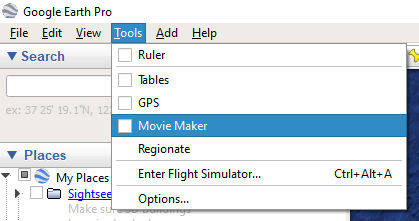
To export the video, click Tools > Movie Maker. If it is grayed out, close the video player control bar.
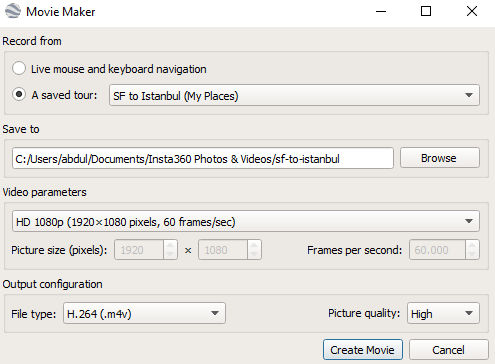
Specify a file path and name, choose video parameters (e.g. 1080p), and an output file type (e.g. H.264), and then click the “Create Movie” button.
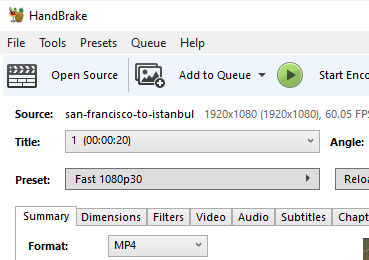
Convert Video
The video will be exported but you may not be able to open it in certain applications like Corel VideoStudio even though it opens in VLC. To fix this, install Handbrake and convert the video to MP4 format.
Other Examples
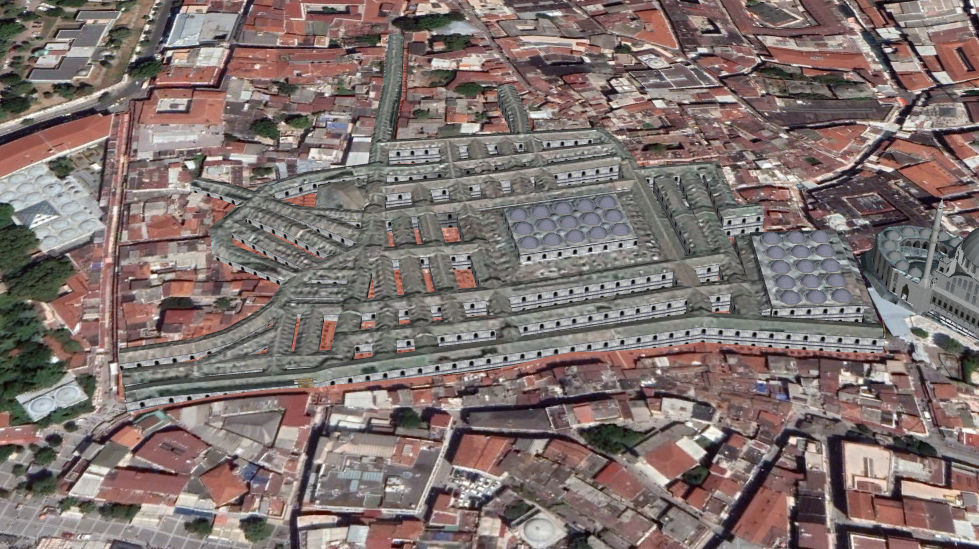
You can make videos from other angles and elevations as well. For example, if you hold the Shift key and drag, you can rotate your view. Then, add a place marker at the view you want to save. Google Earth Pro will animation smoothly from each place marker. For example, here’s a video going from the Sulemaniye mosque to the Grand Bazaar.
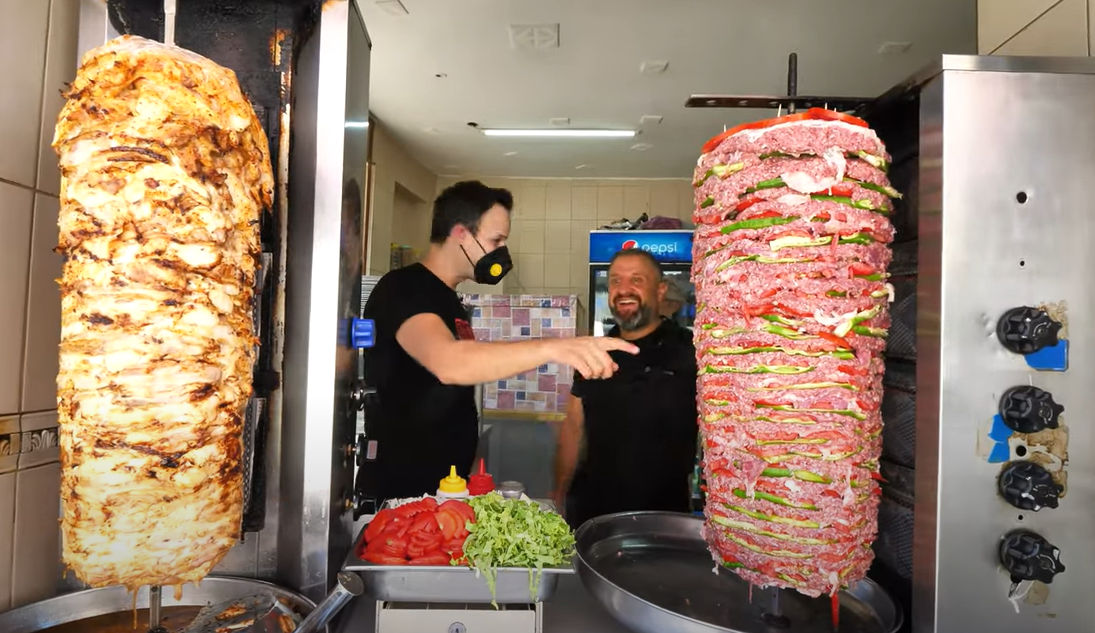
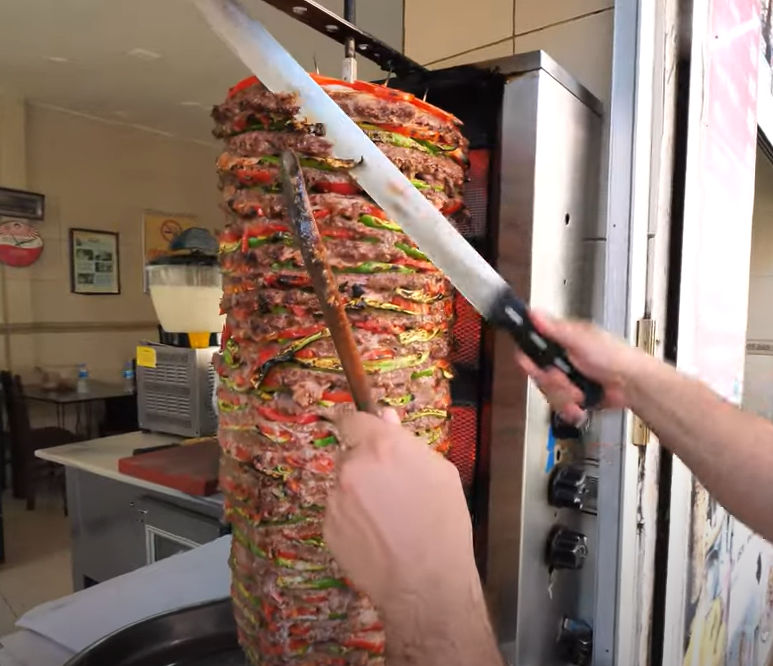
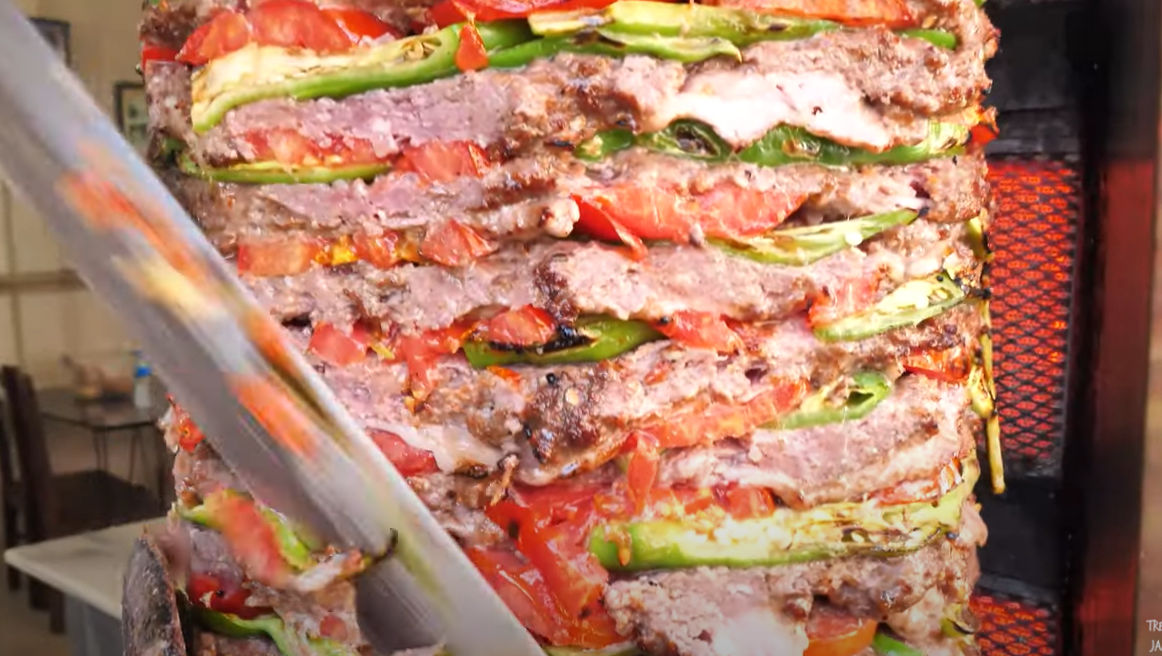
After visiting Istanbul (aka Kebab Heaven) for 8 days, I think I’ve come up with an itinerary for anyone who only has 3 days there.
Note: check open / close times as not everything is open every day 24 hours a day.
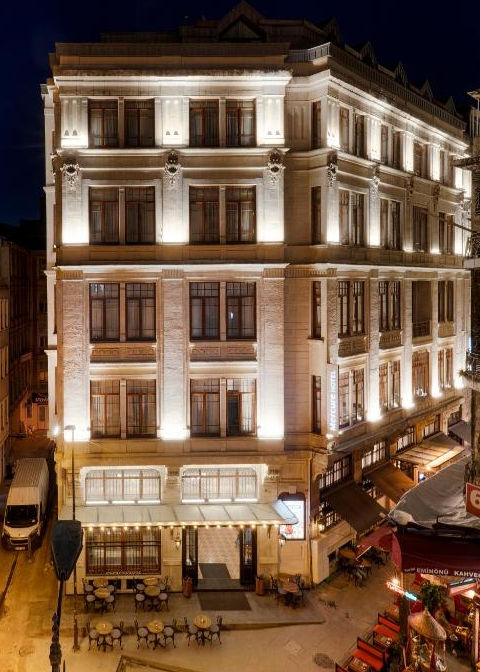
Recommended Hotel
Mercure Istanbul Sirkeci Hobyar, Muhzirbaşı Sk. No6, 34112 Fatih/İstanbul, Turkey Google Map
This hotel is in the perfect location as it’s in the middle of most places you’ll want to visit and there are a ton of restaurants and tourist services nearby.
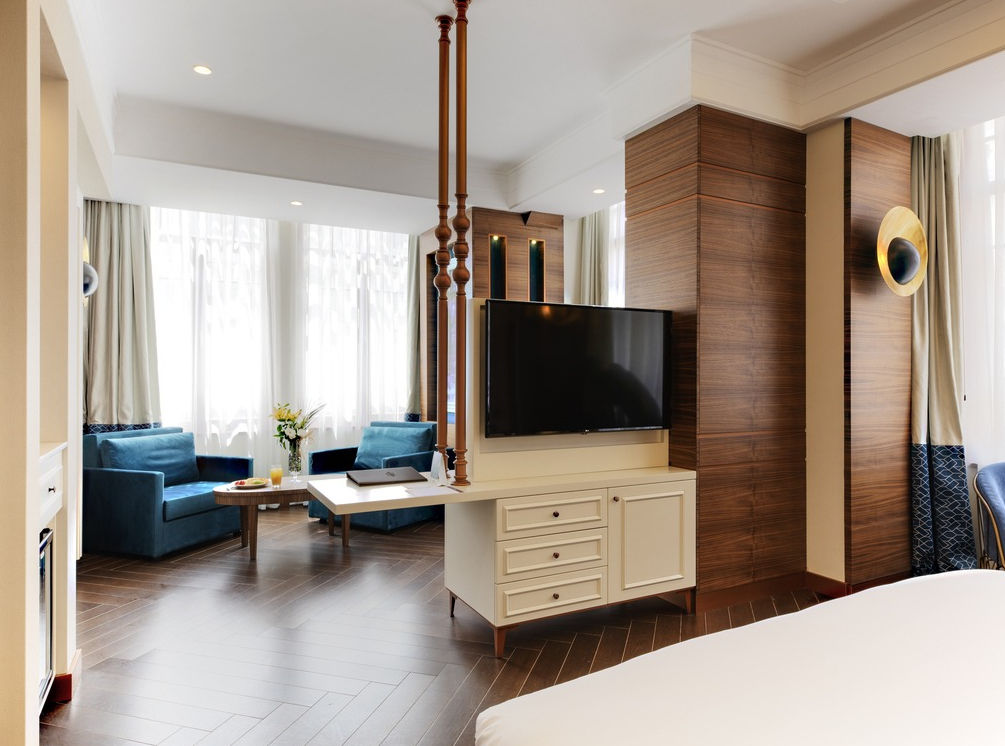
Junior Suite
Day 1
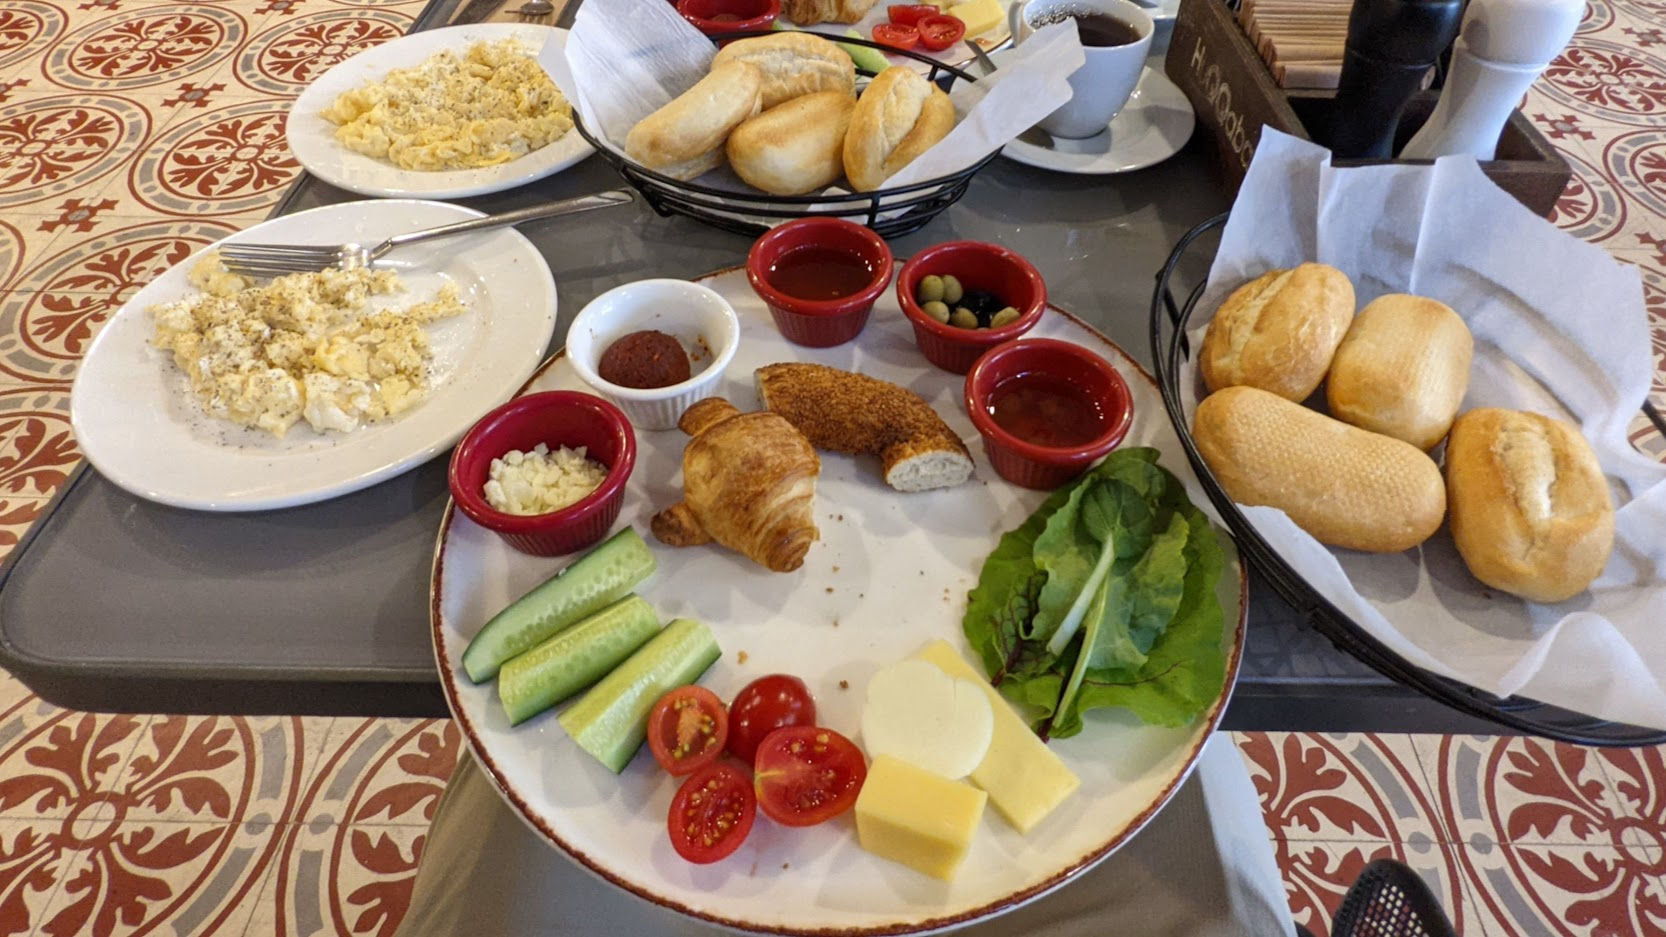
9:00 AM – Breakfast
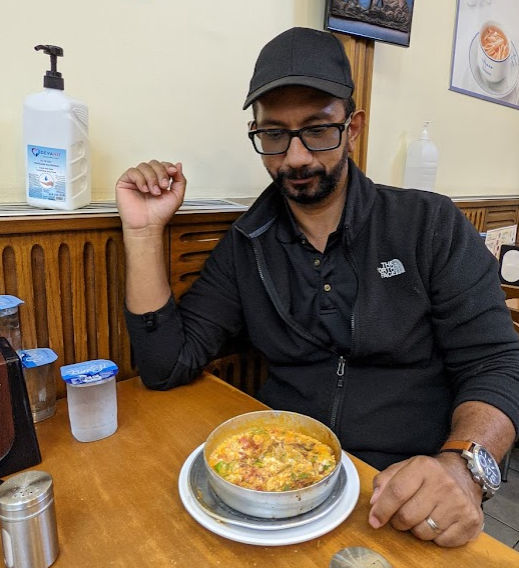
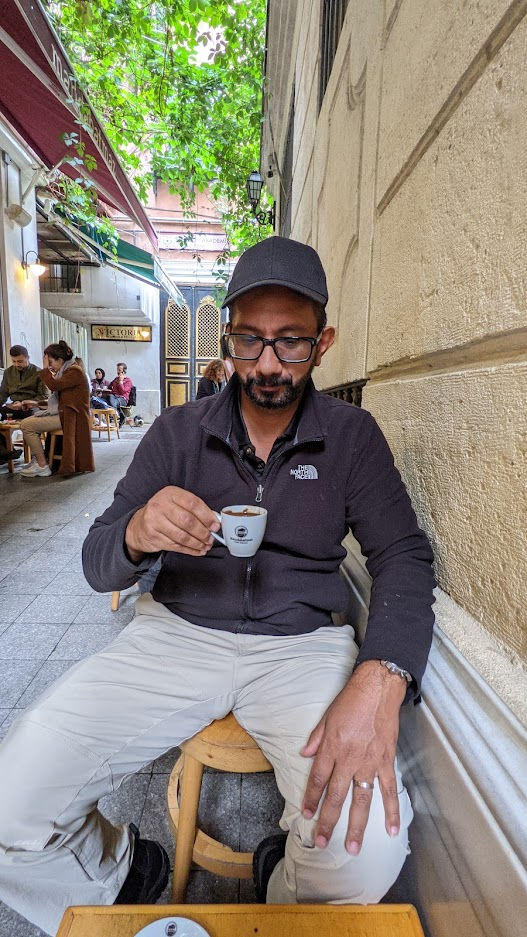
Have breakfast at the hotel and/or eat at one of the many nearby restaurants. My favorite breakfast which most people would enjoy is Menemen (Turkish scrambled eggs) which you eat with bread.
Breakfast at the hotelMenemen
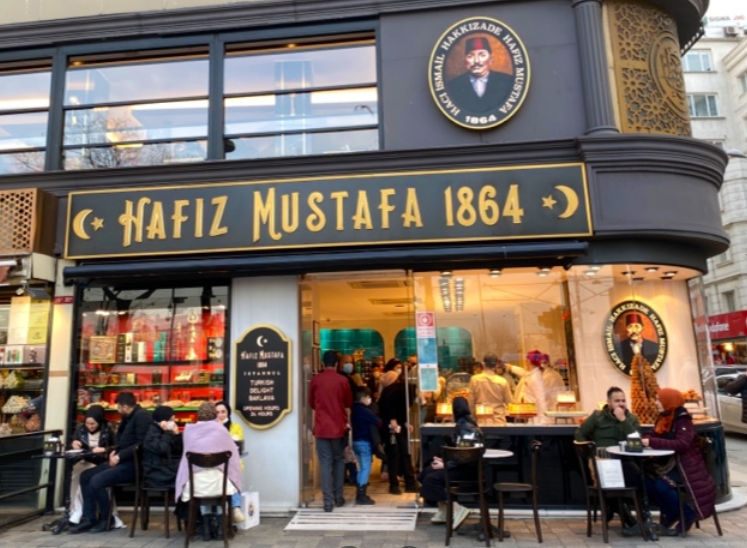
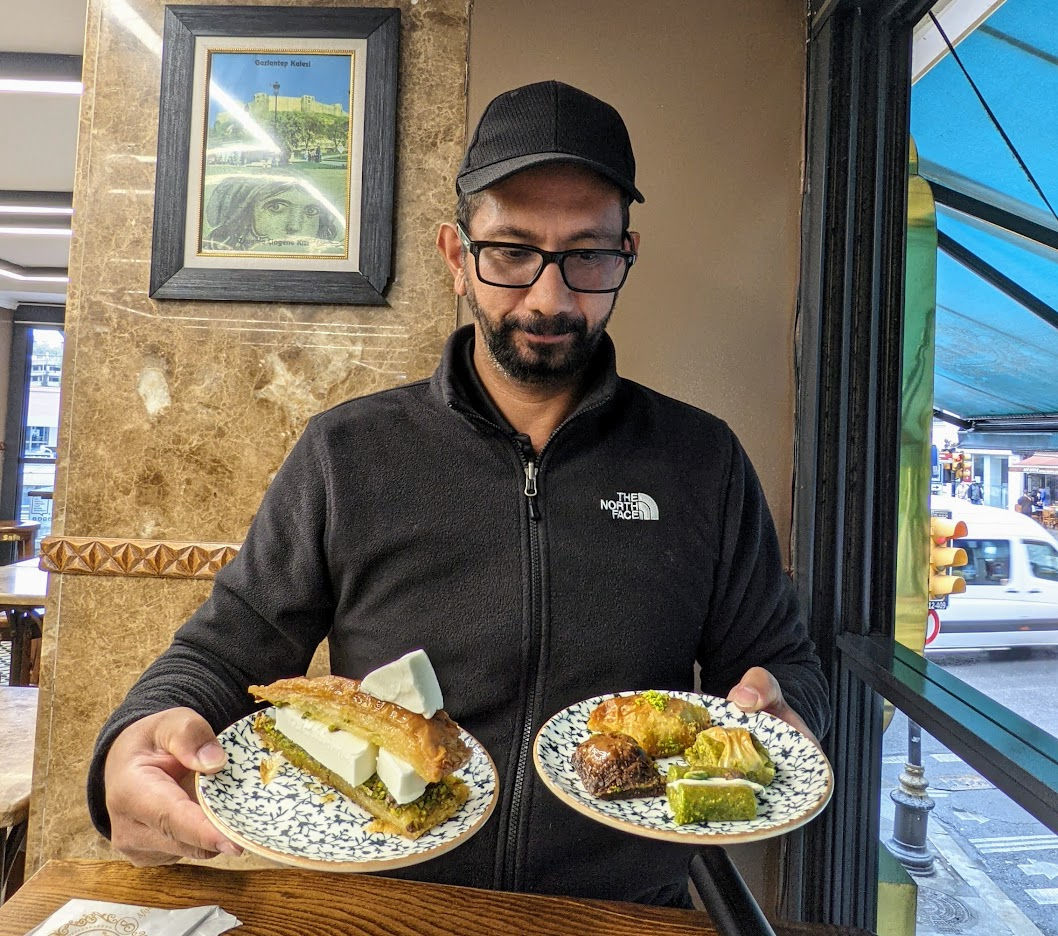
10:00 AM – Baklava
If you have time, stop by and get some Baklava. One famous place that you’ll find all over Istanbul is Hafiz Mustafa just around the corner from the hotel.
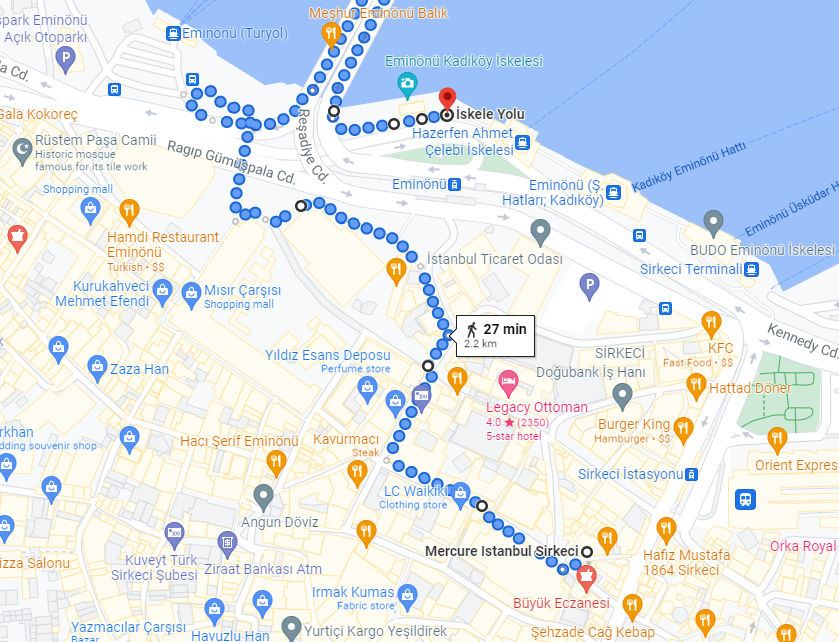
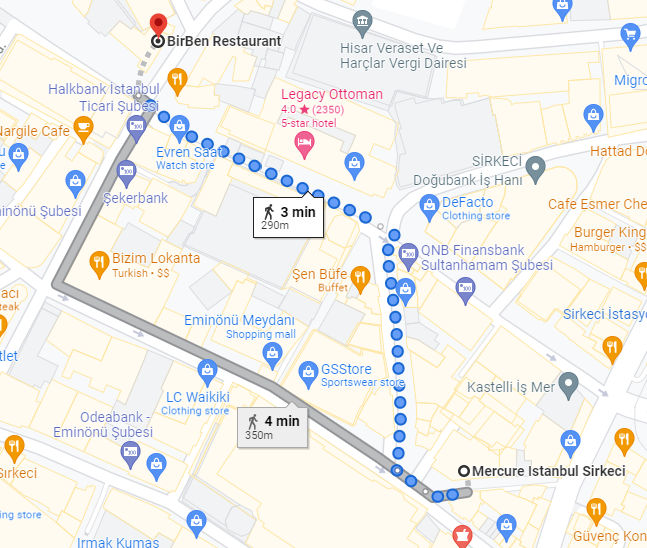
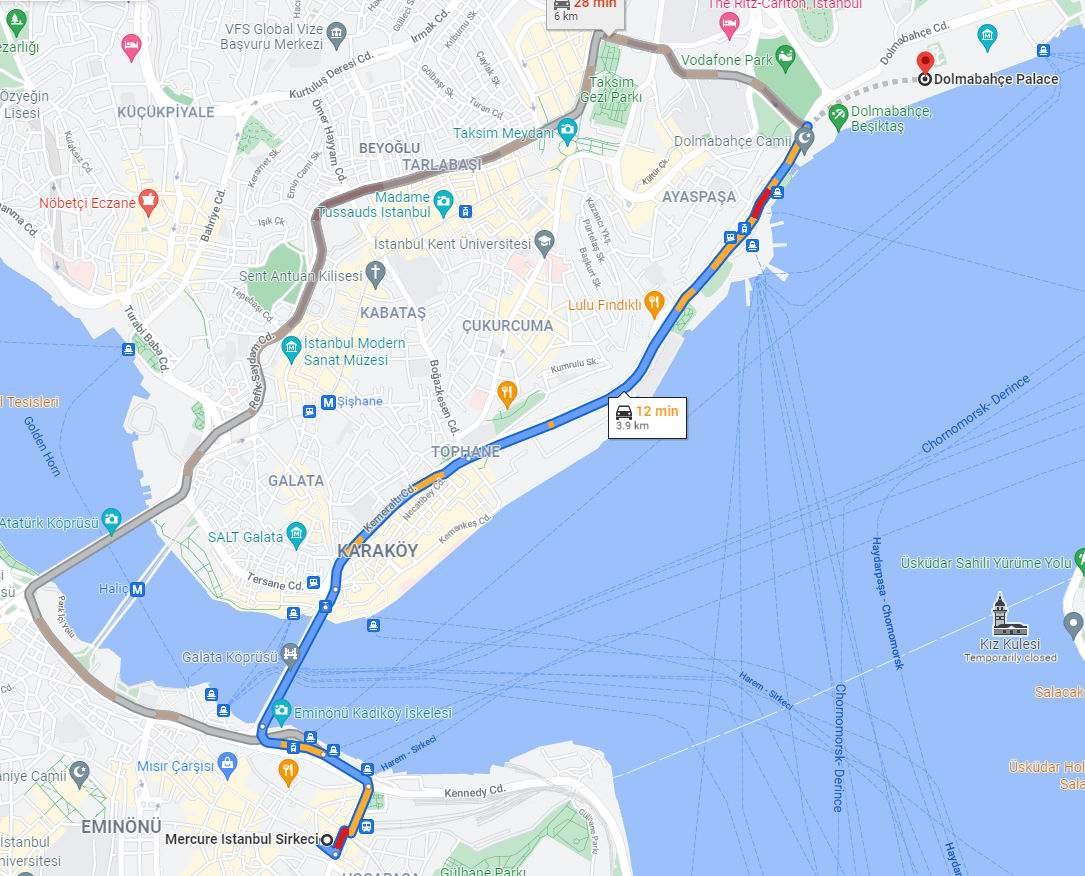
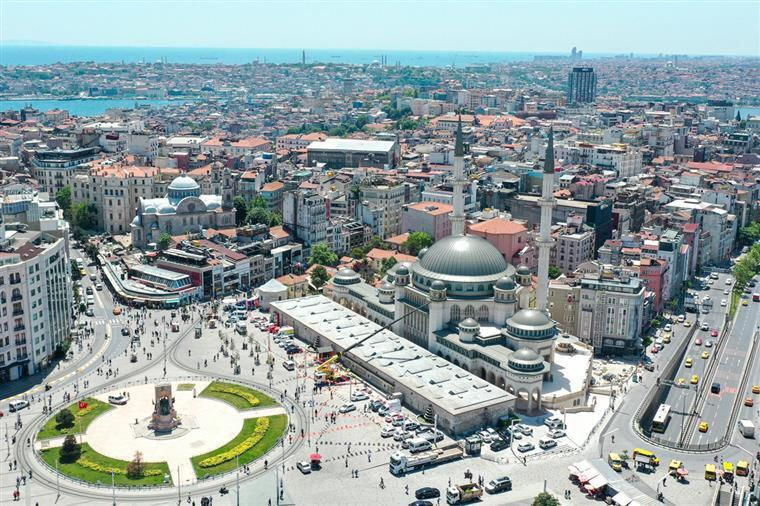
If this is your first time in Istanbul, it’s helpful to go on a quick tour to get an idea of where everything is and what the city is like. The BIG BUS will also cross the bridge connecting Europe to Asia. If you’re staying at the Mercure hotel, then catch the bus at 11:00 AM at Eminonu which is just 10 minutes away by foot.
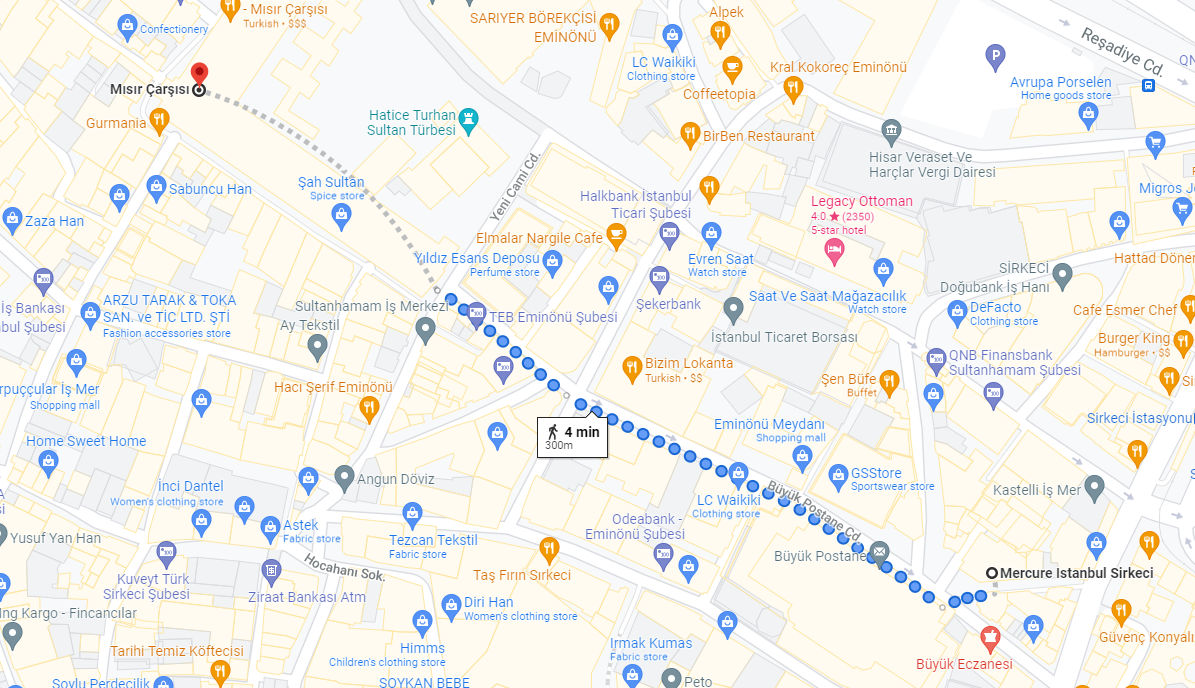
Note: in the screenshot below, Google Maps says you need to walk across the bridge and back and that the walk would take 27 minutes. That’s incorrect. You don’t need to cross the bridge, and the walking time is more like 10 minutes.
Note: The first stop is at Sultanahmet Square and the 2nd stop is at Eminonu (near the hotel). Most people will get on at Sultanahmet Square and sit on the upper deck. By the time the bus gets to stop #2 (Eminonu), the upper deck will most likely be full. You can wait until someone goes down (usually at Dolmabahce Palace) and then move to the upper deck. Or, get on the bus at the starting point (Sultanahmet Square).
https://www.bigbustours.com/en/istanbul/classic-istanbul-tour-ticket 1 Day: $56 per person 2 Days: $67 per person 3 Days: $75 per person Red Route: First Tour: 11:00 from Stop #20: Sultanahmet Square Last Tour: 17:00 from Stop #20: Sultanahmet Square Full Circuit Duration: 2 hours (approx.) Bus Frequency: every 60 minutes (approx.) Bus Stops
Stop #2 is Eminonu
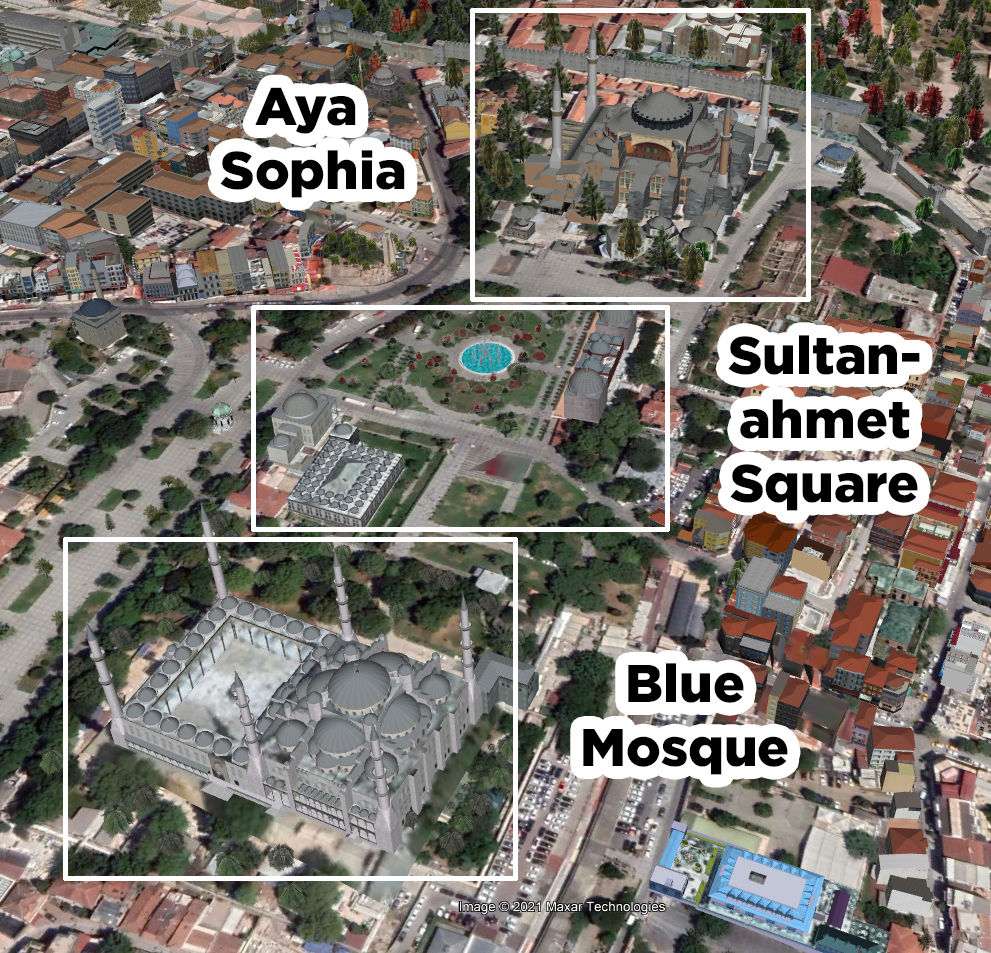
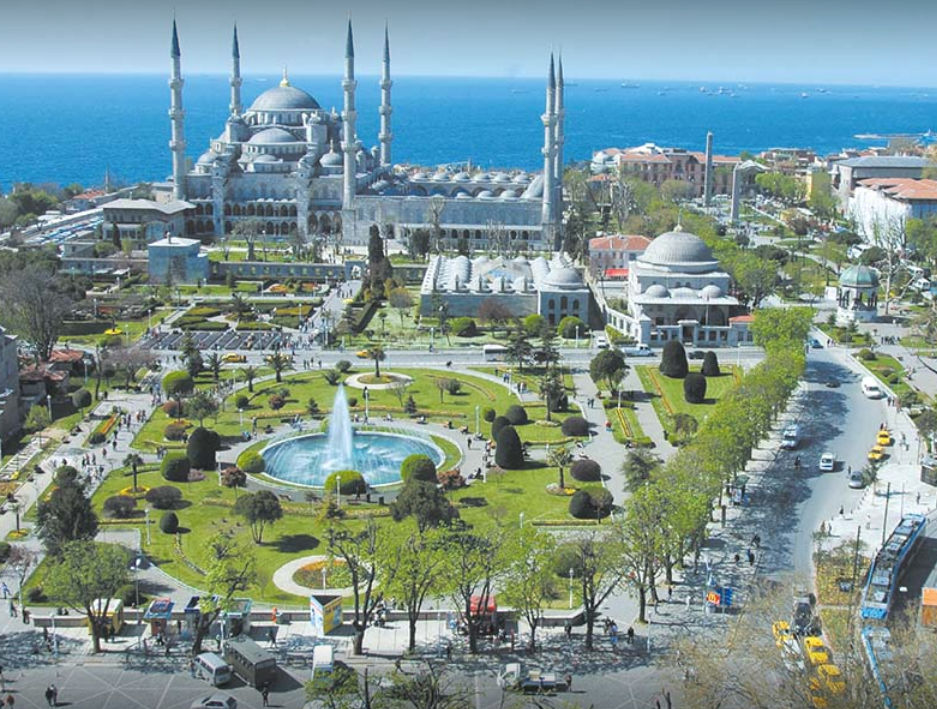
1:00 PM – Get Off at Sultanahmet Square
Sultanahmet Square is between the Blue Mosque and the Aya Sophia. The Aya Sophia is next to Topkapi Palace. Get off the bus here so you can visit all 3 places at once.
1:15 PM – Grilled Corn on the Cob
The Blue Mosque is closed to visitors during prayer times. Whether it’s closed or not, pick up some grilled corn and have a snack at Sultanahmet Square.
1:30 PM – The Blue Mosque
Walk over to the Blue Mosque and check out this building which was built in 1616.
Note: there is often construction going on so some or all parts may be inaccessible.
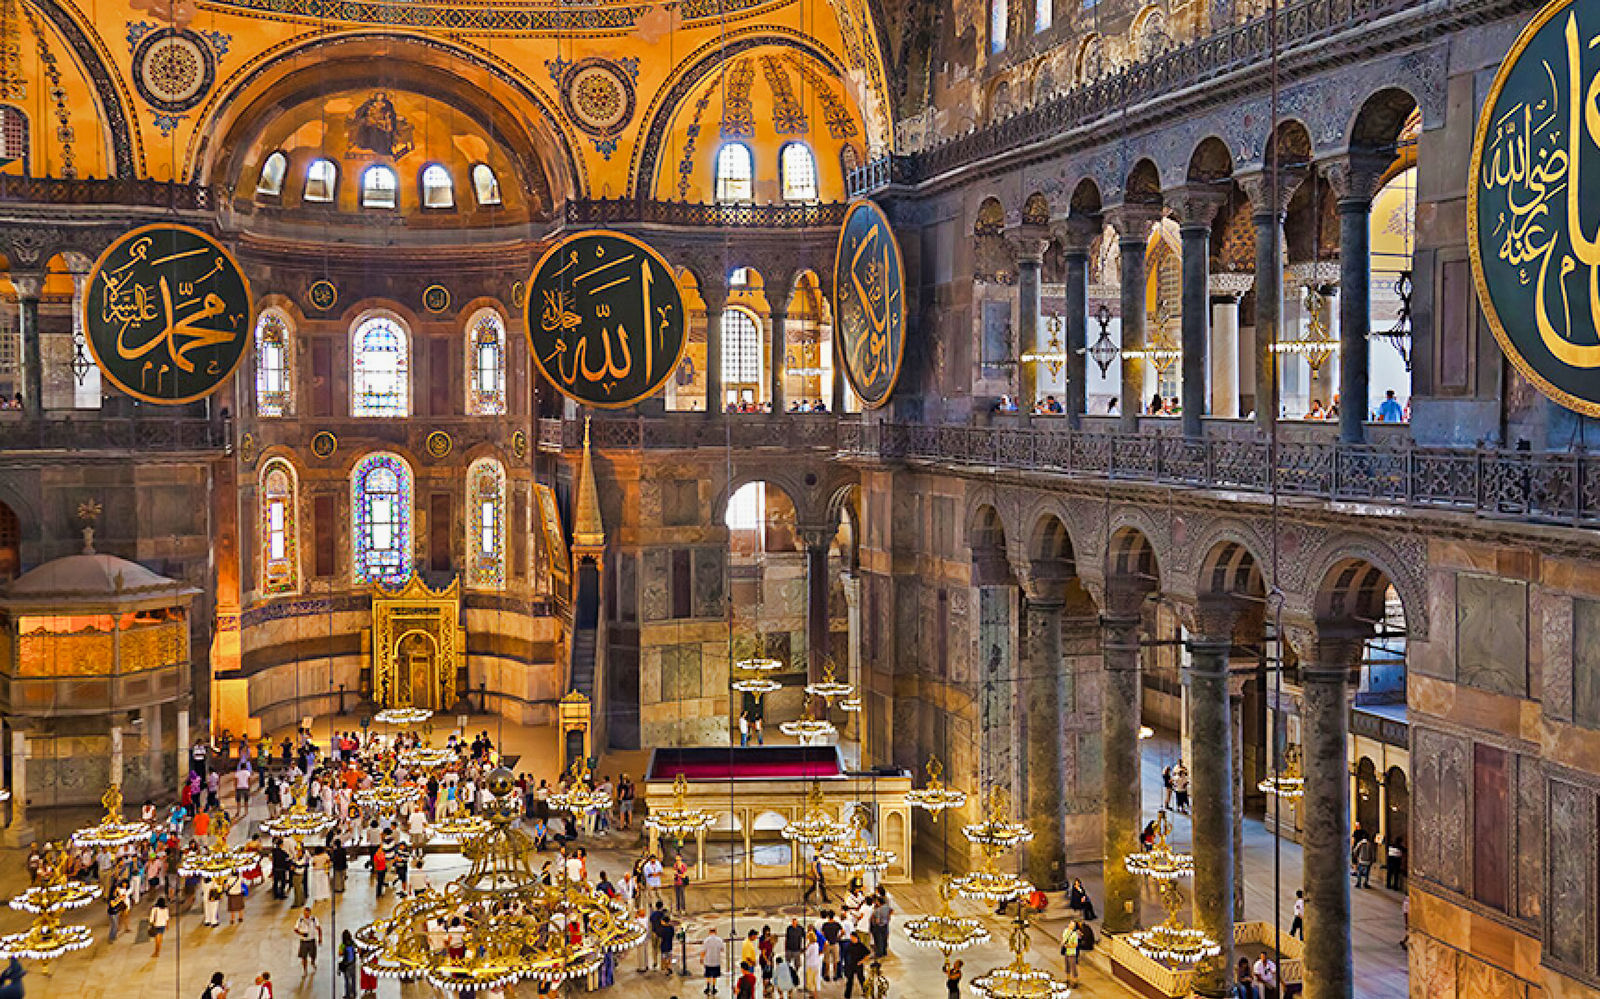
2:30 PM – Aya Sophia
Check out this building which was built in 537 as a church. It later became at mosque and then a museum and then a mosque again in 2020.
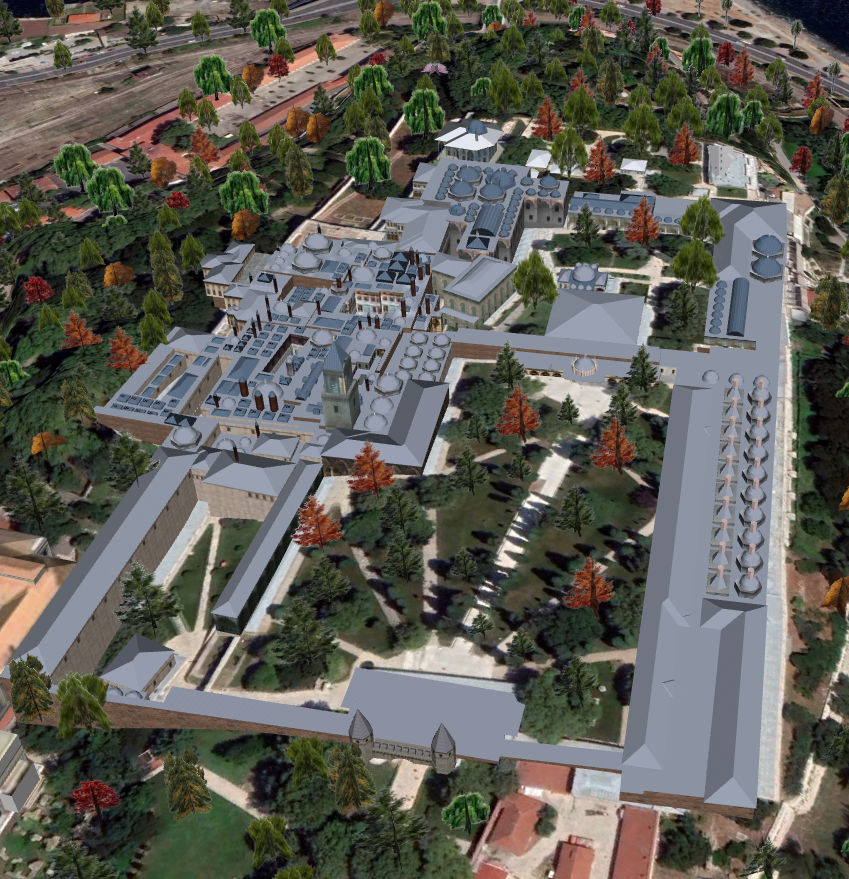
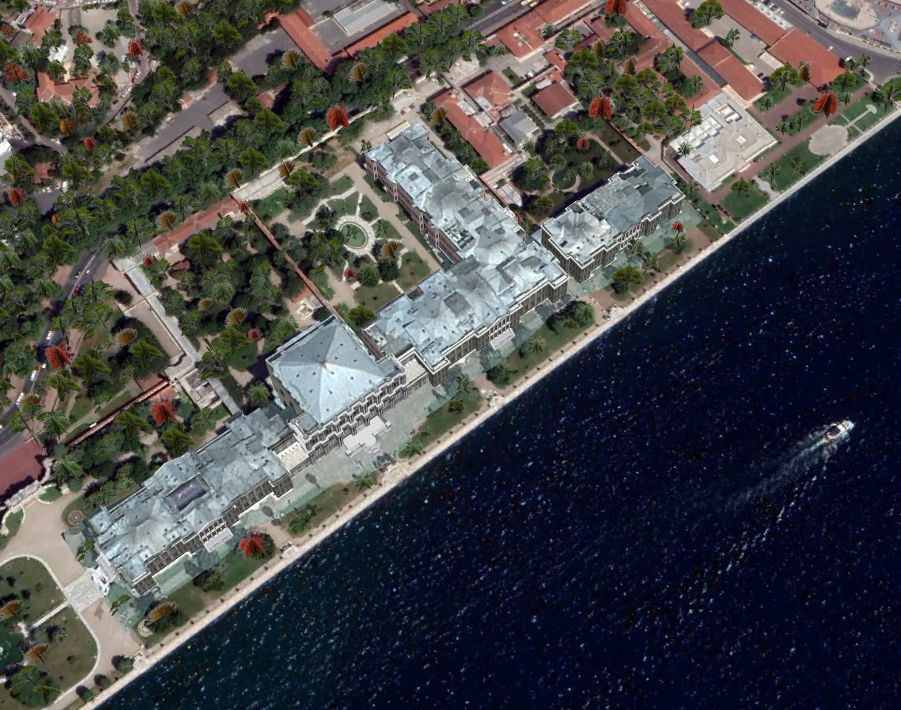
3:30 PM – Topkapi Palace
This is a palace. Personally, I didn’t care for it much, but for the sake of completeness, we checked it out anyway. Some of the rooms were interestingly decorated as were some of the ancient items on display.
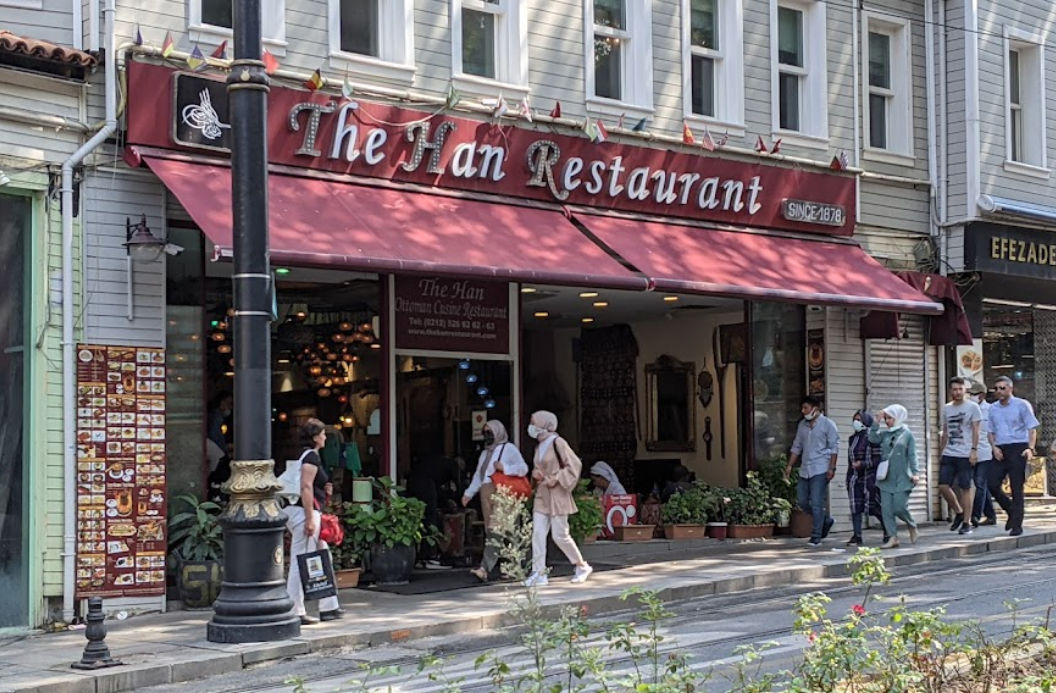
5:30 PM – Dinner
When you leave Topkapi Palace, there is a nearby restaurant you can have dinner at. I haven’t eaten there yet but the food looks good and the place looks exotic.
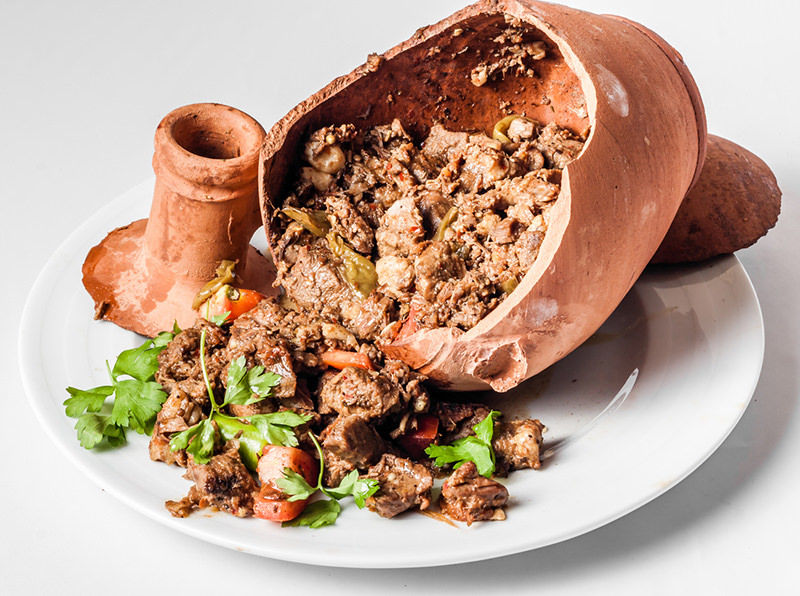
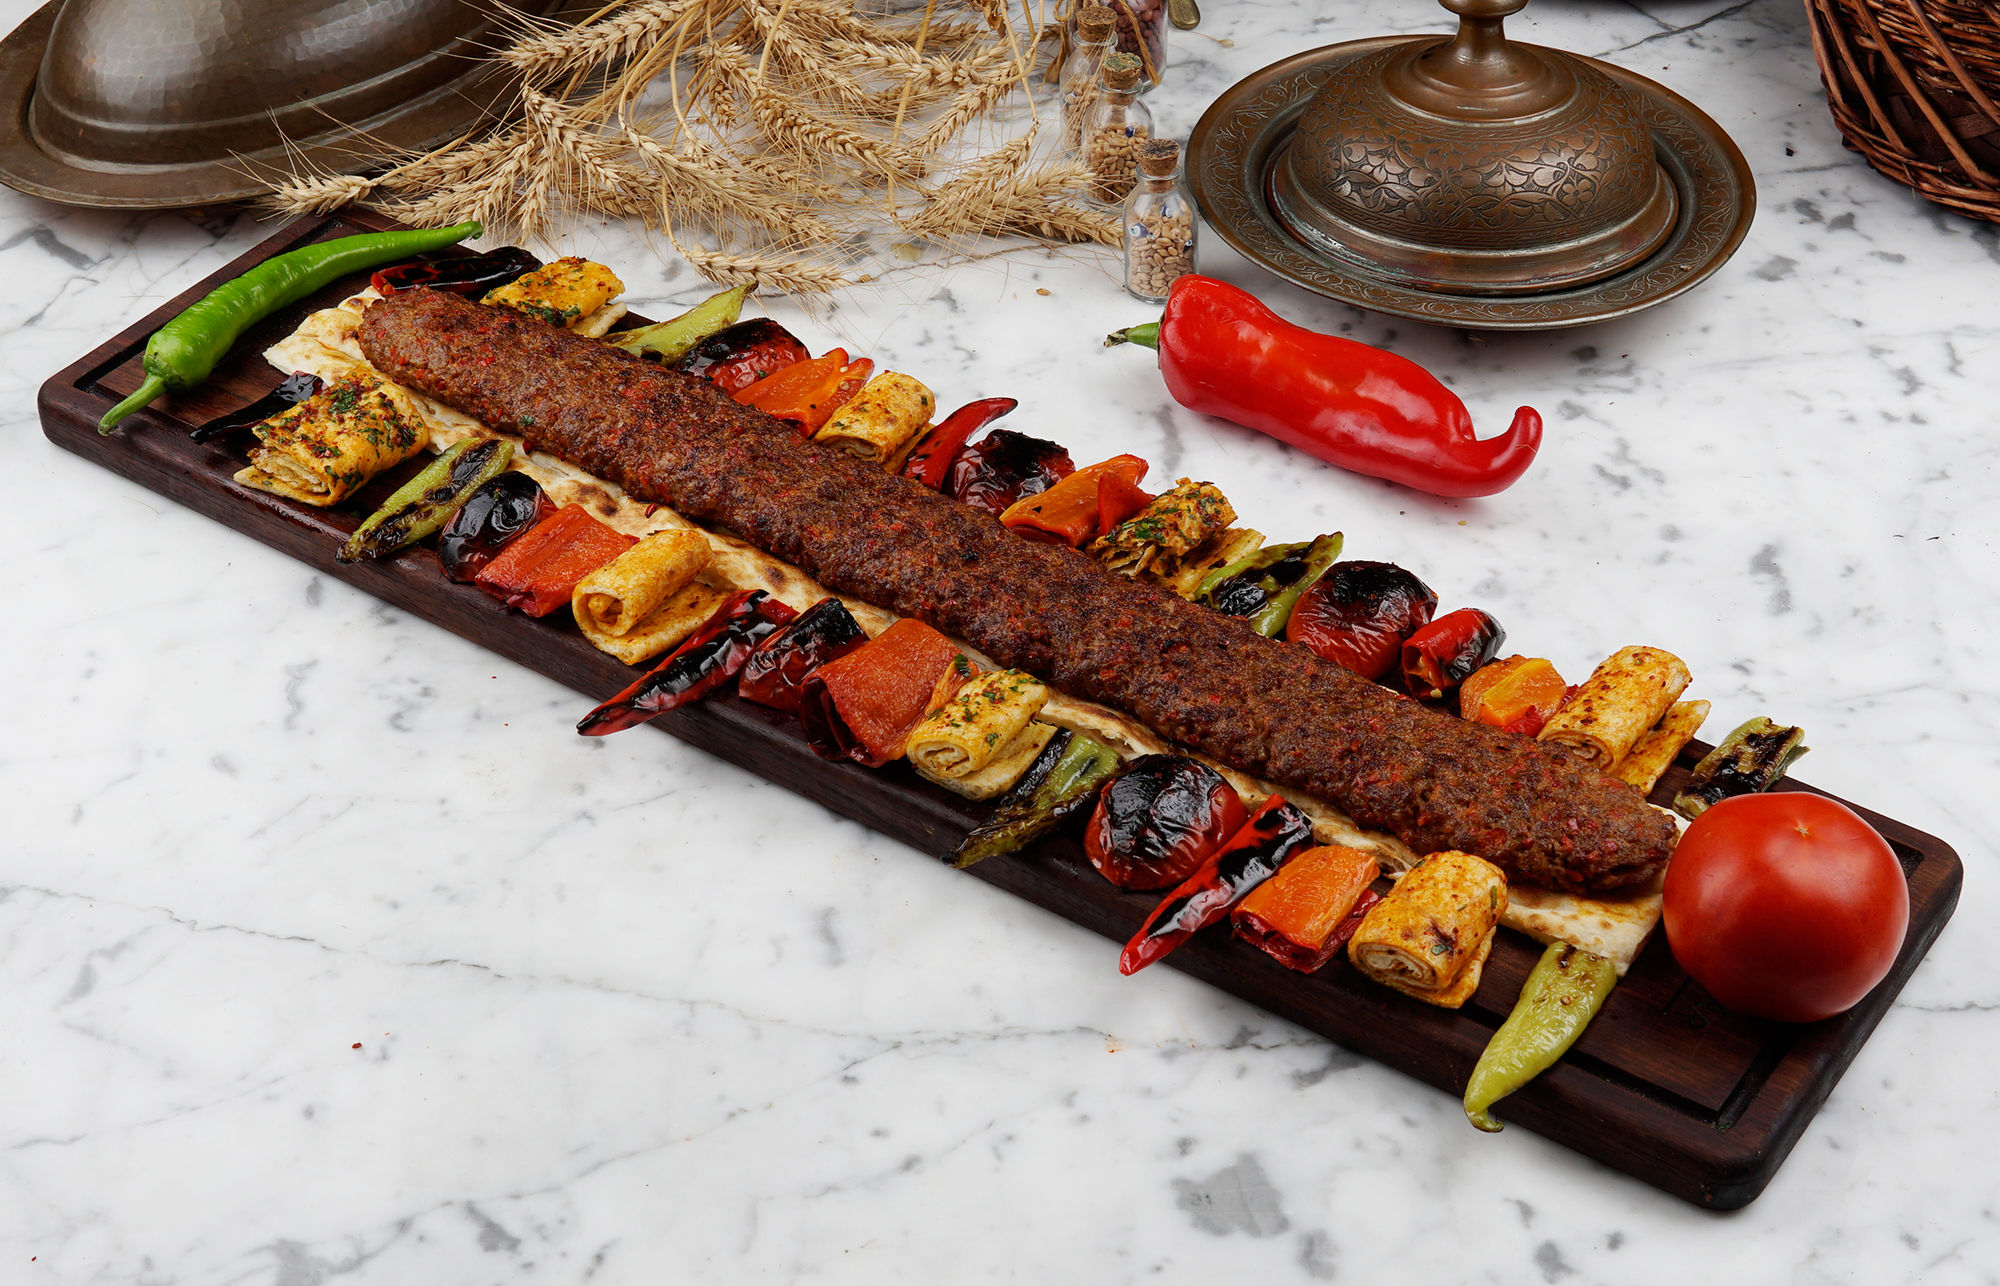
The Han Restaurant Cankurtaran, Alemdar Cd. No:20, 34122 Fatih/İstanbul, Turkey Google Map
Try the Testi Kebap, which is made in a clay pot, or the meter-long Kebap
Testi KebapMeter-long Kebap
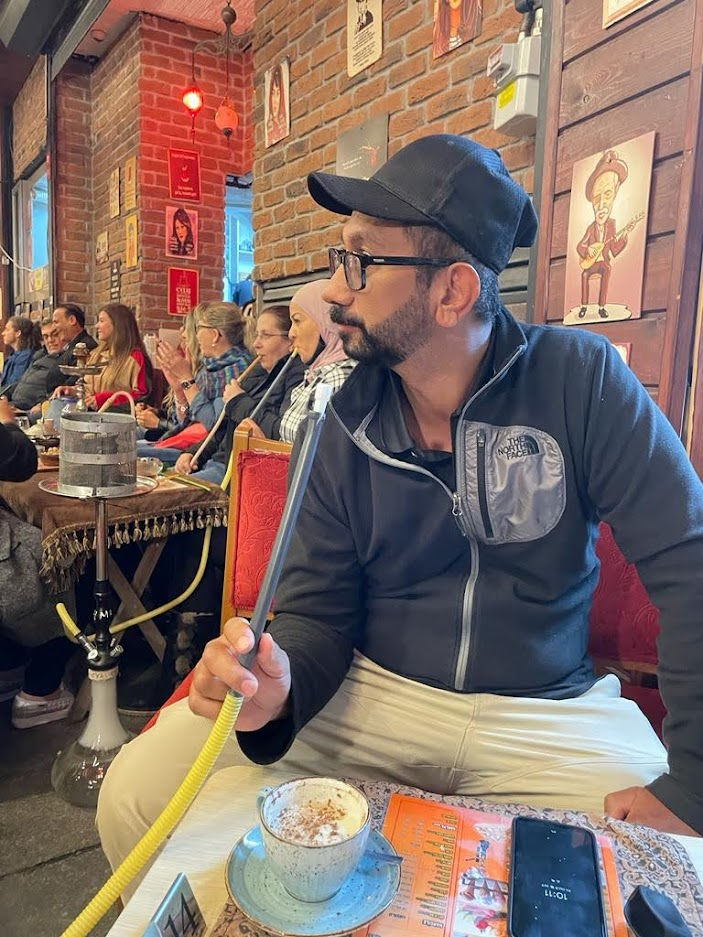
8:00 PM – Shisha and Sahlep
Right in front of the Mercure hotel is a cafe. Stop by for shisha and sahlep before calling it a day.
Day 2
9:00 AM – Breakfast
If you can, try to find a place that has Katmer, a pistachio pastry. It’s really good but hard to find.
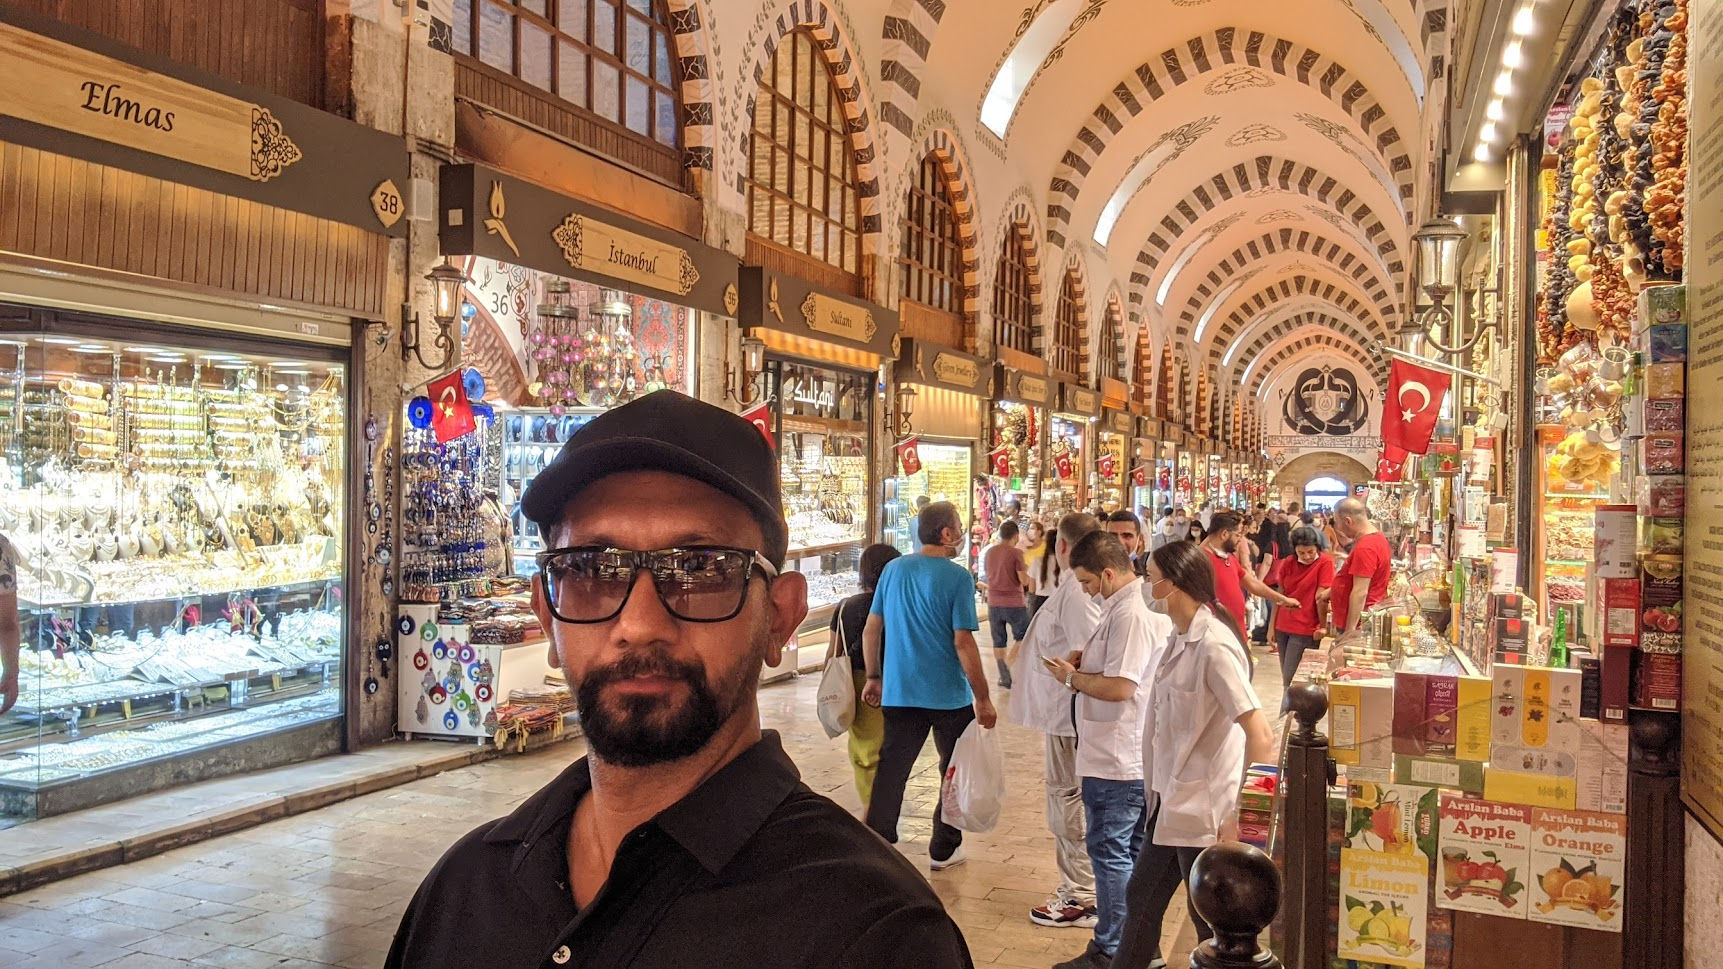
11:00 AM – Egyptian Spice Bazaar (Mısır Çarşısı)
Walk 10 minutes to the Egyptian Spice Bazaar. It’s a very photogenic place.
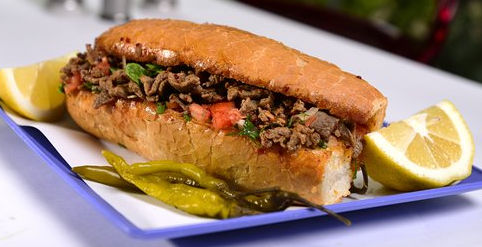
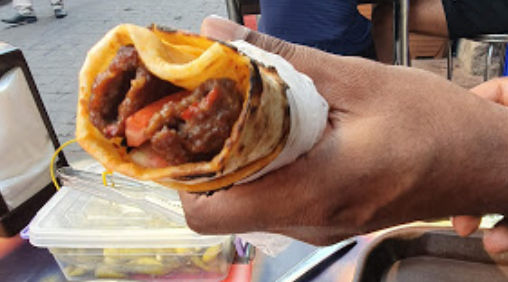
If you are still hungry, try Tantuni (chicken or beef sandwich or roll) located just outside the bazaar.
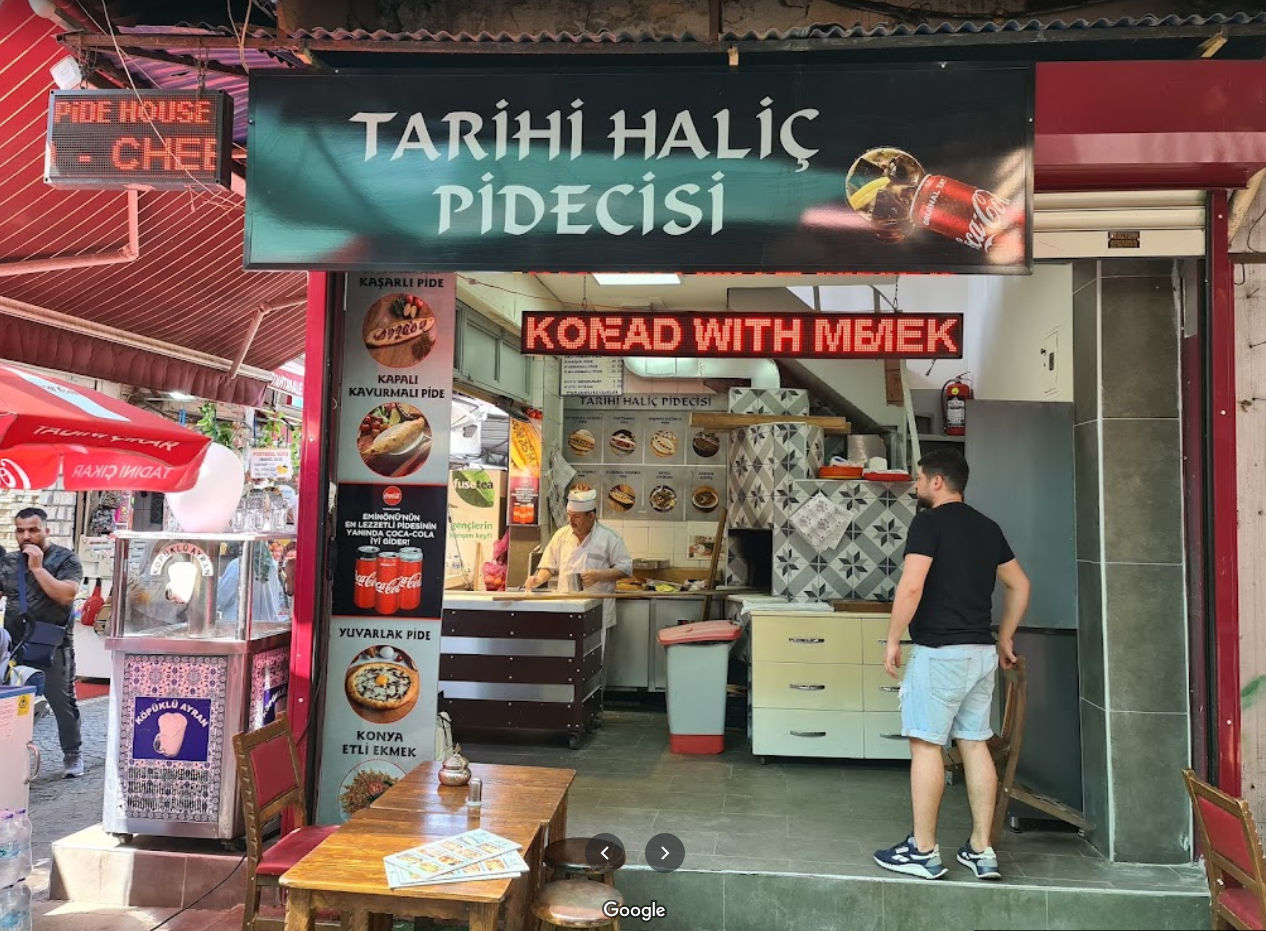
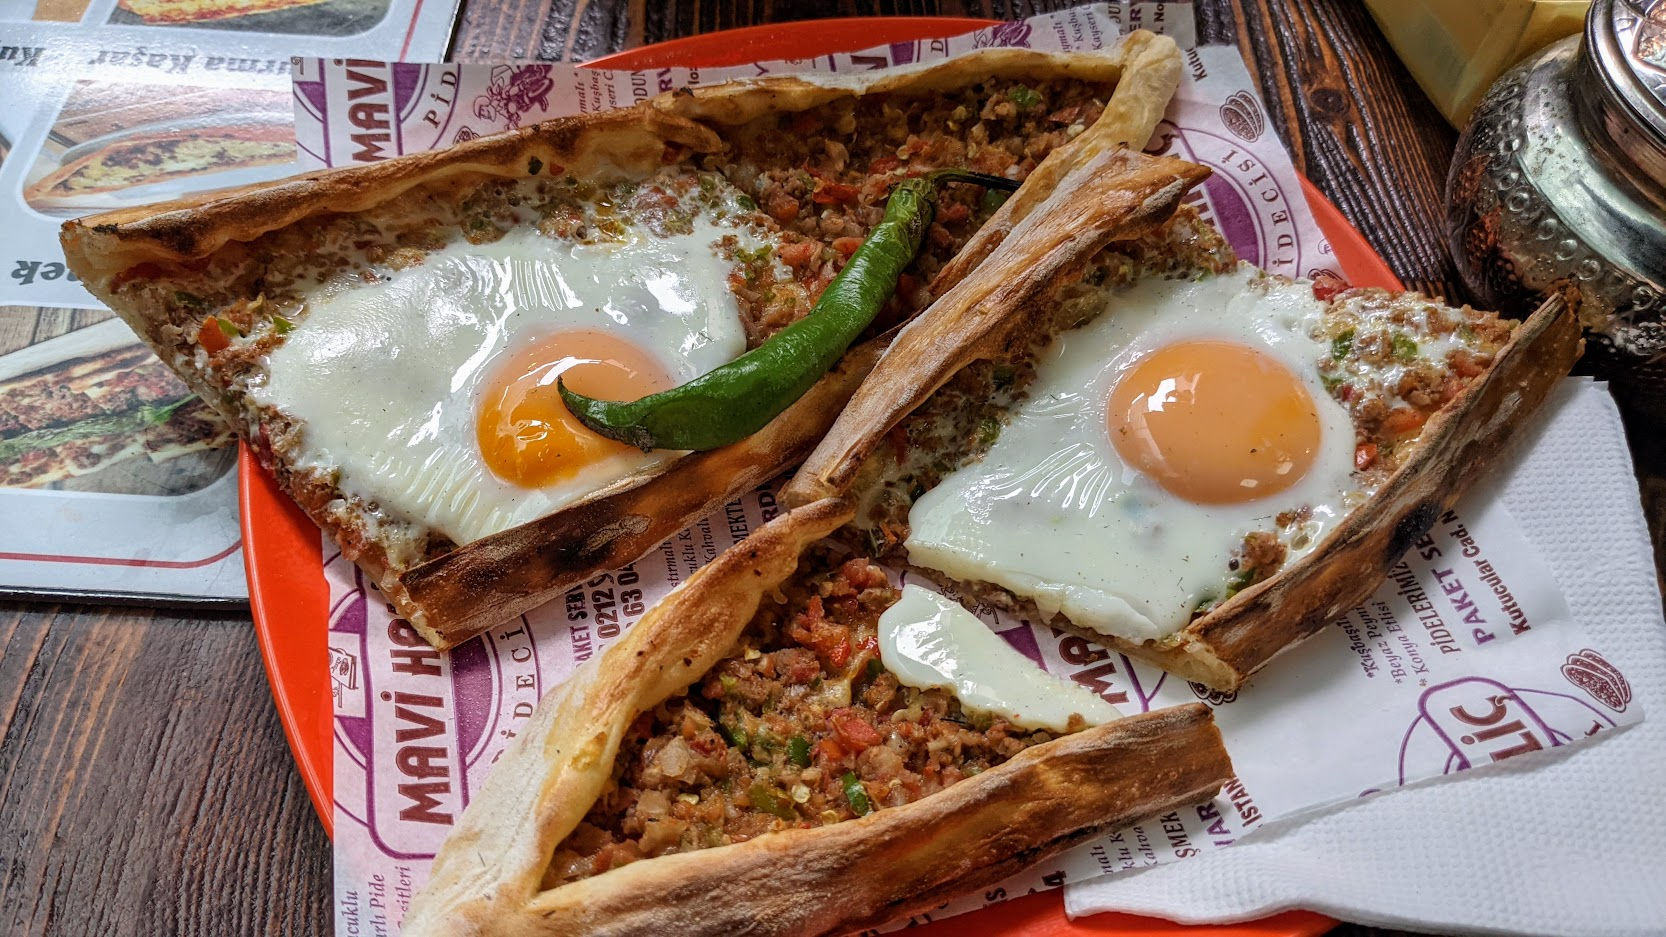
or, try Pide with eggs nearby.
Mavi Halic Pidecisi Sarıdemir, Kutucular Cd. No:28, 34134 Fatih/İstanbul, Turkey Open everyday: 8 AM to 6:30 PM Google Map Order kıymalı yumurtalı pide
Walk from the Egyptian Spice Bazaar to Mavi Halic Pidecisi
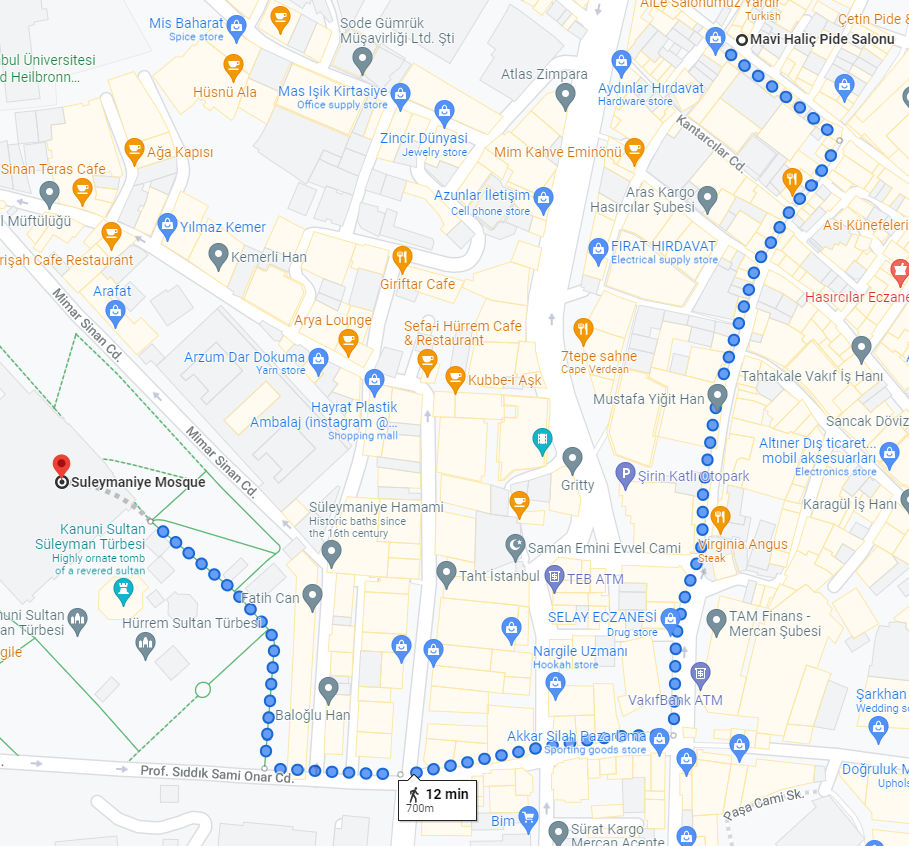
12:30 PM – Go to Sulemaniye Mosque
You can take a taxi, but traffic may be so bad that you’ll end up walking part of the way. If you walk from the Egyptian market to the Sulemaniye Mosque, you’ll be walking through an ancient market for part of the way, but you’ll also be walking uphill, which can be tiring.
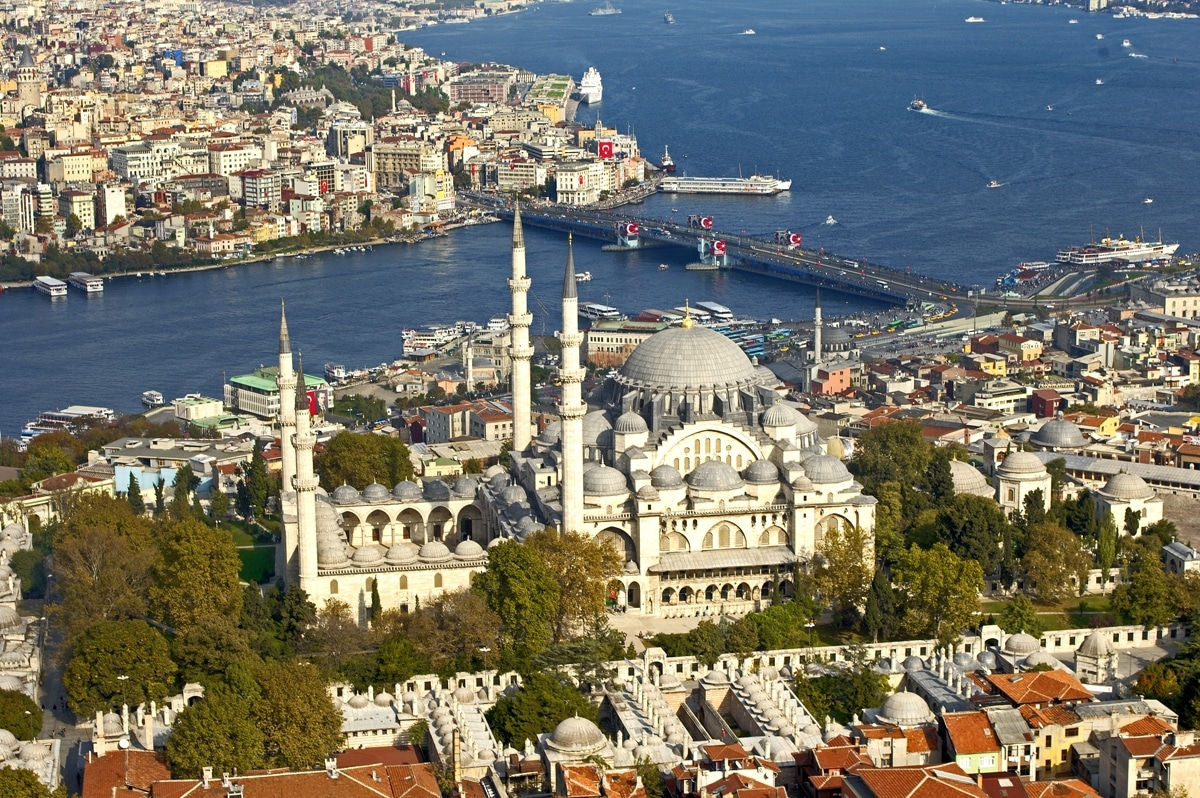
1:30 PM – Visit Sulemaniye Mosque
Check out this building, which was built in 1558.
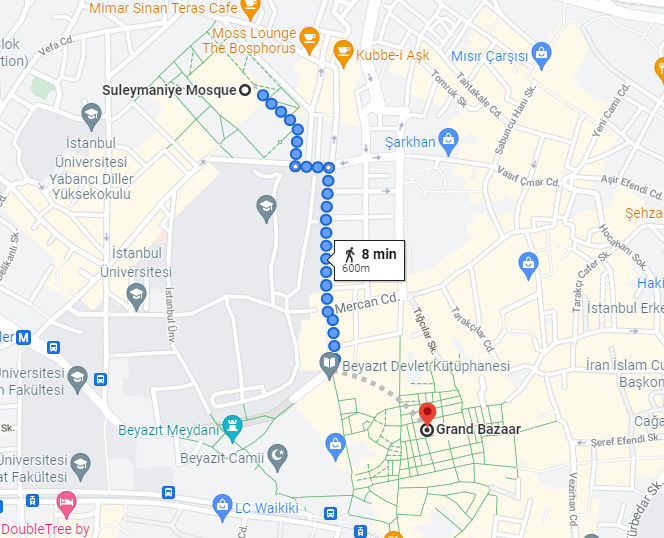
2:30 PM – Walk to the Grand Bazaar
From the Sulemaniye Mosque, you can easily walk to the Grand Bazaar as the walk is either on level ground or downhill. For half the way, you’ll be again walking through a VERY busy, ancient-looking market.
3:00 PM – The Grand Bazaar
Check out this labyrinth of colorful covered markets that was built in 1481.
Grand Bazaar Kapalı Çarşı Beyazıt, Kalpakçılar Cd. No:22, 34126 Fatih/İstanbul, Turkey https://www.kapalicarsi.com.tr/
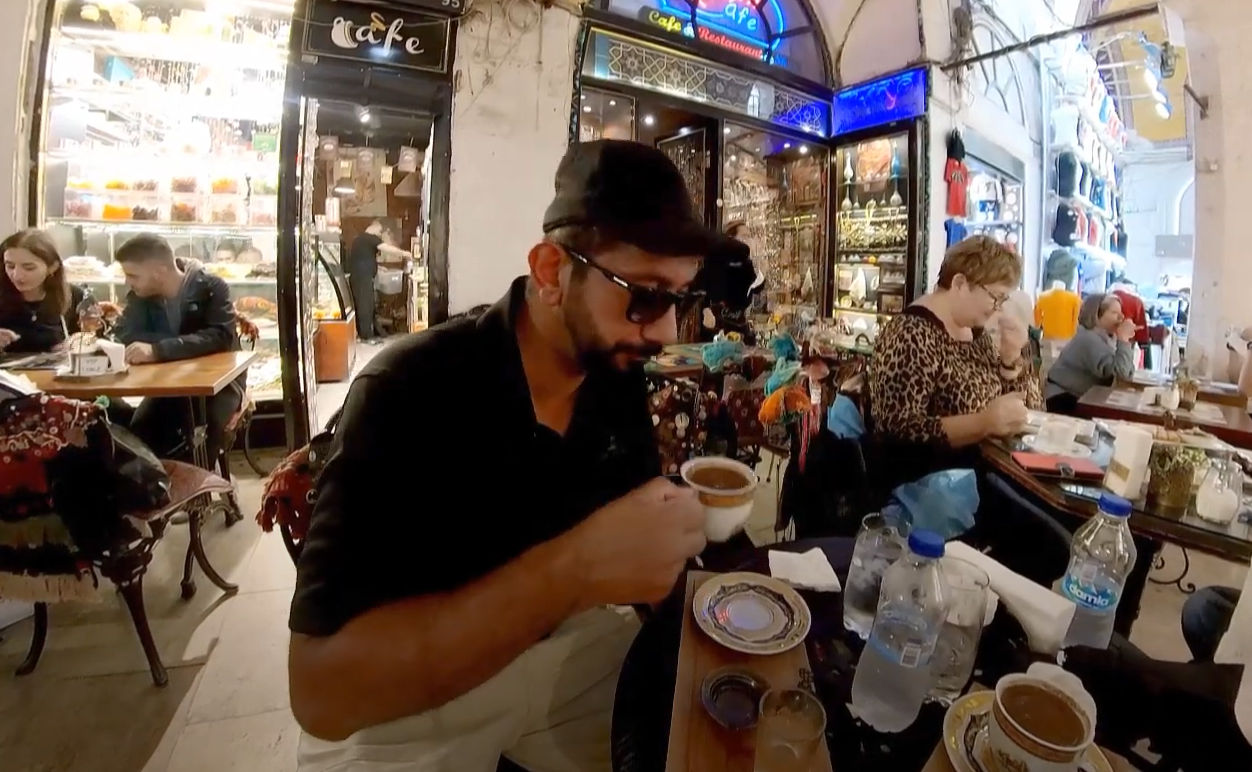
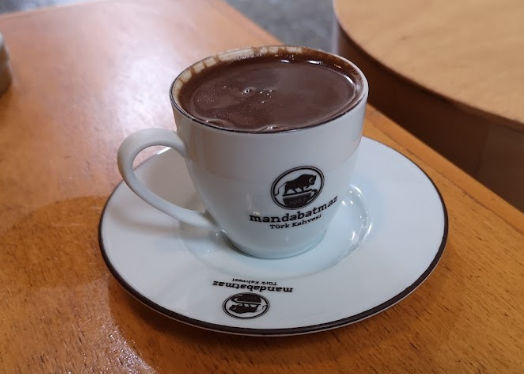
Since you’ll have walked a bit, take a break in the bazaar for some delicious Turkish coffee.
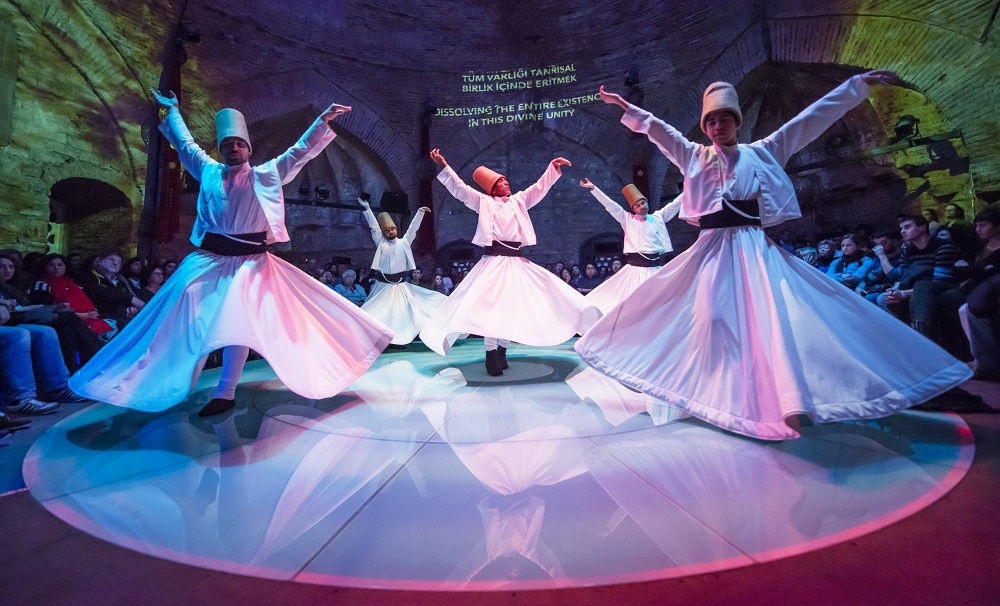
7:00 PM – Whirling Dervishes Show
The Hodjapasha Cultural Center is located near the Mercure Hotel (5-minute walk). If you’re curious, you can watch a whirling dervishes show where Sufi Muslims spin around without getting dizzy and falling.
Note: I watched this because I was curious, but I was also bored and fell asleep. Watch at your own risk.
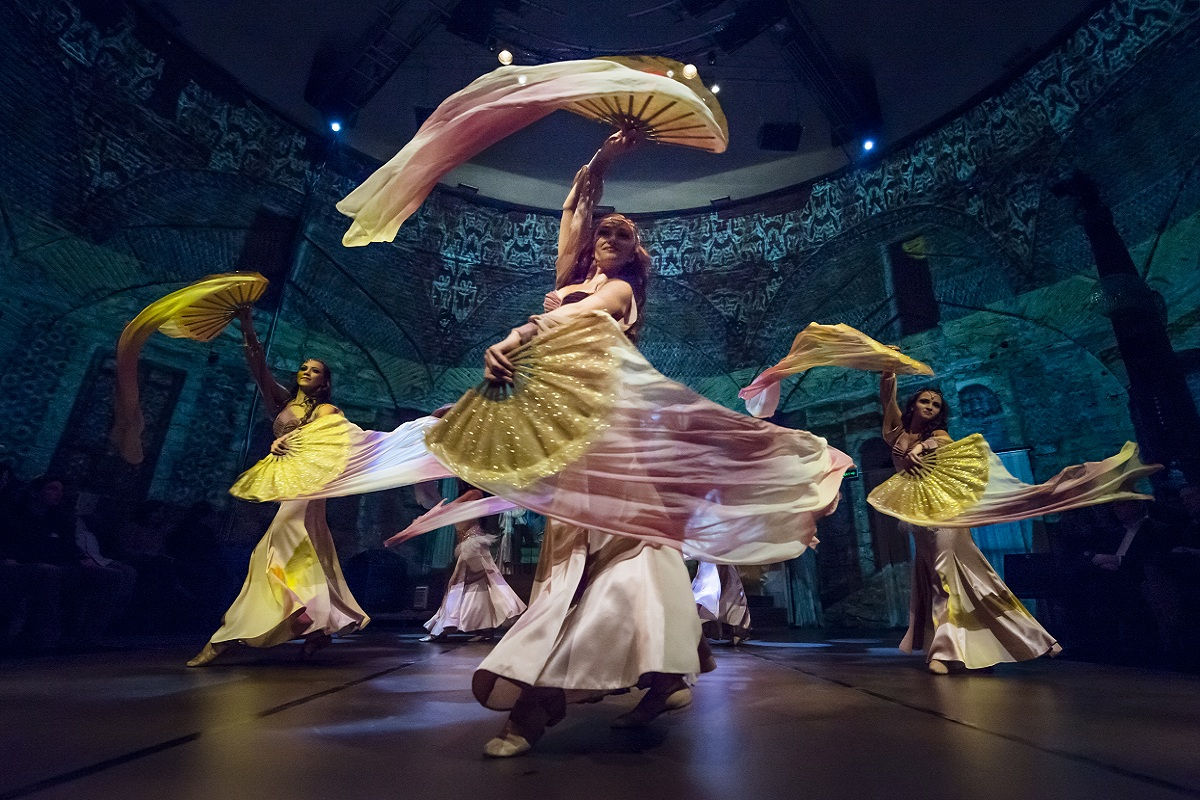
8:30 PM – Rhythm of the Dance Show
This show is also at the Hodjapasha Cultural Center. This show was very much worth watching. Highly recommend!
9:30 PM – Dinner
Since the recommended restaurants below are next door to the Hodjapasha Cultural Center, you can have dinner before or after the shows. One place that gets many good reviews and that I personally liked is
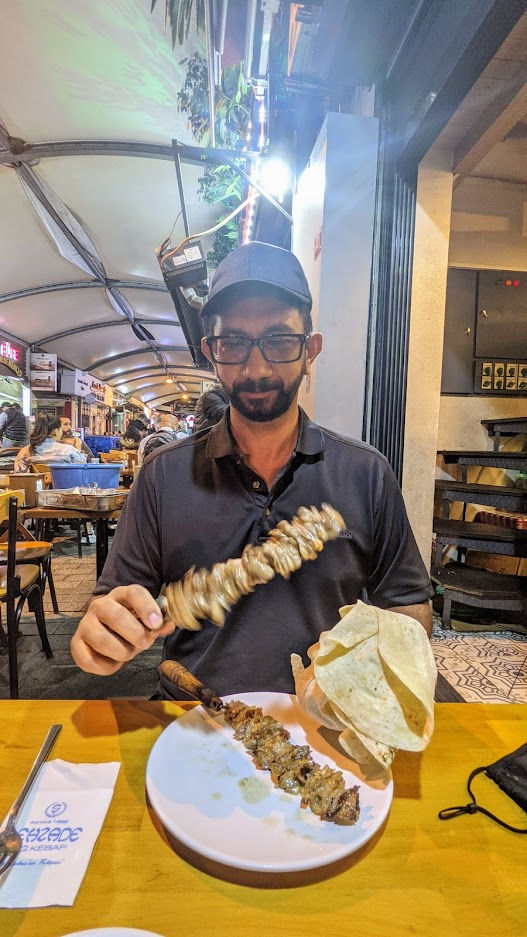
Şehzade Cağ Kebap Open every day 11AM–10PM except Sundays Hoca Paşa, Hoca Paşa Sk. No:6 D:4, 34110 Fatih/İstanbul, Turkey Google Map
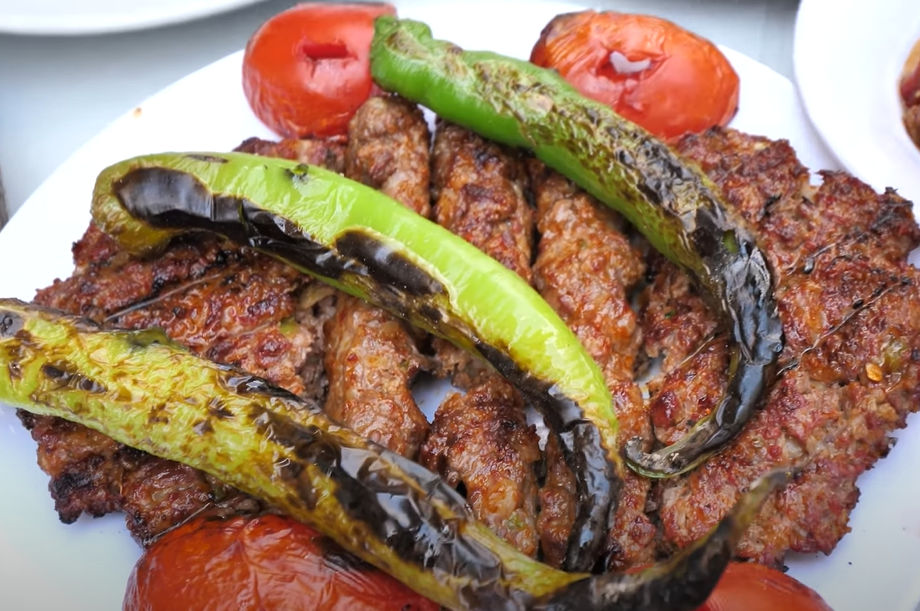
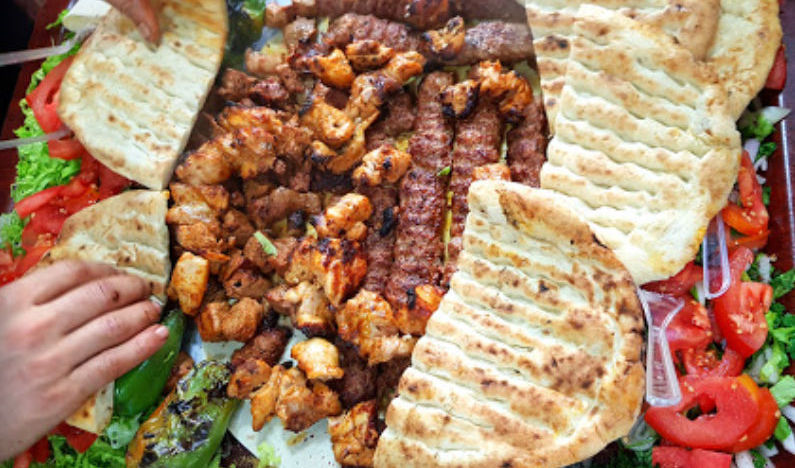
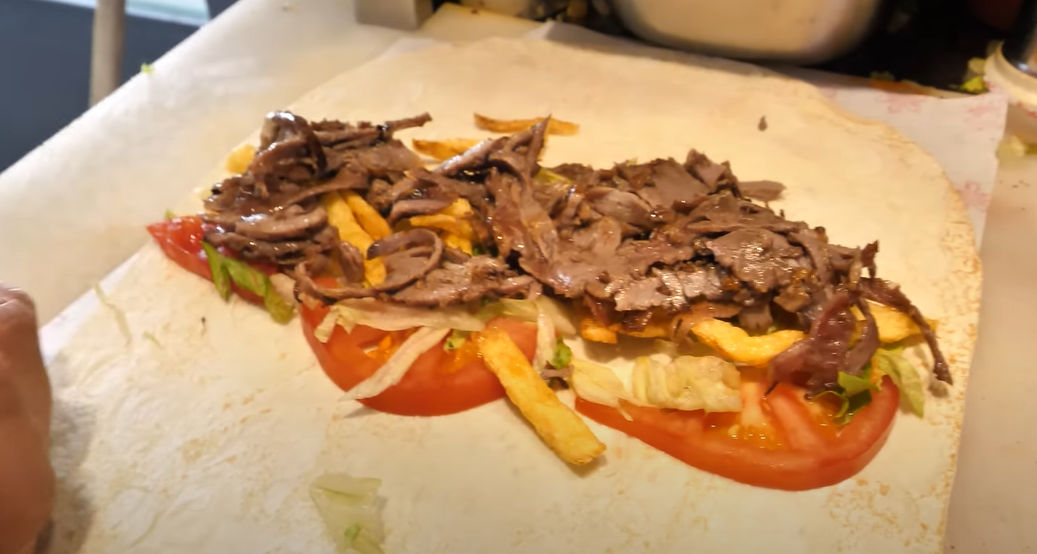
Though tasty, it’s not very filling. At $3.50, consider it an appetizer, then go next door to fill you up with something like Iskendar Kebap or mixed grill at
Kasap Osman Hoca Paşa, Hoca Paşa Sk. No:22, 34110, 34110 Fatih/İstanbul, Turkey Google Map
Iskendar Kebap
Day 3
9:00 AM – Breakfast
For a change, walk 4 minutes from the Mercure Hotel to this restaurant.
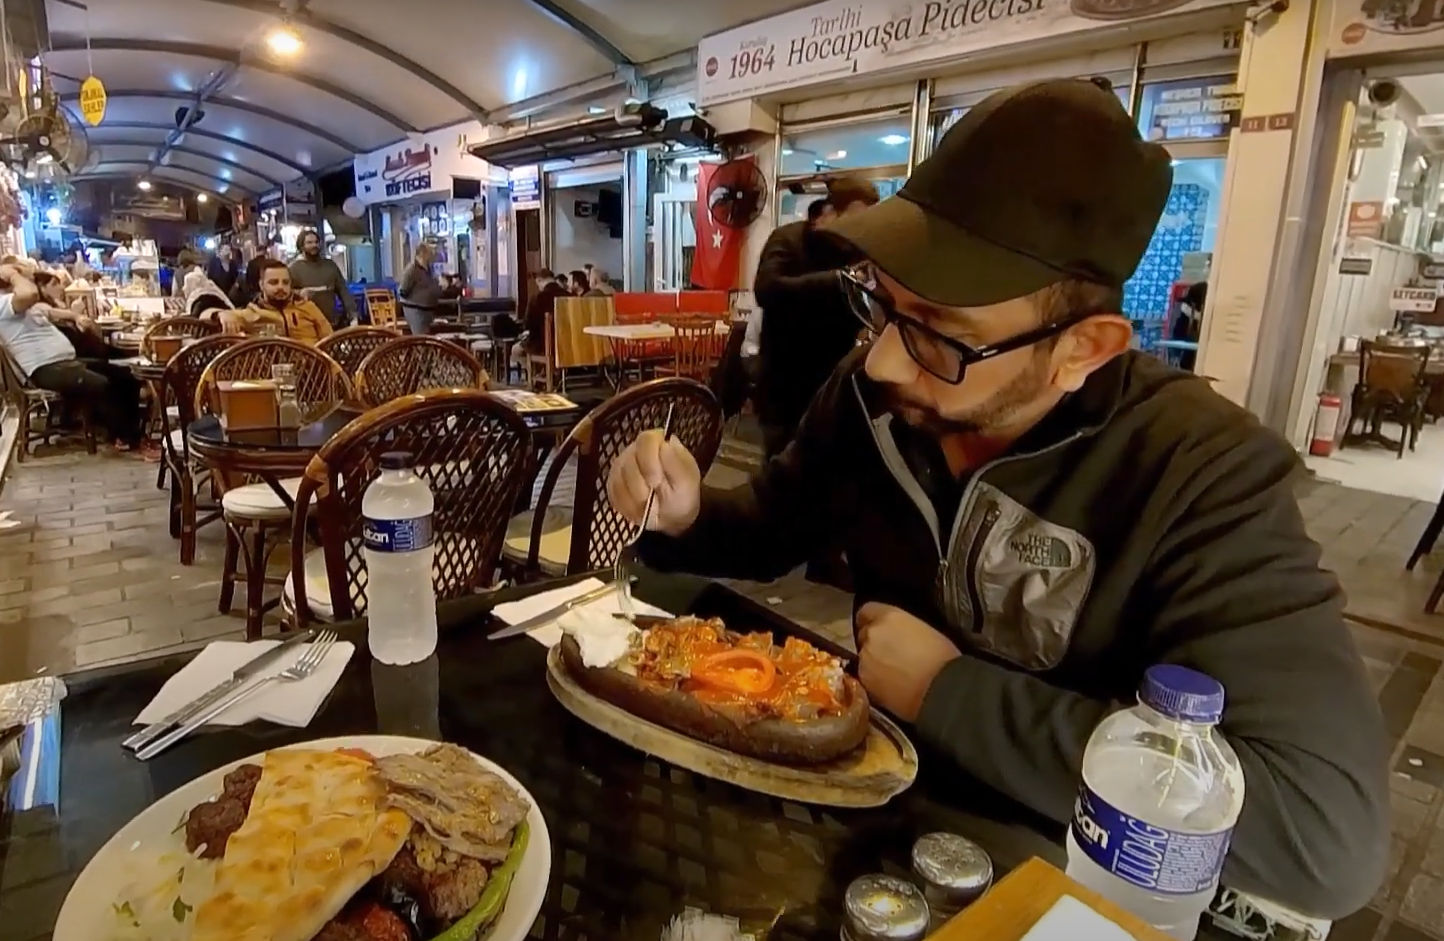
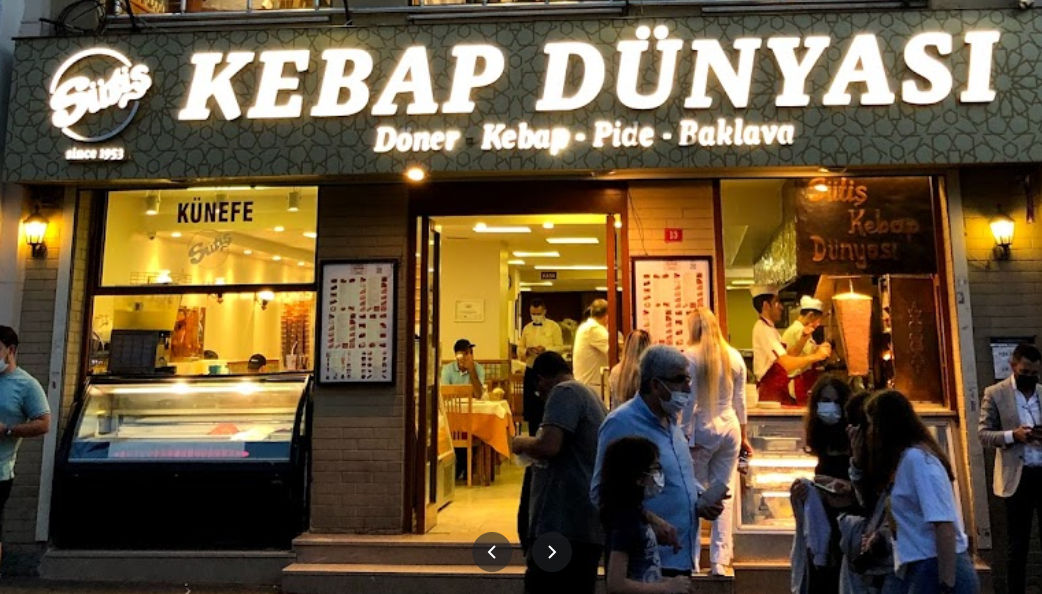
Near Taksim Square, on Istiklal Cadessi, have lunch at Sütiş Kebap Dünyası (Kabab World).
Note: Don’t eat too much because there’s another place nearby you have to try.
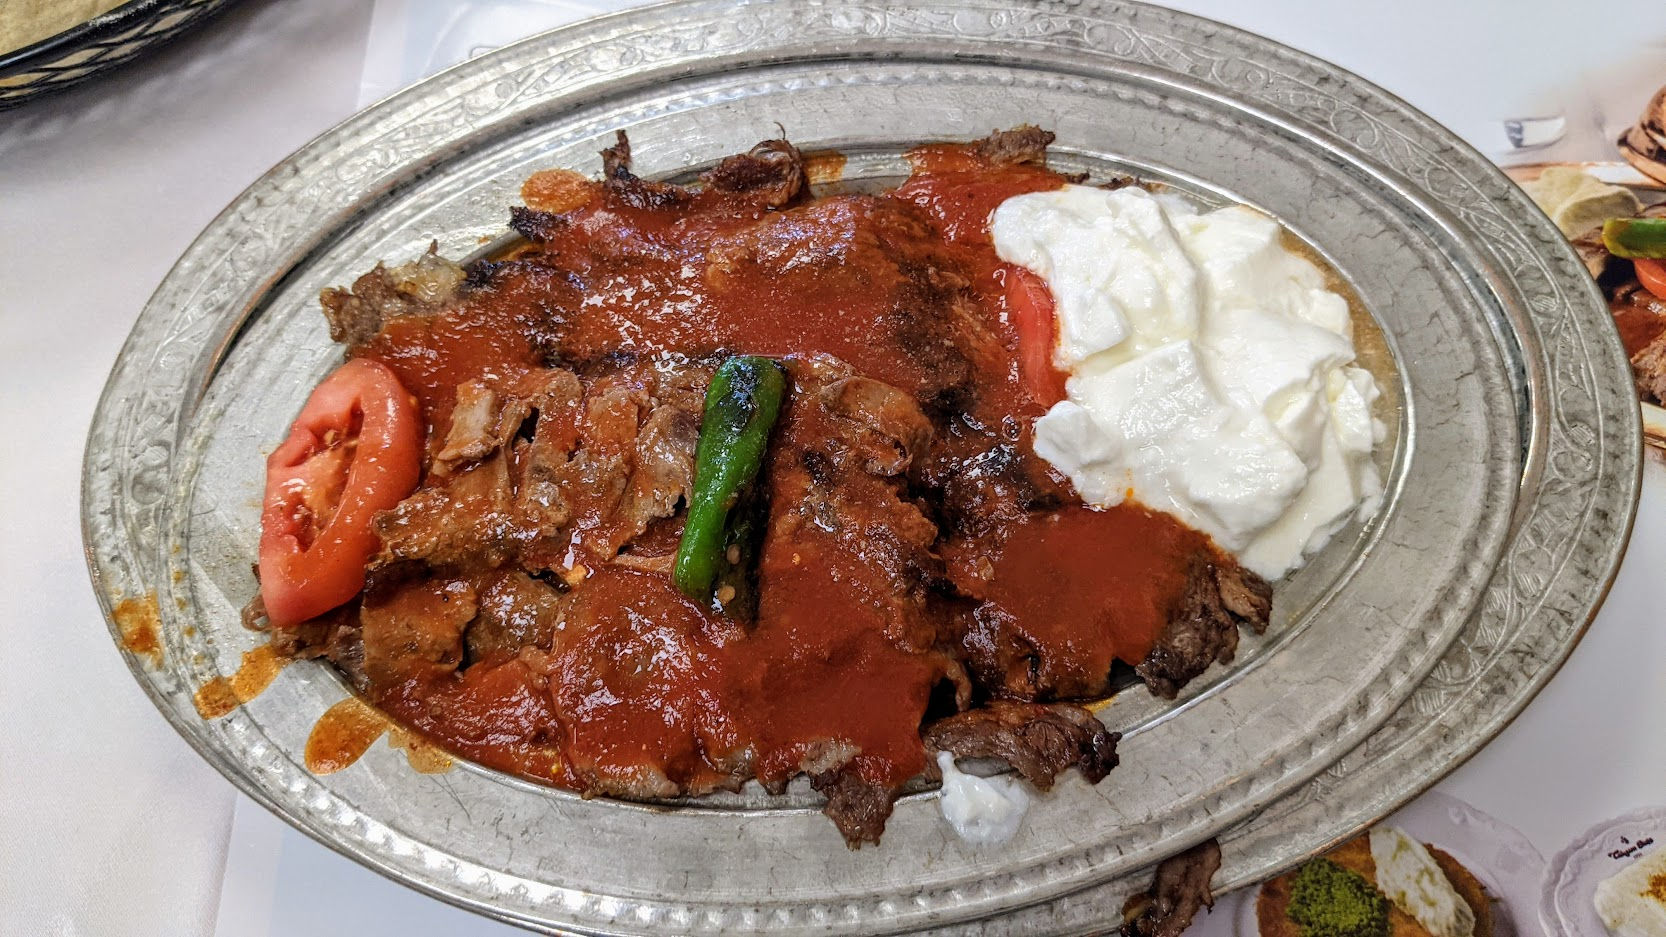
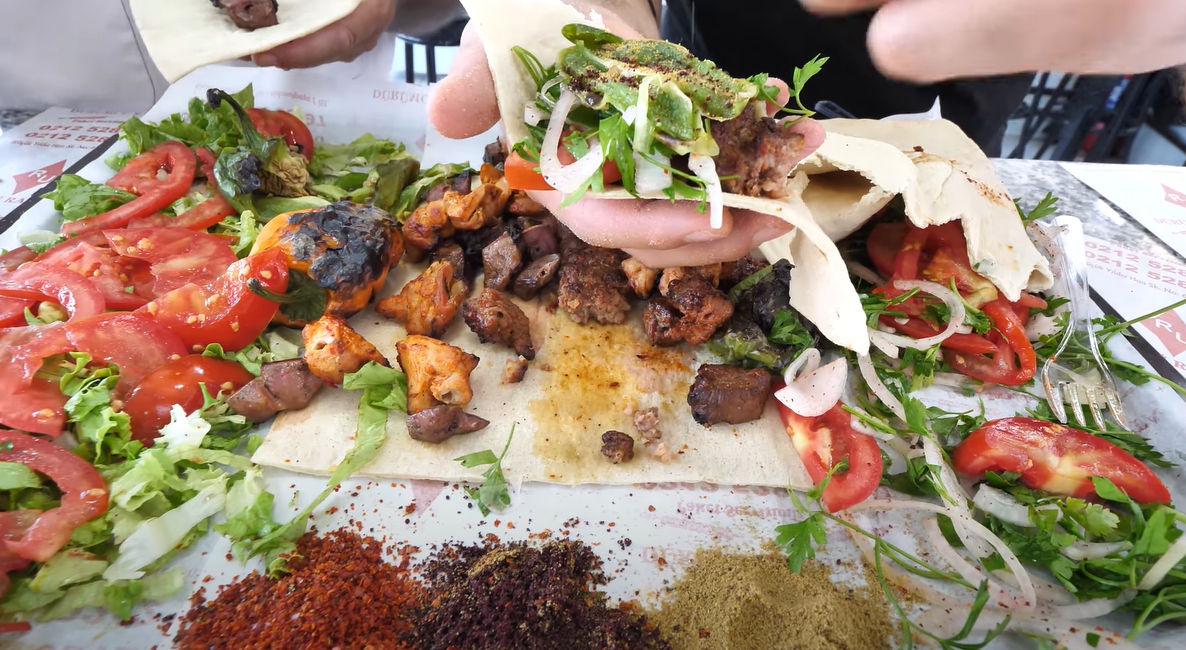
Sütiş Kebap Dünyası Katip Mustafa Çelebi, İstiklal Cd. No:13, 34433 Beyoğlu/İstanbul, Turkey Google Map
I had the Iskendar Kebap and Domatesli (Tomato) Kebap and both were extremely good.
Iskendar KebapDomatesli Kebap
2:00 PM – Walk Along Istiklal Cadessi
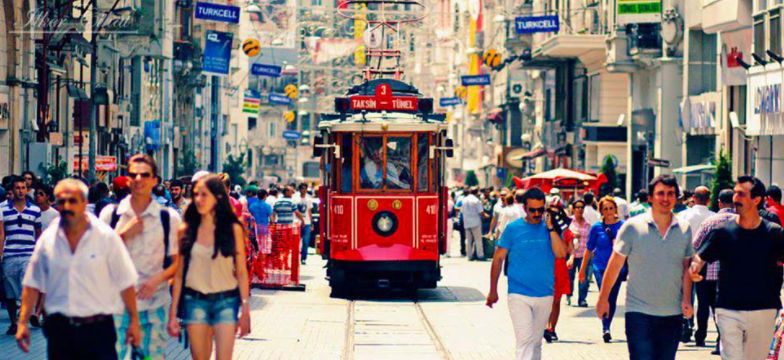
This street is closed to vehicles except for trams that run along its length.
2:15 PM – Lunch (Part 2)
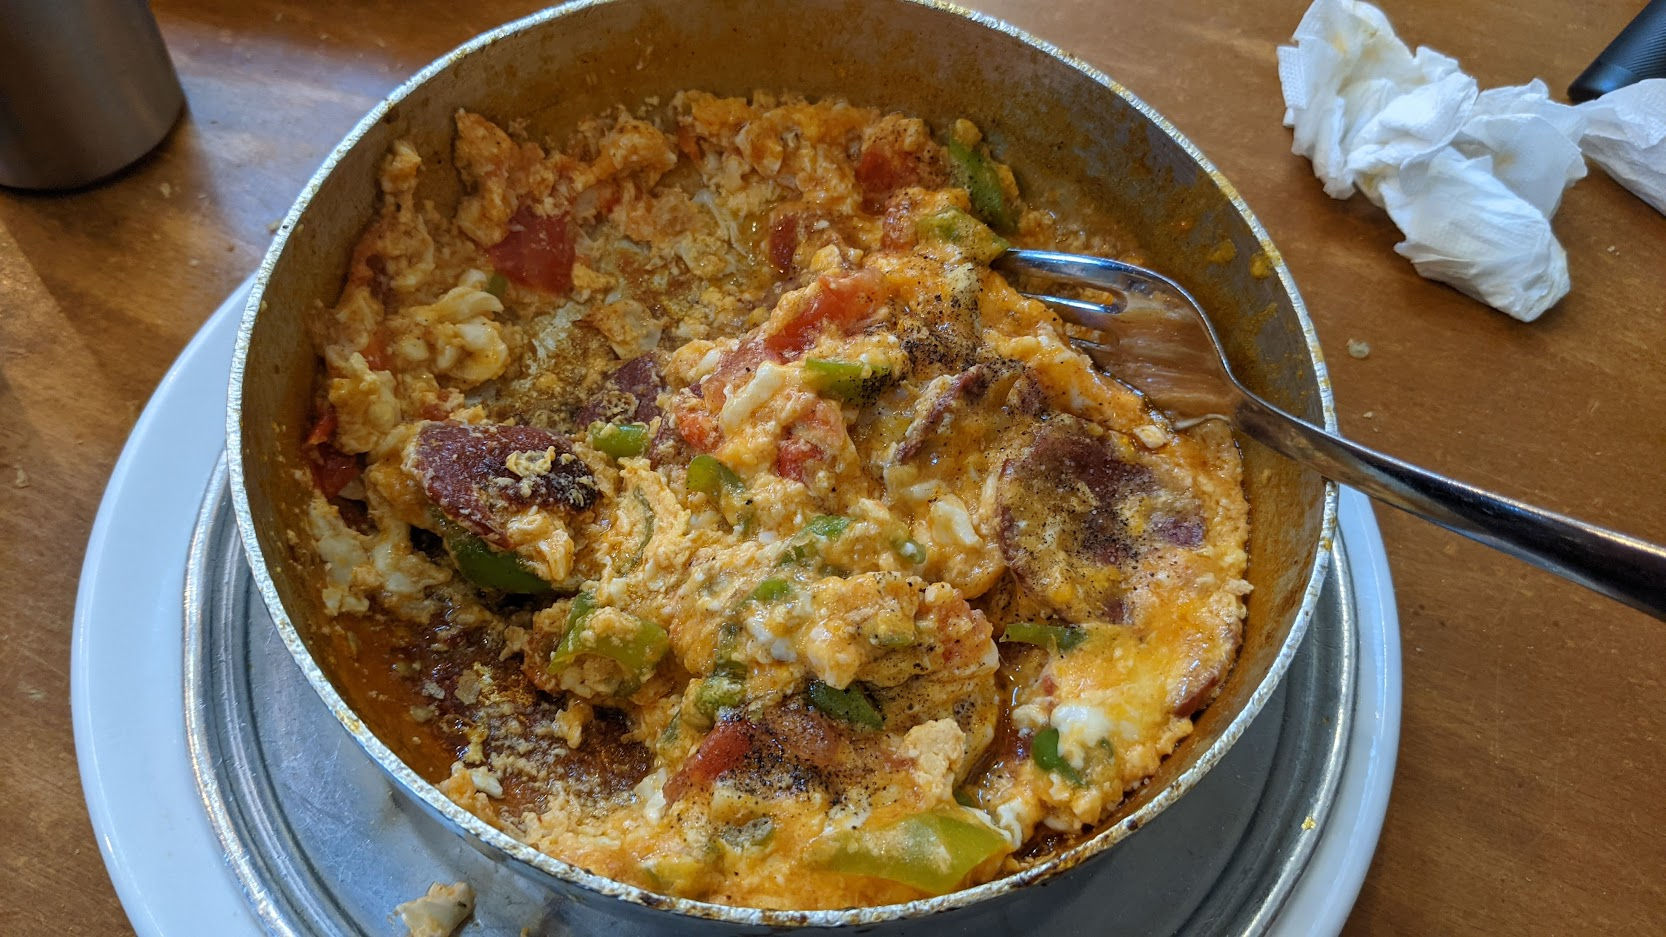
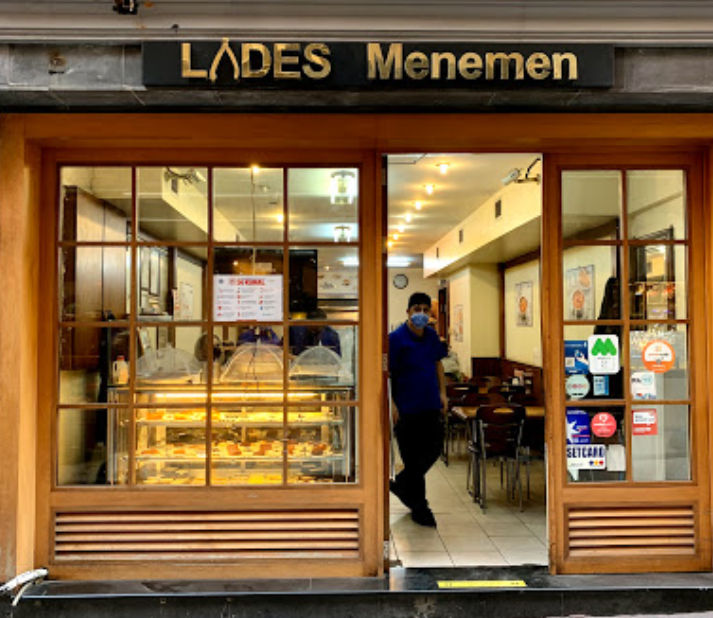
I know you just had lunch, but this second lunch is light if you eat it without the bread. The place is right off of Istiklal Cadessi.
Lades Menemen Katip Mustafa Çelebi, Mahallesi, Sadri Alışık Sk. 11/12 11/12 11 D:12, 34435 Beyoğlu/İstanbul, Turkey http://lades.com.tr/ Open everyday 7AM–11PM Google Map Order Menemen with Turkish Sausage or mixed Menemen
2:45 PM – (Turkish) Coffee Break
Continue walking along Istiklal Cadessi and stop by this cafe for some Turkish coffee.
Continue walking along Istiklal Cadessi until you reach the Galata Tower (built in 1348).
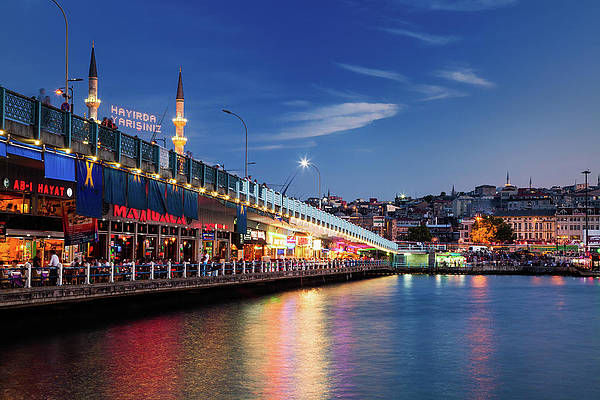
5:00 PM – Galata Bridge
Continue walking along the main path until you get to the Galata Bridge. Walk across the bridge to the other side.
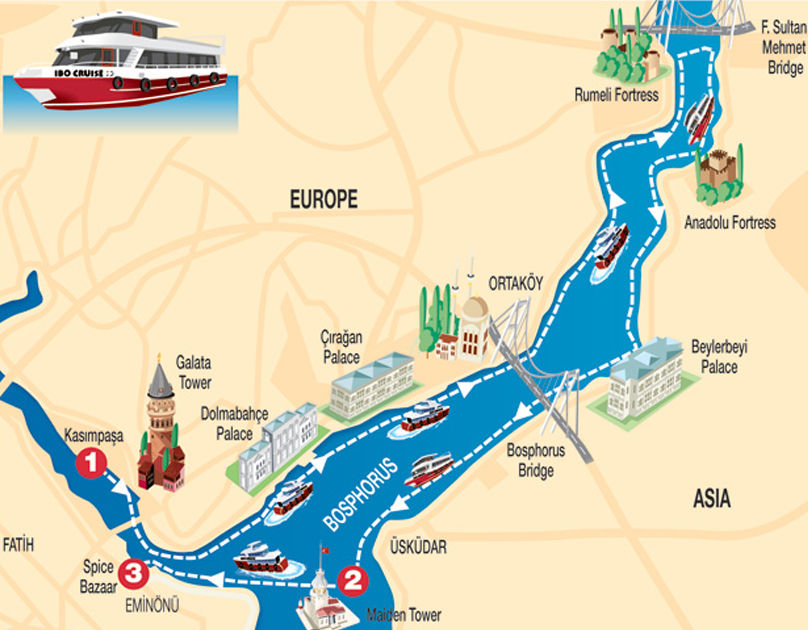
6:00 PM – Bosphorus Tour
Near the government ferry terminal you’ll see a Bosphorus Tour boat. Pay 25 Turkish Lira for the 90-minute tour. Boats leave every hour on the hour.
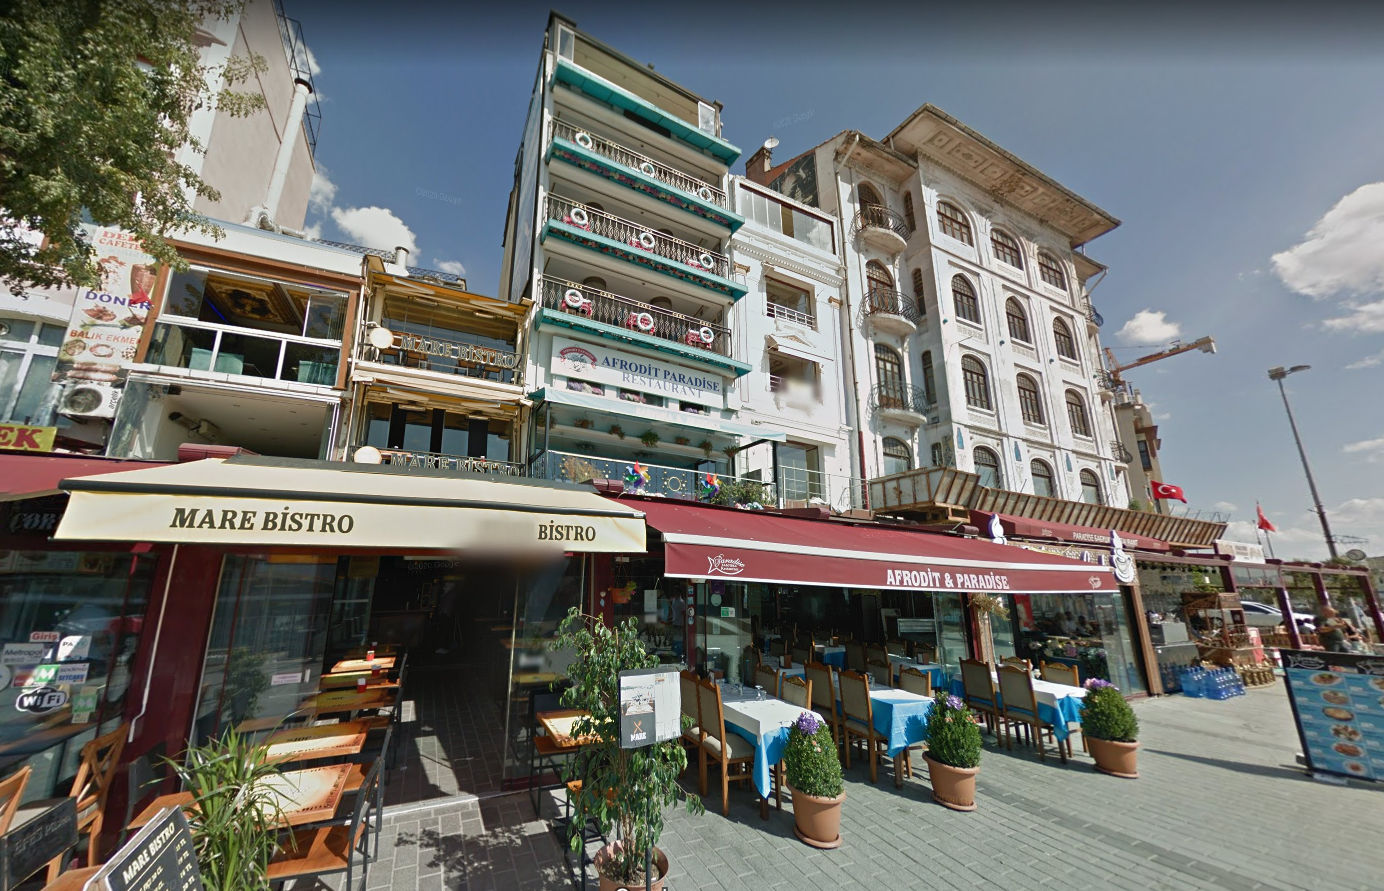
8:00 PM – Dinner
Walk across the Galata bridge then to the right where you’ll see a bunch of waterfront restaurants. Pick one where you can dine on the top floor with a nice view, e.g.
Paradise Restaurant Karaköy Kemankeş Karamustafa Paşa, Rıhtım Cd. 25/A, 34425 Karaköy Beyoğlu/Beyoğlu/İstanbul, Turkey Google Map
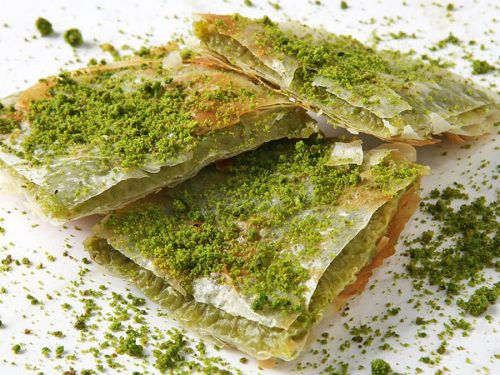
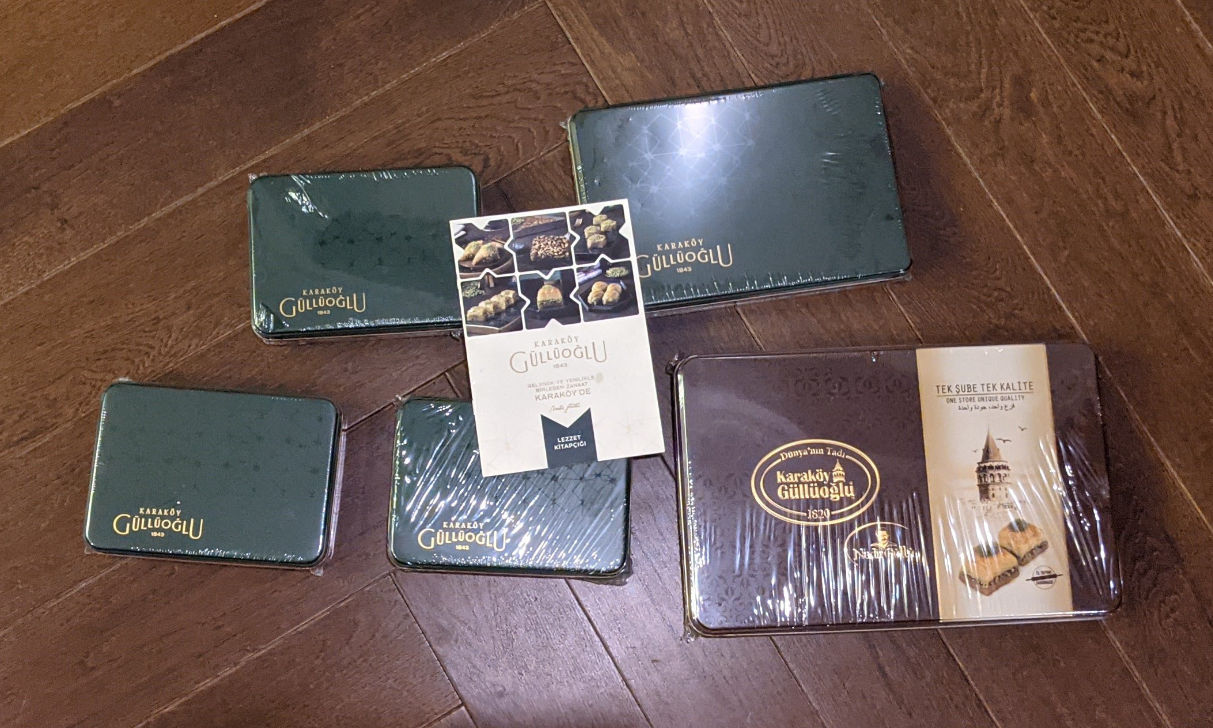
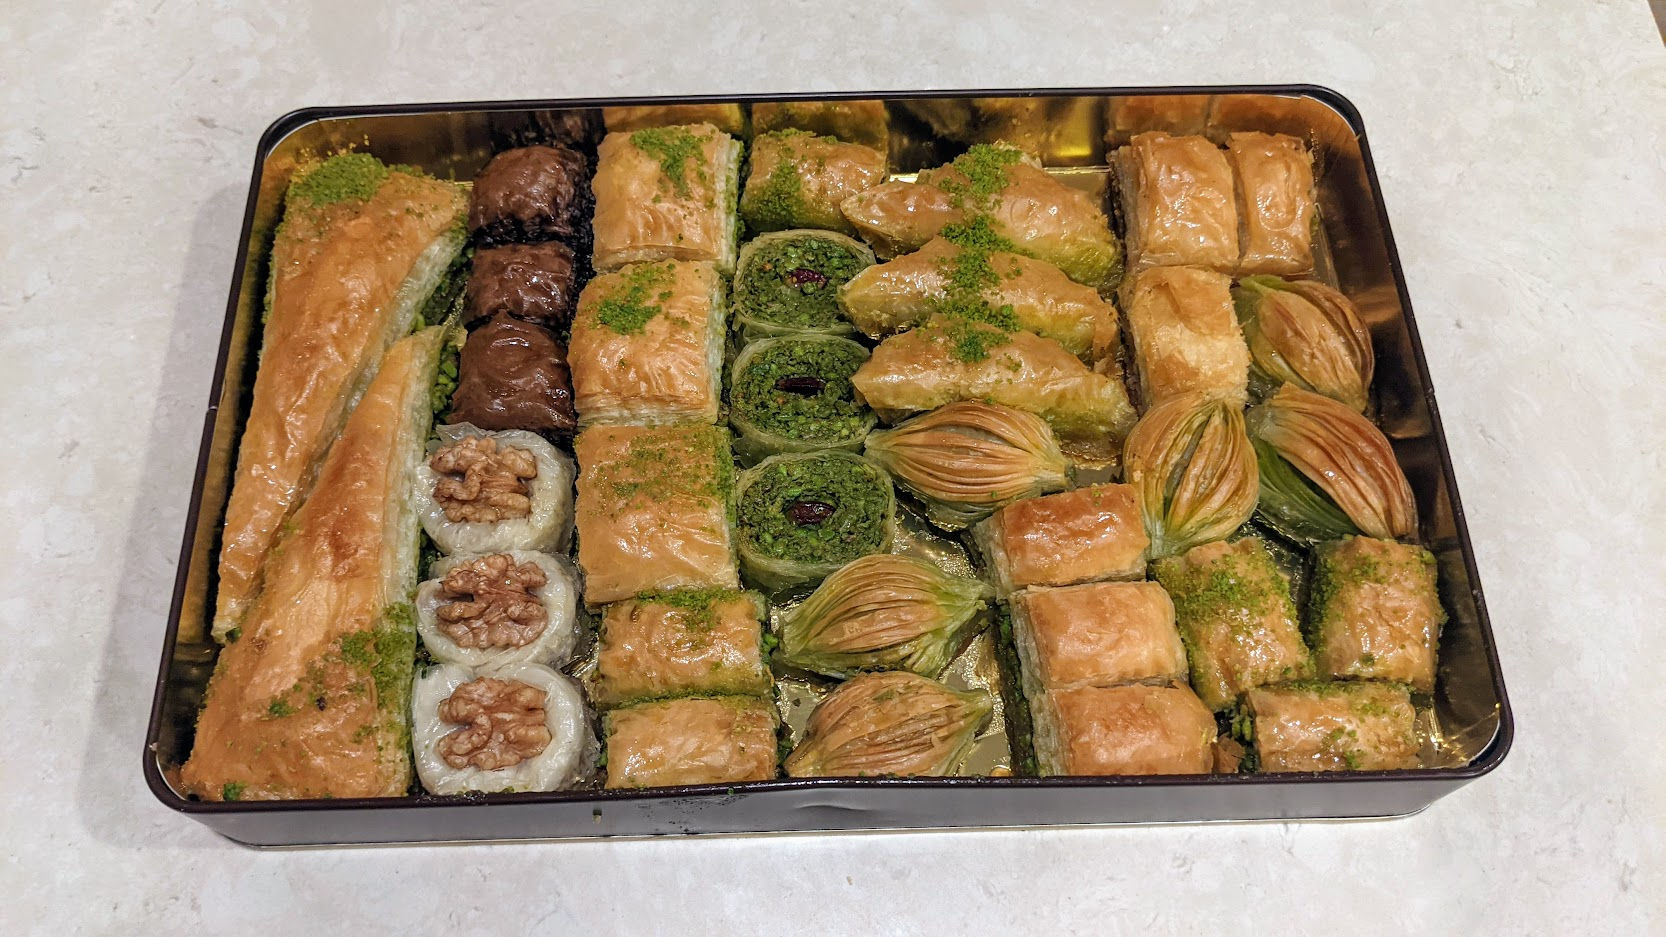
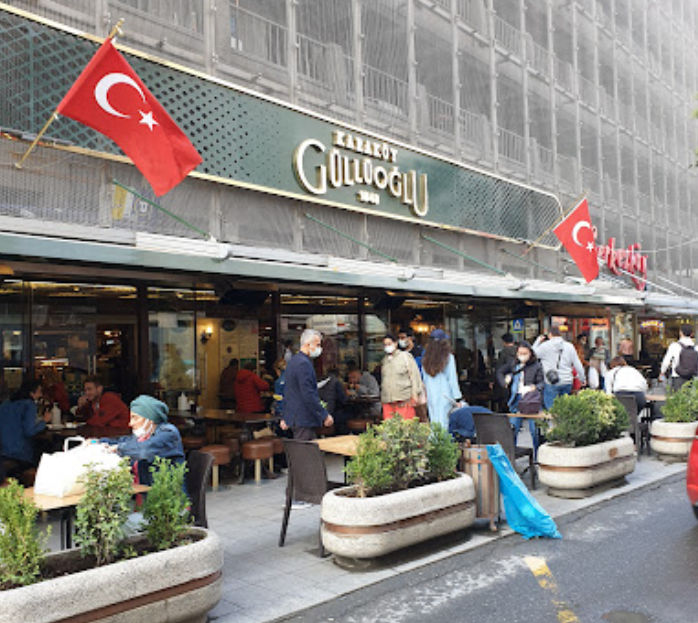
9:30 PM – Baklava
Continue walking a short distance to
Karaköy Güllüoğlu Kemankeş Cad. Katlı Otopark Altı No: 3-4, 34425 Beyoğlu, Turkey Open every day from 7 AM to 1 AM Google Map
Have some baklava and Turkish tea. Then, buy a lot of baklava to bring home.
More Food
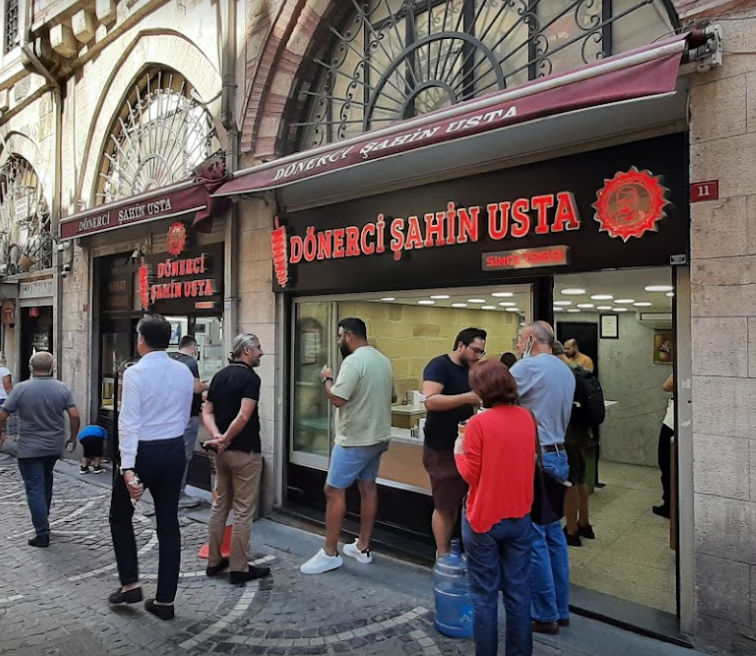
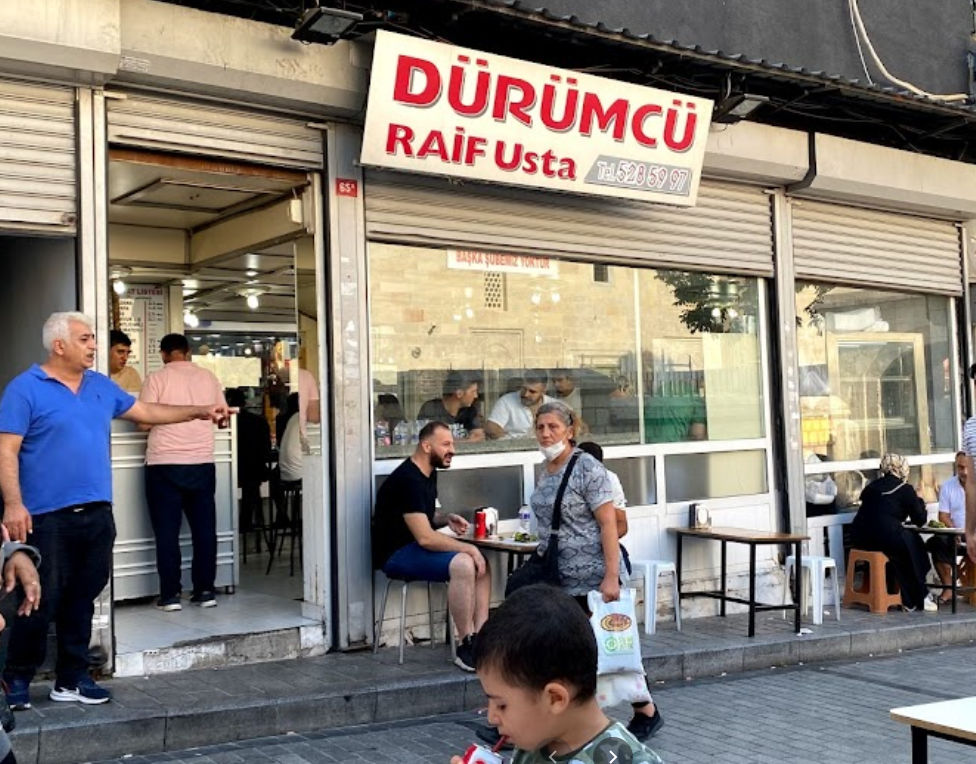
If you have time, here is some more food to try.
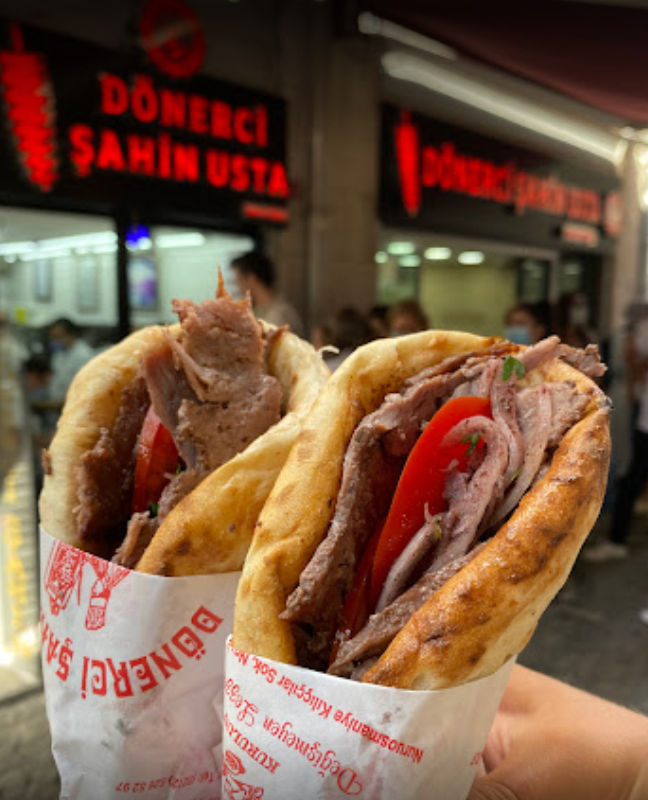
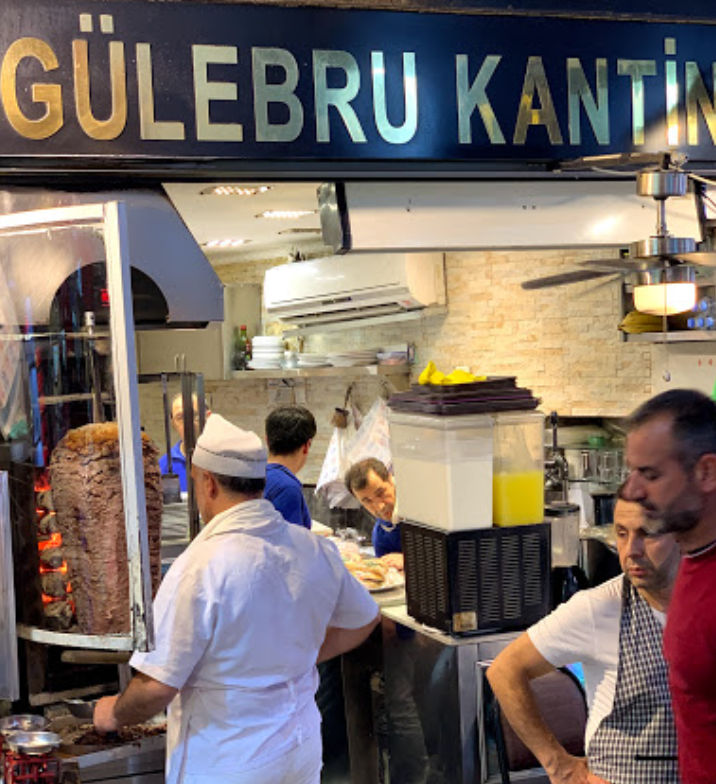
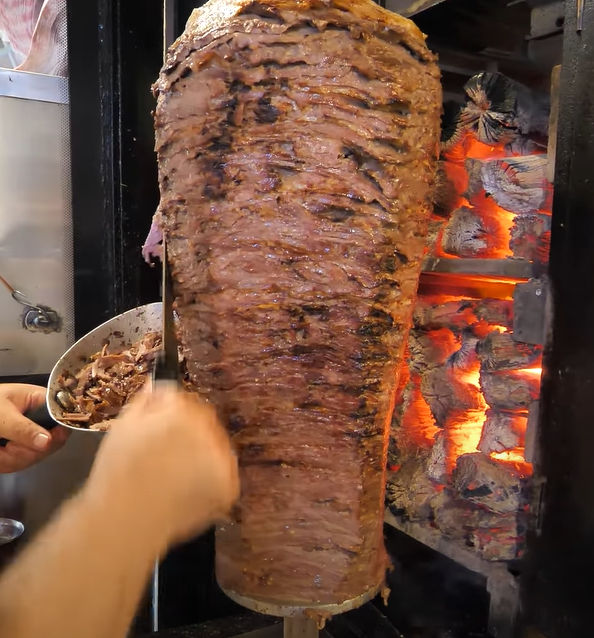
Dönerci Şahin Usta Mollafenari, Kılıçcılar Sk. No:5, 34120 Fatih/İstanbul, Turkey Open everyday 11 am to 5 pm except Sundays Google Map
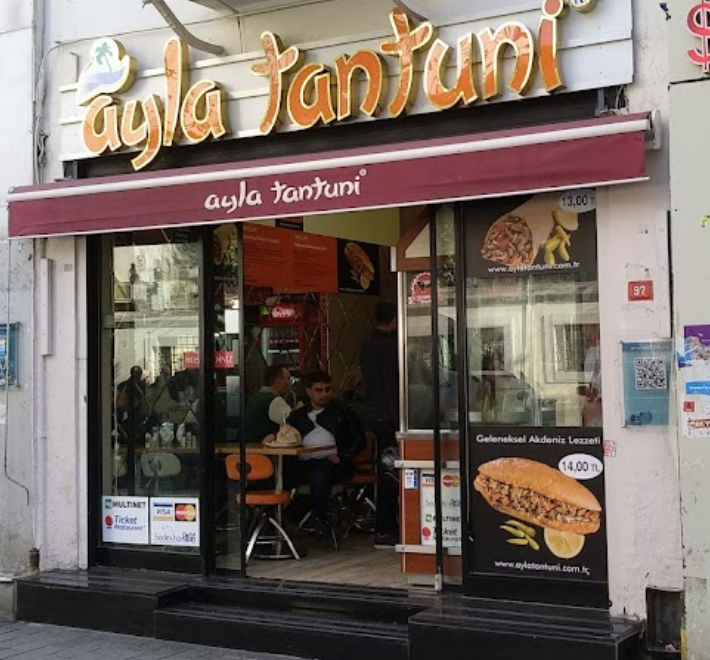
Ayla Tantuni Asmalımescit Tomtom, İstiklal Cd., 34433 Beyoğlu/İstanbul, Turkey Open everyday 24 hours Google Map
Dürümzade Hüseyinağa, Kamer Hatun Cd. 26/A, 34435 Beyoğlu/İstanbul, Turkey Open everyday 10AM–1AM Google Map
Van Kahvaltı Evi Kılıçali Paşa, Defterdar Ykş. 52/A, 34425 Beyoğlu/İstanbul, Turkey Open everyday: 8 AM to 5 PM Google Map Order Gozleme
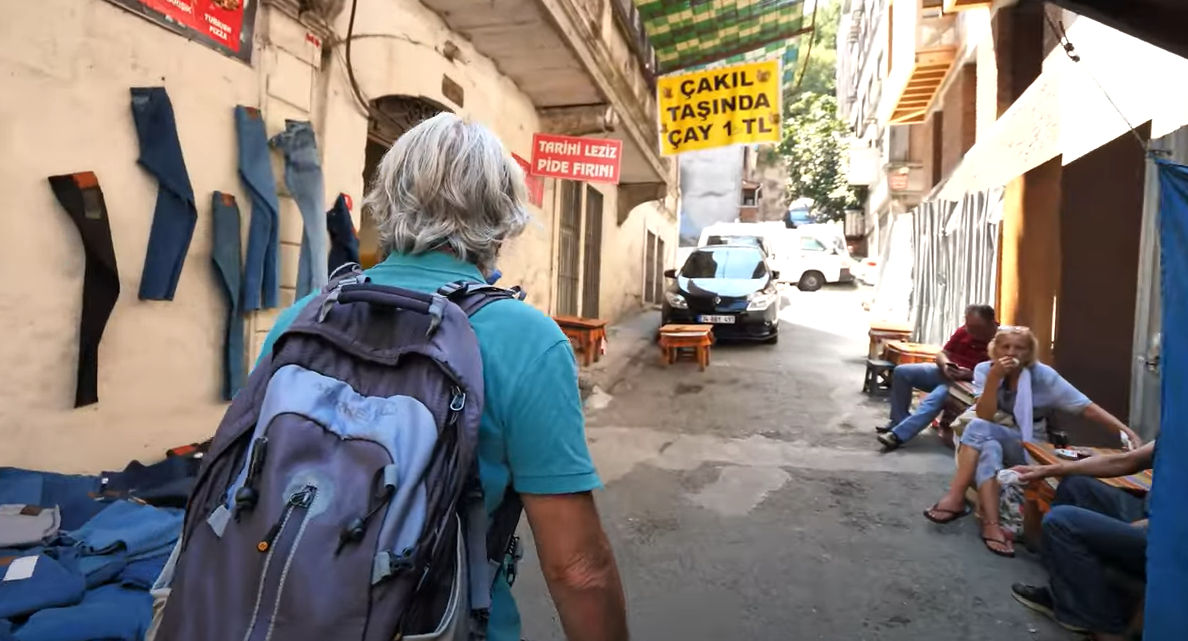
Tarihi Leziz Pide Fırını Demirtaş Mahallesi, Kuvel Oğlu Han, Kıble Çeşme Caddesi, Fatih, İstanbul (Near Sulaimaniye Mosque) Instagram M-F: 10 AM – 7 PM Sat, Sun: Closed Google Map Order Pide
Karadeniz Döner Asım Usta Sinanpaşa, Mumcu Bakkal Sokağı No:6, 34353 Beşiktaş/İstanbul, Turkey Google Map Open everyday 10:30 AM to 6 PM except Sundays Order Doner kabab