One of the food options I like the most at Chipotle is their beef barbacoa. Chipotle doesn’t tell you their recipe, but they do tell you the ingredients. Here’s a beef barbacoa recipe that tastes almost as good as the one at Chipotle and is super easy to make.
This recipe involves using a slow cooker.
Ingredients
3 lb Beef brisket or chuck roast (trimmed and cut into 2-inch chunks. Remove most of the fat.)
1 cup Beef broth (or chicken broth)
2 medium Goya Foods Chipotle Peppers in Adobo Sauce (including the sauce, about 4 tsp)
5 cloves Garlic (minced)
1 tbsp Dried oregano
2 tsp Cumin
1 tsp Sea salt
1 tsp Black pepper
2 whole Bay leaf
1/2 tsp Ground cloves
2 tbsp Apple cider vinegar (optional)
2 tbsp Lime juice (optional)
Instructions
Combine the broth, chipotle chiles in adobo sauce, garlic, apple cider vinegar, lime juice, dried oregano, cumin, sea salt, black pepper, and ground cloves in a blender (everything except the beef and bay leaves). Puree until smooth.
Place the beef chunks in the slow cooker. Pour the pureed mixture from the blender on top. Add the (whole) bay leaves.
Cook for 4-6 hours on high or 8-10 hours on low, until the beef is fall-apart tender.
Remove the bay leaves. Shred the meat using two forks and stir into the juices. Cover and rest for 5-10 minutes to allow the beef to absorb even more flavor. Use a slotted spoon to serve.
Beef chuck short ribs at Costco – $15.99 / lbBeef chuck steak boneless carne asada at Costco – $7.49 / lbBeef barbacoa over riced cauliflower
Svelte is similar to React and Vue, but instead of doing most of the work in the browser, Svelte does it in a compile step. Also, Svelte doesn’t do virtual DOM diffing or require HTML/CSS within JavaScript. Here’s a video showing code to create a simple to-do list app using 10 different JavaScript frameworks. Personally, I find the Svelte code to be the simplest and most elegant.
UPDATE: You can quickly set up preconfigured web stacks using Amazon Lightsail.
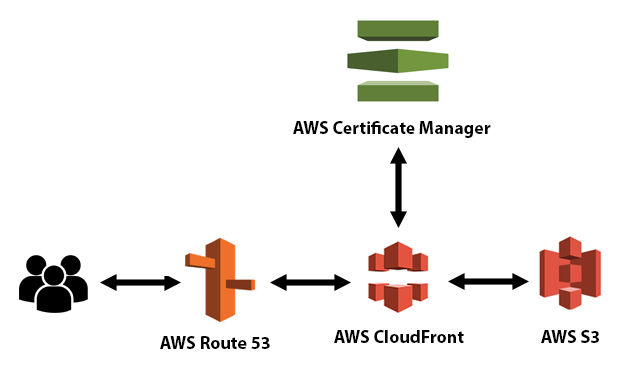
This tutorial will show you how to host a website on Amazon S3, Amazon CloudFront, and Amazon Route 53 using SSL and a custom domain.
Amazon S3 Amazon S3 is an object storage service. Files are objects.
Amazon CloudFront Amazon CloudFront is a content delivery network (CDN) service.
Amazon Route 53 Amazon Route 53 is a Domain Name System (DNS) web service. Route 53 connects user requests to internet applications running on AWS or on-premises.
AWS Certificate Manager AWS Certificate Manager (ACM) is used to provision, manage, and deploy public and private SSL/TLS certificates for use with AWS services and your internal connected resources. ACM removes the time-consuming manual process of purchasing, uploading, and renewing SSL/TLS certificates.
Create an S3 bucket
Go to your AWS console and search for S3. Click it.
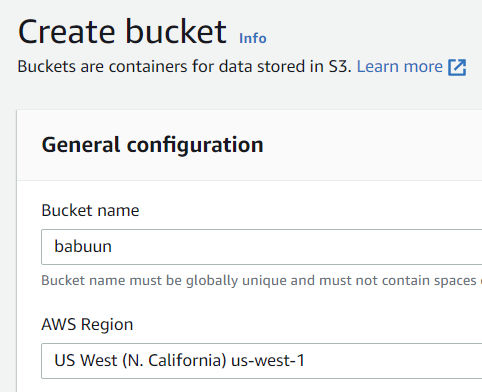
Click ‘Create Bucket’. Choose a globally unique bucket name and AWS region.
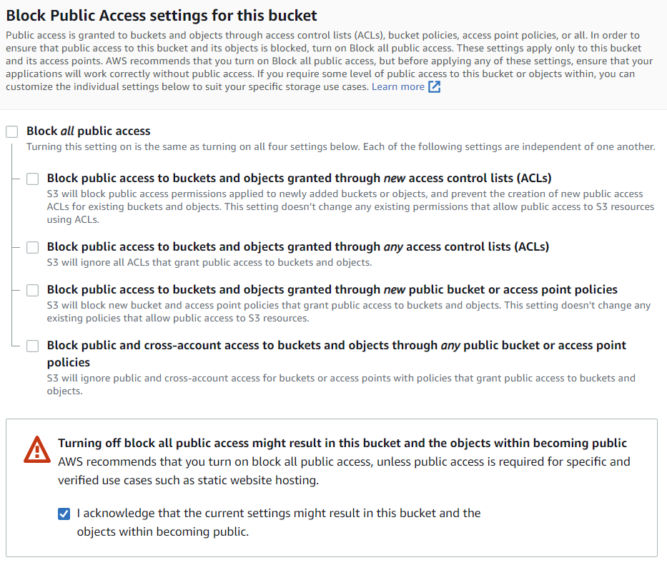
Untick “Block all public access” and confirm it, since we want our static website accessible from the internet.
Leave everything else as is and click ‘Create bucket’.
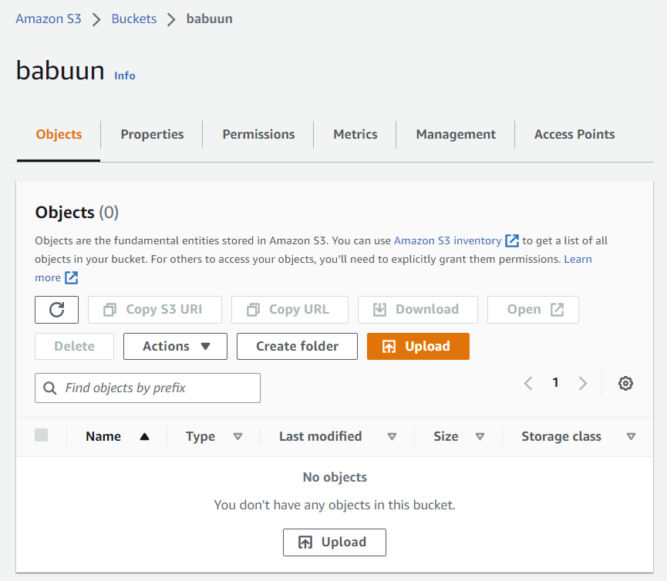
Open the bucket you just created from the console. The bucket should be empty.
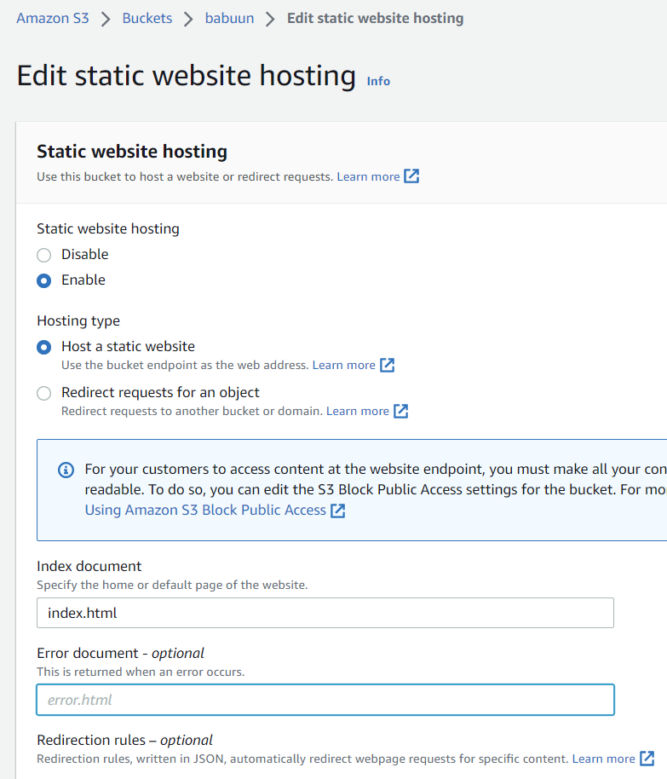
Click the Properties tab, and then sroll down to Static website hosting and click ‘Edit’.
Choose ‘Enable’ under “Static website hosting”
Choose “Host a static website”.
Choose an Index document. You can fill in “index.html”.
Hit Save changes.
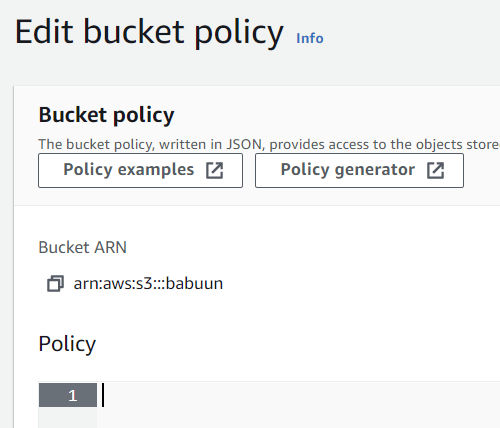
In S3, click the Permissions tab. Then Bucket Policy.
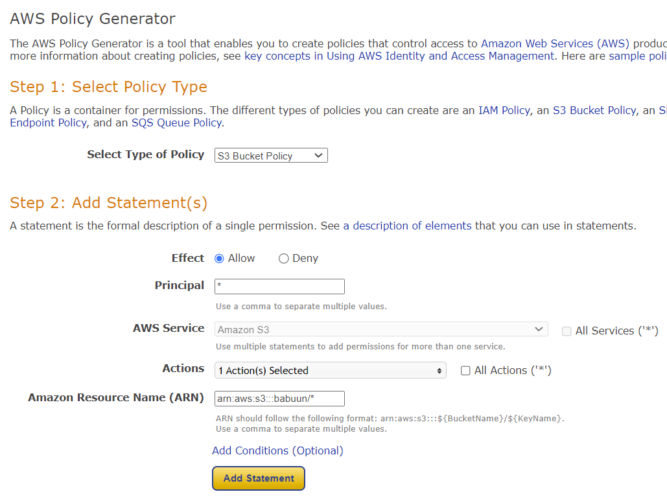
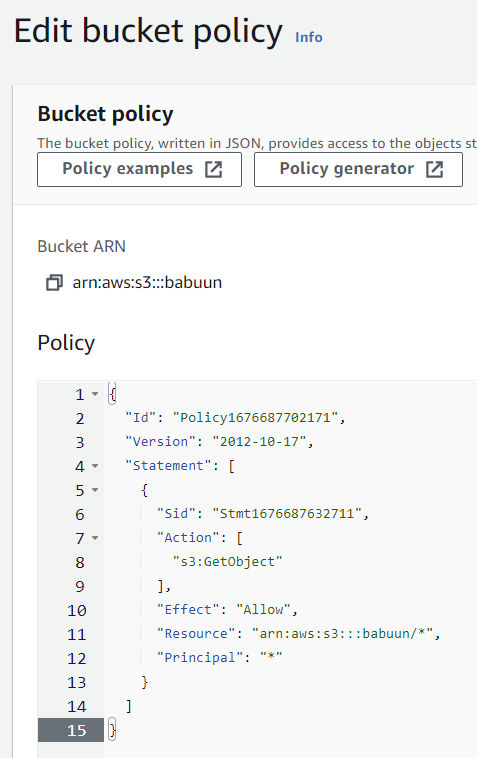
Here you need to fill in a policy that will allow the bucket to be publicly accessed. Open the official AWS policy generator at AWS Policy Generator in a new tab and generate a policy.
At the generator, choose S3 bucket policy as the Type of Policy. Principal will be an asterisk “*” (without quotes), and Actions will be “GetObject”.
Fill in your ARN. It can be found in AWS Console where you were about to fill in the bucket policy. There, at the top of the page, you should be able to find the ARN in the format of arn:aws:s3:::<bucket_name>.
Important: before you paste in the ARN, append a slash and asterisk at the end, so it will look something like: arn:aws:s3:::babuun/* (my bucket name is “babuun”). This will allow access to everything inside the bucket.
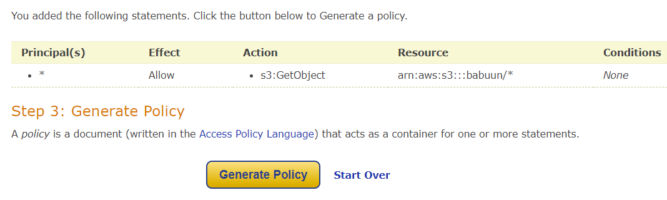
Click Add Statement and then Generate policy.
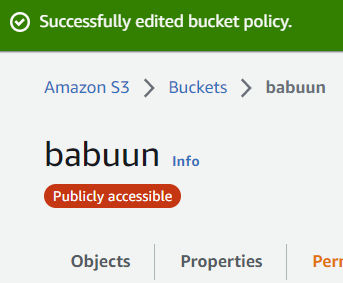
Copy the whole policy over to the S3 AWS console in the Edit bucket policy page and click Save Changes.
Now, when you open your bucket, you should see a red bubble with white text Publicly accessible under the name of your bucket. If you do, everything is correct and we can proceed.
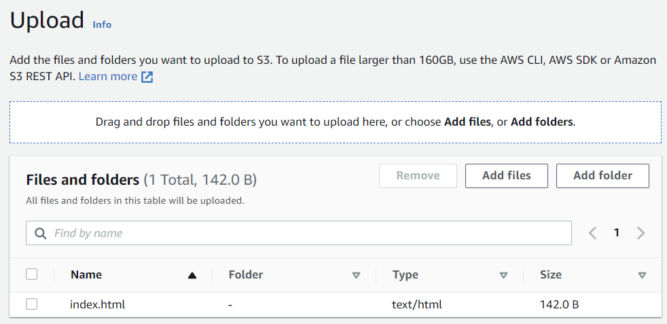
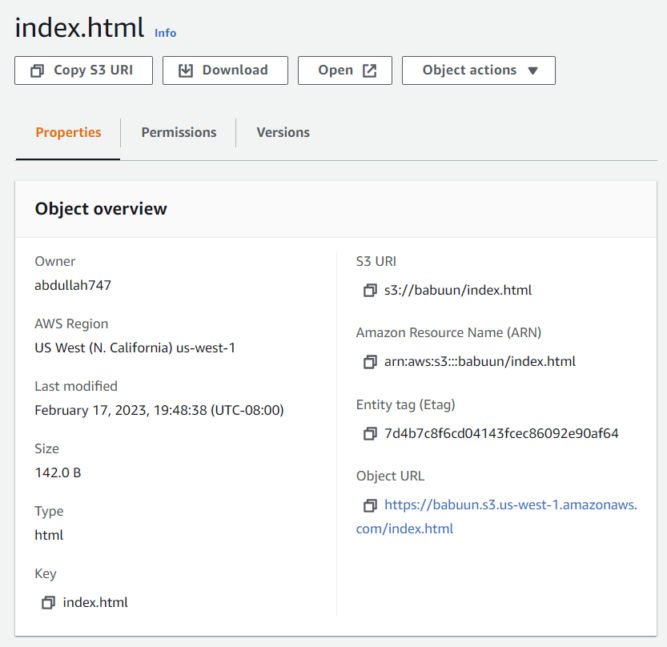
In your AWS console inside your S3 Bucket hit Upload, then Add files and upload your website. If you don’t have one yet, just create an index.html file with the following content and upload it. You can also create a folder, e.g. for images.
In your AWS Console search for Route 53 under Services.
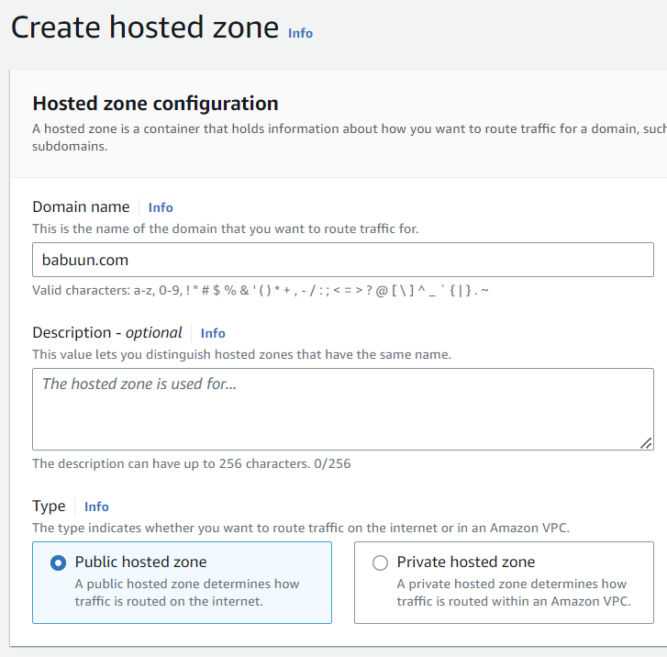
Under ‘DNS management’, click Create hosted zone.
Inside the ‘Domain name’ field, input your domain name. You can get one from any domain registrar like GoDaddy.
‘Type’ will be Public hosted zone.
Click Create hosted zone.
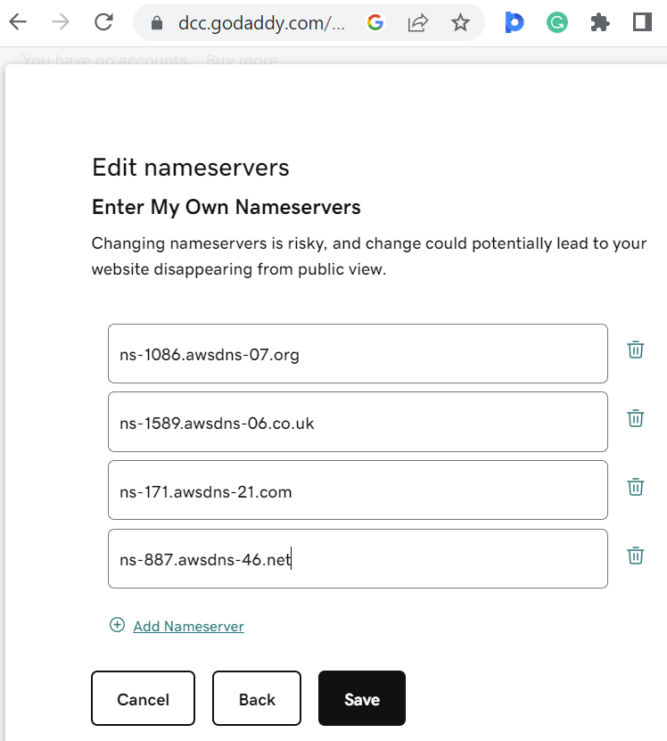
Now we need to link our domain with the records in Route 53. For the zone we just created, you’ll see 2 types of records. The first on is “NS”, which stands for “name server”. There are 4 name servers in this record.
Open a new browser tab and go to your domain’s DNS management page. There, you’ll see a section to update nameservers. My domain is babuun.com and I registered it with GoDaddy. Copy the name server values in Route 53 to your DNS management page. Make sure to remove the dot at the end. In doing so, when someone tries to reach your domain, you redirect them to one of these name servers. Save your nameserver changes. Keep this browser tab open as you’ll need it in the next section.
Set up a certificate
In your AWS Console, search for Certificate Manager and click the link.
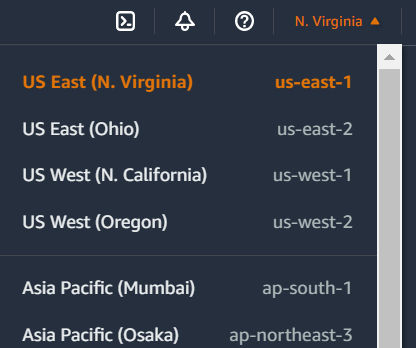
IMPORTANT: In the region dropdown, choose “US East (N. Virginia)”.
Click “Request Certificate” > “Request a Public Certificate”.
Fill in the domain name. In my case, it’s “babuun.com”.
For “Validation Method”, use the recommended value (DNS Validation).
Leave everything else as is and click the Request button.
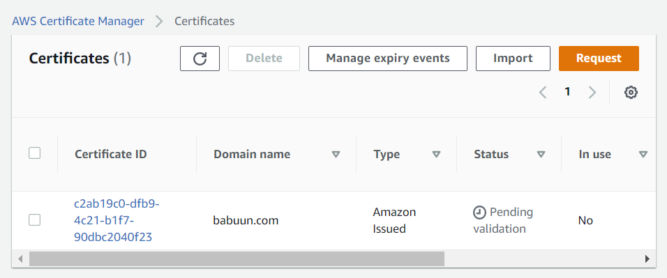
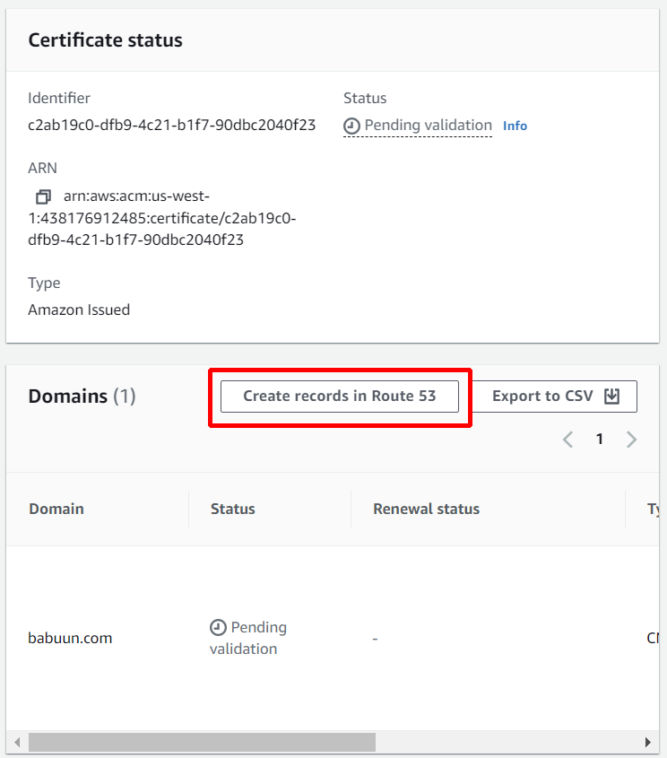
On the next screen, you’ll see the certificate is “pending validation”. In order to validate it, we need to link it to our Route 53 records. Click on the link under “Certificate ID”.
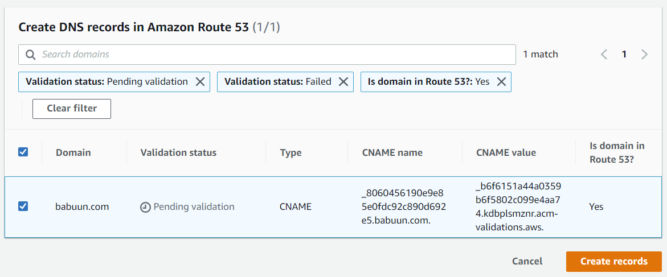
Click on “Create records in Route 53”.
Then, click the “Create records” button.
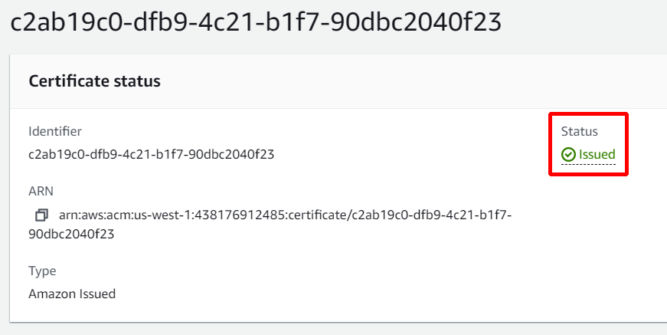
Wait up to 30 minutes for the certificate to be issued. The status will change from “Pending validation” to “Issued”.
Set up a CloudFront distribution
We will create a CloudFront distribution that is connected to our S3 bucket. When anyone tries to access our distribution, they will actually be accessing our S3 bucket while taking advantage of the speed of CloudFront.
In your AWS Console search for CloudFront and click the link.
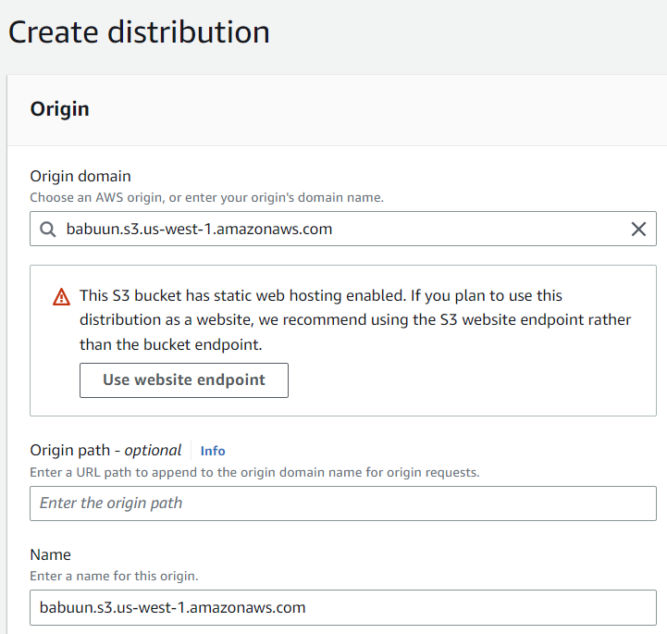
Click Create Distribution. On the next page, under “Origin domain”, select the S3 bucket we created earlier.
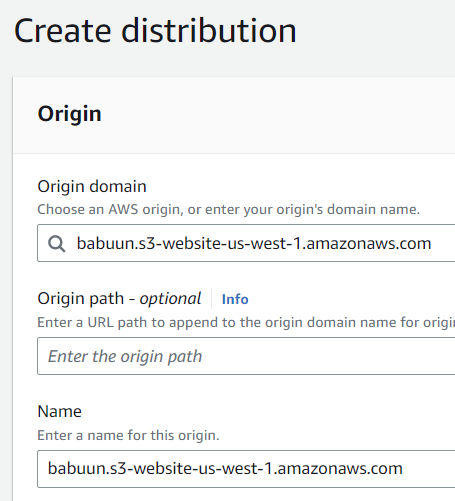
CloudFront will notice that the bucket was set up to host a website. Click the “Use website endpoint” button. CloudFront will automatically update the values for you.
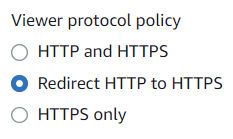
Under Viewer Protocol Policy choose Redirect HTTP to HTTPS
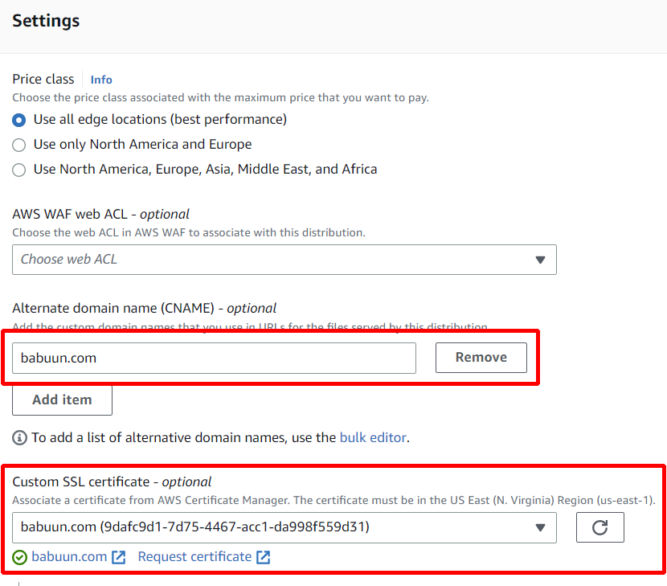
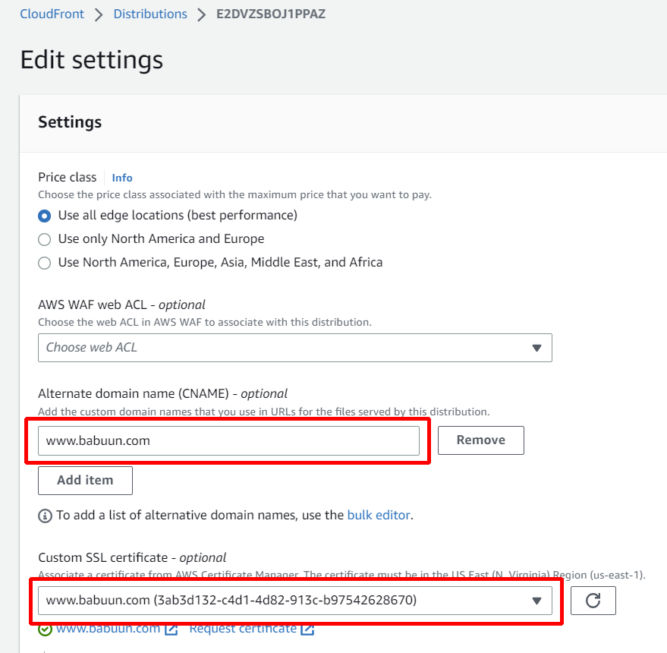
Under “Alternate Domain Names (CNAMEs)”, enter your domain name, e.g. babuun.com.
Under “Custom SSL certificate”, choose the certificate we created earlier. If it’s not available, the certificate may not have been issued yet. Wait 30 minutes or so and click the refresh button until you see the certificate. Select the certificate.
Click Create Distribution at the very bottom of the page.
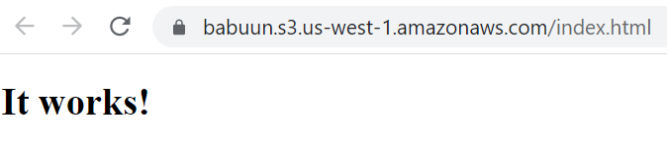
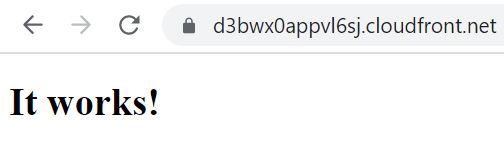
The distribution takes about 10-20 minutes to provision. Once it is provisioned (Status = Enabled, Last modified = a date), you can test it by pasting the URL into your browser. You should see the website you uploaded into S3.
However, your custom domain won’t load in a browser yet. To fix that, we need to create a record in Route 53.
Set up a record in Route 53
Go back to Route 53 and click on your domain.
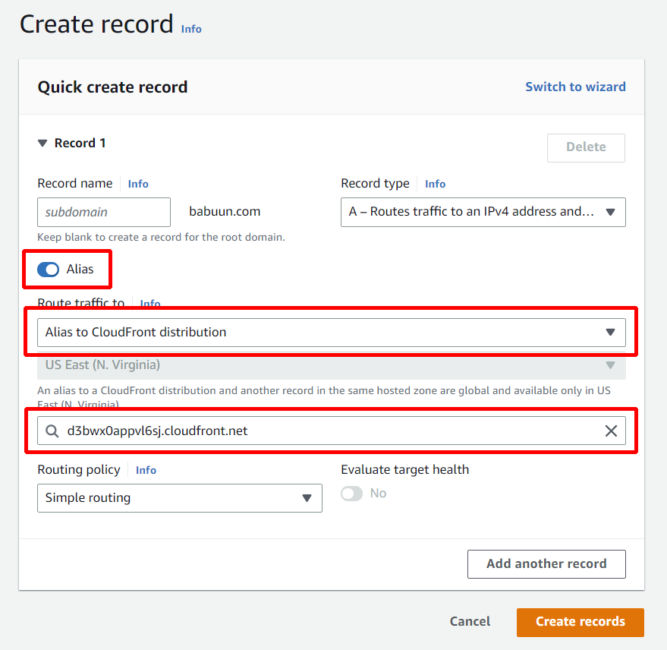
Click Create record.
Click Alias.
Click the dropdown menu at Value/Route traffic to and choose Alias to CloudFront distribution.
Choose the distribution you provisioned previously.
Notice that the only available region is US East (N. Virginia)[us-east-1]. This is due to the fact that we provisioned an SSL Certificate via AWS Certificate manager. This service is only available in US East 1.
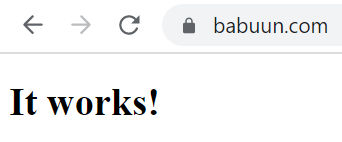
Now, just wait a few minutes for the DNS records to update and try to load your domain name. If everything went correctly, you should see your static website distributed via CloudFront.
And there it is…
Alternate Domain (CNAME)
The instructions above involve using Route 53 as the DNS manager for the domain by updating the nameservers for the domain at the domain registrar to point to AWS’ nameservers. By having Route 53 manage the DNS records, you can have the root domain (babuun.com) point to AWS CloudFront and you can add a CNAME (alternate name) such as www.babuun.com point to AWS CloudFront as well. So, your website would be accessible at both https://babuun.com and https://www.babuun.com.
If you don’t want to use AWS Route 53 as your DNS manager, you would only be able to create a CNAME in your external DNS manager that points to your CloudFront URL as shown below.
In this example, I made www.babuun.com point to d3bwx0appvl6sj.cloudfront.net in GoDaddy.com’s DNS manager. You can’t have the root domain (babuun.com) point to CloudFront because the root domain destination can only be set in the A record, which must point to an IP address, not a domain. Since we don’t know the IP address of CloudFront, then babuun.com will not point to CloudFront. As a workaround, you could have the root domain point to an IP address of a server you have access to, and then add a redirect from there to www.babuun.com.
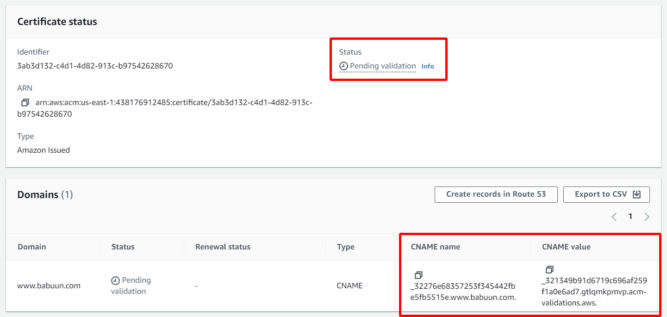
Since you’ll need a certificate specifically for www.babuun.com, or use a wildcard cert like *.babuun.com, you need to create a new certificate in ACM. The instructions are the same as above. After requesting a new certificate, you’ll see the status is “Pending validation”. Since you chose DNS validation, you’ll need to create a new CNAME record in your external registrar with the CNAME name and value provided.
The screenshot below shows the relevant records in my DNS manager on GoDaddy.
ACM will take up to 30 minutes to verify the changes after which time the certificate’s status will change to “Issued.
Now that the certificate is issued, you can update the CloudFront distribution settings by adding the newly issued certificate.
If you are using AWS CloudFront only for static assets, e.g. PDFs and images, then it makes sense to just create a CNAME record with an alternate name like “cdn.babuun.com” or “static.babuun.com” or “assets.babuun.com”.
Bucket Versioning
Versioning is a means of keeping multiple variants of an object in the same bucket. You can use versioning to preserve, retrieve, and restore every version of every object stored in your Amazon S3 bucket. With versioning, you can easily recover from both unintended user actions and application failures.
In S3, choose your bucket, then click the Properties tab, then enable bucket versioning.
I just finished reading the book No Rules Rules: Netflix and the Culture of Reinvention by Reed Hastings, co-founder and former CEO of Netflix, and Erin Meyer. It’s an extremely popular book, based on its ratings. Since I didn’t have time to read the full 320-page book, I read the 7-page summary on Blinkist. I can see why so many people like it. This book is most definitely required reading for anyone managing teams in a company. In fact, the higher you are in the org chart, the more you should read this book!
As everyone probably knows, Netflix is the wildly successful online film streaming service where people can watch movies, documentaries, TV series, and more. Its success can be attributed to many things including its ability to nimbly pivot. It started as a DVD-by-mail subscription service, then transitioned to an online streaming service. It then began licensing original content produced by other studios, and finally, it started producing its own in-house movies and TV shows. In the beginning, it was 1000 times smaller than brick-and-mortar video rental store Blockbuster yet managed to put Blockbuster out of business some 10 years later. Netflix grew 300 times faster than the NASDAQ stock index over 17 years, and a 2018 survey rated it the top place to work in Silicon Valley.
Here are the key takeaways from the book.
1: High talent density encourages employees to perform at their very best
Companies should focus on hiring and retaining highly talented people. To do so, they need to pay rock-star salaries. High performers thrive in an environment with other high performers, and this environment attracts other high performers and holds people to a higher standard. When everyone is excellent, performance skyrockets.
2. Radical candor helps Netflix employees improve, even if it can be difficult to hear
Radical candor is a vital part of Netflix’s company culture. It’s perfectly normal for people to directly contradict their bosses in meetings if they disagree with something. In fact, employees are expected to disagree. If you don’t, it’s as if you are purposely being disloyal to the company. You could help the business improve, but you’re choosing not to.
Unlike at most companies, where there’s just one annual performance review that is top-down, at Netflix, employees are encouraged to give feedback at all times. And, more importantly, they are encouraged to give feedback to their bosses, even more so than the other way around. This is very unconventional, but it actually makes a lot of sense, because the higher you are in an organization, the more likely you are to make a mistake that seriously impacts the company.
There are 4 rules to candor to make it effective:
give feedback with the aim of helping.
your feedback should be actionable.
when receiving feedback, you should appreciate the effort and bravery of your colleague in speaking up.
you should think carefully about whether or not to accept it.
3. Getting rid of useless policies made Netflix employees more accountable
Micromanaging is a waste of people’s time as is requiring employees to follow useless policies. Giving employees more freedom promotes accountability. It signals that you trust them.
4. Maintaining a talent-dense team requires a lot of intense effort.
A lot of companies talk about how their employees are a family. I’d often read new employee introduction emails where they’d say they’re excited to join the company’s family. At Netflix, they don’t consider their talent-dense team like family because they don’t believe that a particular job is something you should have for life regardless of your performance. Instead, they believe a job is something you do for a particular period of time when you’re the best person for that job and the job is the best position for you. Netflix employees are more like a professional sports team of highly talented people rather than a family of people with varying degrees of talent.
To maintain talent density, you have to do something unpleasant: fire people who are merely adequate. To minimize having to do this, it makes sense to put more effort into testing and interviewing candidates. Since firing people can’t impact their personal finances and morale, Netflix offers generous severance packages. An individual contributor gets four months’ pay, and a VP gets nine months.
5. At talent-dense organizations, dispersed decision-making is most efficient.
At most companies, the boss is there to either approve or shut down employees’ ideas. That’s leadership with control. This is a great way to limit innovation and slow down growth.
At Netflix, managers lead with context, letting employees use their own judgment to make the choice they feel is best for the company. With employees making their own decisions, senior leadership is freed up for other things.
I’ve worked with people at all levels of an organization and have seen people make costly, long-lasting mistakes. After a while, it’s hard to not notice a pattern, especially when some of the mistakes affect you. If you stop to think about these mistakes and their root cause, you’ll realize that they could have easily been avoided by following common sense and business best practices. Following are some of the common mistakes I’ve seen that have the potential to have costly, long-term detrimental effects.
Poor Hiring
Successful business leaders and venture capitalists (VCs) know this all too well. What makes or breaks a company is its people, especially the management team. Sadly, I’ve seen many people, including high-ranking executives, make obvious mistakes when interviewing candidates and hiring people. Some of these mistakes include:
Hiring a full-time employee without having a full-time amount of work for them
Asking completely irrelevant, high-ranking employees to interview a candidate
Not having certain employees interview a candidate who they’ll have to work very closely with just because they are low-ranking employees
Judging a candidate based solely on their resume and a short, verbal interview
Writing vague job descriptions and not setting correct expectations up front
Not testing a candidate
Some examples are
Having a director of public relations instead of a web developer interview a web designer candidate
Not having a web developer interview a director of content, even though they’d be working together on a daily basis
Not testing a copywriter or proofreader to write an essay or proofread a blog post
Hiring a director of content marketing to own content but not confirm their ability and interest in performing certain content-related tasks, e.g. writing and proofreading content.
Personal experience being interviewed
When I’ve interviewed at some companies, sometimes I’d be tested. I’ve had to write some code at home and sometimes I’ve had to answer a series of technical questions in real time. I’ve even had to give a presentation in front of a group of 10 or 15 people and write code on a whiteboard. As much as I didn’t like doing this, it made sense for the company to request it.
Testing candidates
When I posted a job ad to hire a web developer in India, I was inundated with applications. Since hiring a skilled and competent employee will make my life easier and make me look good, I spent extra time finding the best candidate available. I first shortlisted the resumes and then ranked each one based on their resume. My recruiter set up meetings with each one in order of ranking. I wrote a series of technical and non-technical questions to ask each candidate. That made the interview process very structured and methodical. It also was fair and made it easy for me to compare each candidate. Based on their verbal answers, I shortlisted them and gave a take-home coding test to the top 3. Each candidate was given 3 or so days to complete the test. Before reviewing each test, my impression was that all candidates were more or less equal in skill. After reviewing their tests, the first candidate failed horribly. The second candidate wrote overly complicated code and made some obvious mistakes. The third candidate wrote simple, clear code and only had very minor mistakes. I hired the third candidate and haven’t regretted doing so ever since. This experience goes to show that a candidate may look good on paper, but fail miserably in practice.
Reviewing sample work
In another situation, I needed to hire a proofreader to review various kinds of content, including product pages, blog posts, emails, etc. I didn’t need a full-time person, so I sought a freelancer on a pay-per-project basis. A seasoned writer was referred to me. When I saw her sample articles, each one contained some obvious typos. This was a red flag since a simple spell checker would have caught them. I did not bother to proceed with the referral. On another occasion, a resume was forwarded to me. Ironically, the candidate’s resume itself was full of typos, so there was no point in proceeding with that candidate either. Surprisingly, hiring managers don’t always look at these signs and are just overly optimistic and hopeful that the candidates will just perform well.
Not all candidates can be tested or may have a portfolio of sample work, but with some creativity, you can probably find a way to gauge their abilities to meet your needs and expectations to fill a particular job besides just looking at their resume and interviewing them.
Unvalidated Decision-Making
Every now and then, I come across some employee who makes a decision based on tradition or assumptions rather than data or subject-matter-expert consultation. It requires no explanation why the latter is better. Here are some examples.
Not making decisions based on data
Someone wants to update the top-level navigation of a website to include a link to their department’s website, e.g. training, support, documentation, blog, videos, etc. They know that their department’s website is accessible from the 2nd-level navigation and from many other places on the website. However, they insist on being at the top level. They don’t bother to ask for website page traffic data to see how many people even visit their section of the website to justify their change request. According to a year’s worth of Google Analytics data, it turns out that only a small fraction of people visit their website. In this case, putting a link to their website at the top-level navigation would not be a smart decision.
Not asking subject matter experts
An executive hears from the website manager that the website is custom-coded by a handful of web developers. Sometime later, the executive hears complaints from marketing campaign stakeholders that it takes too long to create website landing pages. He assumes that the delays are because the pages are custom-coded. He becomes obsessed with migrating the website to a content management system (CMS). He sees an ad for a CMS that claims it can make website updates a breeze. He then embarks on an expensive project to migrate the website to a CMS without realizing that the root cause of the delays had nothing to do with how the pages were built. Had the executive asked the subject matter experts (in this case, the website manager), he would have learned that the delays were caused by the backend integration with other systems, e.g. Marketo and Salesforce, and by the time difference between teams in different countries. In this case, the executive made a bad decision based on assumption, even though the answer to his concerns was a simple email or phone call away.
Quantity Over Quality
Most of the time, quality is more effective than quantity. For example, you can publish many poorly written blog posts and landing pages that get no views, or you can publish a few strategically written ones that go viral. Another example is creating a bunch of paid social marketing campaigns with plain graphics and rushed messaging only to realize that you’re wasting development time and throwing ad dollars away because all of the campaigns are of low quality and therefore ineffective.
Unless you’re a Nigerian scammer who mass emails people all over the world promising high investment returns, you should probably focus on quality over quantity.
Listening Only to Higher-Ranking Employees
Another mistake that some executives make is listening only to high-ranking employees as if one’s rank within an organization automatically makes them more knowledgeable about all matters in and outside their particular area of expertise.
For example, instead of asking a junior web developer, a senior director of public relations may be asked if she approves the hiring of a graphic and web design candidate. While it is true that website graphics are usually public in nature and therefore, a public relations specialist may seem relevant, their relevance is so tangential that it is insignificant. On the other hand, a lower-ranking web developer would be more relevant to approve or disapprove of the candidate since the web developer would have to work closely with the candidate almost daily.
In another example, an executive might consult a chief technology offer or chief information officer instead of a website manager about rearchitecting a website. That’s like consulting a chief medical officer instead of an eye doctor about blurry vision. The fact of the matter is the higher one’s rank, the less specialized they are in specific issues because they are too busy being concerned about high-level issues or with issues spanning many different areas. Just as no doctor can specialize in all areas of health, no one can specialize in all areas of technology or some other vast field.
Executives may assume that if a high-ranking employee can’t provide answers with confidence, then the high-ranking employee can consult the next lower-ranking employee down the chain until someone is knowledgeable enough to provide good answers. This approach may work, depending on the size and situation of your organization, but it is often unnecessary and just wastes people’s time as the information flow may have to pass through multiple layers up and down an org chart instead of just going directly to the source, not to mention the potential of information to change as it passes through many people.
Unclear Job Responsibilities & Expectations
One thing I’ve noticed all too often is not knowing what people’s job responsibilities are and what we can expect from them. For example, there could be a director of content marketing as the primary point of contact for all matters related to content. When interviewing the person, it was not made clear what types of work they’d need to be responsible for. The assumption was that the director of content marketing just “owned” content. After hiring the individual, it became clear that he wanted to “own” as much as possible without actually doing as much as possible. One expectation of this employee was that he’d review content and approve it for publication. “Review” in this case can mean many things. It could mean to review the high-level messaging. It could mean to review and fix typos. It can also mean both and anything else related to content. This is where problems occur. Clear responsibilities and expectations were not set in the job description and after hiring. As a result, the employee became unhappy, employees who had to work with him became unhappy, and the employer wasted time and money.
Some employers will intentionally make a job description vague so that it could be interpreted in many different ways so the employer could tell the employee that some new task is part of their responsibility. This is a bad approach that will likely backfire. Tricking an employee to do something they didn’t expect to have to do will result in resentment and “quiet-quitting”, the act of doing the least amount of work just to not get fired. Unhappy employees become unmotivated to excel which would affect company performance.
I once interviewed a candidate for a director of content marketing position. I interviewed the candidate for almost 2 hours. I gave her as many examples as I could of the type of work she’d be responsible for and told her straight up that if she wasn’t interested in being responsible for certain tasks, then she was probably not a good fit. She said she was fine with everything, but she eventually didn’t get hired. Nevertheless, it’s better to be specific, thorough, and set clear expectations up front rather than have regrets later on.
Another example is in defining the job responsibilities of a director of brand and creative. Different people have different interpretations of what brand and creative entails. Some interpretations are
ensuring a company’s logo is used properly
creating print and/or web graphics
design user interfaces
owning all aspects of “creative” which includes both text and graphics content
being a hands-on contributor or just directing other people to be hands-on
The sky’s the limit when it comes to the various ways you can interpret what a director of brand and creative should be responsible for and what they should actually do. If the expectation is that they should not be hands-on yet he should own all graphics, then the company should expect to hire more people who will be hands-on graphics editors.
Without clear, upfront expectations, there’s bound to be disappointment and regret from both parties. Rather than waste everyone’s time and the company’s money, it’s better to be as clear as possible before giving someone a job offer.
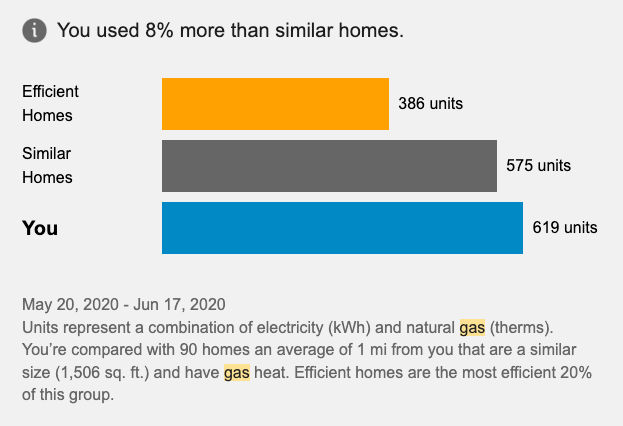
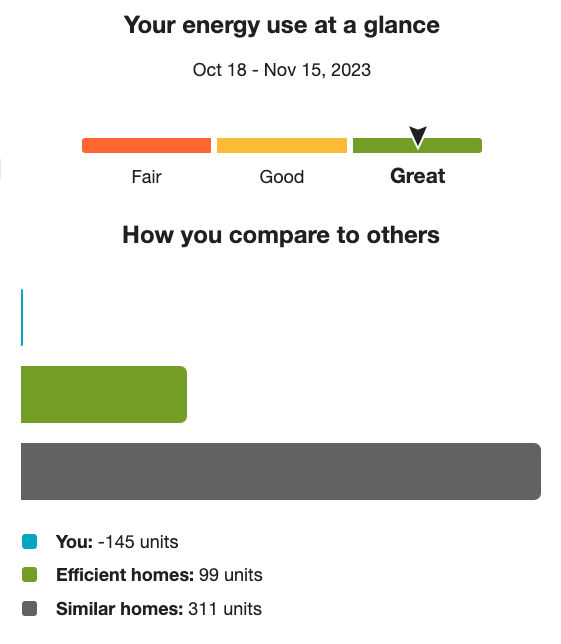
The information below is primarily for California. However, much of it still applies nationwide.
Interesting Fact
The sun essentially provides an endless supply of energy. In fact, with the amount of sunlight that hits the earth in 90 minutes, we could supply the entire world with electricity for a year — all we have to do is catch it!
Seattle had the lowest price of any major metro area at $0.118 per kWh while San Diego, Houston, Urban Hawaii, and San Francisco all had electricity rates above $0.311 per kWh.
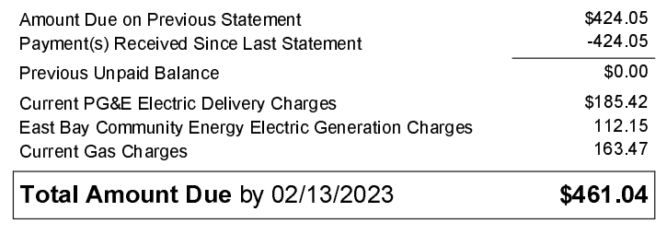
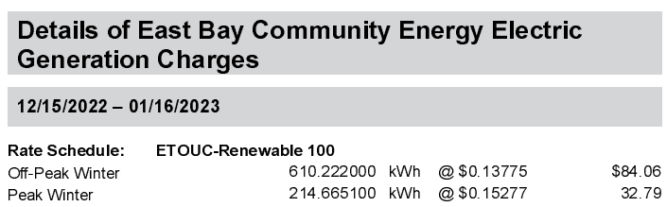
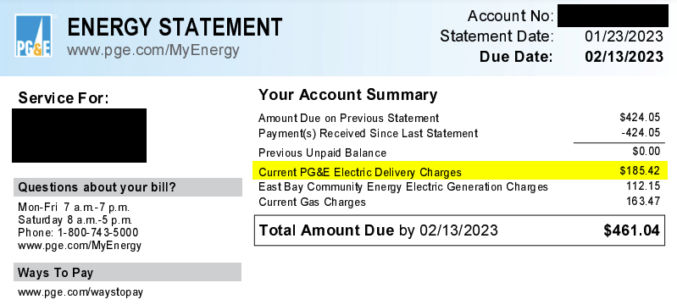
In January 2023, my PG&E energy bill was $461.04. The electricity portion alone was about $300. Looking at the bill below, the electricity portion is divided into two:
Delivery charges: This is the cost PG&E charges to just deliver electricity to my house.
Generation charges: This is the cost to generate electricity, e.g. by solar, wind, etc.
The delivery rate averages $0.38 / kWh.
The generation rate averages $0.14 / kWh.
The cost to deliver electricity is way more than the cost to generate it. Adding the two rates up, we get $0.38 + $0.14 = $0.52 / kWh.
According to the California Energy Commission, 66.4% of California’s energy comes from non-renewable sources and 33.6% comes from renewable sources. 14.2% comes from solar.
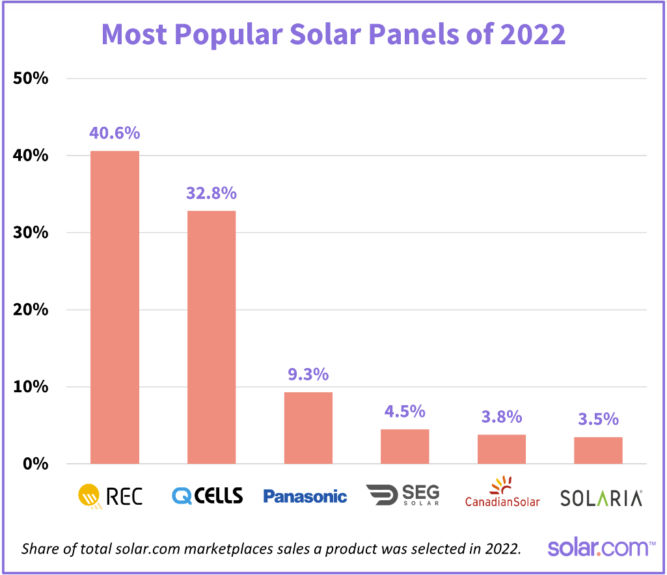
There are nearly 50 REC models and 80 Q CELLS models available through the solar.com network, ranging in wattage from 265W to 450W (although 400W is now considered the norm, and anything under 365W is considered rare).
REC and Q CELLS back their panels with a 25 year product warranty.
Best solar panels manufactured in the US
BRAND – HQ LOCATION
PANEL
MANUFACTURE LOCATION
WHY SOLAR.COM LIKES IT
Silfab – Canada
SIL Mono series
Bellingham, Washington
Durable, >20% efficient
Q Cells – Korea
Q. Peak Duo Series
Dalton, Georgia
Durable, >20% efficient
Mission Solar – US
MSE PERC series
San Antonio, Texas
Qualifies for Buy American Act
Solaria – US
Power XT series
Fremont, California
>20% efficient, superior shade performance
Best solar panels made overseas by US-based companies
BRAND – HQ LOCATION
PANEL
WHY SOLAR.COM LIKES IT
Sunpower – San Jose, CA
A-series
Up to 22.8% efficiency, 25-year warranty, built-in AC inverter
Sunpower – San Jose, CA
X-Series
Up to 22,7% efficient, extremely low degradation rate, 25-year warranty
SEG – Pleasanton, CA
SEG-410-BMD-HV
21.25% efficiency, 25-year warranty
Aptos Solar – Santa Clara, CA
DNA-120-MF26-370W
20.29% efficiency, durable, 30-year warranty
Top 3 solar panels by degration rate
PANEL
DEGRADATION RATE
PERFORMANCE WARRANTY
SunPower X-Series
0.2% to 0.25% per year
92% of minimum peak power after 25 years
Panasonic EverVolt® Photovoltaic series (EVPV)
No more than 0.25% per year
92% of maximum power after 25 years
REC Alpha series
No more than 0.25% per year
92% of nameplate power output after 25 years
Best solar panels for efficiency
Residential solar panels typically range between 15% and 20%, with the industry leading panels pushing 23%.
MANUFACTURER
MODEL
EFFICIENCY RATING
SunPower
A-series
Up to 22.8%
SunPower
X-series
Up to 22.7%
Panasonic
EverVolt® Photovoltaic series
Up to 22.2%
SunPower
M-series
Up to 22%
REC
Alpha series
Up to 21.9%
Silfab
Elite series
Up to 21.4%
SEG
SIV AC Module Series
Up to 21.25%
Silfab
X series
Up to 21.1%
Solar World
Sunmodule series
Up to 21.1%
S-Energy
SL40-60MCI-370
21.04%
Solar Panel Efficiency
There are a number of factors that influence solar panel efficiency. They include:
Temperature — Solar panels operate best in temperatures between 59 and 95 degrees Fahrenheit
Solar panels still generate electricity on cloudy days, although not as effectively as sunny days. Solar panels can capture both direct and indirect light (light that shines through clouds), but perform at around 10-25% of their normal efficiency when it’s cloudy.
Cloudy days can be beneficial, however, as rain washes the panels and increases their overall efficiency.
Color
If you’ll have solar panels that are visible, e.g. from the street, you may want to pick ones that look good. Most solar panel frames are anodized aluminum and come in silver or black. Choosing a black frame can enhance the look of your system greatly. You may be interested in getting “all black” panels, where the frame, backsheet, and cells are all the same black color.
Inverters
Most inverters have warranties ranging from anywhere between 5 and 10 years, though some can be extended to 25 years.
There are 2 types of inverters.
String inverter
Pros
Lowest cost
Standard inverter
Performs well with no shade
Cons
Overall production decreases if one panel is damaged or shaded
No ability to monitor each panel individually
Not optimal if your solar panels are facing different ways
Increasing power needs are more difficult and may require second central inverter installation
Microinverter
Pros
Shade from a nearby tree won’t reduce the whole solar panel system power output
Individual panel monitoring available
Increasing power needs are easier and less expensive than installing a second central inverter
Good for rooftops where solar panels may face different directions
Cons
Higher initial cost
Not necessary if all panels face the same way and are not shaded
Power Optimizers
Power optimizers can optimize the power before sending it to a central string inverter.
Pros
More efficient than string inverters
Less expensive than micro-inverters
Individual panel monitoring available
Cons
Higher initial cost
Not necessary if all panels face the same way and are not shaded
Solar Inverter Efficiency
Peak (max) efficiency and weighted (average) efficiency
Clipping/Scalping
If the solar panel DC output exceeds the max power rating of the inverter, the excess power is clipped (wasted).
It’s normal for the DC system size to be about 1.2x greater than the inverter system’s max AC power rating. For example, a 12 kW solar PV array paired with a 10 kW inverter is said to have a DC:AC ratio — or “Inverter Load Ratio” — of 1.2.
Solar Monitoring System
In order to ensure your solar system is producing energy normally, it’s important to make sure your solar panels are paired with an energy production monitoring system.
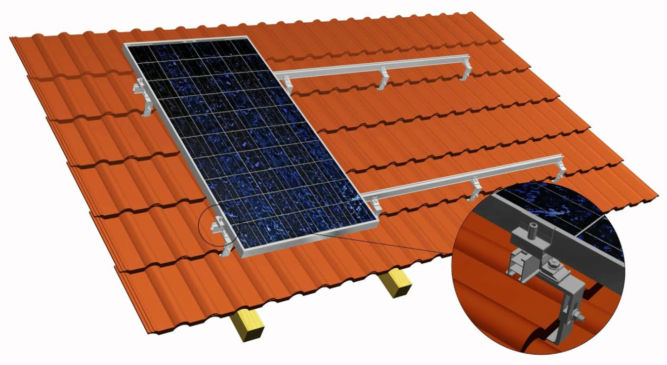
Solar Mounting and Racking System
It’s important to make sure your racking system, if roof-mounted, is properly flashed and sealed to ensure your roof is well-protected against the elements.
Roof Type
Roof Material
Note
Composite shingles
Most common roof material. Easy and cheap to install solar panels on them.
Clay Tiles
More expensive to install than all other roof types.
Concrete Tiles
Cheaper to install than clay tile roofs but more expensive than shingles.
Metal Standing Seam
Easy and cheap to install.
Tar and Gravel
More expensive to install than clay tiles.
Wood
Not recommended for installing solar panels
Warranties
Most major solar manufacturers including REC, SunPower, and Panasonic offer warranties that guarantee a certain level of output over 25 years, and some companies are beginning to offer 30-year warranties. The performance warranty guarantees that a panel’s output capacity will not drop by more than 0.7% per year, or less than 20% over 25 years.
Solar panels don’t disappear when they reach the end of their warranty, their production capacity just slowly degrades over time.
Solar Equation
The average energy needs of a U.S. household is a 6.62-kW solar system to match the 9,000 kWh of average energy usage by U.S. households each year. And, the typical solar panel makes 320 watts of electricity in ideal sunny conditions. Here’s how many solar panels that equals.
Divide 6.62 kW (the system size) by .320 kW (the wattage per panel) = 20.69—rounded up that’s 21 panels. While your home is far from average, this is how you can calculate your own rough estimate.
Solar Panel Wattage VS Efficiency
Solar panels are rated based on the watts they generate. The higher the wattage rating, the greater amount of power your solar installation will produce. Most residential solar panels have power output ratings from 250 to 400 watts, depending on panel size and how well they convert sunlight into energy. While higher power ratings are considered preferable, power output is not the sole factor in judging a solar panel’s performance.
For instance, two solar panels may each have a 15% efficiency rating, yet the power output rating of one is 250 watts and the other is 300 watts.4 The higher output may simply be due to the 300 watt panel’s larger physical size–rather than having a high efficiency or more advanced technology. Therefore, panel efficiency is a better indicator of solar panel performance than just power output for meeting your energy needs.
Incentives
The solar investment tax credit (ITC) is a 30% tax credit that you are allowed to claim in the form of a deduction from your income taxes (after any available rebates) off the overall gross system cost, including any necessary upgrades to the main panel box upgrades in order to go solar.
In August 2022, the Inflation Reduction Act increased the tax credit from 26% to 30% and extended it until 2032. It also renamed it the Residential Clean Energy Credit (although most people still call it the ITC or solar tax credit).
So if you purchased a solar system worth $25,000 in 2022, you can claim a $7,500 deduction on your 2022 taxes that you file in early 2023.
The new and improved solar tax credit also applies to battery storage, whether or not it’s connected to solar. So you can claim the tax credit for adding battery storage to an existing solar system or for battery storage that’s not connected to solar at all.
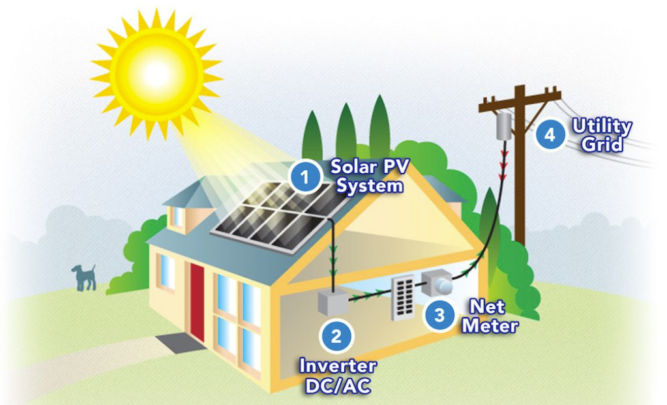
Net Energy Metering (NEM) is the policy that allows you to push and pull energy to and from the grid through your electrical meter. Traditional utility users pull energy from the main grid, use the energy in their home, and the meter counts how much is used. With solar, you will push your excess energy into the grid during the day and pull it out at night to use for lights, TV, A/Cm or anything else you may need. The grid functions as a bank storing your energy from your solar panels until you are ready to use it. With a battery backup system and secure power supply, you can use the energy from your system when the grid goes down.
Net Energy Metering Credits
If you don’t use all the energy your system produces in a day, that energy will roll over to the next day and so on. This happens day after day, month after month. This allows you to use all the energy you produce with your solar system. If you have higher usage months (AC, guests, holidays, etc) you draw from the extra energy credits you earned earlier in the year.
Solar True-Up
Once a year you “true up” with your utility where you settle the balance on your energy credit. If you consume more than you produce then you’ll pay the utility for the excess energy you pulled from the grid. If you produce more energy than you consume, the utility will compensate you for your excess energy at a below-retail rate.
NEM 1.0, 2.0 and 3.0
In most cases, 1 kWh of electricity pushed onto the grid offsets 1 kWh of electricity pulled off the grid.
However, energy utilities are making a nationwide push to weaken net metering by paying less than retail prices for solar exports. Most notably, California’s NEM 3.0 reduces the export rates by over 75%.
NEM 3.0 Final Decision: The California Public Utilities Commission (CPUC) unanimously voted to approve NEM 3.0. Under NEM 3.0, customers of PG&E, SCE, and SDG&E with solar systems will receive an average of 8 cents per kWh for the excess power they push onto the grid. This is roughly 75% less than the average export rate of 30 cents per kWh under NEM 2.0. IOU customers have until April 13, 2023 to grandfather a new solar system into NEM 2.0 by submitting a complete interconnection application.
NEM 3.0 key takeaways:
Current solar owners will remain under their existing net metering policy
Solar owners under NEM 3.0 will earn around 75% less for the excess electricity they push onto the grid
Under NEM 3.0, the payback period for solar and battery storage systems will be roughly equal to the payback period of solar only systems
Californians can be grandfathered into NEM 2.0 by submitting an Interconnection Application for a new solar system by April 13, 2023
Payback period and savings under NEM 2.0 vs NEM 3.0
Scenario 1: Cash purchase of an average 7.6 kW system with 100% offset
SOLAR UNDER NEM 2.0
SOLAR UNDER NEM 3.0
Monthly energy bill (previously $250)
$18
$96
Payback period
4.6 years
6.5 years
Lifetime savings
$116,680
$73,620
Scenario 2: 12-year loan for an average 7.6 kW system with 100% offset
SOLAR UNDER NEM 2.0
SOLAR UNDER NEM 3.0
Monthly energy bill (previously $250)
$162
$239
Down payment
$0
$0
Lifetime Savings
$110,308
$67,248
Scenario 2: 20-year loan for an average 7.6 kW system with 100% offset
There are two steps required to grandfather a solar system into NEM 2.0.
Submit a solar interconnection application to your utility before April 13, 2023
Install and receive permission to operate (PTO) within three years of submitting your interconnection application
Quick Note: NEM 3.0 is not retroactive. Existing solar systems will remain under their current net metering policy for 20 years from their interconnection date.
According to the final NEM 3.0 proposal, a valid solar interconnection application includes:
Complete application
Signed contract
Single-line diagram
CSLB Disclosure Document
Signed consumer protection guide
Oversizing attestations (if applicable)
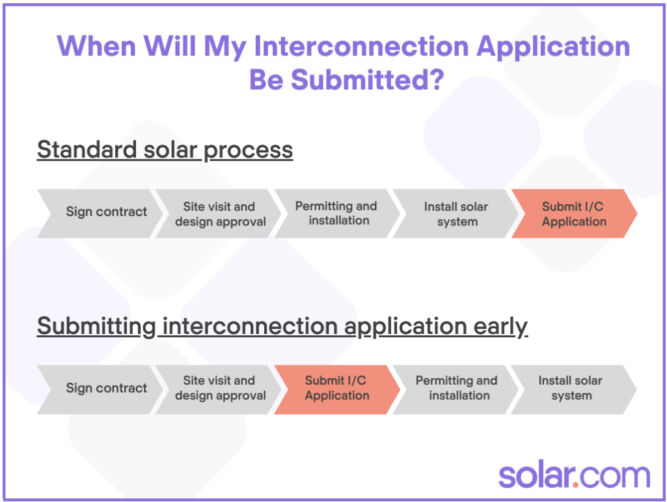
Typically, solar installers submit the interconnection application after the system has been installed. However, in response to NEM 3.0, many – but not all – companies are changing their operations process to submit as early as possible.
Since solar installations typically take 3-5 months to line up, it’s important to find an installer that has changed their process to submit interconnection applications early.
Beginning in January, you should be able to get emailed proof that you have been grandfathered within 2-3 weeks of signing the contract.
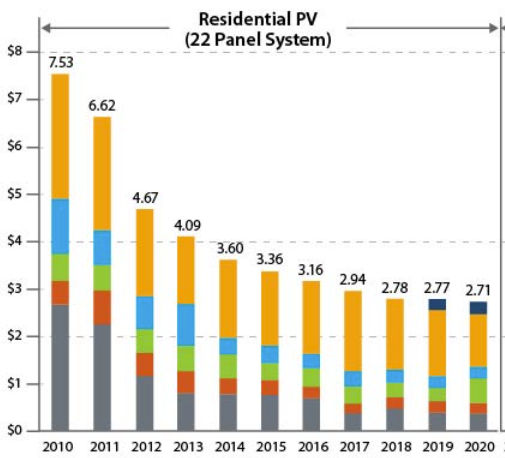
A 10-year study concluding in 2015 by the Lawrence Berkeley National Laboratory found that solar panels add around $4 per watt of capacity installed – or $4,000 per kW. Here’s how that adds up based on the size of your system:
SOLAR SYSTEM SIZE
INCREASE TO HOME VALUE FROM SOLAR PANELS*
4 kW
$16,000
5 kW
$20,000
6 kW
$24,000
8 kW
$32,000
10 kW
$40,000
Solar Installation Company
Factors to consider when choosing an installation company are
their number of installations,
their locations,
their bankability,
their online reviews,
their certification,
length of their workmanship warranty covering
roofing penetrations,
water damage,
electrical work, and
anything related to their installation for the time period described
Possess at least one year of installation experience
Solar Panel Maintenance
Solar PV systems require almost zero maintenance. Be wary of these ‘maintenance packages’ as they are often overpriced.
System Size
To determine the size of your solar system and the number of panels you’ll need, you need to know how much electricity you use on average per day.
Looking at my PG&E electricity usage and cost over the last 12 months below, we find that my average monthly electricity usage was 527 kWh. But, since I bought a plug-in hybrid and started charging my car in October, I’ll take my average to be from the last 3 months, which is 709 kWh. Of course, the last 3 months of the year were cold and daylight ended early at around 5 PM, so my electricity usage went up for other reasons as well. We’ll assume my average monthly electricity needs is 700 kWh and my annual usage would be 700 x 12 = 8400 kWh / year.
Start Date
End Date
kWh
Cost
Note
2022-01-18
2022-02-15
656.84
$168.47
2022-02-16
2022-03-17
577.84
$134.91
2022-03-18
2022-04-18
494.57
$102.54
2022-04-19
2022-05-17
358.42
$68.48
2022-05-18
2022-06-15
372.67
$82.26
2022-06-16
2022-07-17
443.17
$110.39
2022-07-18
2022-08-16
416.57
$103.91
2022-08-17
2022-09-15
452.3
$115.19
2022-09-16
2022-10-16
420.99
$94.50
2022-10-17
2022-11-15
604.61
$136.73
Includes charging EV
2022-11-16
2022-12-14
695.44
$162.45
Includes charging EV
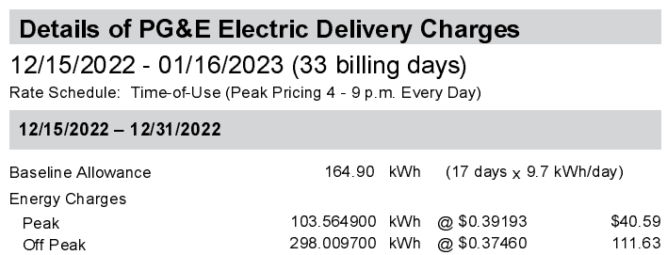
2022-12-15
2023-01-16
824.89
$185.42
Includes charging EV
Average
Last 12 months
527 kWh
$122
Average
Last 3 months
709 kWh
$161
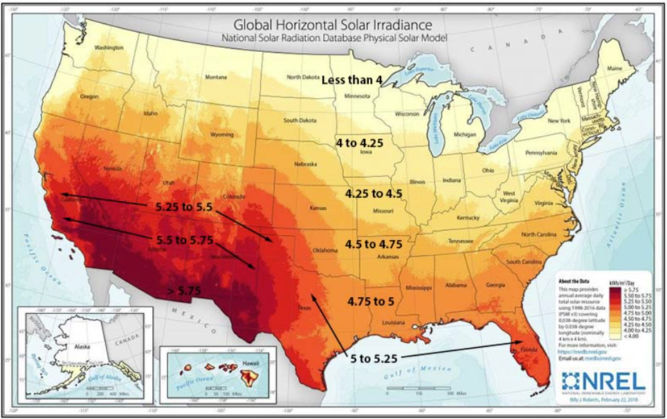
To continue this analysis, we’ll need the peak sunlight hours where I live. According to the map below, my peak sun hours is 5.
A
Monthly electricity usage
700 kWh / month
B
Daily electricity usage
24 kWh / day
A/30
C
Hourly electricity usage (kWh)
1 kWh / hour
B/24
E
Solar panel system output needed per day
5 kWh / day
F * peak sun hours (5)
So, the solar panel system size I would need is a 5 kW system. But, since solar panels don’t operate at maximum efficiency 24 hours a day, we’ll add a cushion of 25%. That brings the system size to 5 kW x 1.25 = 6.25 kW.
The average solar panel produces 400 W. So, the number of panels I would need is 6250 / 400 = 15.6 panels.
For a 6 kW size, I was quoted $25,820. If I apply the 30% federal tax credit, I’d get $7,746, which brings the effective cost to $18,074. Since the minimum lifetime of the solar system is 25 hours, then we can calculate the cost per kWh as $18,074 / 25 years / 365 days / 24 hours = $0.08 / kWh. That’s a lot cheaper than my current electricity rate of $0.52 / kWh (PG&E generation + delivery rate).
Since my monthly electricity needs are 700 kWh. Then we can compare costs as follows:
Cost / month
Cost / 25 years
Solar with 30% tax credit
700 kWh * $0.08
$56
$16,800
Grid
700 kWh * $52
$364
$109,200
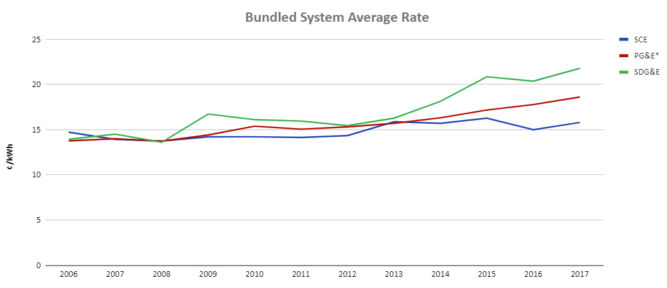
As you can see, going solar saves a ton of money. And that doesn’t even include the rising cost of electricity from the grid, which averages 2.2% per year.
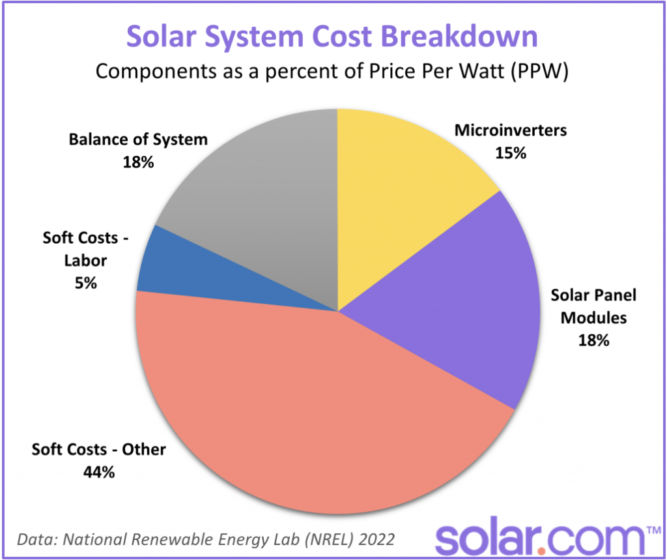
Cost Breakdown
Loans
“Same as cash” option
This means that the lender will fund the full amount of the loan, but only collect payments based on 70% of the outstanding balance during the first year or so. This amounts to a 30% discount on your payments for the first 12-18 months and makes Day One savings greater than on a traditional loan.
After the 12-18 months is over, the homeowner is expected to pay down the loan balance by the amount of the tax credit.
In the example used earlier, the homeowner would receive a $20,000 loan but only pay interest on $14,000. If at the end of the 12 month grace period the homeowner fails to pay back the tax credit amount, then the lender will start charging interest on the $6,000 portion from that point forward.
Combo Loan
Combo loans are independently financed. There are two separate loans.
The first loan is for 70% of the contract price, which has an interest rate (for which the homeowner qualifies). The second loan covers the remaining 30% of the contract price.
This second loan is meant to equal the federal tax credit amount and typically lasts for 18 months with 0% interest. If this amount is not paid off in that allotted time frame, the balance adopts the same APR as the first loan, whatever that may be.
Some lenders tout extremely low nominal rates (some as low as 1.89%). They don’t tell you is that there is something known as a ‘dealer fee’ that can run as high as 17%.
Make sure you check the following:
True APR
Monthly payments
No dealer fees
No prepayment penalty
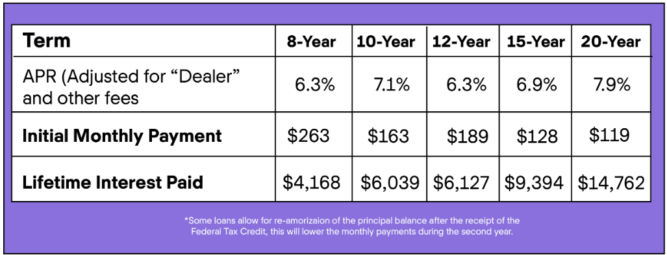
Loan Term
The table below compares monthly payments and lifetime interest paid for a $20,000 loan at different terms and APRs.
The most popular loan with Solar.com customers has a 12-year term, no pre-payment penalties, and interest rates of 2.99-4.99% depending on your credit score. The 12-year term is common because for most customers, their monthly loan payment is equal to or less than their current utility bill.
Sun Exposure
The more sun your solar panels get, the more money they can save you.
Comparison Shopping Checklist
Solar Panel
Brand
Type
Number of panels
Wattage per panel
Efficiency
Color
Warranty (fine print)
Company bankability
Solar System
Size (kW)
energy monitoring system
All-inclusive total cost (permits, materials, warranties, taxes, financing costs, etc)
Inverter
Type
Max power input
Peak efficiency
Weighted efficiency
Warranty (fine print)
Installation Company
number of installations,
their locations,
their bankability,
their online reviews,
their certification (NABCEP),
length of their workmanship warranty covering
roofing penetrations,
water damage,
electrical work, and
anything related to their installation for the time period described
do they guarantee minimum daily energy production?
NEM 2.0 Grandfathering
Is the company prepared to submit the documents needed for NEM 2 grandfathering early in the process?
Loan
Length of loan
True APR
Monthly payments
No dealer fees
No prepayment penalty
Update
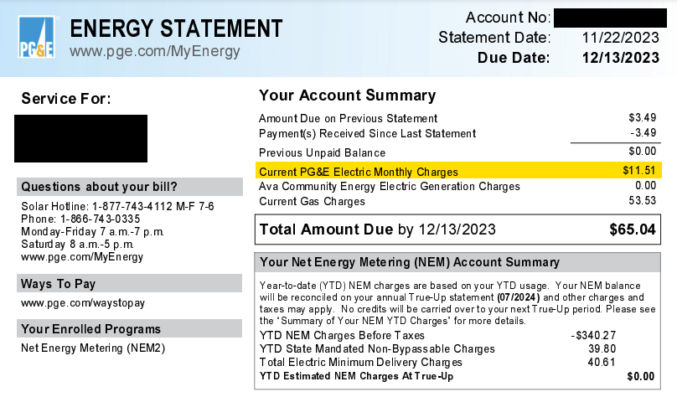
After installing solar panels, my electricity bill has gone down significantly.
Many Muslims hear the call to prayer (adhaan) and assume it is correct. However, the most widely used version of the call to prayer contains wording that not only seems irrelevant, but also possibly contradictory to the purpose of the call. According to Wikipedia, the Sunni call to prayer, for example, contains the wording “I acknowledge that Muhammad is the Messenger of God.”
A couple of questions worth asking are:
If the caller to prayer (muezzin) is calling or telling people to pray to God, why is he (it’s always a male) saying that he acknowledges that Muhammad is the messenger of God?
In verse 72:18, God makes it clear that mosques (places of worship) are for God and that we must not invoke anyone with God. Verse 20:14 makes it clear that prayer is to remember God. Based on these two verses, is it even necessary or allowed to mention that Muhammad is a messenger of God? God has many messengers including Abraham and, according to 2:285, they should all be treated equally. Exclusively stating that Muhammad is the messenger of God would therefore violate 2:285.
Indeed, I am God. There is no deity except Me, so worship Me and establish prayer for My remembrance. (20:14)
لَا نُفَرِّقُ بَيْنَ أَحَدٍ مِّن رُّسُلِهِ
We make no distinction between any of His messengers. (2:285)
Based on these issues, a more logical version of the call to prayer that also doesn’t violate the Quran would be as follows:
Before
After
God is the greatest.
God is the greatest.
I acknowledge that there is no god but God.
There is no god but God.
I acknowledge that Muhammad is the Messenger of God.
Hasten to prayer (Salah).
Hasten to success.
God is the greatest.
There is no god but God.
I didn’t mention the number of times each statement should be said since that is irrelevant. It could be twice, four times, or however many times one sees fit.
I also excluded the “Hasten to prayer” and “Hasted to success” statements since people already know that they should pray as soon as it’s time and that praying is one of many requirements for long-term success. Everyone knows that when the call to prayer is done, it is time to pray and that they should pray. The purpose of prayer is to worship God alone and the two statements in the proposed call to prayer clearly focus on that aspect.
Must the call to prayer be done in Arabic?
Many Muslims in non-Muslim countries believe that the call to prayer must be done in Arabic. However, there is no requirement in the Quran that it be done in Arabic. It is clear that the purpose of the call to prayer is to remind people that it’s time to pray so that they go and pray. If people don’t speak or understand Arabic, then an Arabic call to prayer becomes less useful. Although most non-Arabic-speaking people know that when they hear the call to prayer in Arabic that it’s time to pray, not understanding the meaning of the words uttered during the call would render it effectively no different than if someone blew a horn or rang a bell.
Must the call to prayer be done live or can it be prerecorded?
Many Muslims think that the call to prayer must be done live and that playing a prerecorded version of the call is invalid. However, there are no requirements in the Quran that it be done live. It is commonly known that the first person to perform the call to prayer was a man by the name of Bilal. It is also commonly known that he was chosen for having a good voice. Unfortunately, many callers to prayer (muezzins) do not have a good voice and to make matters worse, they use modern-day technology (loudspeakers) to blast their unpleasant voices all over town and sometimes right next to people’s living rooms. It is clear that God has given some people gifts over others, such as a nice voice. There are many people who have a nice voice and can perform the call to prayer such that it is generally more pleasant to listen to. These calls can be recorded and played either manually or automatically. It is clear that doing so has many benefits including motivating people to actually pray rather than cover their ears. While some people may argue that using modern-day technology by playing a recording invalidates the call, that argument would also invalidate all current methods of the call to prayer since they use loudspeakers which did not exist during the time of Muhammad. Regardless, there are no specific requirements in the Quran with regards to the call to prayer. Therefore, God has given us the freedom to perform it however best we can. Playing a recording of a pleasant-sounding call to prayer would clearly result in a better, consistent and more motivating experience for the target audience.
It’s January 9, 2023, and it’s cold here in California. Sure, it’s nothing compared to the freezing temperatures in other parts of the country, but still, it can get pretty chilly in the evening and early morning.
And as the temperature drops, my energy bill goes in the opposite direction.
On top of that, high inflation has made everything, including energy, even more expensive.
Despite having an energy-efficient gas furnace, using it to heat up a 1600-square-foot house still seems more expensive than it should be. Plus, even if heating the entire house was inexpensive, it seems wasteful since many parts of the house are not always actively used. Though I have a gas furnace, according to EnergySage, the average wattage of an electric furnace is 10,000 to 50,000 watts. For comparison, my space heater uses 1500 watts. That makes sense since it plugs into a 120V / 15A outlet, which can support a maximum of 1800 watts before tripping the circuit breaker. And for another comparison, I have an electric throw (62″ x 50″ Microplush Electric Throw Blanket Leopard/Black – Biddeford Blankets) that, according to the label, uses 130 watts. A king-size electric blanket will use up to 200 watts. Personally, I actually find the electric throw more comfortable than the space heater and central furnace when I’m stationary (watching a movie or sleeping).
Electric blanket
130 – 200 watts
Space heater
1500 – 1800 watts
Electric furnace
10,000 to 50,000 watts
According to my PG&E bill, my electricity cost is
Off peak: $0.37460 / kWh (kilowatt hour)
Peak (4-9 PM): 0.39193 / kWh
Assuming I run a 200W electric blanket and an 1500W space heater for 3 hours a day during peak hours, I can find the cost for each using the formula:
W/1000*H*CPKWH
where
W = device watts
H = number of hours
CPKWH = cost per kWh (I’ll choose peak time)
Device
Math
Cost/day
Cost/month
Electric Blanket
200/1000*3*0.39193
$0.23
$7
Space Heater
1500/1000*3*0.39193
$1.76
$53
So, yeah, the electric blanket or throw is way cheaper!
There are many different ways you can edit home improvement videos. Here are some:
Make a Video From Photos
This is pretty simple to do. You can just add a bunch of photos to the video track of your video editor, animate each photo (many video editors can do this automatically), add some music to the music/audio track, and render the video. The result can be pretty good but it doesn’t really give a sense of the amount of effort or process involved. Here’s an example clip.
Regular 1x Speed Video
If you have a short video, leaving the speed at normal 1x speed might be okay. But, if your video is long, people will get bored very quickly. Since most home improvement projects take longer than 30 seconds, I don’t recommend this option, unless you are maybe adding a voiceover that explains what you are doing in the video.
Fast Speed (Timelapse) Video
Another option is to just timelapse the entire video. Some home improvement projects can take all day. Many people, including myself, will just leave a camera somewhere that will take many still photos at a set interval to create a timelapse video. You can also record an entire day’s worth of video, which I’ve also done using a WyzeCam mounted on a wall. Timelapsing an entire video is as easy as speeding up the video clip. The downside is the audio is also sped up and often doesn’t sound good so you usually mute the audio and optionally add some background music. Here’s an example.
Mixed-Speed Video
Another option is to timelapse (speed up) certain parts of the video and leave the other parts at regular 1x speed. This is definitely more work but I personally find this better than just speeding up the entire video. However, I find the best effect is when the regular speed segments are ones that have a high volume, e.g. when you’re using a tool that makes a lot of noise (drilling, jackhammering, cutting, etc). Here’s an example.
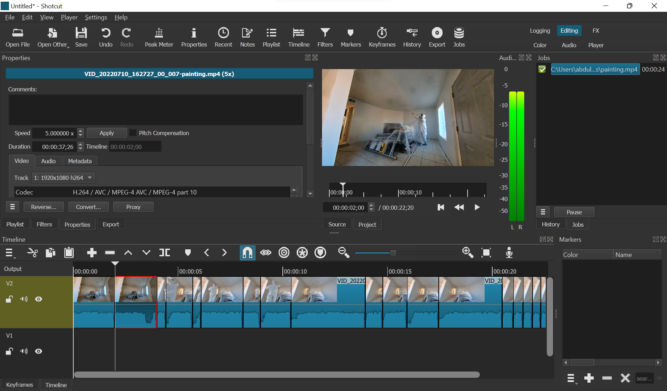
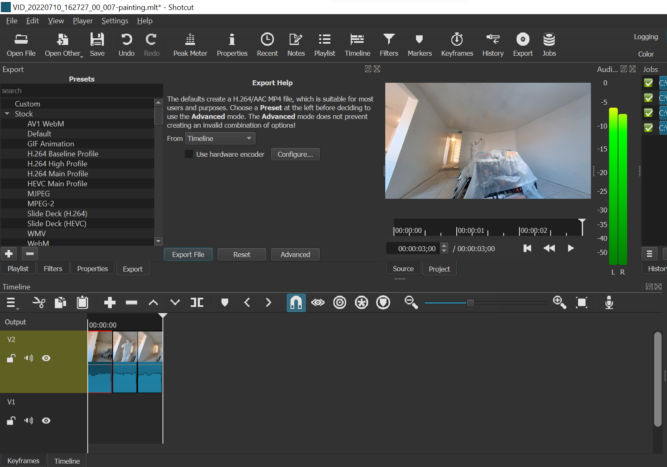
I normally use Corel VideoStudio to edit videos but for this purpose, I find Shotcut to be easier to use. Shotcut, which is free, shows the waveform very clearly, runs faster and hasn’t crashed on me yet. The UI takes some getting used to but once you get the hang of it, it’s pretty simple to us. Here are the steps I follow in Shotcut to create this type of video:
Open the original video in Shotcut
Drag it from the player to the timeline
Zoom in, if necessary, so that you can see the audio waveform
Choose some or all segments where the waveform is high (high volume)
Scrub the playhead until you find a segment where the waveform is high (high volume) and the segment is interesting to show at 1x speed
Split the video at that playhead position.
Move the playhead by where you want to end the segment. For 1x speed segments, I choose a duration of 1 second. You can advance the playhead by 1 second by going to “Player” > “Forward One Second”.
Delete any segments you don’t want to keep (choose Ripple Delete to remove empty space as well)
Click on a segment you want to speed up, click Properties, and change the speed. I choose 5x.
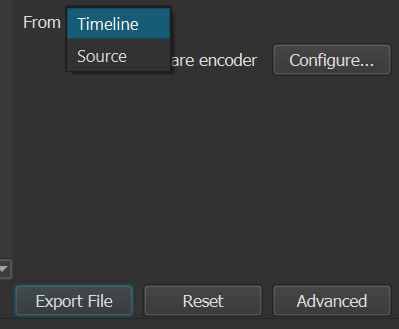
Click the Export button, select “Timeline” in the From field, and click “Export File”.
I changed the speed of this segment to 5x.
Video Showing Only Selection of 1-second Segments
Another option is to create a video from a selection of 1-second segments. Some segments will probably have high volume, e.g. drilling, jackhammering, cutting, etc. , Others may not, e.g. lifting, cleaning, drawing lines, etc. Again, I find this much easier to do in Shotcut than in Corel VideoStudio. Here’s an example.
Here’s how I do it in Shotcut:
Open the original video in Shotcut
Drag it from the player to the timeline
Zoom in, if necessary, so that you can see the audio waveform
Scrub the playhead until you find an interesting segment
Split the video at that position
Move the playhead forward or backward by 1 second (“Player” > “Forward One Second” or “Backward One Second”.)
Split the video again to create a one-second clip
Repeat steps 4-7
Delete all other segments (choose Ripple Delete to remove empty space as well)
Click the Export button, select “Timeline” in the From field, and click “Export File”
I reduced this 3-minute long video to 3 seconds (each segment is 1-second long) where the volume was high.
Merging Clips
If you end up with a bunch of video clips that you want to merge and you don’t need to apply any transitions or effects, you can merge them almost instantly with LosslessCut.
The human body is very similar to a car. Following are some similarities between the human body and the car.
Car
Human
ECU (Electronic Control Unit)
Brain
Engine and fuel pump
Heart
Air intake
Nose and lungs
Exhaust
Anus
Vehicle Identification Number (VIN)
Fingerprint
Wheels
Legs and hands
Fuel
Food
Fuel tank
Stomach
Ball joints
Elbows and knees
Horn
Mouth
Car diagnostic scan
Human vital signs/Medical scan
Car structural frame
Skeletal system
Engine torque
Strength
Engine oil and other fluids
Blood and body fluids
Car chassis
Human spinal cord
Oil and fuel filters
Kidneys
Shock absorbers
Cartilages and fat
Fuel and radiator filler
Mouth to eat and drink
Windscreen wipers
Eyelashes
Headlight and windscreen
Eyes
Turbo and superchargers
Steroids
Tires
Shoes
When a car stops working, whether due to lots of use (like old age in humans) or an accident (like humans getting injured in an accident), it can be fixed, e.g. by flushing and replacing dirty transmission fluid (like human blood dialysis), or a part can be replaced (like a human organ transplant). Like cars, the human body requires maintenance and can often be repaired. However, the fundamental difference between the two lies in their ability to be resuscitated after experiencing a catastrophic failure. With a car, you can wait forever and still be able to fix it. When a car is dead, e.g. if the engine is off, there’s always a way to bring the car back to life, whether by opening the engine to replace one small part or replacing the engine altogether. In contrast, once a human’s engine (heart) is off (the heart’s electrical system fails, which causes the heart to stop pumping blood), there’s only so much time before the person is completely dead. One must rush to try to restart the heart by either
CPR or mouth-to-mouth resuscitation
Resuscitation with an automated external defibrillator (AED) device
Chest compressions
Time is of the essence. Usually, the person would be considered dead if there is no pulse within 5 minutes. Unlike a car engine, transplanting a perfect heart once someone is dead will not bring the person back to life. Therefore, something must have existed in the human other than the physical parts that gave it life. Some (most) people call this thing the “soul”. Whatever you want to call it, it seems then that this soul is an intangible and invisible form of life (to the human eyes, at least) that transcends the limitations of the material body.