The ancient Greeks called the language deployed in such debates rhetoric – a word derived from rhetor, meaning “public speaker.” For Aristotle, persuasive speech has three modes: ethos, pathos, and logos.
Ethos (Character / Credibility)
Ethos is the Greek word for “character”. In this context, it concerns the credibility of the person. For example, we’re more inclined to accept what a practicing doctor has to say about vaccinations, for example, than an anonymous blog author.
Pathos (Emotion)
Pathos is the Greek word for “emotion”. In this context, it concerns an attempt to sway an audience by appealing to powerful emotions such as love and fear. For example, if a doctor’s credentials haven’t persuaded their reluctant patient, they doctor may tell a story about a couple in perfect health who refused to get vaccinated but died within 15 days of each other leaving behind four young children. The patient would feel emotionally in fear and be more inclined to trust the doctor.
Logos (Facts, Figures, Data, Statistics)
Logos is the Greek word for “reasoning”. This form of persuasion deals in facts and figures. For example, if a doctor points out that multiple peer-reviewed studies show that COVID vaccines result in a 90% decrease in the risk of hospitalization and death, they’re appealing to logos.
Arguing using just logos (facts and figures) is insufficient because people are stubborn, reactive, overconfident, afraid of change, and, more importantly, emotionally invested in beliefs, ideas, and ideals. People’s feelings don’t care about the facts. Therefore, to win an argument, you need also appeal to feelings, not just state the facts.
Tell Stories to Appeal to Feelings (Pathos)
According to 2007 study, people are much more likely to give money to charity if they’re told stories about an “identifiable victim” than they are if they’re presented with accounts of “statistical victims.” For example, a story of the suffering of a single child with a name and a face is more effective than a description of millions of nameless and faceless people suffering in the same way. For example, telling a story about the awful hunger cramps that one child suffers every day is more effective than abstract statements like “820 million people around the world go hungry every day”.
To win arguments, tell gripping and relatable stories.
Cite Credibility, as Necessary (Ethos)
When debating, your aim is to go after the argument, not the person making it. If you go after the person, that’s ad hominem. In theory, the merits of the person speaking have nothing to do with the soundness of what they’re saying, but in reality, merits matter. When facts and figures (logos) are insufficiently convincing, then cite the person’s character and reputation (ethos).
Conflicts of Interest
Imagine a major study is published that claims to show that climate change isn’t nearly as bad as we thought. The caveat: it was entirely funded by fossil fuel companies. If the authors of the study were paid by companies with a less than purely academic interest in the topic, then there’s a conflict of interest. Therefore, dismissing the study on the credibility of the authors is a logical and reasonable thing to do.
Hypocrisy
If an outspoken anti-abortion lawmaker privately supports women having abortions, then they are hypocrites. In theory, the hypocrisy of the person speaking has nothing to do with the soundness of what they’re saying, but in reality, hypocrisy matters.
To win arguments, consider citing the credibility of the speaker.
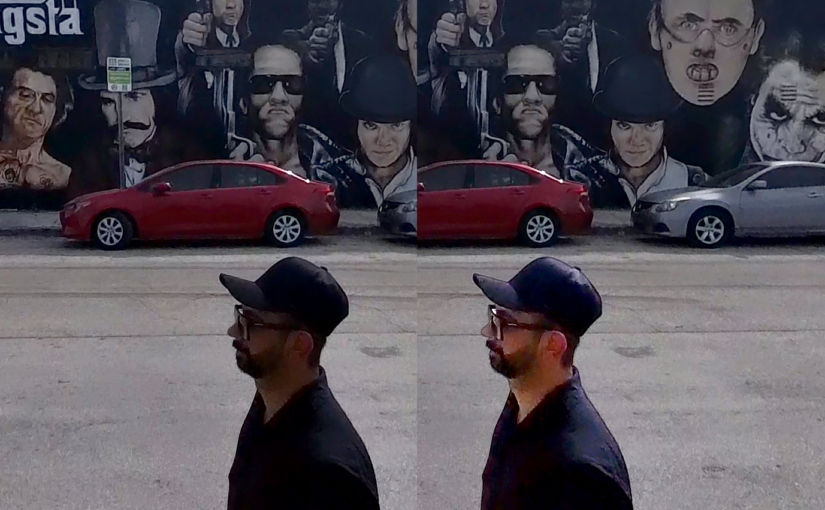
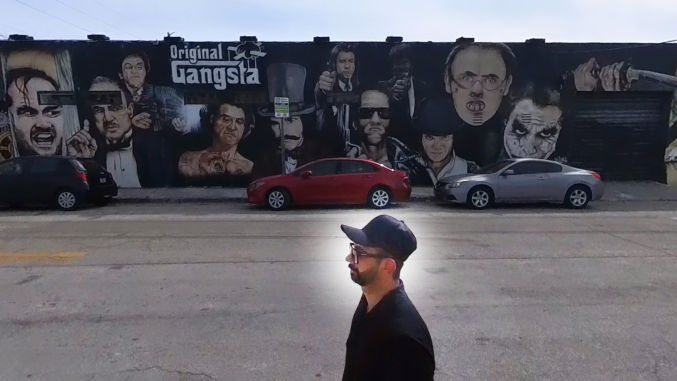
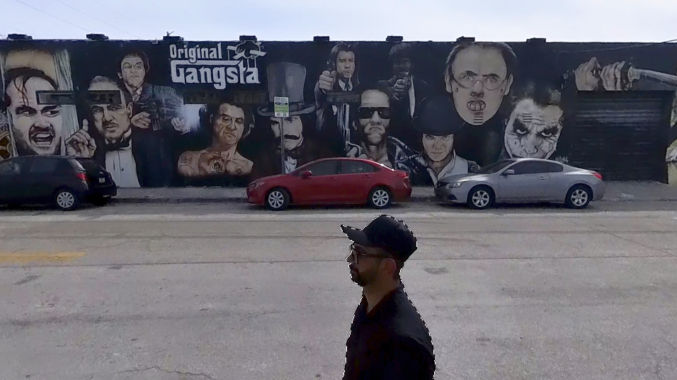
Chances are you’ve taken photos where the faces are too dark. This can be due to a low-quality camera and/or incorrect camera settings. Fortunately, there is a way to easily fix this using Photoshop. As an example, I’ll use this photo of me in the Wynwood district of Miami (below). Notice how my face lacks detail because it’s underexposed (too dark).
Levels
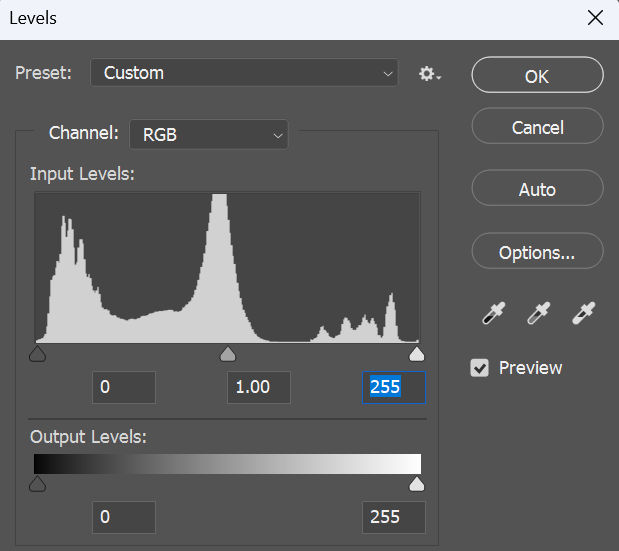
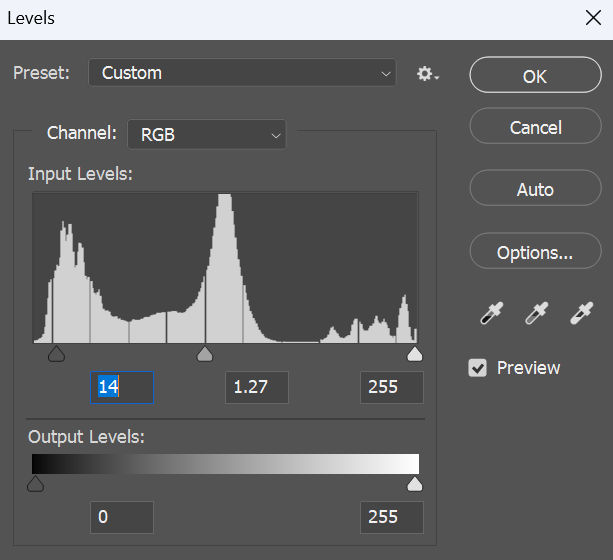
First, I like to check and adjust the levels for the image. Go to Image > Adjustments > Levels. You’ll see a histogram like this
In the input levels, there are 3 markers from left to right
black marker (left) = shadows
gray marker (middle) = midtones
white marker (right) = highlights
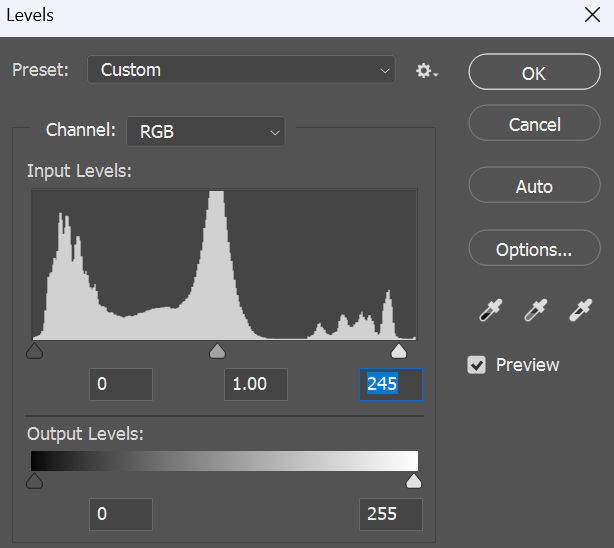
The left and right markers should touch the left and right edges of the histogram. In this case, there is a small gap between the right marker and the right edge of the histogram, meaning the image is a little underexposed. If we move the right marker to the right edge of the histogram, the image will become a little brighter.
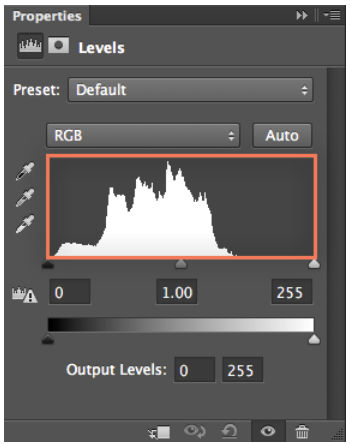
In this particular example, this adjustment isn’t significant. But, if there’s a big gap in the histogram like this
then adjusting the levels will make a big improvement to your image.
Exposure
If adjusting the levels doesn’t brighten your subject’s face enough, you can adjust the exposure of just the face. First, make a circular selection around a face.
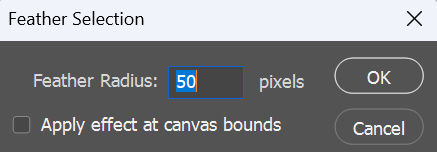
Then, add a feather to it. Select > Modify > Feather. For a 1920 x 1080 image, I create a 50-pixel feather.
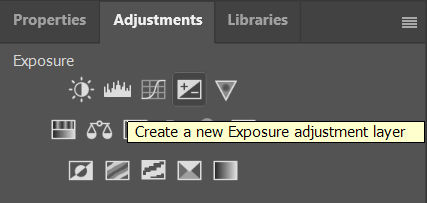
Then, adjust the exposure by going to Adjustments > Exposure
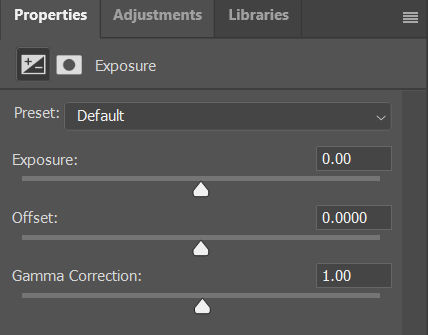
You will see a slider for Exposure. Drag it to the right to increase the exposure.
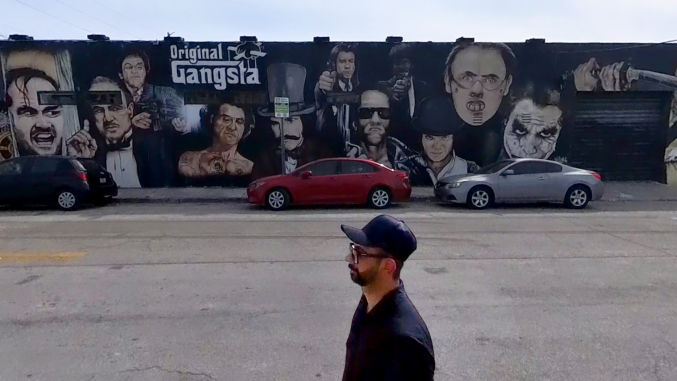
Notice how the face is brighter.
If I increase the exposure too much, the face will look nice and bright, but it won’t look natural against the darker surroundings.
The problem is there appears to be a white glow around the face. In this case, I can select just the subject or the subject’s face to limit the exposure adjustment area. In this case, no feather is needed.
Now, only the subject is brightened.
I can also tweak the levels by adjusting the shadows and the midtones so that the subject doesn’t look unnaturally bright against a darker background.
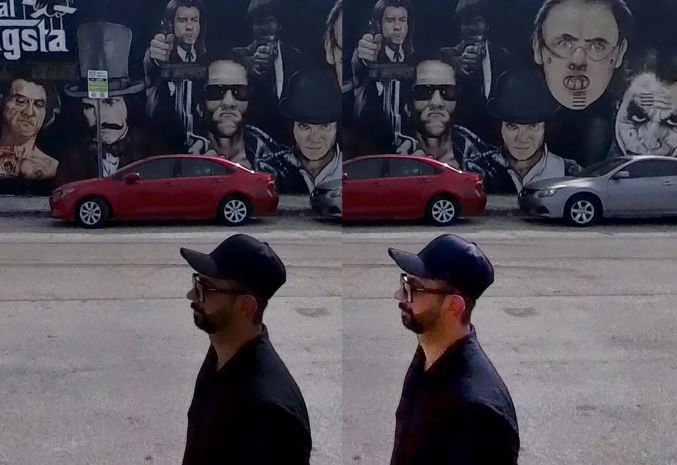
Before and After
As you can see in the before and after image below, my face looks much brighter while still appearing natural.
Many people wonder why their website doesn’t rank high for a particular keyword. Let’s take cybersecurity as an example because I am familiar with that space. A cybersecurity company usually has products and events, and a need to market them. One type of product is a tool to manage vulnerabilities. The industry refers to the topic as “vulnerability management” or “VM”. Marketers would then often ask, “why isn’t my VM product page showing up at the top of Google when people search for “vulnerability management”. Likewise, if the company has an annual user conference with session talks about cybersecurity, marketers will again often ask why their conference website doesn’t show up for the keyword “cybersecurity”. The main reason lies in search intent.
Search Intent
When people search for “vulnerability management” or “cybersecurity”, they are most likely not searching for a VM product or a cybersecurity conference. These generic terms likely indicate that they are searching for information about them rather than a tool or a conference. Consequently, search results for those terms show informational pages containing content explaining what they are as if a user searched for “what is vulnerability management” or “what is cybersecurity”.
There are 4 types of search intent:
Navigationalintent: Users want to find a specific page (e.g., “reddit login”)
Informationalintent: Users want to learn more about something (e.g., “what is seo”)
Commercialintent: Users want to do research before making a purchase decision (e.g., “best coffee maker”)
Transactionalintent: Users want to complete a specific action, usually a purchase (e.g., “buy subaru forester”)
Therefore, for the VM tool and cybersecurity conference examples above, the correct search terms to check would be something like
(best) vulnerability management tool
cybersecurity conference
The qualifiers “tool” and “conference” make it clear what people’s search intent is so they find content relevant to what they are actually looking for. But how do you know what keywords people are searching for? This is where keyword research tools come in.
Keyword Research
To do keyword research, you can use a free tool like Google Keyword Planner or a paid tool like Semrush. I’ll use Google Keyword Planner. You can use it to
discover new keywords and
get keyword search volume and forecasts.
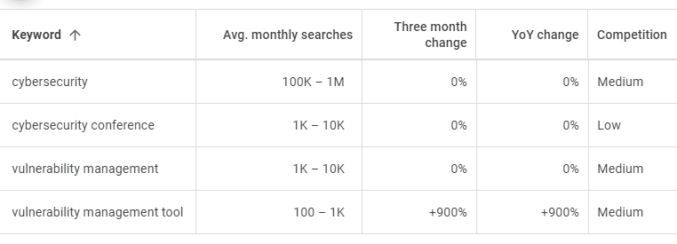
Continuing with our example, let’s see how many people search for the following keywords:
vulnerability management
vulnerability management tool
cybersecurity
cybersecurity conference
I enter those keywords as shown below…
and Google spits out the following data
The keyword “vulnerability management” gets many more searches per month compared to “vulnerability management tool”. But, since people searching for “vulnerability management” are probably not looking for a tool or software, people will likely ignore your VM product page even if it does show up in the #1 spot. The keyword “vulnerability management tool” gets fewer searches, but ranking for it will at least match your product page with a targeted group of interested people. Therefore, you’ll want to optimize your page for the keyword “vulnerability management tool”, e.g. by adding the word “tool” to your page copy, and monitor your Google page rank for that keyword.
As for the conference example, though the keyword “cybersecurity” gets a huge number of searches per month, it’s such a generic term that most people are probably not looking for a cybersecurity conference when they search for “cybersecurity”. On the contrary, the keyword “cybersecurity conference” is more specific / targeted and gets a decent search volume. Therefore, that is the term you should optimize for and monitor your page rank for.
In addition to the keywords you may already know about, you can using Google Keyword Planner to discover other relevant keywords. For example, if I enter “vulnerability management tool”…
I get the following results.
It looks like some companies like “Qualys” and “Rapid7” are known for having vulnerability management tools, so people looking specifically for their respective product pages just use the company name as a qualifier. However, there are some non-brand keywords that get a decent amount of searches as well, including “vulnerability management program” and “vulnerability management process”. While these keywords can be included in a VM product page, they may deserve to have their own pages.
How Long to Rank High
Now that you know what keywords to target, another misunderstanding people have is that adding keywords to a page will result in a higher page rank in just a matter of weeks. First of all, keywords are just one of many factors that affect page rank. SEO is a long-term strategy. Unless you’re looking to rank high for a long-tail keyword – a keyword so specific that there is very little competition – don’t expect immediate results.
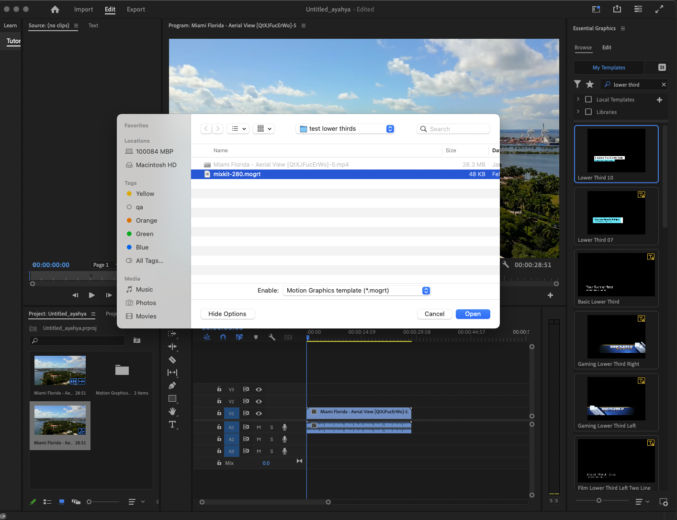
A lower third is a text title or graphic overlay placed in the lower region of the screen. Motion Graphics templates are a file type (.mogrt) that can be created in After Effects or Premiere Pro. Here’s an example of a motion graphic lower third.
There are many motion graphic templates for lower thirds available online, e.g.
In this tutorial, I just get a free one from Mixkit.
Download MOGRT template
Download this free template and unzip it. You’ll get an mogrt file and an mp4 file showing how the animated title looks.
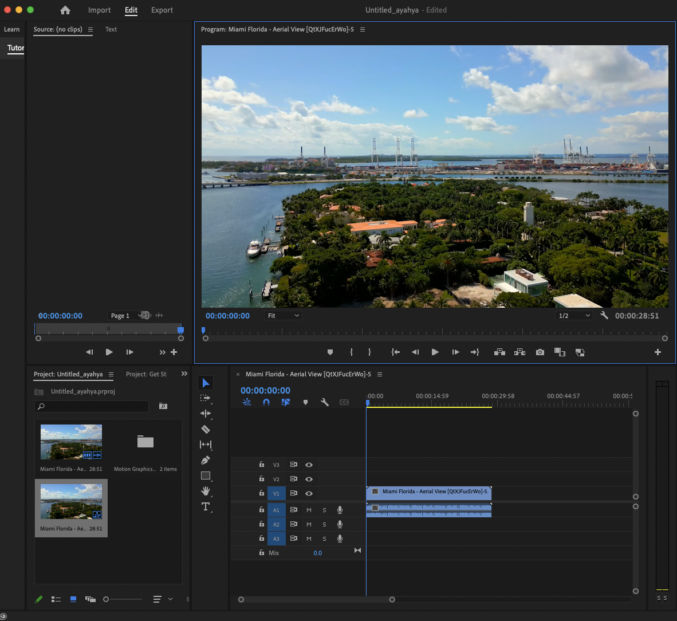
Add a video to your timeline in Premier Pro
Drag a video to the timeline pane.
Open the Essential Graphics pane
Click on Window > Essential Graphics. You’ll see the Essential Graphics pane on the right.
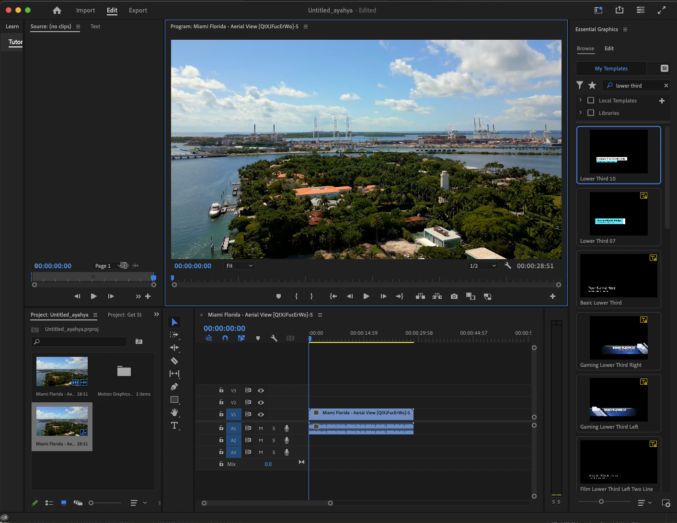
Install the mogrt file
In the Essential Graphics pane, click the “Install Motion Graphics template” button in the bottom right corner. Browse to the mogrt file and click Open. The template will appear at the top of the list of templates in the Essential Graphics pane.
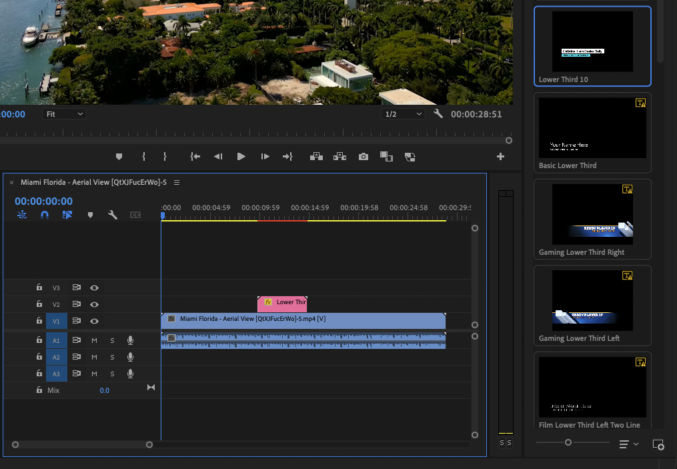
Drag the template to the timeline
I dragged it to the V2 track.
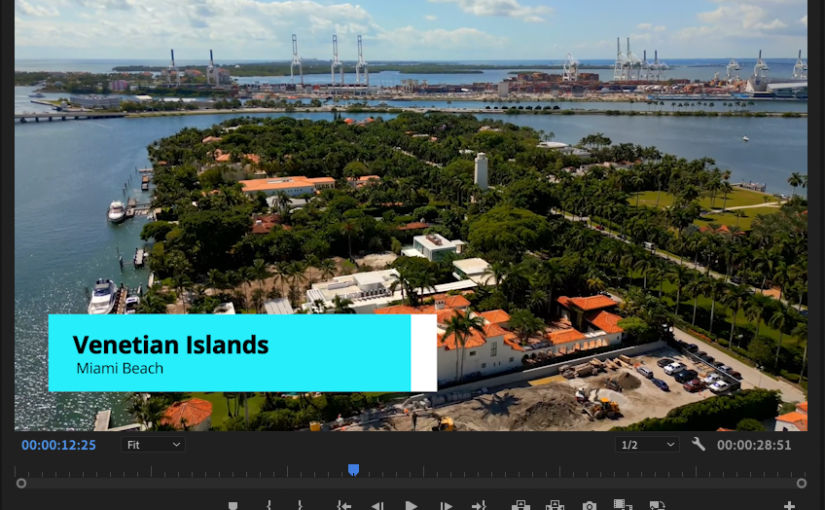
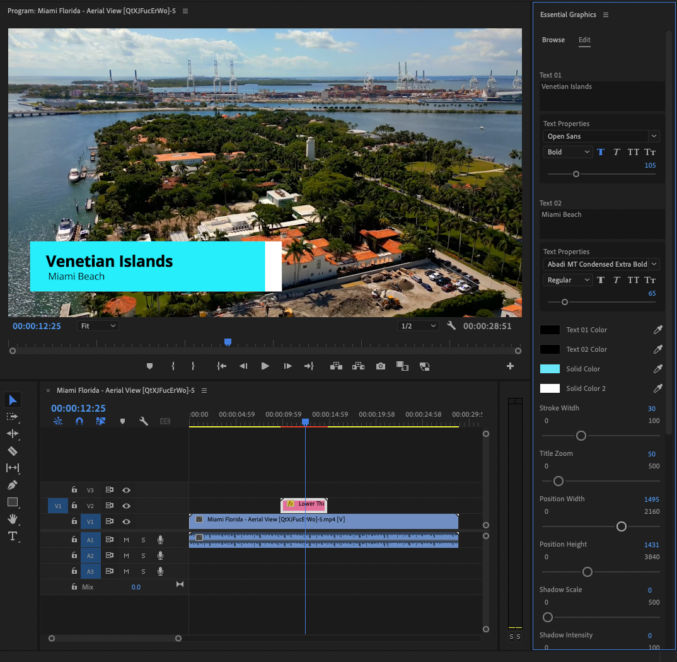
Edit the template
Double-click the motion graphics clip in the timeline (pink bar) to edit the template. Depending on the template, you can edit the text, colors, size, positioning, etc.
Preview the lower thirds title
Click the play to preview the lower thirds animated title. You may find the duration to be too short.
Extend the duration of the lower thirds title
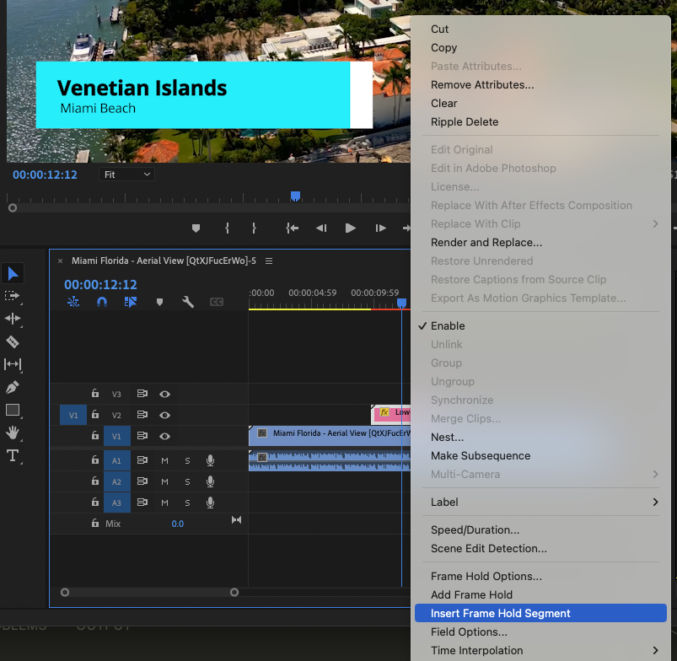
Move the playhead in the timeline to the point where the title text is fully shown and not moving. At that point, right-click on the motion graphic clip in the video track (pink bar) and click on “Insert Frame Hold Segment”.
This will split all clips at that timestamp and the motion graphic clip will be split such that you can extend the middle subclip, which is the clip containing the frame showing the full title text, to increase the duration of the title. You will need to move the right subclip of the animated title to the right to make room to extend the duration of the middle subclip.
For the split video clip, just drag the right clips toward the left clip.
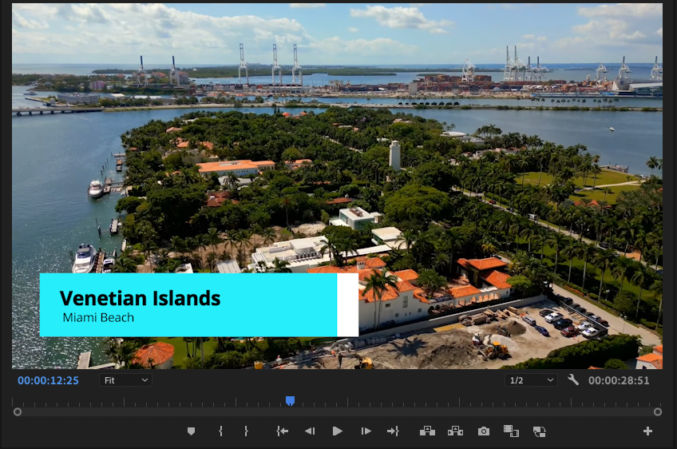
You may end up with something like this.
Preview the animated lower thirds title. If it looks good, export the video. Otherwise, tweak the title further.
The video below is the same video but with the text removed.
Same video with text / watermark removed
We can remove objects like text and watermarks from videos using Adobe After Effects (AE) content-aware fill feature. Here’s how I did it for the video above.
1. Open your video in Adobe After Effects
Choose “New Composition From Footage” and select your video.
2. Shorten work area
The content-aware fill takes a long time to process. To speed up testing, shorten the work area to a 2-second section by dragging the blue start and end markers on the timeline.
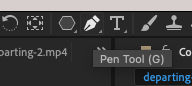
3. Create a mask
Click a tool like the pen tool and create a mask area around the object (in this case, text) you want to remove.
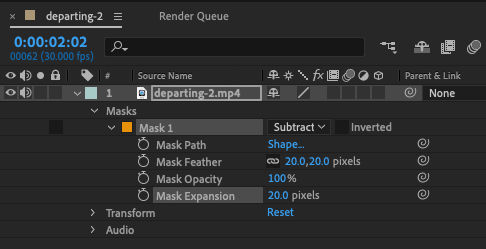
4. Adjust mask settings
In the video track, expand the Masks and select “Subtract”. For the Mask Feature, choose 20 pixels for the vertical and horizontal feather. For the Mask Expansion, choose 20 pixels as well. Play with these settings until you find values that produce good results.
These changes cause the mask to look like this
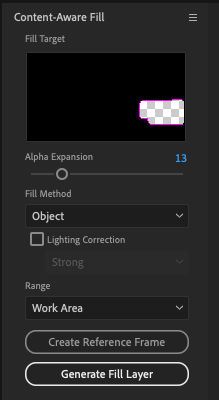
5. Adjust content-aware fill settings
If the content-aware fill pane isn’t open, open it by going to Window > Content-Aware Fill.
For the alpha expansion, I set the value to 13. You can experiment with different values.
For the fill method, choose “Object”.
For the range, choose “Work Area” because we only want to apply the fill to the short 2-second work area for now.
Click the “Generate Fill Layer” button. You will be asked to save the project if you haven’t already done so. You will then see AE analyze and generate the fill layer.
You will see the fill layer above the video layer in the list of tracks / layers.
6. Preview the content-aware fill layer
Click the play button in the preview pane to preview the content-aware fill.
This is how it looks for me. I think that looks good. If it doesn’t look good, go back and tweak some of the previous settings and try again.
7. Apply content-aware fill to the entire range containing the text to remove
Move the blue start and end work area markers to the beginning and end where the object / text you want to remove.
Disable the test content-aware fill layer by toggling the eye icon.
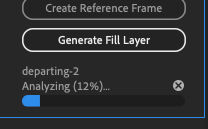
In the content-aware fill pane, click “Generate Fill Layer”. AE will create a new content-aware fill layer above our test layer. If the work area duration is long, this will take time to process.
Content-are fill will go through an analyzing phase followed by a rendering phase.
8. Preview complete content-aware fill effect
Click the play button in the preview pane again to see how the fill effect looks in the entire clip. If it looks good, you can export the video.
9. Export the video
Click File > Export > Add to Render Queue.
If the output location is unspecified, choose an Output To location. Then click the Render button.
Update: Use a reference frame for better results. The more reference frames, the better the results.
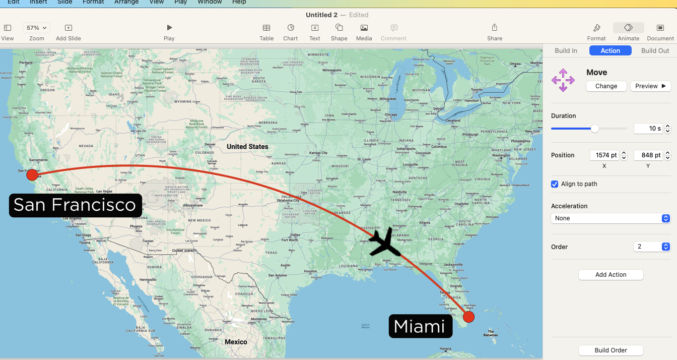
In this post, I’ll show you how to make an animated travel map like the one below using Apple Keynote.
1. Get an image of a map
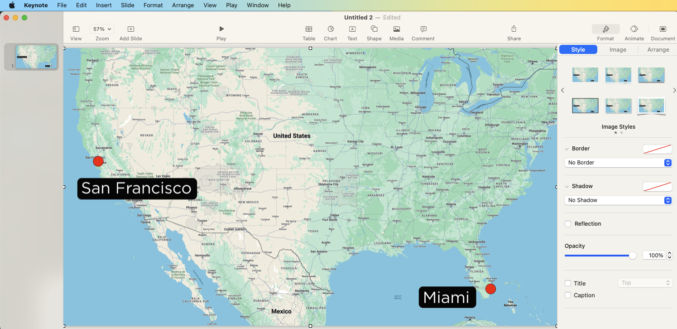
I usually just go to Google Maps, zoom in/out to the area I want to show, then take a screenshot. In this example, I took a screenshot of the USA because I want to show an animated flight path from San Francisco to Miami.
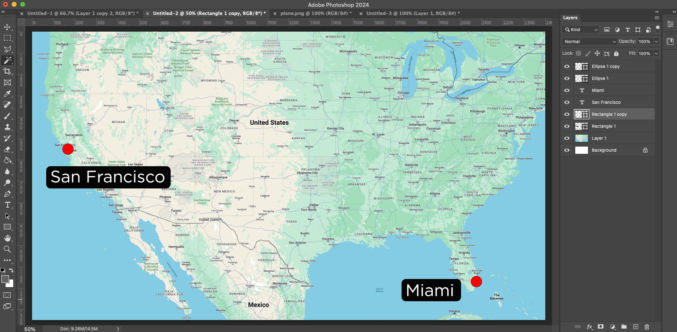
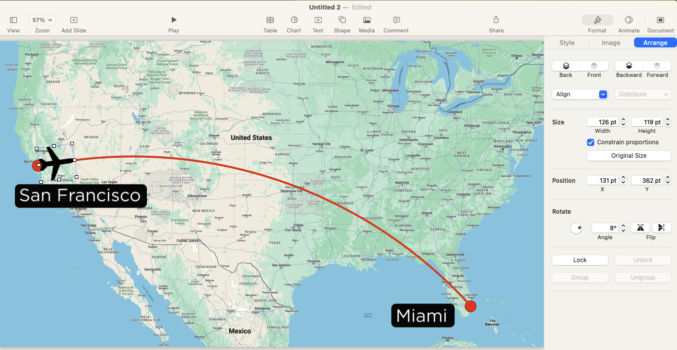
2. Crop map and optionally add labels
Open the screenshot in an image editor (I use Photoshop) and crop to your target video resolution. My target resolution is 1920 x 1080 (standard HD). I also added some red dots where the start and end points will be as well as some city labels.
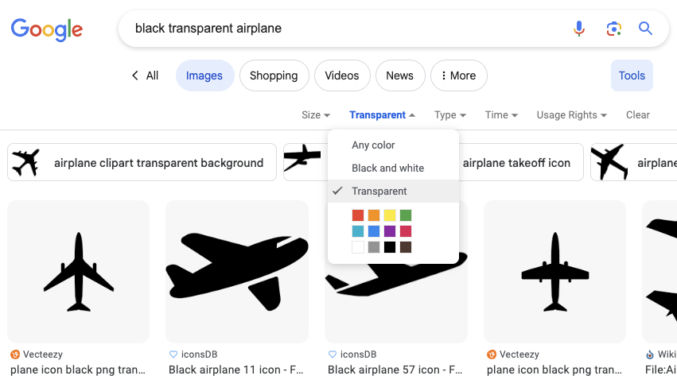
3. Get a transparent image of a plane, car, train, boat, etc
Since I want to show an airplane animate along a path, I looked for an image of one in Google Images. The background should be transparent. In Google Images, you can choose Tools > Color > Transparent to find images on a transparent background.
I chose this image.
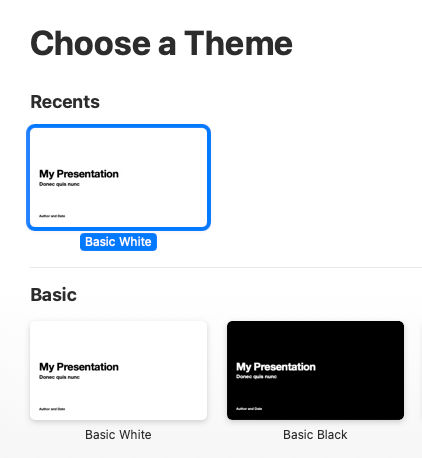
4. Create a blank Keynote presentation
Open Apple Keynote and choose the basic white theme.
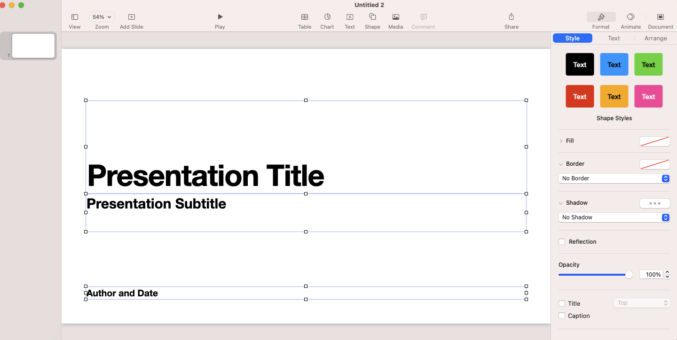
You will get a single slide. Select and delete everything in the slide.
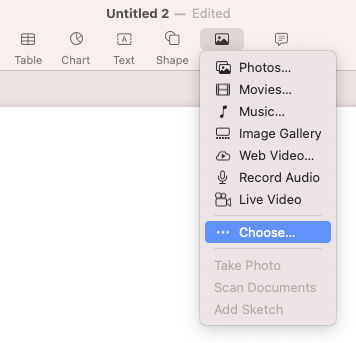
5. Insert background map
Go to Media > Choose and select the background map.
6. Draw a path
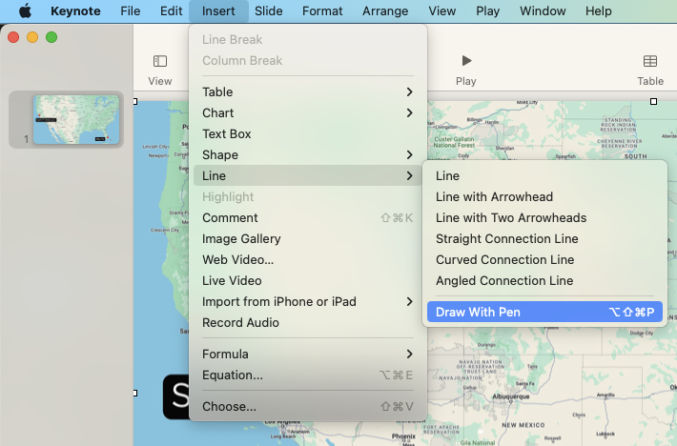
Go to Insert > Line > Draw With Pen and draw your travel path.
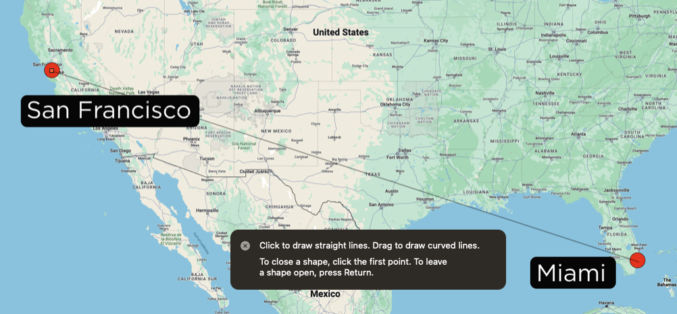
Click on the start point then click on the end point. You will get a straight line.
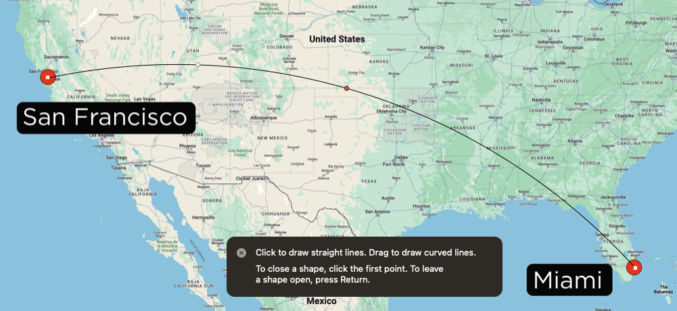
In the middle of the line, there will be a point. Click and drag it up if you want to create a curve. Repeat with other midpoints as necessary.
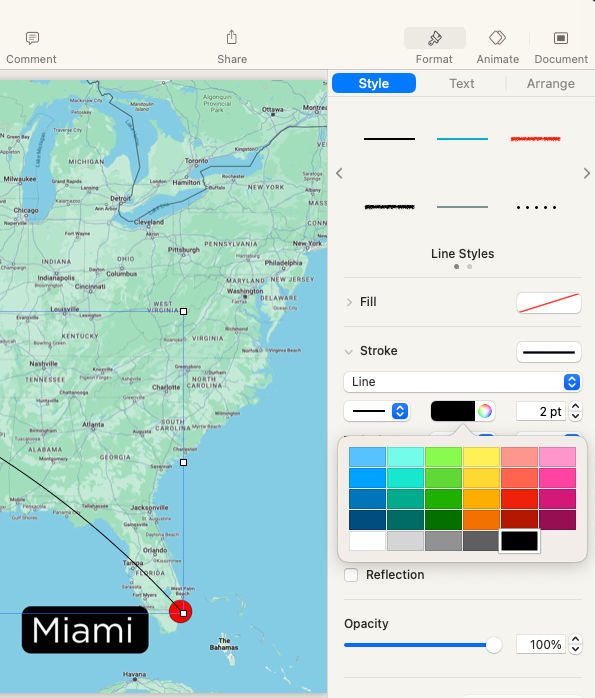
When you’re done, hit the ESC key. We now have our travel path. Let’s change the style of the path. I’m going to make it red and thick. In the right pane, under Format > Style, you can edit the style of the element (curve). I choose a red color that is 7 pt thick.
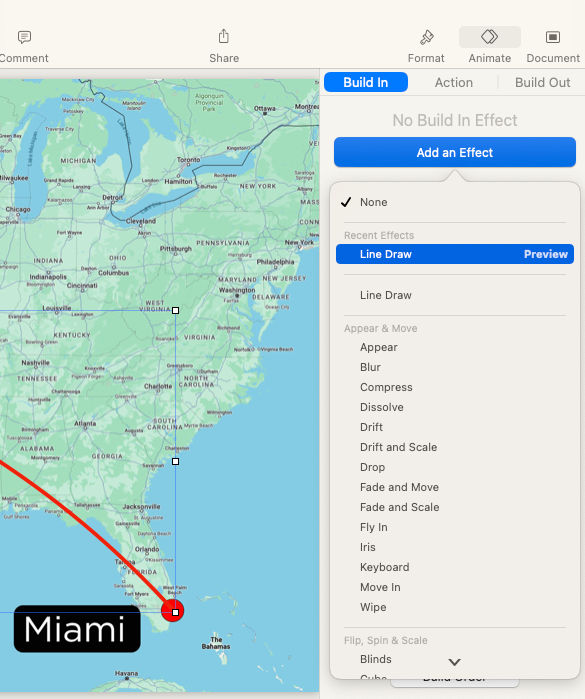
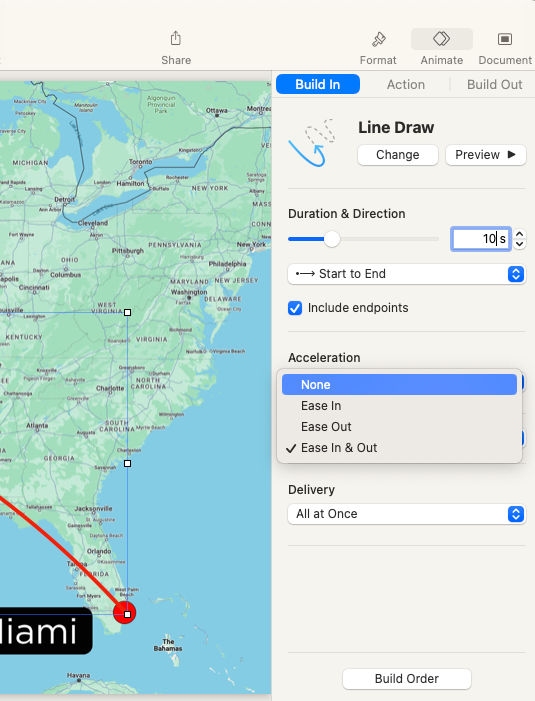
7. Animate the path
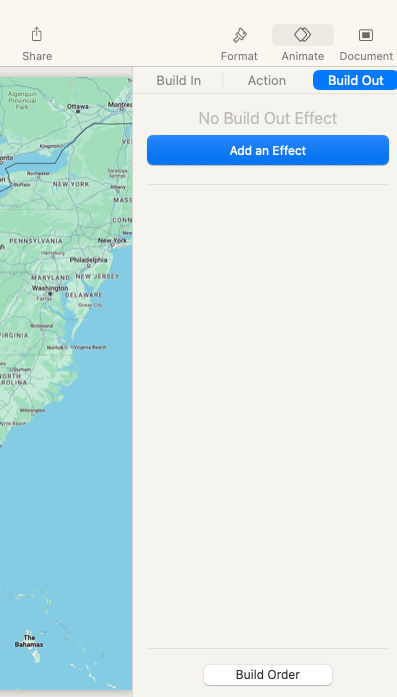
In the top right corner, choose the Animate tab and then “Add an Effect” > “Line Draw”.
You can then change the default animation from 2 seconds. I changed the duration to 10 seconds so that in my video editor, I can slow it down without it appearing jumpy. I also changed the acceleration to “None”.
Click the “Preview” button to preview the path animation.
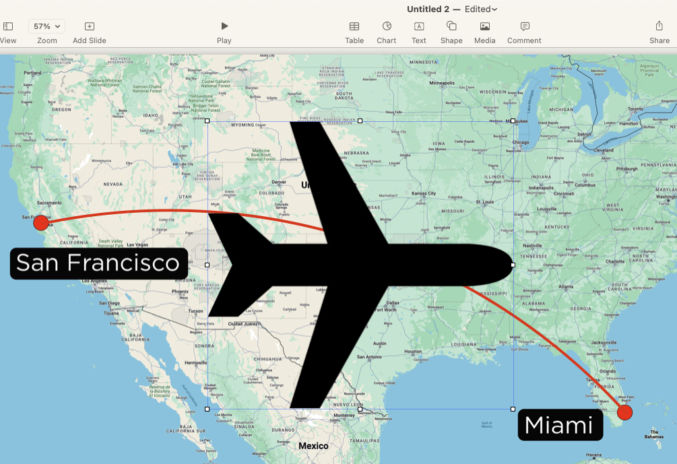
8. Add the airplane image
As in step 5, go to Media > Choose and select the airplane image.
Scale the airplane by dragging one of the corners. Drag the airplane to position it at the start point.
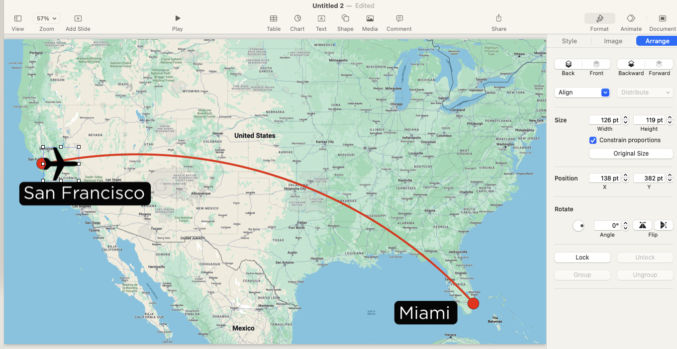
Rotate the airplane. In the top right choose Format > Arrange and adjust the rotation value such that the nose of the plane is aligned with the flight path.
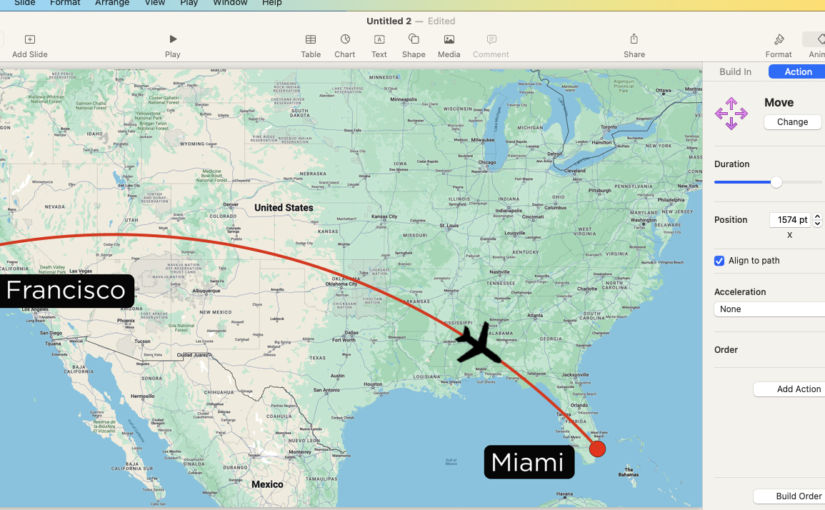
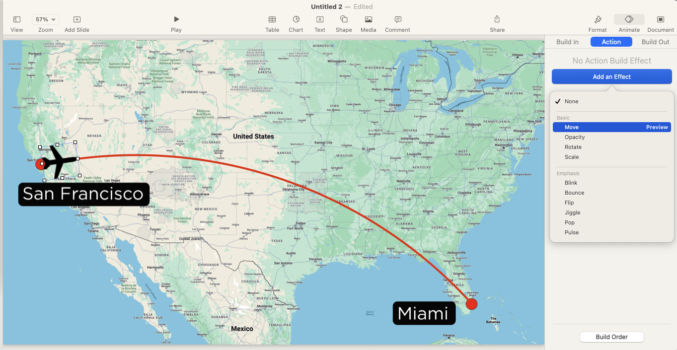
9. Animate the airplane
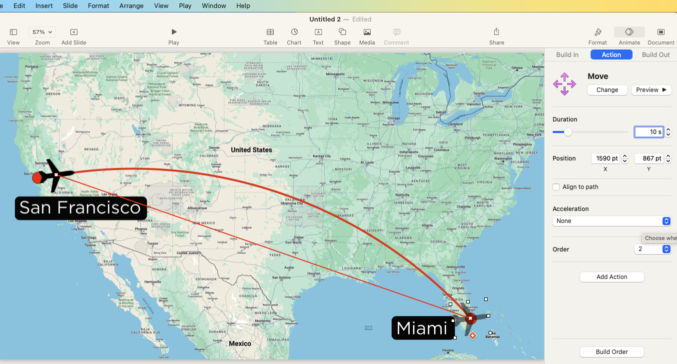
In the top right, click Animate > Action > Add an Effect > Move.
Drag the airplane to the end point. Set the duration and acceleration to match that of the flight path (10 sec, None).
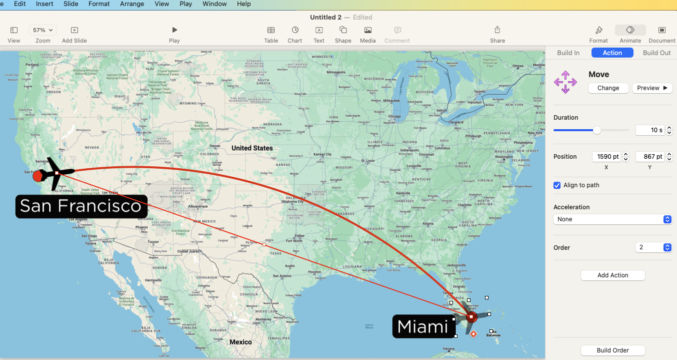
Click Preview to preview the animation. The airplane doesn’t yet follow the flight path. Check the “Align to path” checkbox. A point will appear along the line between the airplane’s start and end points. Drag that middle point to where the flight path is.
Click Preview again. You will see the airplane animate along the flight path.
10. Animate the flight path and airplane at the same time
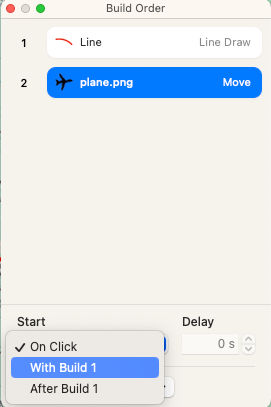
In the top right, click Animate > Build Out > Build Order.
You will see a list of all animation effects. The first animation is the line (flight path). The second is the plane. Choose te second animation and then under “Start”, select “With Build 1”.
11. Export the animation
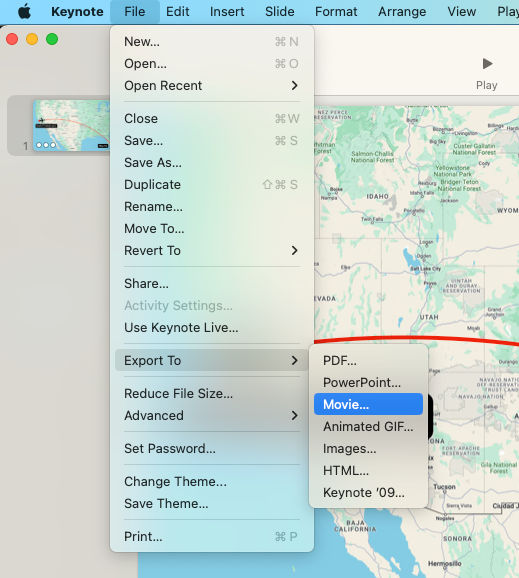
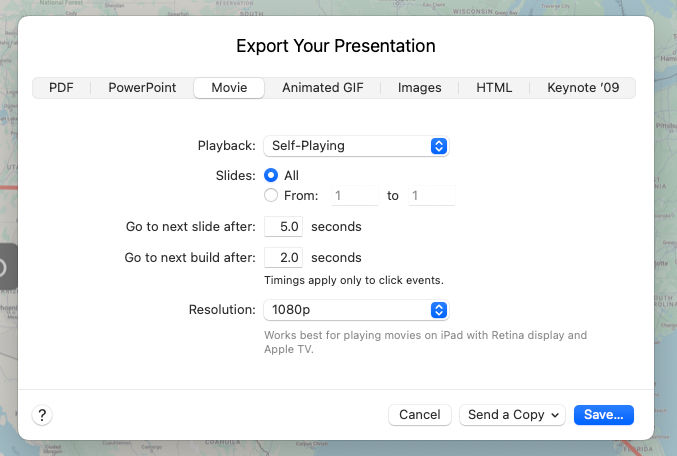
Choose File > Export To > Movie.
Since there’s only 1 slide, you can leave “Slides” to “All. The resolution should match that of the background image (1080p).
Here are some alternatives for creating an animated travel map:
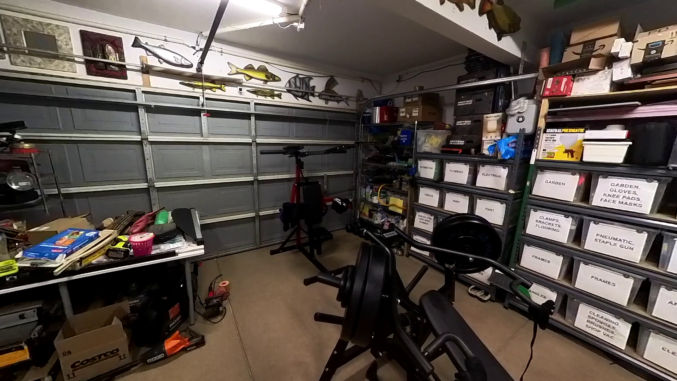
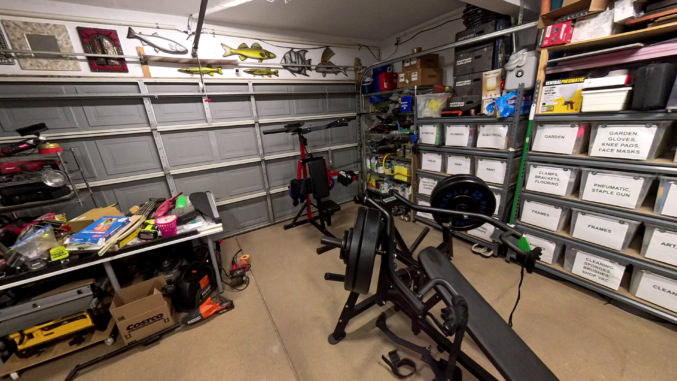
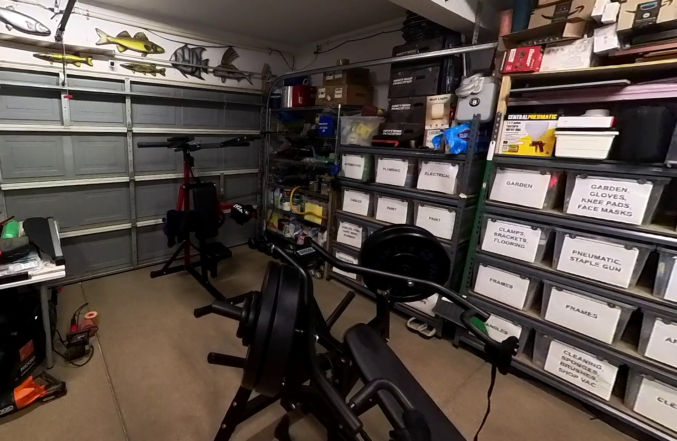
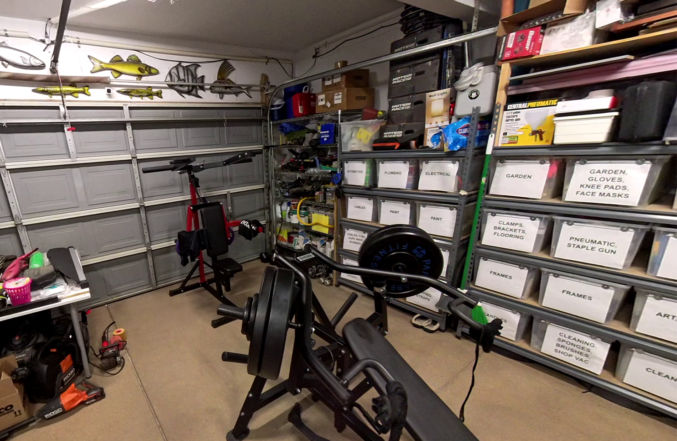
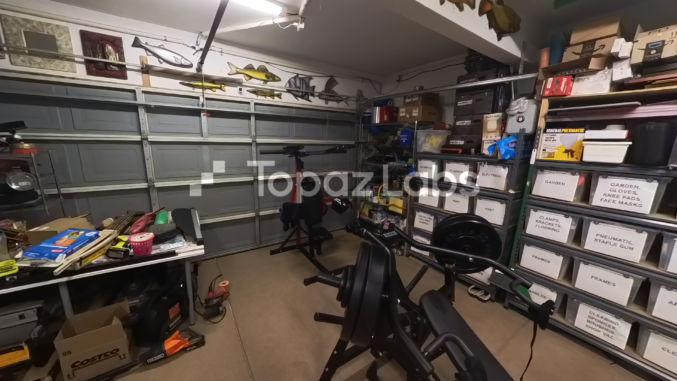
Going to the gym is a hassle, and with our busy lives, it’s hard to go routinely to achieve fitness goals. That’s why I decided to just move the gym into my home by creating a home gym in my garage. Of course, space is limited, but I do have enough space for some equipment. Since space is limited, I decided to focus on upper-body workouts. To see the biggest gains, most people would agree that the upper-body muscles to target in descending order are as follows: (each muscle’s relative size is also shown based on this article)
Delts / Deltoids (shoulders) – 380 cm3
Tri’s (triceps) – 370 cm3
Pecs / Pectoralis Major (chest) – 290 cm3
Lats / Latissimus Dorsi – 262 cm3
Traps / Trapezius
Bi’s (biceps) – 143 cm3
Dumbbells / Free Weights
Almost all exercises can be done using dumbbells or free weights, which don’t take a lot of space. However, I personally don’t like dumbbells or free weights because
it’s hard to lift heavy weights with them
they are more dangerous than using machines, which makes you opt for lower weights
it’s harder to balance them and use proper form compared to using a machine
they are not necessarily more comfortable to use compared to machines
you are limited to maybe 120 lbs per dumbbell
Machines
I find resistance machines way more enjoyable and safer to use, but they can take up a lot of space. Fortunately, there are some options that are designed for home gyms. Following are the machines I have and my opinion about them. They all accept 2″ Olympic plates.
This chest press machine works very well. You can incline the bench to train your upper chest, but it’s a little less comfortable in that position as your lower body is lower to the floor. The manufacturer claims you can use it to also do situps, but it doesn’t work well at all for that purpose.
As this machine is called a chest press machine, it primarily targets the chest. However, it also works the triceps to some extent. However, don’t expect much work on your triceps. A seated dip machine does a much better job for that.
Unlike the regular incline bench press, which targets your upper chest, the close-grip version targets your inner chest and triceps. In order to get better efficiency from this exercise, it is recommended to do high repetitions with low weights instead of lifting too much weight.
If you’re limited on space, you can buy a power cage + smith machine with pulley system and weight stack. The PMAX 5600 from RitKeep is currently on sale for $2000.
As for the number of sets to do for each muscle group per training session, do 3 to 6.
Log in to AWS and go to EC2 > Instances > Launch an Instance
Enter a name. I’m calling mine “My Web Server”.
For Application and OS Image, I’ll just choose the default, which is “Amazon Linux 2023”.
For Amazon Machine Image (AMI), I’ll choose the default, which is “Amazon Linux 2023 AMI”
Under Key Pair, click “Create new key pair”.
Amazon EC2 can easily create a key pair for you. Just enter a key pair name. I chose “aws-ec2”. OpenSSH is available on Linux, Mac, and Windows 10+, so keep the default key format of .pem. On Windows 10+, OpenSSH is an optional feature you must install. Click the “Create Key Pair” button. The private key will be downloaded to your computer. Keep it in a safe place. You will need it to SSH into your EC2 instance.
In the Network Settings section, since we want to SSH into the EC2 instance and we want to be able to browse our website over HTTP and HTTPS, check those checkboxes.
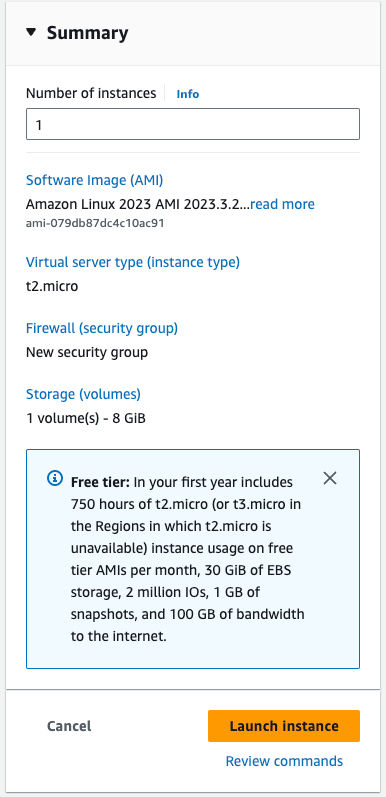
Leave everything else at their defaults. Review the summary and click the “Launch Instance” button.
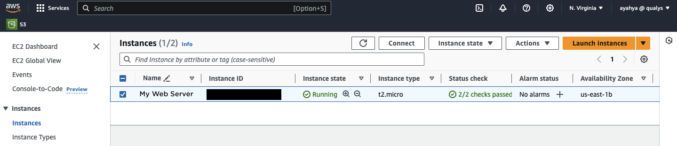
You will then see your EC2 instance listed. Wait for the “Status check” to change to “2/2 checks passed”.
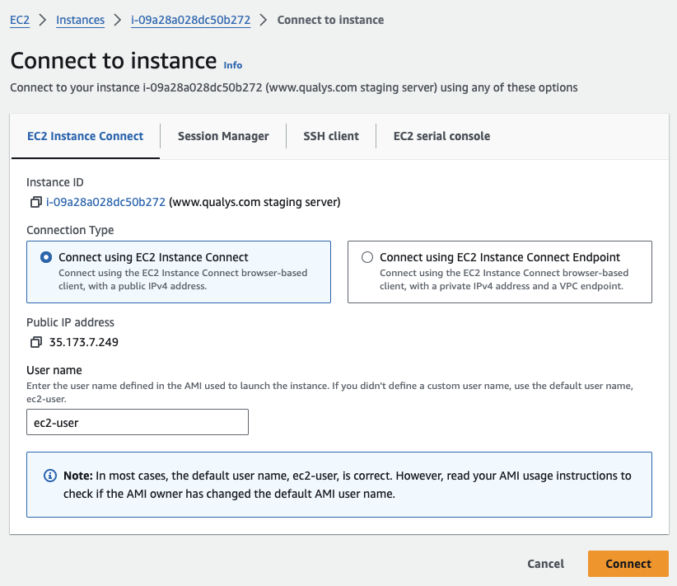
Once your instance has been set up, click the button to connect to the instance.
SSH into EC2 Instance
You have a few options to connect to the EC2 instance. For simplicity, choose EC2 Instance Connect. This will open a new browser tab with shell access. Leave the default username as “ec2-user”.
You’ll notice the command prompt changes to ec2-user@ip-172-31-47-114 which is my default username (ec2-user) followed by my EC2 instance’s private IP (ip-172-31-47-114).
Install Apache
Since we installed Amazon Linux 2023, follow these instructions to install Apache. Since we don’t need MySql and PHP, ignore the commands and instructions for those. For example, instead of
Make sure to follow the instructions to set the file permissions so that Apache can serve the website.
The Amazon Linux Apache default document root is /var/www/html
The Apache config is at /etc/httpd/conf/httpd.conf
The Apache logs are in /var/log/httpd/
To view Apache errors, run the following command
sudo tail -100 /var/log/httpd/error_log
Test that Apache works by going to the public IP address WITHOUT “https”, e.g. http://34.229.240.7/.
Set Up SSL/TLS
These instructions show how to create a self-signed certificate and a CA-signed certificate. For a self-signed cert, you don’t need a domain name. You can access your website over https by IP address, e.g. https://34.229.240.7/
For a CA-signed cert, you can follow these instructions to automate certificate renewals using Let’s Encrypt with Certbot. You can also use AWS Certificate Manager to manage and automatically renew certs.
Get a Fixed IP Address
The default IP address that AWS gives you is dynamic (will change whenever the server restarts). To get a static (fixed) IP address, get an Elastic IP Address. Once you get one, try to access your website over https, e.g. https://35.173.7.249/
Put Your Website in a GitHub Repo
Create your website locally in a folder. If you have an existing website under git version control with a lot of history and you want to remove the history, git clone the repo into a new folder, delete the “git” folder, and then run git init.
Clone your GitHub repo to your EC2 instance. I’m going to clone it to my home folder.
In GitHub, get the SSH URL of your repo.
Then, in your home folder, clone it
You will then see a new folder containing your website files from the GitHub repo.
Since my website document root is at /home/ec2-user/my-website/www, we need to update the Apache default document root (/var/www/html) to reference that path by editing the Apache config.
sudo nano /etc/httpd/conf/httpd.conf
Change all references of /var/www/html to /home/ec2-user/my-website/www
Change all references of /var/www to /home/ec2-user/my-website
Restart Apache (sudo systemctl restart httpd)
Update Folder Permissions
If you try to view your website, e.g. by going to https://35.173.7.249/, you will probably get a “Forbidden” error. To better understand this error, view the Apache error log.
sudo tail -100 /var/log/httpd/error_log
You will probably see an error like this
[Sat Dec 23 01:36:55.545345 2023] [core:error] pid 89394:tid 89446 Permission denied: [client 135.125.246.189:49368] AH00035: access to / denied (filesystem path '/home/ec2-user/my-website') because search permissions are missing on a component of the path
To fix this, follow these instructions on how to update file permissions
But replace /var/www with your website document root. In my case, I changed it to /home/ec2-user/my-website
I recently added a slab of concrete in the backyard of one of my rentals. Unfortunately, I made some mistakes along the way. Specifically,
I removed too much dirt from the area where the slab would go
I could have paid less for a contractor to do the concrete work
I should have verified the quality of the contractor’s work
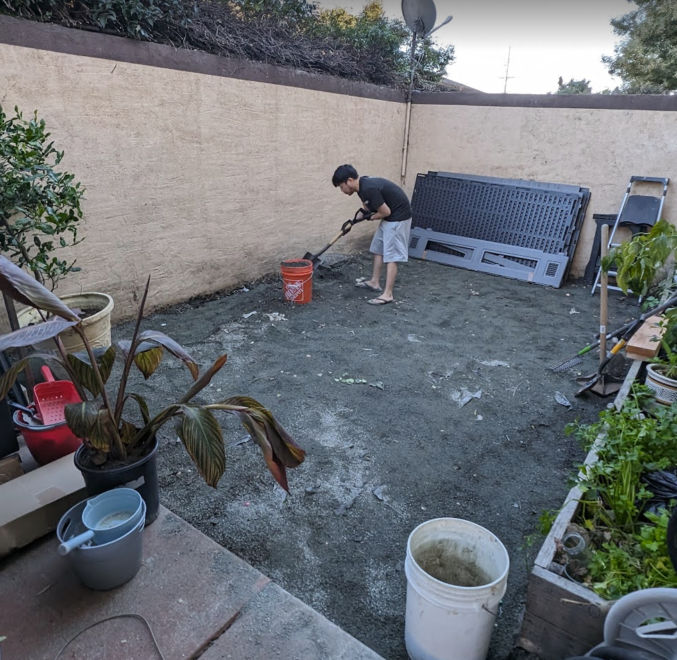
Preparing the Foundation
We first removed a lot of dirt and gravel by scooping it into some buckets. We did this so the 3.5″-thick concrete slab would be level with the existing concrete slab.
I rented a pick-up truck from U-haul and put tarp on the truck bed to protect it. This also made cleanup easier because I could pull the tarp off the truck along with any remaining dirt on it.
Driving with a full load of dirt made the truck swerve slightly at higher speeds so we took local roads to go to the city dump.
At the dump, we just shoveled the dirt onto the ground. The problem was the cost to dump dirt and gravel. If I had paid by weight, the cost would have been about $500. The clerk instead calculated the cost by volume, which lowered the cost to $372.
After making one trip, I regrettably thought I needed to remove more dirt and gravel. So, we made another trip and I spent another $372. After creating the wood form for the concrete slab, we realized that we had removed too much dirt, which meant I needed 2.5 times the amount of concrete I should have needed.
Getting Quotes
I called around to get quotes from concrete contractors. The slab dimensions would be 9′ x 15.5′ (140 sq ft). The first contractor quoted me $2000, but then lowered it to $1700. He quoted me without seeing the work area.
The second contractor came to see the work area and then quoted me $1500. That meant his rate was $1500/140 = $10.71 / sqft. According to one source, the cost in the California Bay Area to install a concrete slab including materials and delivery is between $8 to $14 / sqft. Therefore, I went and chose the 2nd contractor and paid $10.71 / sq ft.
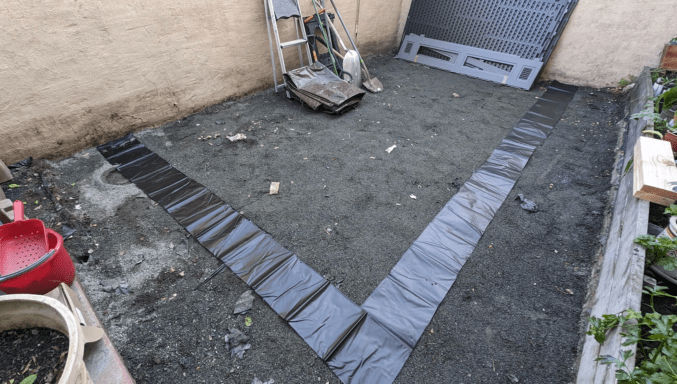
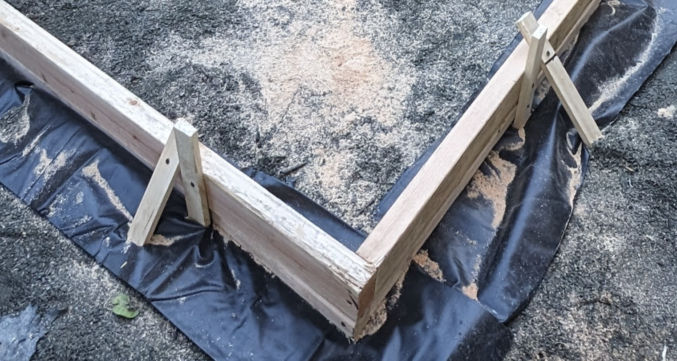
Creating the Concrete Slab Form
The contractor came and created the wood form. I first compacted the soil using a hand tamper and put down some pond liner where the edge of the concrete would be. Half of the pond liner would be under the concrete. The other half would be under rocks or mulch. The reason for doing this is so that weeds don’t grow along the edge. I left a 30″ gap between the old concrete slab and the new one for rainwater to drain into the ground.
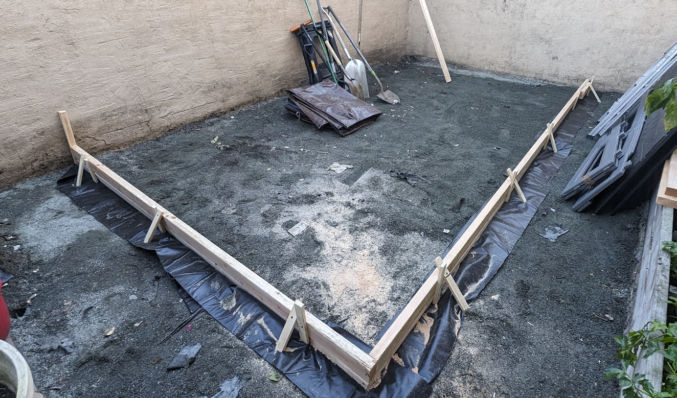
This is when I realized that I had removed too much dirt and gravel. I wanted the top of the new concrete slab to be level with the existing concrete slab in the backyard. Using a level, the contractor drove a wood stake into the ground and marked on it where the top of the 2×4 wood form would go. Screws were screwed through the vertical stakes into the 2x4s. Wood stakes were also used at an angle. This was necessary because without them, the weight of the concrete could push the vertical stakes and cause a deformity in the form. As you can see in the photo below, too much dirt and gravel had been removed, so the contractor had to put another 2×4 below the first set of 2x4s. This resulted in a slab thickness that was approximately 3.5″ x 2 = 7″ (one 2×4 is actually 1.5″ x 3.5″). That’s twice as much as is needed for a standard slab and therefore twice the amount of concrete would be needed.
Furthermore, I wanted the slab to slightly slope towards the long edge so that rainwater could flow into the ground rather than puddle on the slab and weaken it (concrete is porous). To determine the slope, the contractor used a level on the 2×4 and tilted it slightly before screwing it into the wood stakes. Then, he used a red chalk string to snap a line on the wall, marking the desired height of the slab along the wall. Since the red chalk wasn’t clear, he went over parts of it with a black marker as shown below.
Lay Rebar
To reinforce the concrete, the contractor added rebar. He cut the rebar with a reciprocating saw and metal blade.
They then tied the rebar together in what appeared to be plastic-coated wires or electrical (romex) cable.
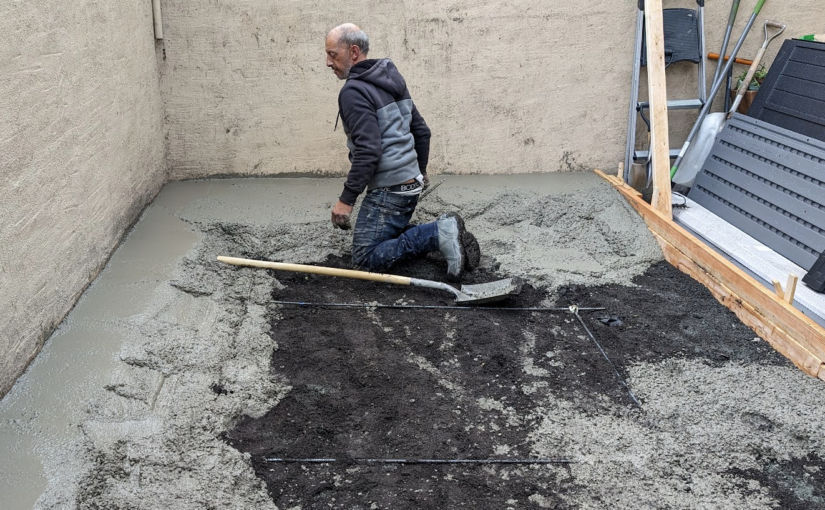
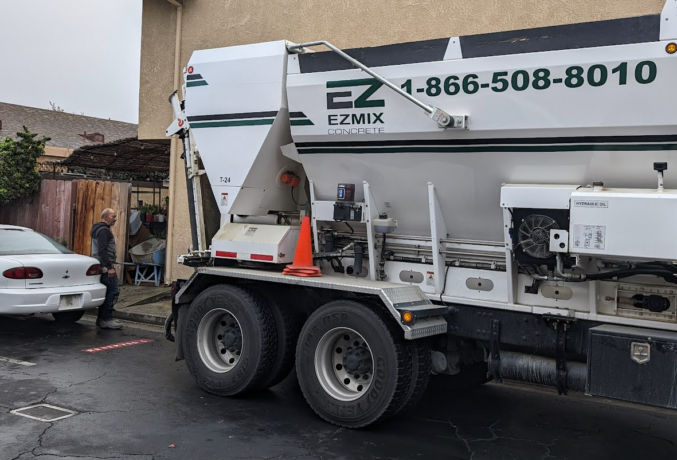
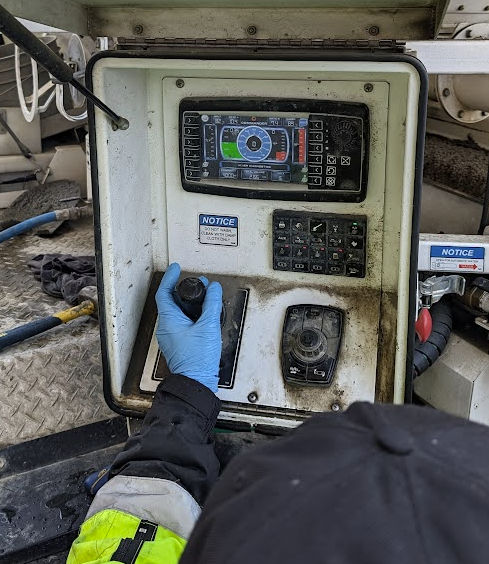
Pour Concrete
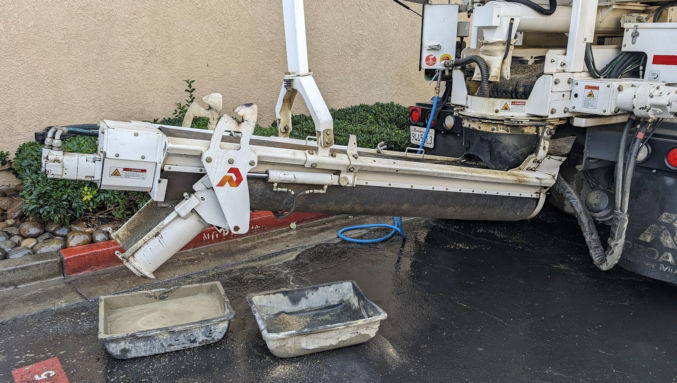
Instead of buying a bunch of bags of concrete and mixing them with water, the contractor ordered a truck to come and deliver premixed concrete.
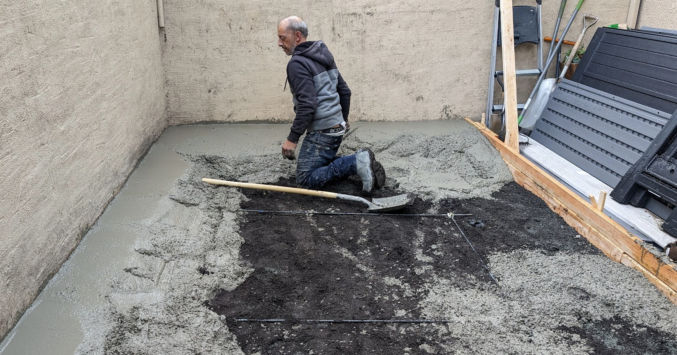
The premixed concrete flowed down a channel into a wheelbarrow.
One person transferred the concrete to the work area while the other used a trowel to trowel the concrete.
Occasionally, they’d pull the rebar up so that it would settle in the middle of the slab rather than at the bottom.
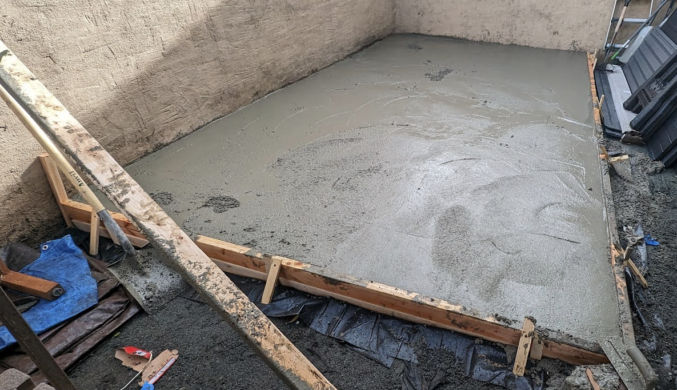
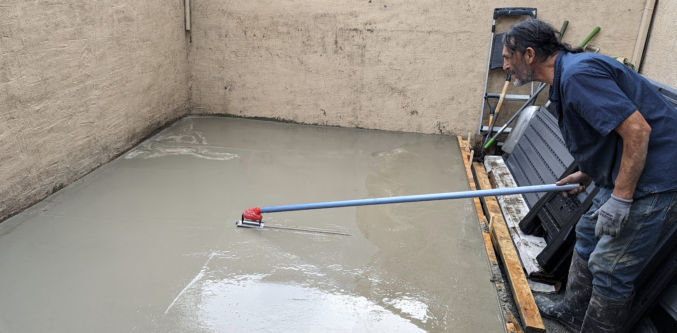
After pouring all the concrete and moving it into place using a hand trowel, this is how it looked.
The contractor then used a float attached to a pole to create a smooth surface. If necessary, he would spray a mist of water to soften the concrete.
On the truck, the concrete supplier could see how much concrete was supplied. As you can see below, I needed a total volume of 2.66 cubic yards. People in the business would just say “yards”, which makes no sense since that’s a measure of length rather than volume. What they really mean is cubic yards.
The unit cost of concrete is $169 / cu yd (cubic yard). Fortunately, the concrete supplier put down 2.5 cu yds rather than 2.66 cu yds to save me a little money. Had I not removed so much dirt and gravel, I could have only needed 1 cu yd for a 3.5″ thick slab. Instead, the resulting slab is now 6 to 6.5″ thick.
For small loads, the concrete supplier charges an extra $80 for 1 to 2.75 cu yds or $60 for 3 to 4.75 cu yds. Again, the supplier gave me a small discount by only charging me an extra $60 instead of $80. Then, there’s the delivery fee, which costs $80. The total cost for just the concrete was $607.91.
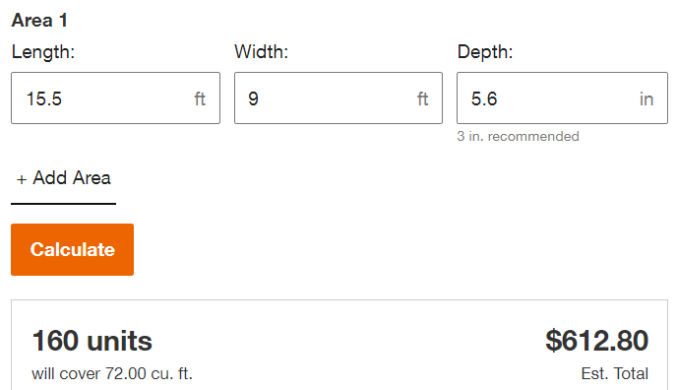
For comparison, if you buy bags of concrete at Home Depot, transport it yourself, and mix it with water, you’d pay $612.80 + 10% tax = $674 for the same 2.66 cu yds (72 cu feet) of concrete.
The concrete supplier cleaned his truck and washed the surrounding area.
The contractor then used an edging trowel to create a rounded edge.
He also used a special tool to create a control joint line.
Once the concrete dries a bit, he’ll give the concrete surface a brushed texture so it’s not slippery smooth. Then, tomorrow, he’ll remove the wood form.
Smoothen Uneven Spots
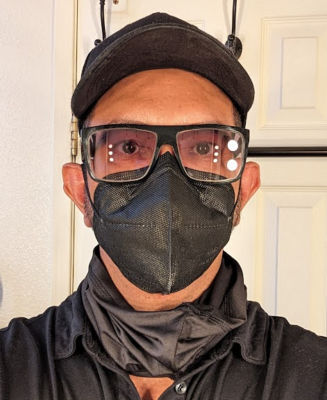
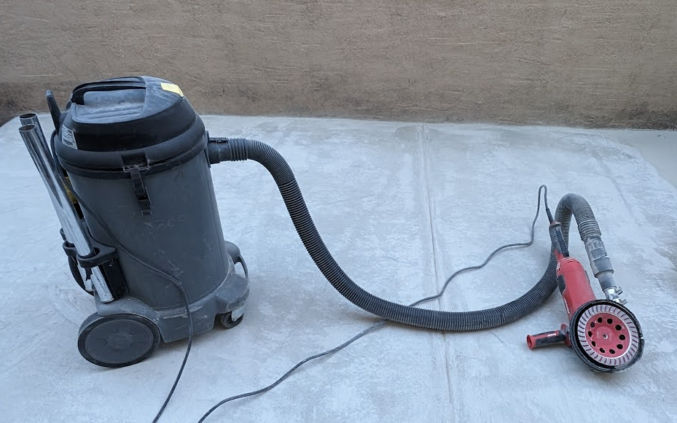
Unfortunately, the contractor didn’t do a good job. There were some uneven areas that drove me crazy. To fix this, I used a 7″ concrete grinder.
7″ Dust Shroud I bought the Dustless Technologies 7 in. Universal Dust Shroud Pro for Angle Grinders from Home Depot. It’s a bit expensive, but it works better than others I’ve tried.
N95 Face Mask and/or Neck Gaiter and/or Balaclava Despite using a powerful shop vac, some dust will still escape. Wear an N95 face mask like this one coupled with a neck gaiter or a balaclava.
Rubber Strip and Hose Clamps To prevent the shop vac hose from detaching from the angle grinder, I wrapped a 2″-wide rubber strip around the connection and clamped it using two hose clamps.
Knee pads You will be on your knees when grinding concrete. Wear knee pads. I like this one on Amazon.
IMPORTANT: concrete dust is very dangerous if inhaled! Always wear protection.
N95 maskN95 mask with neck gaiter for added protectionN95 face mask and balaclava for even better protection
When grinding concrete, move relatively quickly and in a circular motion to avoid creating uneven spots.
Etch the Surface
Raw concrete doesn’t look that great. To beautify it, I’ll apply some epoxy to it. In order for the epoxy to stick, the smooth surface needs to be etched. The easiest way to do this is by renting a flooring tool with the Diamabrush concrete prep attachment. In my case, the surface wasn’t smooth, so I was able to skip this step.
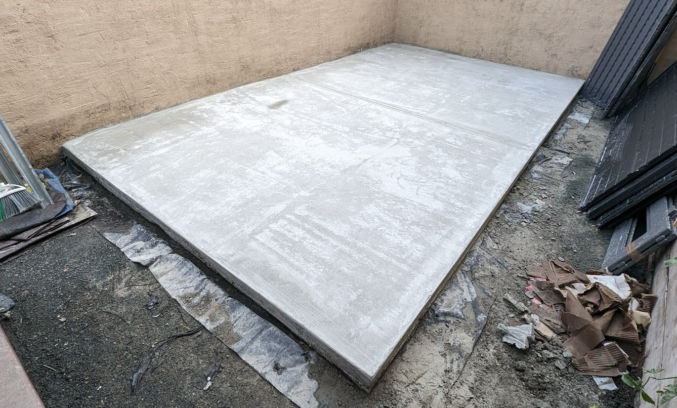
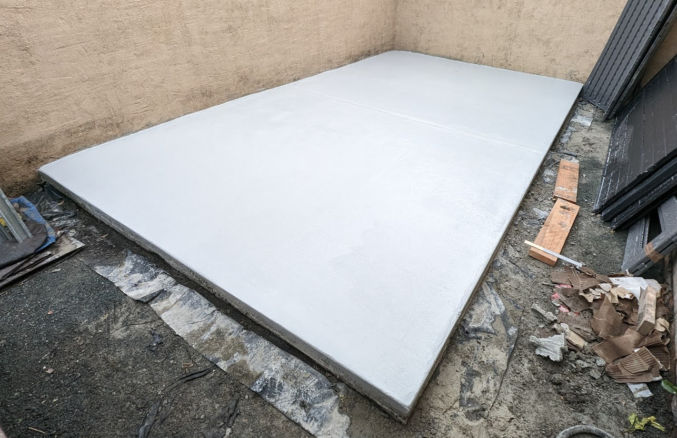
Apply Epoxy
Since cars will not go on my slab, I’ll apply some 1-part epoxy. I like this one in silver gray:
Before applying epoxyAfter applying epoxy (it was still wet)
Lessons Learned
For some reason, it costs more to dispose of dirt and gravel at the dump than it is to be supplied the same amount of premixed concrete, including delivery.
Before removing dirt, create the wood form first so you’ll know how much dirt to remove. The concrete slab need only be 3.5″ thick.
Since I paid $608 for the concrete, assuming the other materials (2×4 lumber and wood stakes) cost $42 (conservative estimate), then that means I paid the contractors (2 people) $1500 – $608 – $42 = $850 for pretty much one day of actual work. So, each contractor got $425 a day or $425 / 5 hours = $85 an hour. That’s a high hourly rate. However, all concrete contractors charge a high rate even though the number of hours worked is low. Next time I’ll ask for a quote for the labor only since now I know the costs for the materials.
The quality of the contractor’s work was poor. There were uneven spots and the concrete was mostly level rather than slightly sloping in one direction for water runoff. There was also one lower area where water would puddle. Next time, verify the quality of the contractor’s work.
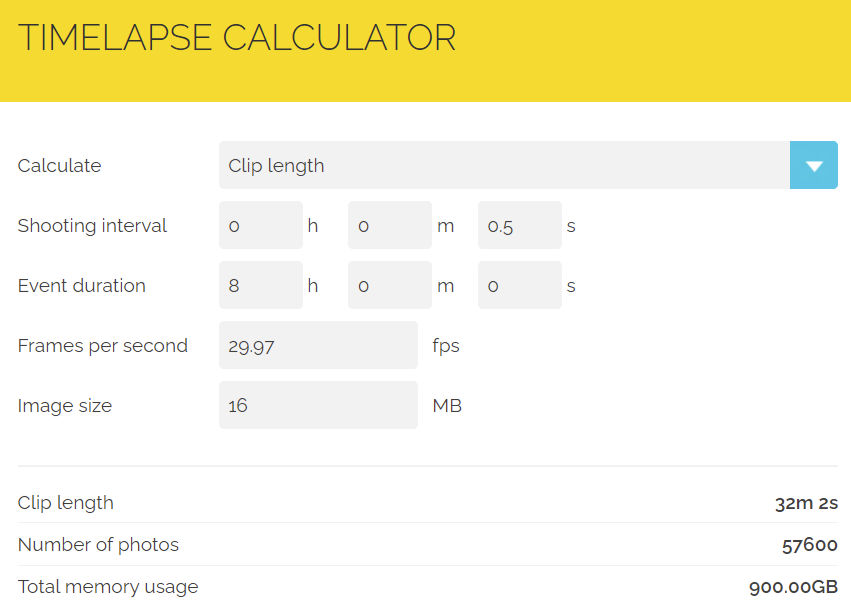
You can create timelapse videos using the Insta360 ONE X2/3. The resulting timelapse will be a 360-degree video that you can edit the same way you can non-timelapse videos. Unfortunately, the interval setting between when a picture is taken to create the timelapse can only be set from your phone. The interval options are 0.5s, 1s, 2s, 4s, 10s, 30s, 1min, 2min. Note that standard video is 29.97s, which is like making a timelapse video where the interval between still images is 1/29.97s or 0.03s. According to this timelapse calculator, if you film for 8 hours straight (event duration) with a shooting interval of 0.5s, then the camera will take 57600 photos. If you want the resulting timelapse video to have a frame rate of 29.97 fps, then the resulting timelapse video duration will be 32m 2s long.
Here are the number of photos and video durations for an 8-hour event duration for the shooting intervals supported by the ONE X2.
Interval
Number of Photos
Video Duration
0.5s
57600
32m 2s
1s
28800
16m 1s
2s
14400
8m
4s
7200
4m
10s
2880
1m 36s
30s
960
32s
1min
480
16s
2min
240
8s
I wouldn’t choose a timelapse interval greater than 10s since an 8-hour-long filming session would produce a video that’s longer than 1m 36s. If 1m 36s is too long, then in post-production, whether in Insta360 Studio or some other video editing program, you can speed up the timelapse to produce an even shorter video.
The battery that comes with the Insta360 ONE X2 is good for 80 minutes. You can buy additional batteries, but if you’ll be recording a long timelapse video, it would be annoying to have to keep changing the battery every 80 minutes. In this case, you’re better off recording with the USB charging cable plugged in. To prevent overheating, remove the battery. The camera can still operate and record while plugged in.
When taking a 360-degree timelapse video, make sure the following options are set
360-degree mode (not 150-degree mode)
Left to right: 360-degree mode, panorama mode, 150-degree wide-angle mode
Video timelapse mode
Slow Motion Videos
If you want to make a slow-motion video, e.g. a real estate tour video, then you definitely want to record at a high frame rate like 60 fps. Then, in your video editor, slow down the video and export it at 30 or 60 fps. If the original video is recorded at 30 fps, then the slowed-down video will be choppy.
https://www.youtube.com/watch?v=6ywQnh2gmX0
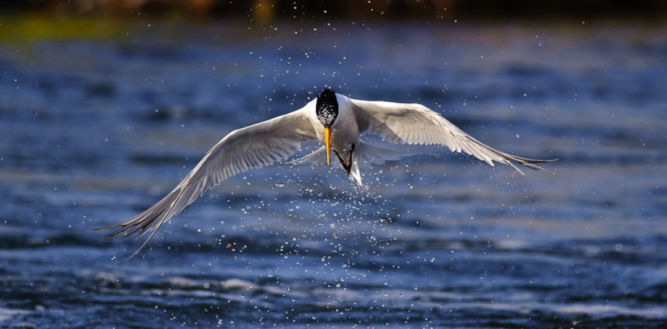
Action Videos
When filming action scenes, it’s better to record at a high frame rate so that playback will be sharp, more fluid, and not blurry.
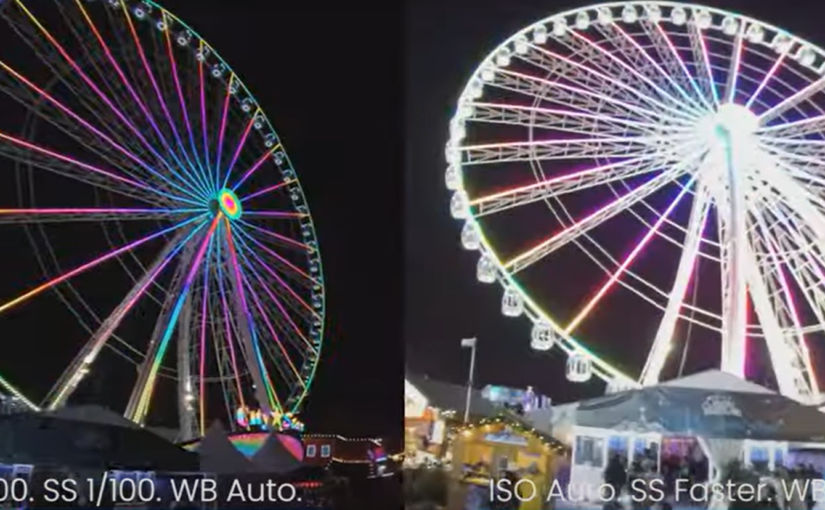
Low-Light / Night Scenes
When filming in low light like at night, you’ll get much better results if you manually adjust the exposure.
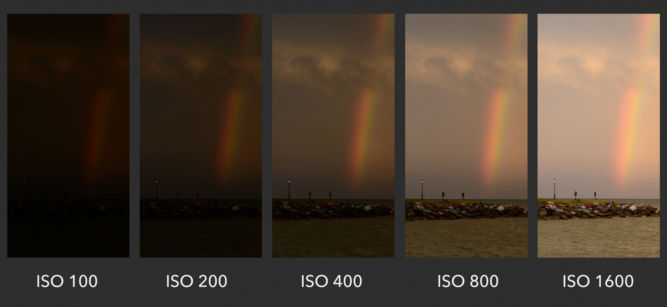
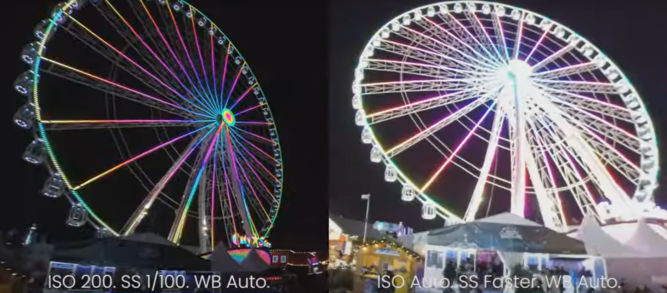
ISO
ISO is a camera setting that will brighten or darken a photo.
However, if you increase the ISO too high, you’ll see a lot of grain.
You should only raise your ISO when you are unable to brighten the photo via shutter speed or aperture instead (for example, if using a longer shutter speed would cause your subject to be blurry). The ISO 200 image on the left was brightened with a long shutter speed.
Shutter Speed
Shutter speed is responsible for two particular things:
changing the brightness of your photo and
creating dramatic effects by either freezing action or blurring motion.
Shutter speed is the length of time in seconds the camera shutter is open, exposing light onto the camera sensor. Essentially, it’s how much time your camera spends taking a photo. When the shutter is open, light passes through the lens and is collected on the camera sensor. The button that fires the camera is also called “shutter” or “shutter button,”
Fast / Short Shutter Speed > Freezes Action
A fast shutter speed is a small fraction of a second, like 1/250th of a second.
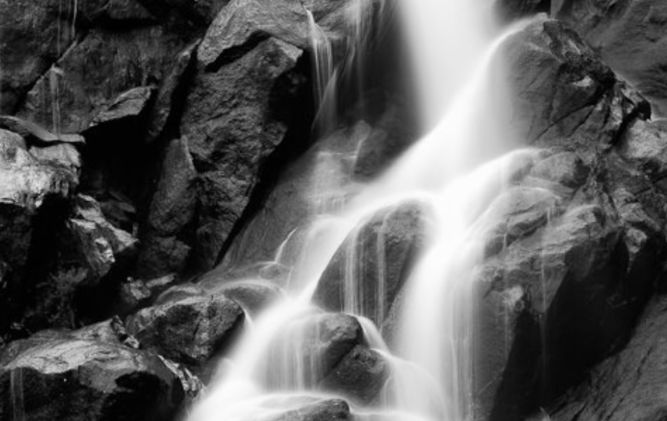
Slow / Long Shutter Speed > Motion Blur
A long shutter speed is 1 second or longer. A slow shutter speed is like 1/2 or 1/4 of a second.
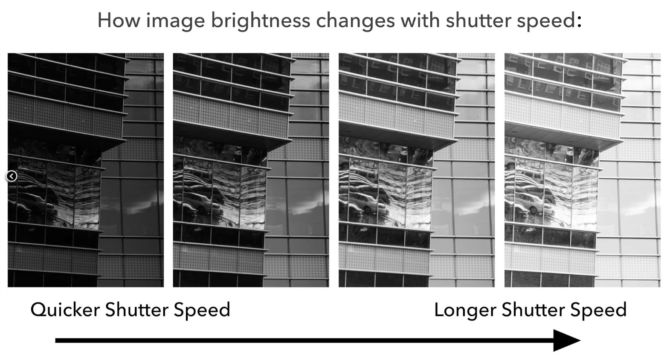
Shutter Speed and Exposure (Brightness)
If you use a long shutter speed, your camera sensor gathers a lot of light, and the resulting photo will be quite bright. If you use a quick shutter speed, your camera sensor is only exposed to a small fraction of light, resulting in a darker photo.
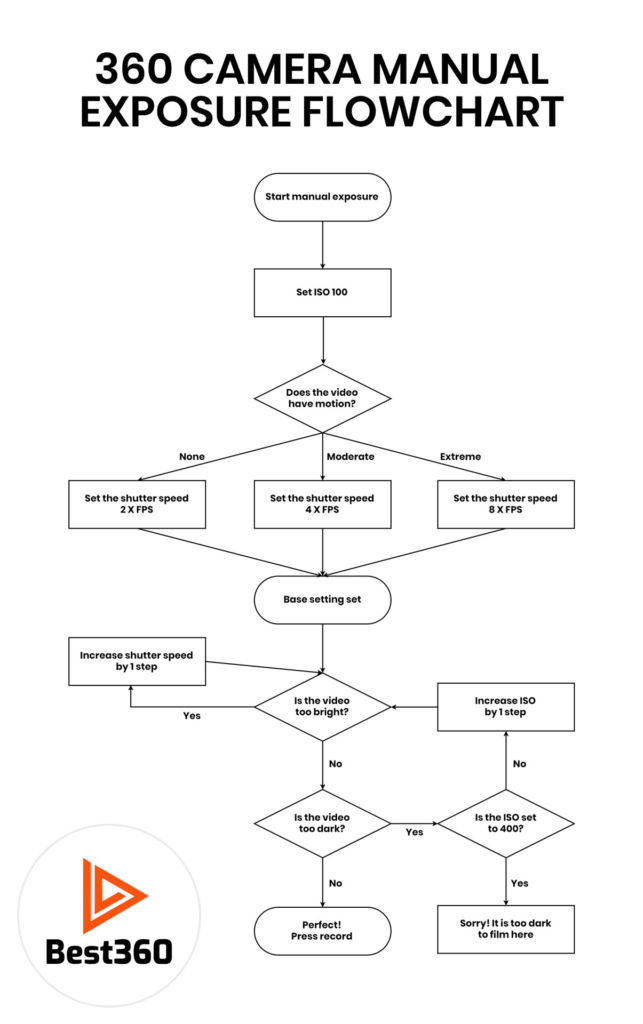
The following flowchart can help you tweak the ISO and shutter speed.
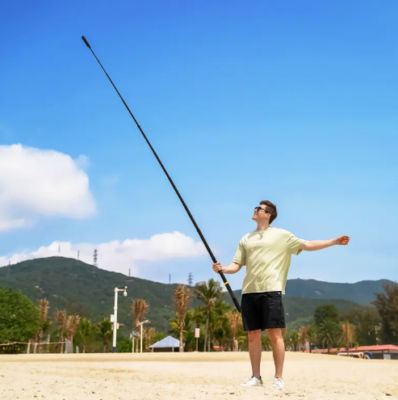
Following are how some videos look when using each stick.
3.4′-long selfie stick, front, face level
10′-long selfie stick extended to about 5′, front, face level
3.4′-long selfie stick, front, stomach level
3.4′-long selfie stick, 45-degree angle, face level
3.4′-long selfie stick, side, face level
3.4′-long selfie stick, side, face level
3.4′-long selfie stick, front, feet level
3.4′-long selfie stick, straight up
10′-long selfie stick, straight up
10′-long selfie stick, up, back
10′-long selfie stick, up, side
10′-long selfie stick, front spin, face level
10′-long selfie stick, low to high, facing down
10′-long selfie stick, low to high, facing up
Selfie Drone
For comparison, following are some videos taken with the Hover Air X1 selfie drone.
Bird’s Eye, no spin, 10 feet
Bird’s Eye, no spin, 10 feet, return
Bird’s Eye, no spin, 50 feet
Bird’s Eye, no spin, 50 feet, return
Bird’s Eye, fast spin, 50 feet
Bird’s Eye, fast spin, 50 feet, return
Bird’s Eye, slow spin, 50 feet
Bird’s Eye, slow spin, 50 feet, return
Dolly track
Dolly track
Follow
Hover with target tracking
Orbit, 5 feet
Orbit, 20′
Zoom out, down
Zoom in, down, return
Zoom out, flat
Zoom in, flat
Zoom out, up
Zoom in, up
Zoom out, up, far
Zoom in, up, far
Lens Care
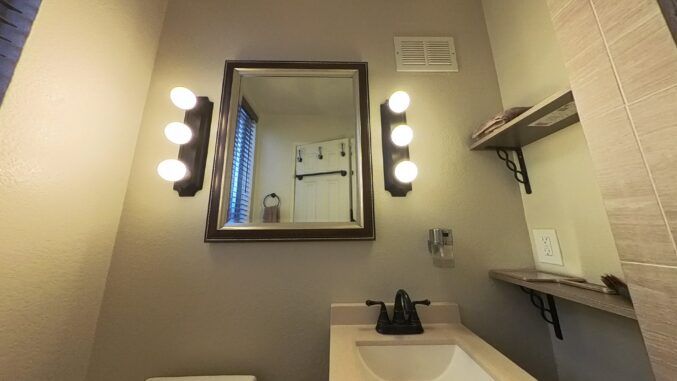
The Insta360 X2/X3 camera has protruding lenses on two sides. As such, the lenses can easily get scratched, so extreme care must be taken to prevent that from happening. Also, before shooting, you should always clean the lens to remove any dirt or fingerprints. A dirty lens can easily result in a blurry shot. Following are comparisons of image quality when different lens conditions.
Brand New and Clean Lens
The image quality is relatively sharp.
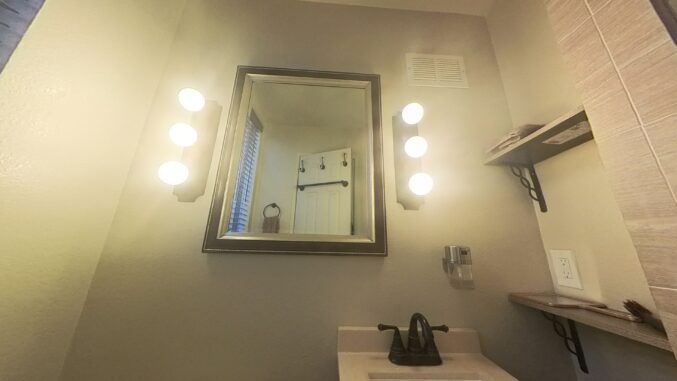
Brand New Lens But Full of Fingerprints
The image is blurry, especially around the lights.
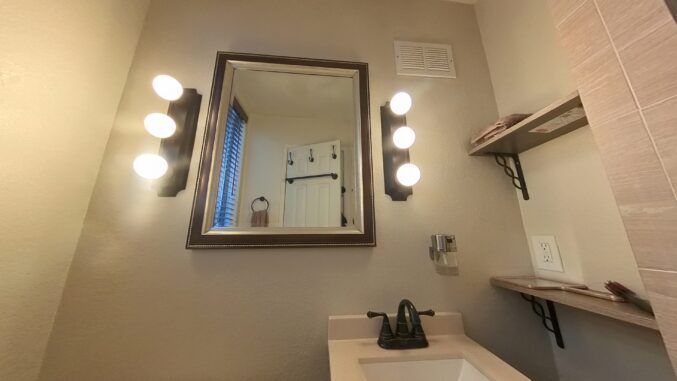
Scratched But Clean Lens
Despite being cleaned with a new cloth, the image is partially blurry due to the scratched part of the lens.
3rd-Person Pan
High-Up Shot
Freestyle
Hyperlapse
Rise-Up Reveal
Upward Tilt
X3/X4 Picture Quality
Here’s a comparison of the picture quality of the X3 and X4 after reframing a 360-degree video and exporting to 1080p and 4K at 20 Mbps, respectively. It’s clear that the X4 produces a brighter and sharper picture, even if the X3 picture is upscaled to 4K using Topaz Video AI.