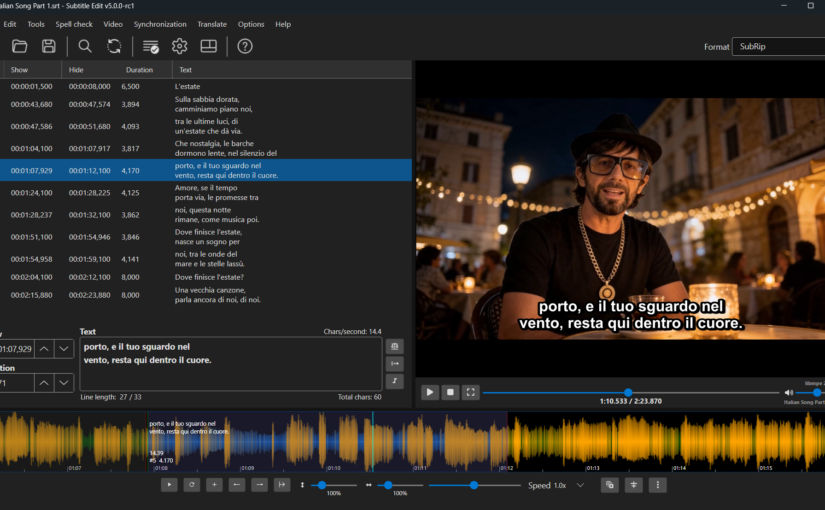
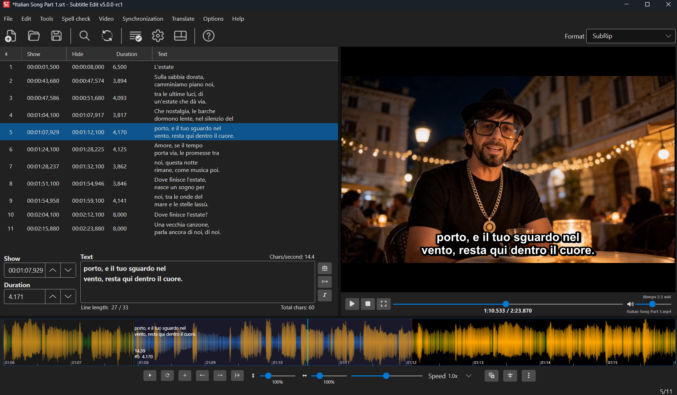
Subtitle Edit is a free app that lets you generate and edit subtitles from a video. If you have a song that you want the lyrics for, you can export the song as a video and then add the video to Subtitle Edit. In the example below, I want the lyrics for an Italian music video.
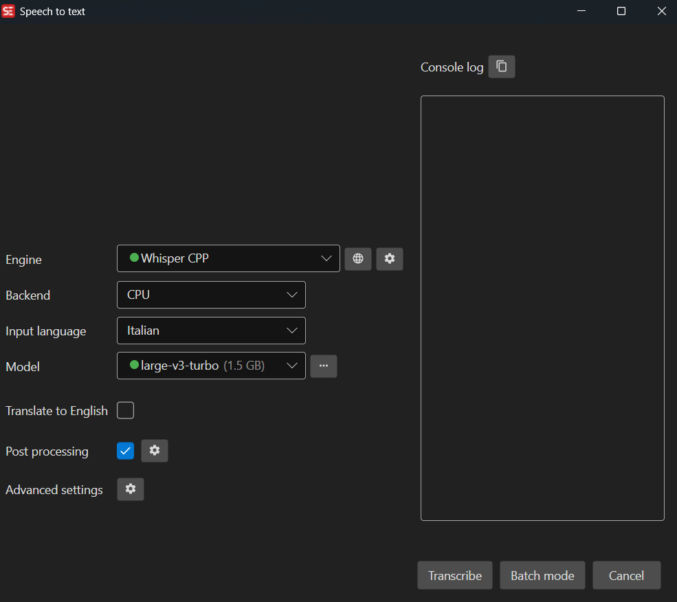
Since my video is in Italian, I set the language option to Italian.
When processing is done, you will see the lyrics in the left pane. Clicking on a verse will jump the playhead to the point in the waveform where that verse begins. The “Text” field lets you edit subtitle text. In the waveform, you can also drag the vertical start and end lines for each verse, which will update the timestamp accordingly.
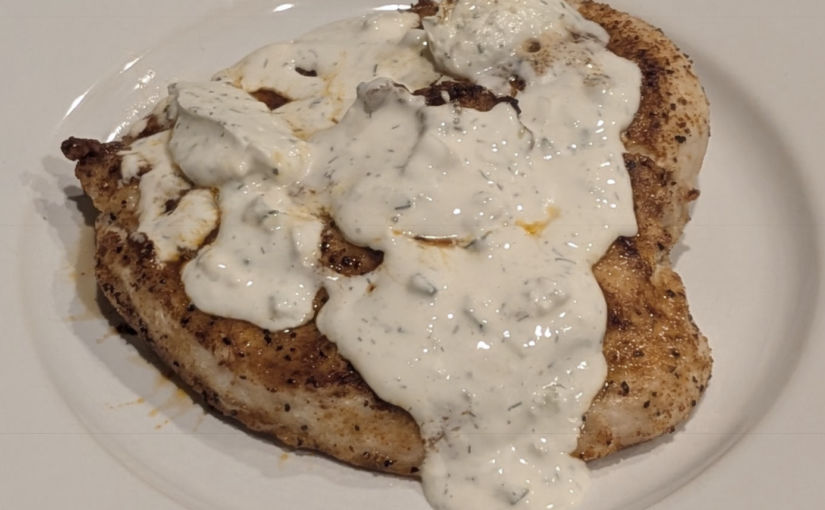
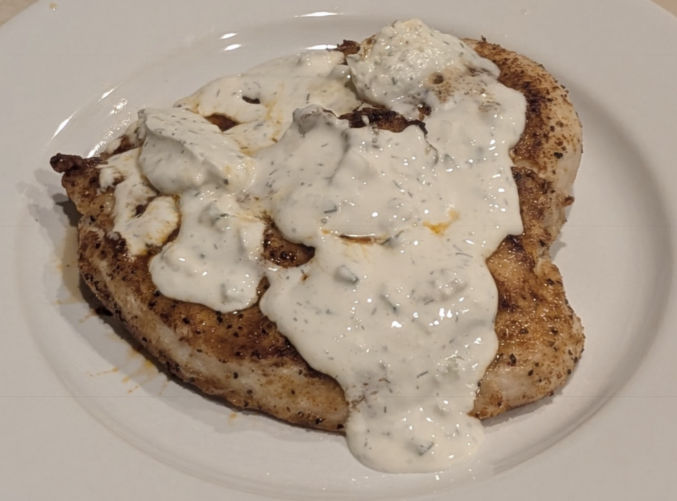
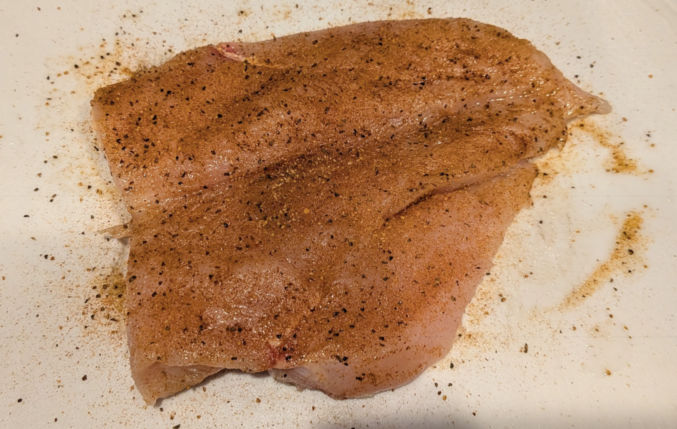
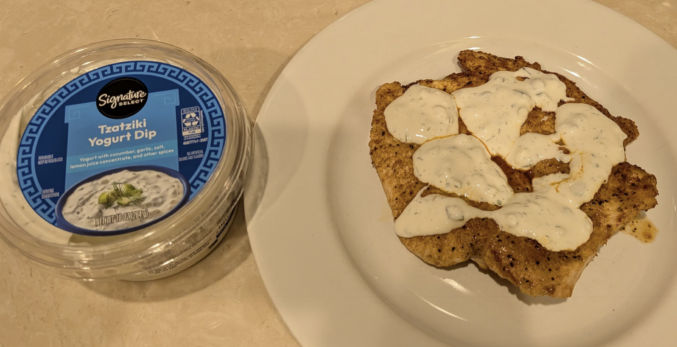
Everyone knows that the problem with baking or air-frying chicken breast is that it often comes out too dry. Most people prefer chicken breast over other parts (legs, thighs) because it contains less fat, but it’s the fat content that makes chicken legs and thighs more juicy. You can dip chicken breast in barbecue sauce, but many such sauces aren’t healthy. One option that I found to work really well is Tzatziki. Not only is Tzatziki very healthy, but it also makes air-fried chicken breast, including dry ones, tasty and moist. Here’s my recipe for making this.
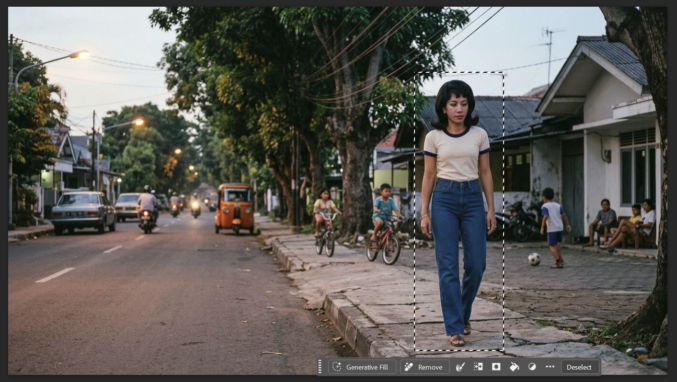
Most AI image-to-video generation tools support first-frame reference images. Considering how much more expensive video generation is compared to image generation, it makes sense to use image references, like a first frame, when generating videos. However, providing a first-frame image, with or without a last-frame reference, still fails when you need character consistency because the AI model only knows what the character looks like in the first-frame image. Fortunately, SeeDance 2.0 supports multiple reference images, so you can upload both a first-frame image and a character sheet containing different views of a character.
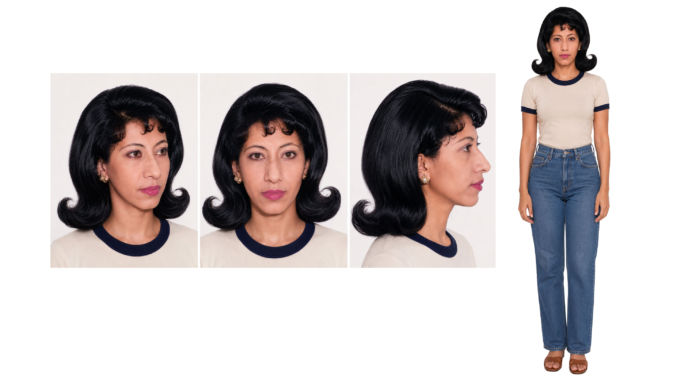
For example, I had the following character sheet.
I then used it to create the following first-frame image using Nano Banana 2 in OpenArt.ai.
If I zoom in, I can see that the face looks close enough to the one in the character sheet.
When I created a video using Kling 2.5 of the woman walking, using that image as the first frame, I got the following.
The video starts out fine because of the first-frame reference, but as it progresses, the woman’s face slowly changes and looks less and less like the one in the character sheet. Here’s a screenshot of just her face in one frame of the video.
What’s particularly different is the nose, but the width and height of her face looks somewhat different as well, especially compared to the character sheet.
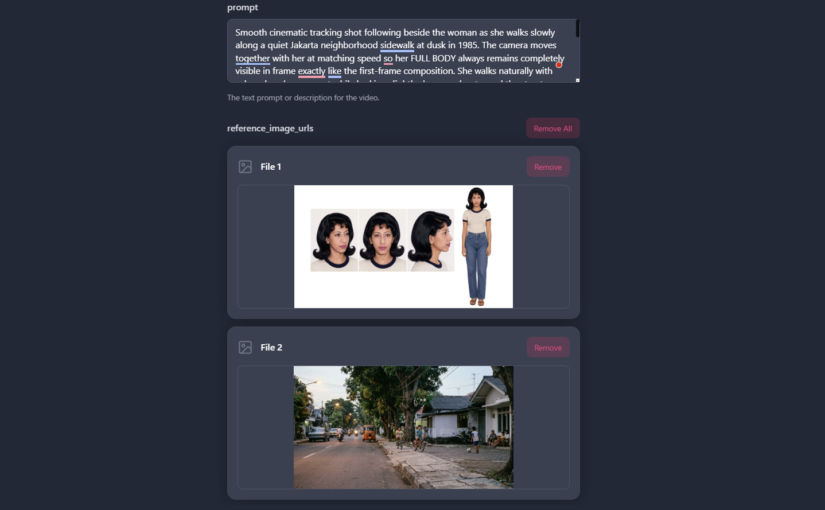
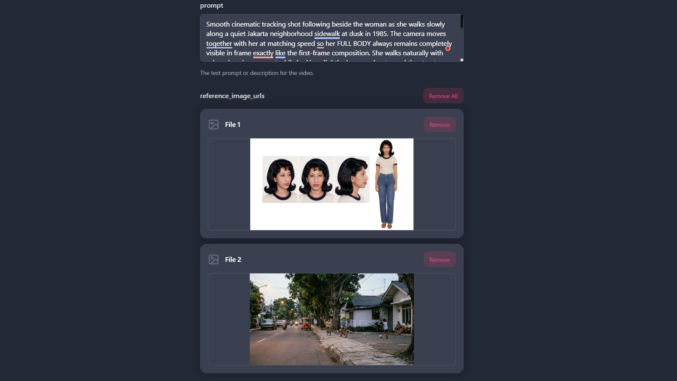
Now, let’s see how the same video turned out using SeeDance 2.0 with multiple references. For this, I used Kie.ai.
Since I wanted to keep the setting and just replace the subject, I used Photoshop to “remove” the subject from the previous image. I selected the subject and clicked “Remove”, which used AI to remove the woman.
This is what I got.
Next, I upload the character sheet and setting image to Kie.ai (SeeDance 2.0 page), gave it the same prompt I used in Kling 2.5.
Here’s the resulting video.
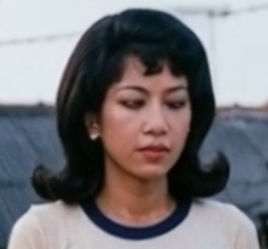
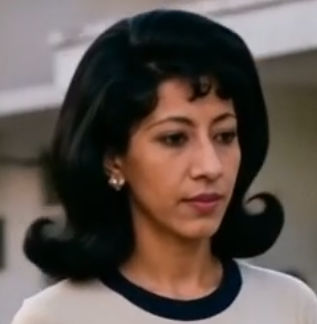
Notice how the character looks EXACTLY like the one in the character sheet throughout the entire video clip.
Here’s a close-up of the face near the end of the clip.
I just made this music video, and the lip-sync portion is amazingly impressive.
I actually used SeeDance 2.0 Fast at Kie.ai, but you can use SeeDance 2.0 as well and get up to 1080p resolution. For each generation, I used
Prompt
Reference image (not first-frame image)
Reference video (this was just a black video containing the audio clip)
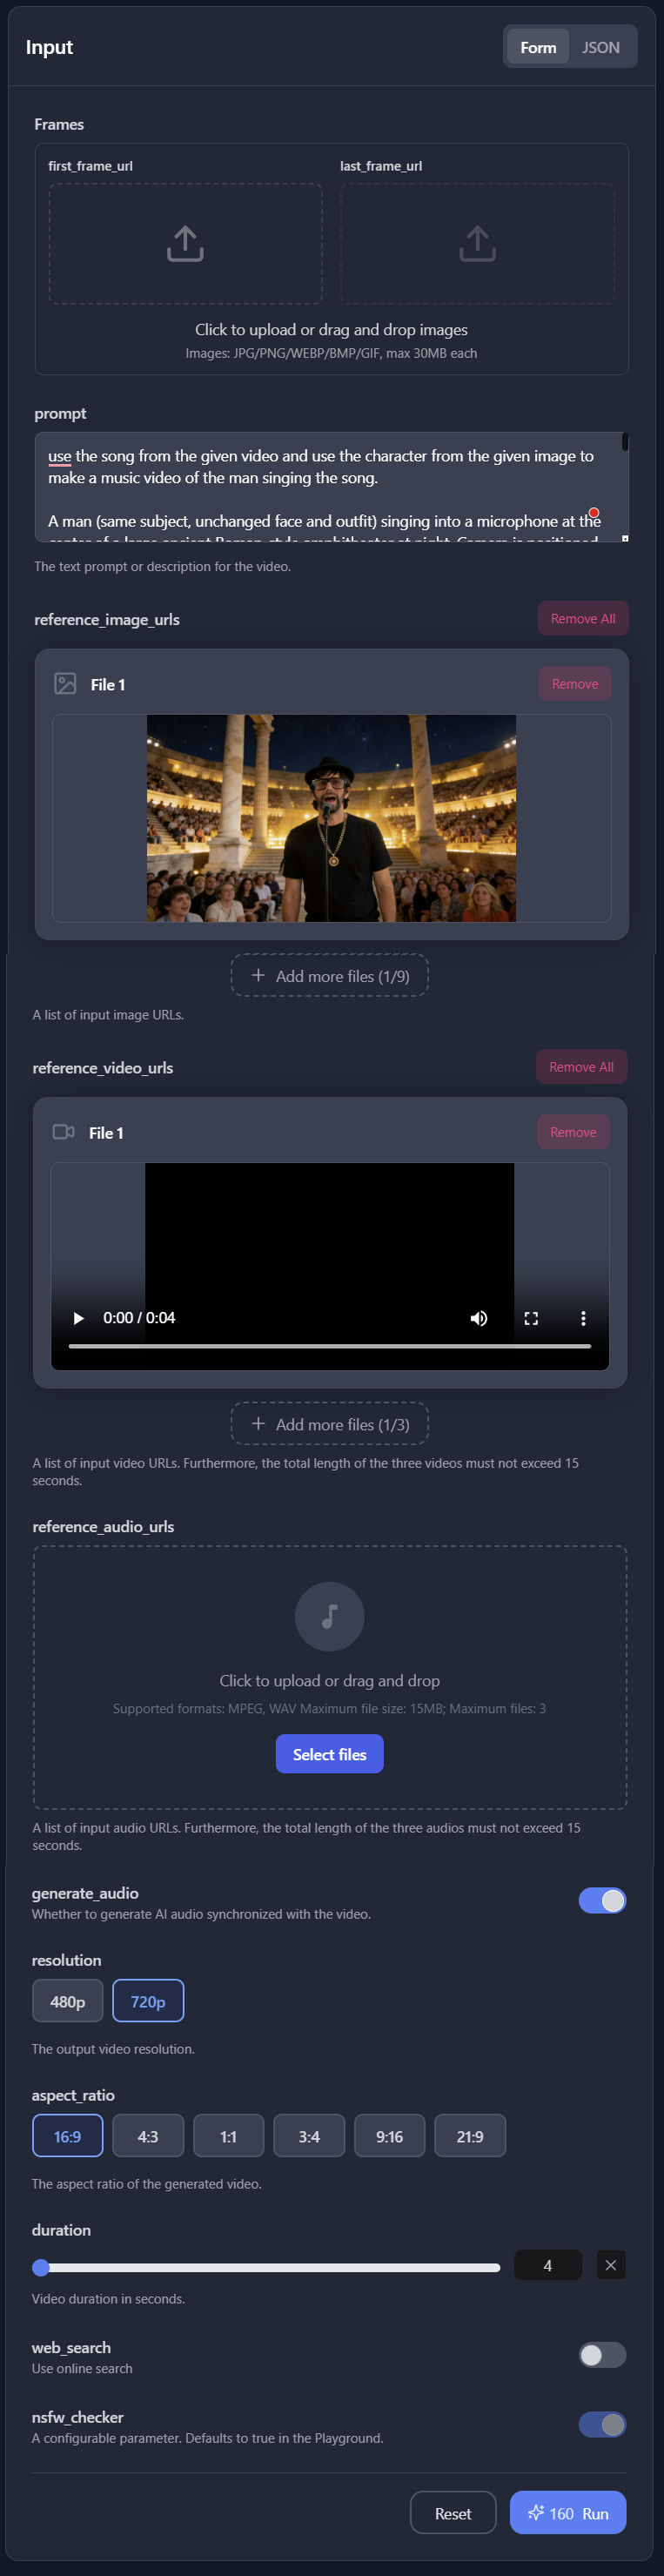
“Generate audio” enabled
“Web search” disabled
Duration = duration of reference video
SeeDance 2.0 supports generating videos up to 15 seconds long. But, if you give it a 15s reference video and you want to lipsync a character in it, the lipsync won’t work. So, when generating lipsync videos, always provide a reference video that is no longer than 13 seconds to be safe.
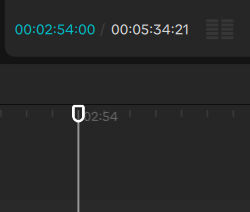
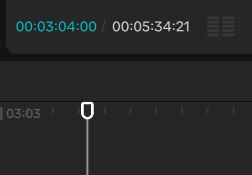
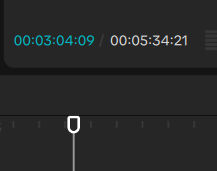
When creating reference videos, make sure the duration is a whole number, not a fraction, e.g., 5 full seconds, not 5.5 seconds. The reason is because in the UI, Kie.ai or another app may round down the duration to the nearest whole second, and if you tell SeeDance you want to generate a 5s video, then it will generate a 5s video, not a 5.5-second video, and your lip-sync video will be truncated. I use Capcut to generate my black reference videos. I put a playhead at a location where I want a segment to begin and end and set a marker at each location, making sure the time ends with :00 (no frames), e.g.
start 2:54:00
end: 3:04:00
duration = 10s
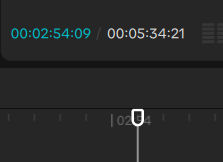
If I really need to split at a location between seconds, like 2:54:09, then make sure the end location includes the same number of frames, e.g., 3:04:09, so you end up with a duration in whole seconds.
SeeDance 2 supports reference audio, but for some reason, it didn’t lip-sync my reference image, and sometimes it would change the lyrics.
Also, the following method worked well for English audio. It may not work for other languages. If you find that it doesn’t work for your language, then see some options below.
Here’s a screenshot of the inputs.
Below are the inputs and outputs for various lip-sync clips.
Prompt:
use the song from the given video and use the character from the given image to make a music video of the man singing the song. he sings the exact lyrics in the song as if lip-syncing.
Reference image:
Reference Video:
Output:
Prompt:
use the song from the given video and use the character from the given image to make a music video of the man singing the song. he sings the exact lyrics in the song as if lip-syncing.
Reference image:
Reference Video:
Output:
Prompt:
use the song from the given video and use the character from the given image to make a music video of the man singing the song. he sings the exact lyrics in the song as if lip-syncing.
Reference image:
Reference Video:
Output:
Prompt:
use the song from the given video and use the character from the given image to make a music video of the man singing the song. he sings the exact lyrics in the song as if lip-syncing.
Reference image:
Reference Video:
Output:
Prompt:
use the song from the given video and use the character from the given image to make a music video of the man singing the song. he sings the exact lyrics in the song as if lip-syncing.
Reference image:
Reference Video:
Output:
Prompt:
use the song from the given video and use the character from the given image to make a music video of the man singing the song. he sings the exact lyrics in the song as if lip-syncing.
Reference image:
Reference Video:
Output:
Prompt:
use the song from the given video and use the character from the given image to make a music video of the man singing the song. he sings the exact lyrics in the song as if lip-syncing.
Reference image:
Reference Video:
Output:
Prompt:
use the song from the given video and use the character from the given image to make a music video of the man singing the song. he sings the exact lyrics in the song as if lip-syncing.
Reference image:
Reference Video:
Output:
Prompt:
use the song from the given video and use the character from the given image to make a music video of the man singing the song. he sings the exact lyrics in the song as if lip-syncing.
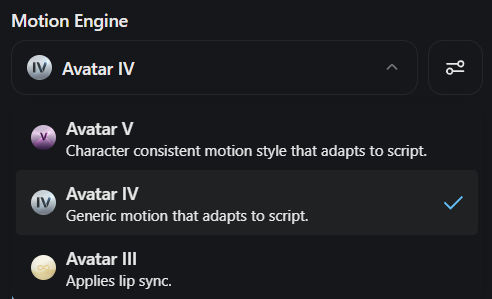
A man (same subject, unchanged face and outfit) singing into a microphone at the center of a large ancient Roman-style amphitheater at night. Camera is positioned at chest height, medium close-up framing, stable and focused on the singer.
The audience fills the stone bleachers behind him, hundreds of people seated and standing, naturally animated: subtle head movements, clapping, cheering, shifting in seats, occasional phone screens glowing, realistic variation in motion without repetition.
Warm golden stage lighting illuminates the singer from the front and slightly below, creating a cinematic glow on his face. Behind the singer, rows of soft amber lights line the steps and columns. Moving stage lights sweep slowly across the audience and architecture, creating gentle light motion across the crowd and stone surfaces.
The night sky is clear with visible stars. Light atmospheric haze adds depth and catches the beams of moving lights. The columns and amphitheater remain stable and realistic.
The singer performs naturally: subtle head movement, mouth lip-syncing accurately, slight body sway, breathing and posture shifts.
Camera behavior: very subtle cinematic push-in (slow, minimal), no drifting or unintended orbit, no zoom jitter. Maintain subject as the clear focal point at all times.
Depth of field: subject sharp, audience slightly softened but still readable.
Lighting style: warm amber/yellow tones only, no harsh white light, no overexposure, cinematic contrast.
Reference image:
Reference Video:
Output:
Here are some similar clips using the same prompt and reference image but different reference videos (for the audio).
Reference Video:
Output:
Reference Video:
Output:
Playing Musical Instruments That Sync to Music
SeeDance 2.0 also seems to support making a video of a person playing a musical instrument in a way that matches the sounds in a reference source. Consider the following:
Prompt:
use the song from the given video and use the character from the given image to make a music video of the man playing the guitar sounds in the song. sync the playing of the guitar to the guitar sounds in the song.
Reference image:
Reference Video:
Output:
Here’s another example.
Prompt: use the song from the given video and use the character from the given image to make a music video of the man playing the saxophone such that the sound of the saxophone in the song is in sync with the playing of the saxophone. the background should be solid green as in the reference image for chroma key background removal later on. the camera remains fixed. do not zoom in or out. the man’s fingers move on the saxophone naturally and in sync with the sound from the song. the man moves his body naturally as he plays the saxophone.
The duration was set to the duration of the reference video. I used SeeDance 2.0 Fast and 720p resolution. I later upscaled the video to 4K using Topaz Video AI.
Result
SeeDance 2.0 Error – output audio may contain sensitive information
If you get an error that says “The request failed because the output audio may contain sensitive information.”, then disable audio generation.
For example, in order to make the following video,
I had to use the following settings in Kie.ai:
Prompt: use the song from the given video and use the character from the given image to make a music video of the man singing the song in front of a green screen, as shown in the reference image. he stands in place and sings the exact lyrics in the song audio as if lip-syncing to the audio with natural face and body movements, but keep his hands beside his body. The camera is fixed and doesn’t zoom in or out and doesn’t pan.
Do not add shadows, floor shadows, lighting gradients, reflections, stage lighting, environmental lighting, or any background elements. Camera locked off and completely static.
Reference Image:
Reference Video: (example)
generate_audio: off
The duration was set to the duration of the reference video. The resulting clip was
I then removed the green background in Capcut to overlay the singer on a series of background video clips.
Singing Lip Sync Videos Using HeyGen
If your song is not in English and SeeDance 2.0 can’t lip-sync it correctly, then use HyeGen with custom motion enabled, as follows.
Log in to HeyGen and create an avatar. You can simply upload a photo of your singer. I used the one below. I put my avatar on a green background so I can chroma key it out.
Open Avatar Studio and
in the Script section on the left, instead of typing your script, upload your song’s audio (mp3)
in the Avatar and Voice section on the right, under Voice, you can ignore this since you’ll be using the audio you uploaded
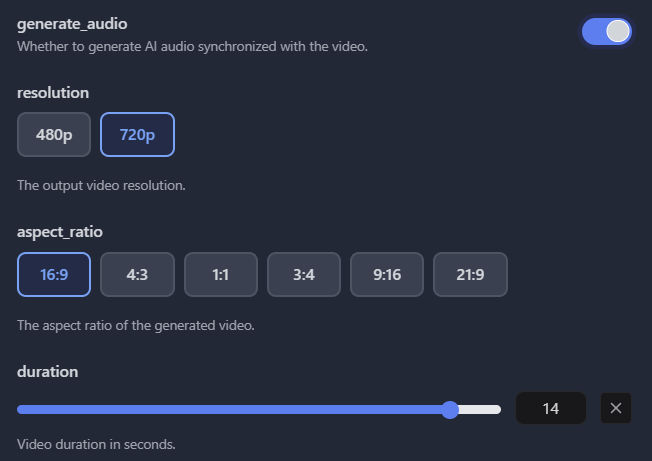
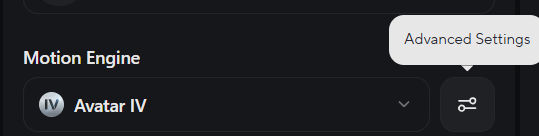
in the Avatar and Voice section on the right, under Motion Engine, choose “Avatar IV”
then, and this is important, click the “Advanced Settings” button.
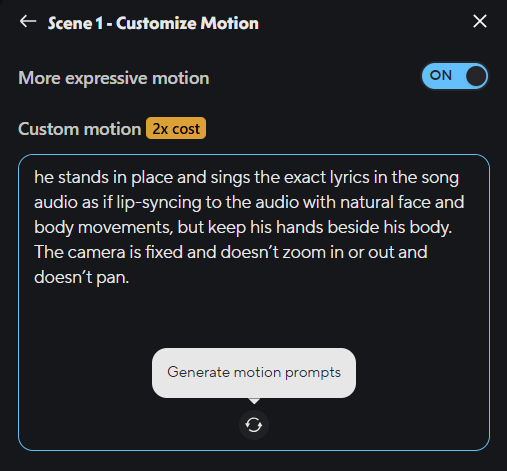
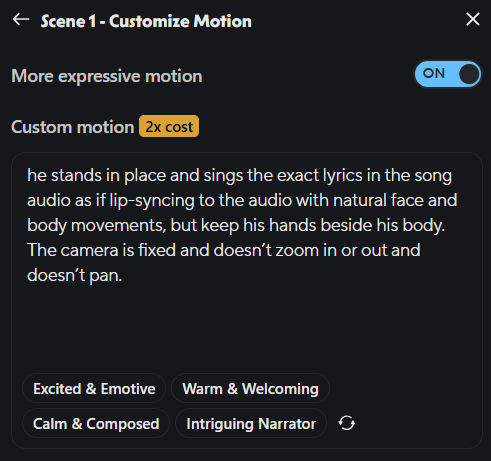
Toggle on “More expressive motion” and enter a custom motion prompt.
Optionally, you may click the “Generate motion prompts” icon, which will generate motion tags as shown below.
Then, click the Generate button.
Following are examples comparing different settings.
HeyGen LipSync Using Avatar IV WITHOUT Custom Motion
HeyGen LipSync Using Avatar IV WITH Custom Motion
In this example, I didn’t click the “Generate motion prompt” button.
HeyGen LipSync Using Avatar IV WITH Custom Motion
In this example, I did click the “Generate motion prompt” button.
As you can see, in the first example, the avatar doesn’t look like he is singing at all, and in the last 2 examples, the avatar looks more expressive. It may be difficult to tell the difference for such a short clip, but the difference is actually huge when you lipsync a full song, as in the following example.
The lip-sync quality is definitely not as good as SeeDance 2.0, but it seems to be the best option when SeeDance 2.0 doesn’t work for a particular language.
UPDATE 6/5/2026
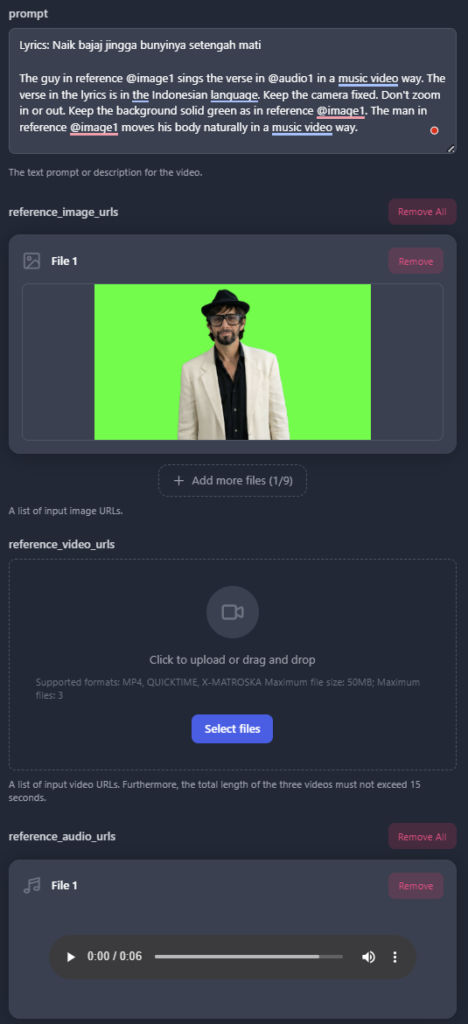
There’s another way to generate lip-sync videos using SeeDance 2.0, and it supports non-English languages. Here, I’m using Kie.ai. Instead of uploading a black video with audio, I upload an audio and include the lyrics in the prompt.
Inputs:
Prompt: Lyrics: Naik bajaj jingga bunyinya setengah mati
The guy in reference @image1 sings the verse in @audio1 in a music video way. The verse in the lyrics is in the Indonesian language. Keep the camera fixed. Don’t zoom in or out. Keep the background solid green as in reference @image1. The man in reference @image1 moves his body naturally in a music video way.
Reference Image:
Reference Audio:
Duration: 6s
Output:
UPDATE 6/13/2026 – Actually, using a video reference containing the audio is better than an audio reference. See following example.
Inputs:
Prompt: Lyrics:
Còn tôi như cánh chim Sẽ bay đi muôn phương Mang về mầm xanh tươi
use the song from the given video (@video1) and use the character from the given image (@image1) to make a music video of the man singing the song. he sings the exact lyrics in the song as if lip-syncing. The lyrics are in Vietnamese. He sings passionately and moves his body naturally to the sound of the music. Keep the camera fixed. Don’t zoom in or out. Keep the background solid green as in reference @image1.
Reference Image:
Reference Video:
Duration: 11s
Output:
Create Cinematic, Multi-Shot Lip-sync Music Videos
To create cinematic, multi-shot lip-sync music videos in one SeeDance 2.0 video generation, do the following:
Give Claude or ChatGPT the lyrics to the whole song so it knows what the song is about
Create reference video clips in 720p containing audio segments that are 14s or less. Don’t split mid-word.
For each clip, give Claude the mp3 and the lyrics for that clip, if any, and tell Claude you want a SeeDance prompt to generate a music video. Specifically, tell Claude to give you the shots (scenes) similar to the example below.
Shot 1: Medium-close on the singer at golden hour along a cliffside coast, glowing amber coastline and ocean curving behind him, warm sun on his face. Camera slow gentle push-in. He is the only person in frame.
Shot 2: Medium shot of the singer standing at a coastal overlook, vast golden California coastline stretching into the distance behind him, soft waves and warm haze. Camera slow drift. He is the only person in frame.
Shot 3: Medium-close, front-on, on the singer with the blazing golden sunset coastline glowing behind him, the warmest light of the clip full on his face, a peaceful contented expression. Camera slow push-in. He is the only person in frame.
Then, append it to your base prompt, which is
LYRICS: “[enter lyrics for the clip / segment here]”
use the song from the given video (@video1) and use the character from the given image (@image1) to make a music video of the man singing the song
@image1 is the face and identity reference for the lead singer — match his face, afro, beard, and glasses to @image2 throughout, keeping his identity consistent.
The generated audio must match the audio in @video1 EXACTLY and the lip sync must match the vocal segments in @video1 EXACTLY.
4. Add your character sheet as the first reference image (@image1).
5. Add your reference video
6. Specify a duration that matches the reference video duration
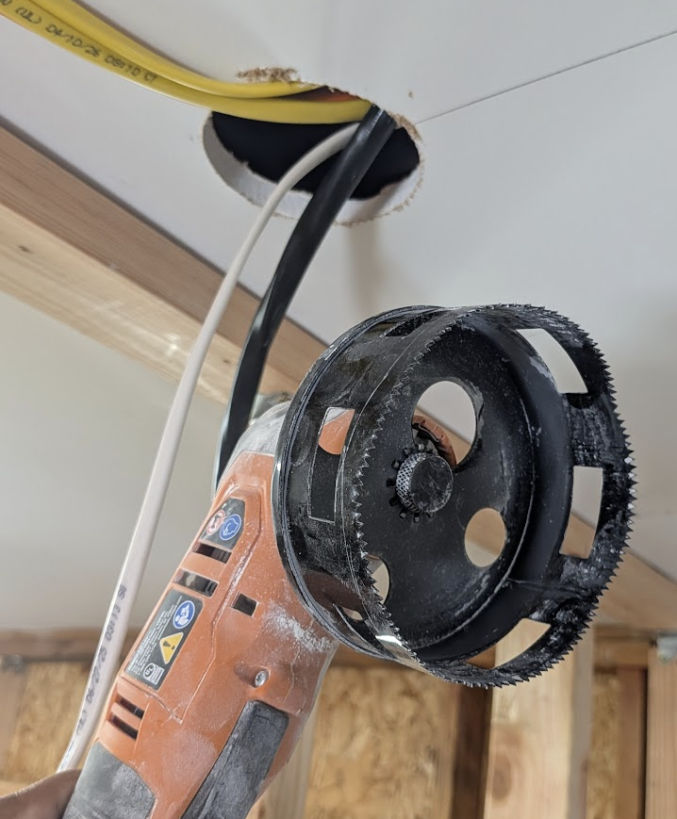
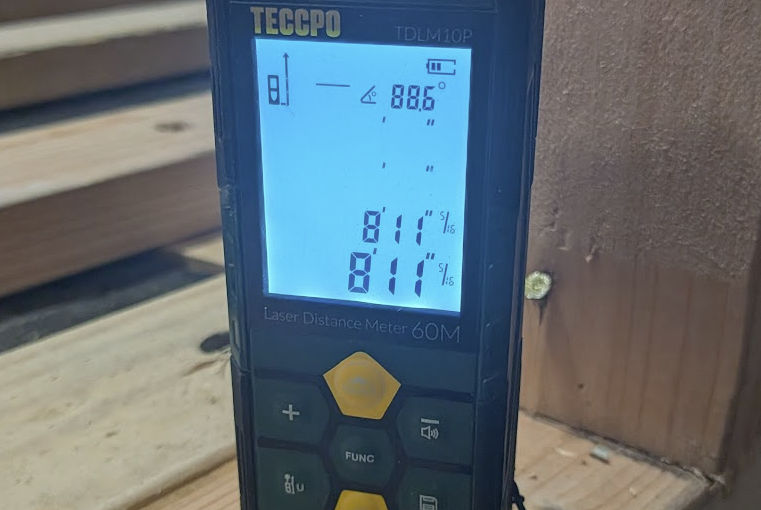
This method assumes the top and bottom plates are already in place.
Use a laser measure like the one shown below. In this example, the reading shows 8′ 11″ 5/16″. If you prefer precision to 1/8 of an inch, you may be able to change the precision settings in your laser measure.
Make sure the laser dot is on the surface of the distance you want to measure.
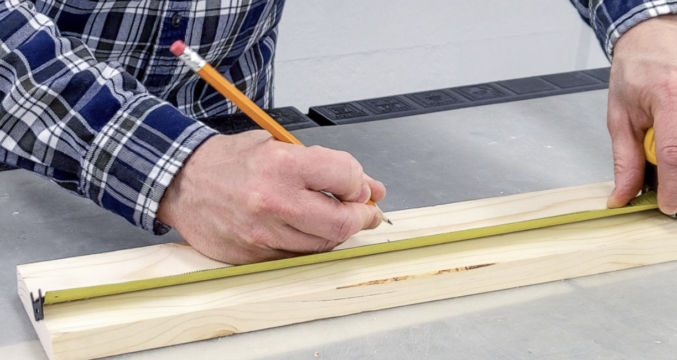
2. Then, using a measure, mark that length on your 2×4 wood.
3. Use a carpenter square to draw a straight line at that mark
4. Cut the wood at that line using a miter saw.
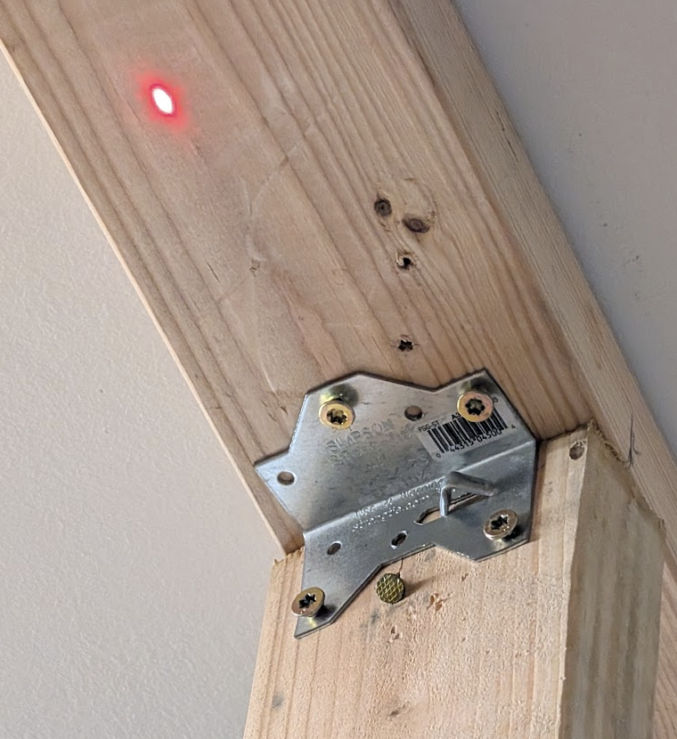
If you want to dry-fit your studs before permanently fastening them with nails, you can use A34 metal brackets with screws.
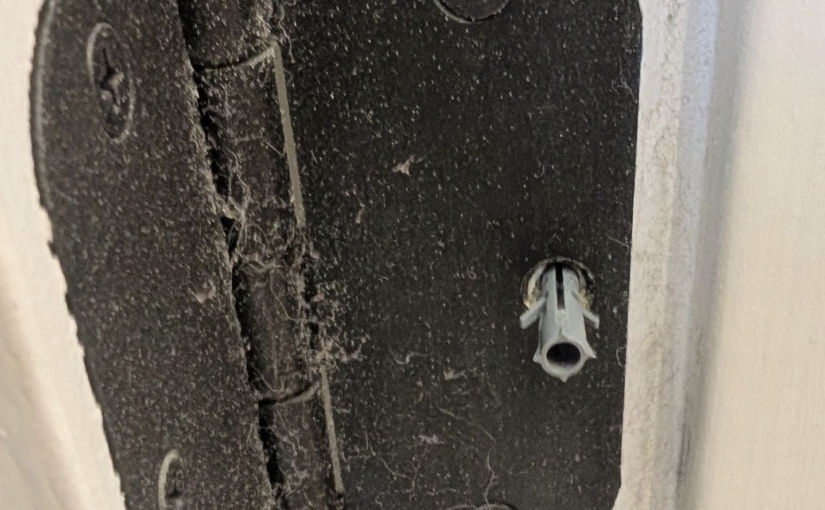
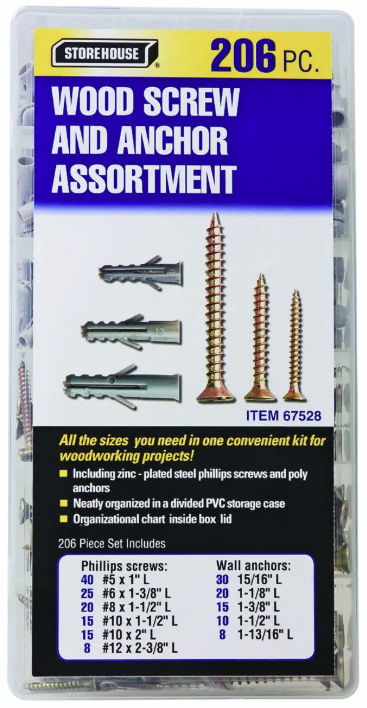
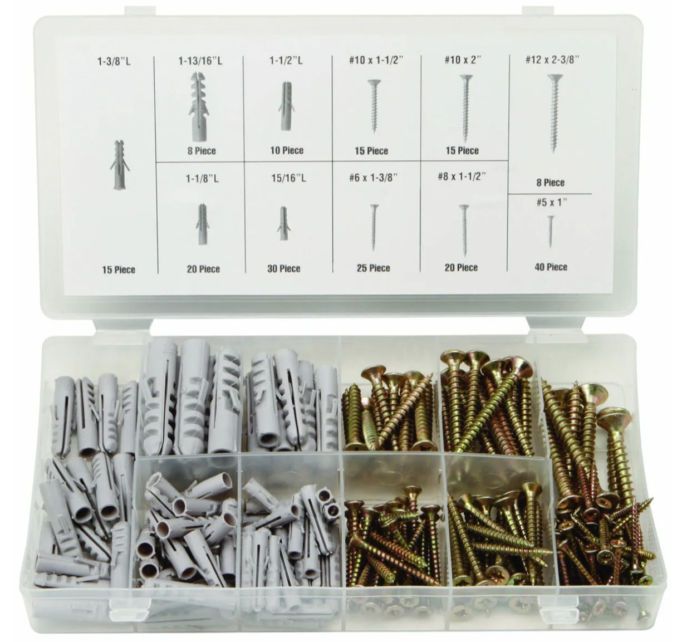
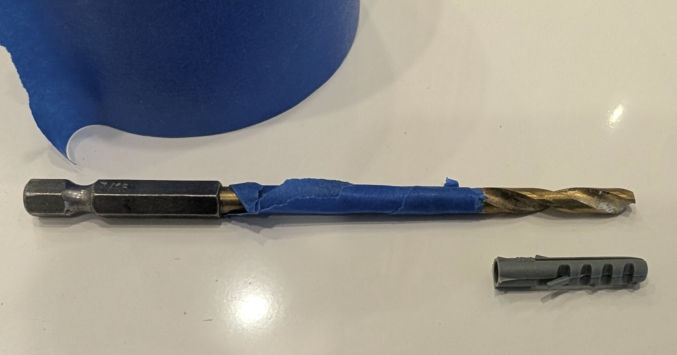
If you have a loose screw that just keeps turning when it’s fully inserted, some sources indicate you can stuff one or two zip ties in a screw hole before screwing the screw to fix that. I’ve tried that, but it only works occasionally. I’ve also tried the Screw-it-Again wood anchors, but those are no better. What actually works are these plastic anchors at Harbor Freight.
They are cheap and work consistently. Here’s how to use them. For standard residential door hinges, choose the smallest anchor (15/16″ long”) and the #8 x 1-1/2″ screw. You can also just reuse the screw that came with the hinge.
Wrap a piece of painter’s tape around a 3/16″ wood drill bit the length of the anchor from the tip so you know how far to drill without drilling longer than the length of the anchor.
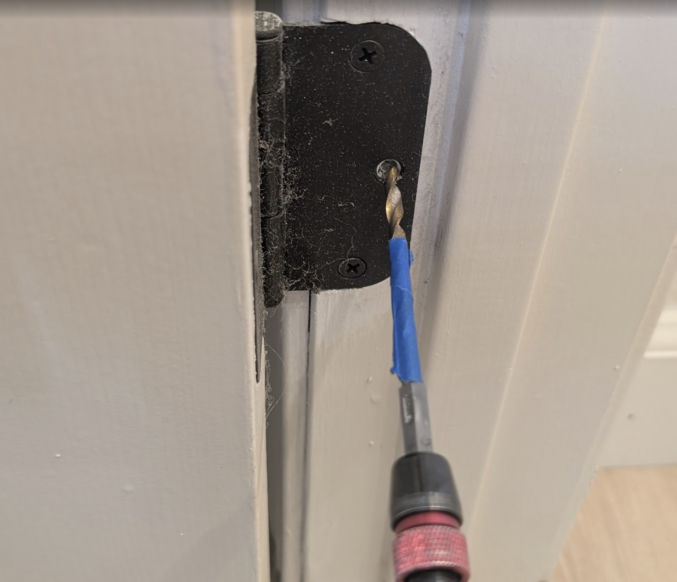
Remove the existing screw and drill into the hole until you reach the tape.
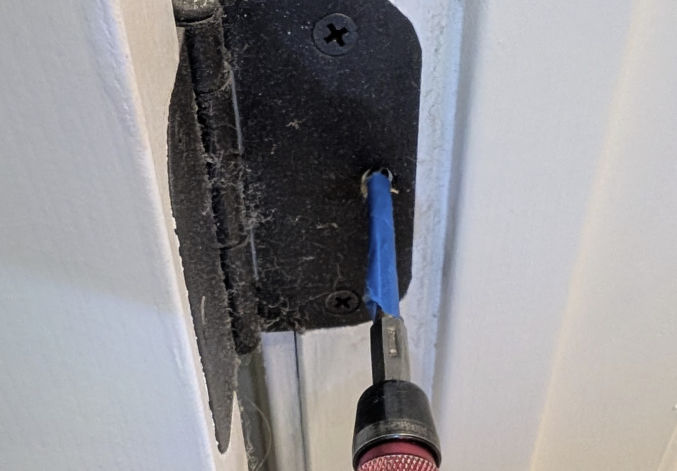
Insert the anchor into the hole.
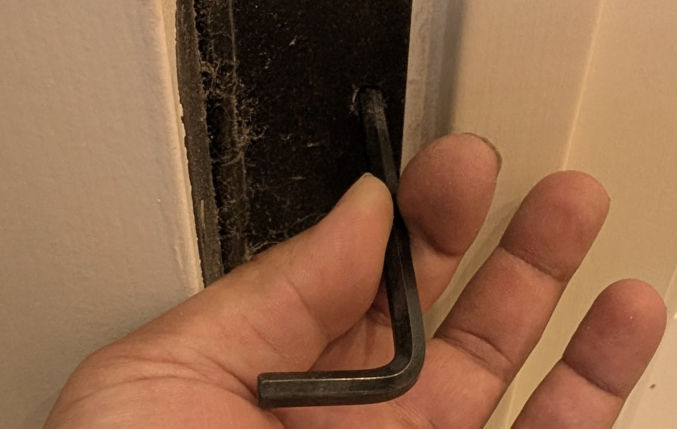
If you can’t insert it all the way into the hole with your hands, hit a hex key against it to push the anchor flush with the hole.
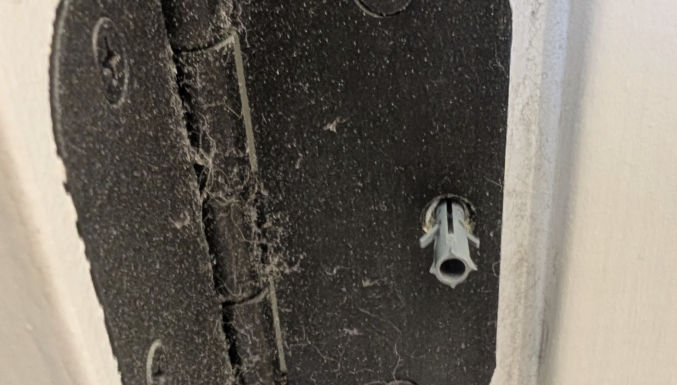
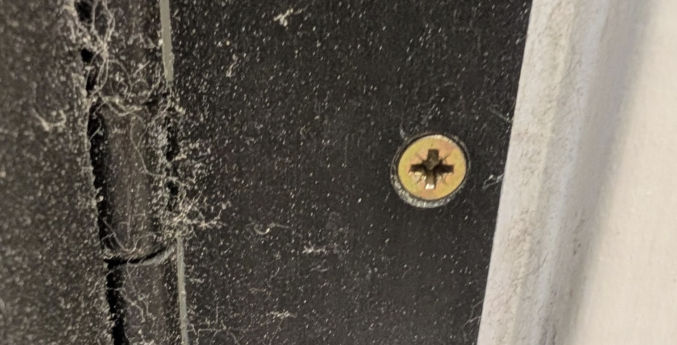
Screw either the existing screw or a #8 x 1-1/2″ screw into the hole. The screw will eventually stop turning when it’s tight.
If you need even stronger door hinges, these Zzem steel anchors may fit the bill.
If, after tightening all screws, your door is still slightly hitting the door frame, sand off the protruding part using a belt sander like the one below.
Repainting all the walls and ceilings in your house can really refresh your home and make it appear new and clean. As a landlord of multiple properties, I’ve repainted the interior of entire homes in as little as 6 hours. Here are my tips for whole-house interior painting.
Neutral Paint Color
My go-to paint color is Hazelnut Cream 750C-2 (Eggshell) by Behr (Home Depot). It looks good both during the day and at night and in different light color temperatures.
Same Wall and Ceiling Paint Color
Unless you’re really picky or enjoy spending time masking surfaces and painting, I recommend painting the walls and ceilings the same color. It greatly simplifies the painting process. If you have an MDF baseboard, you can also paint it the same color as your wall. Or, you can paint it pure white, which is the default color.
Masking
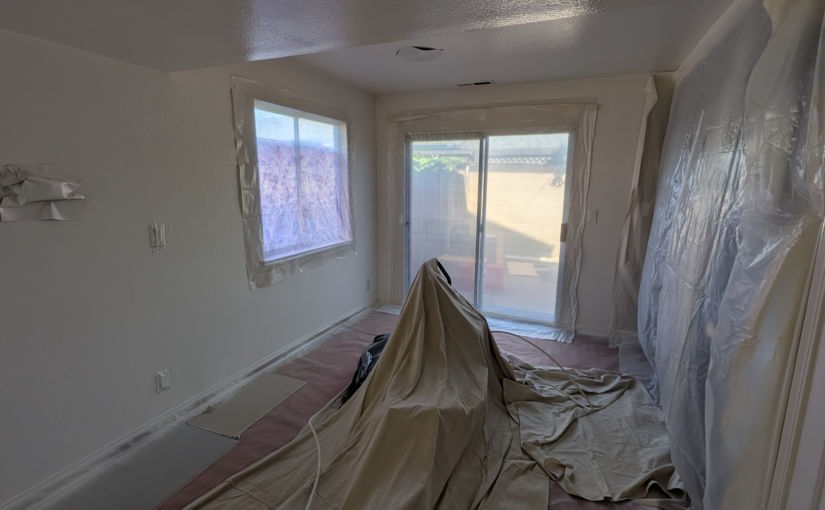
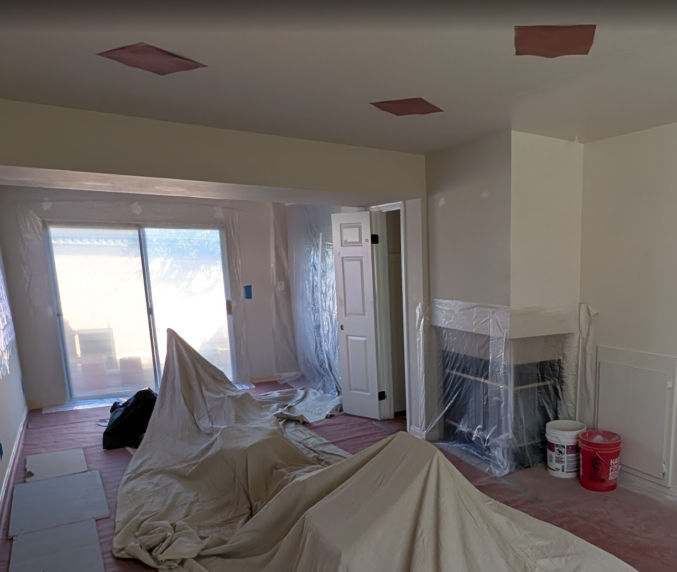
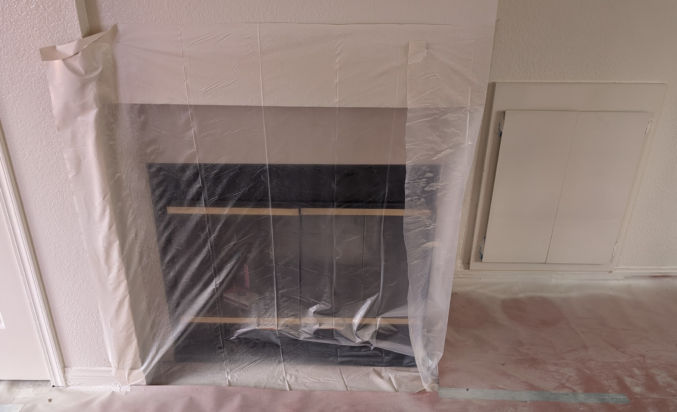
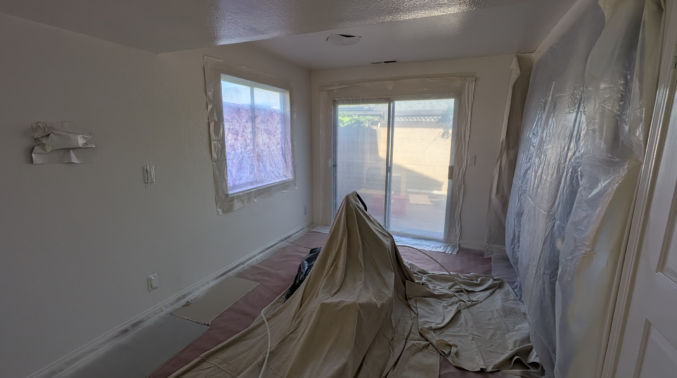
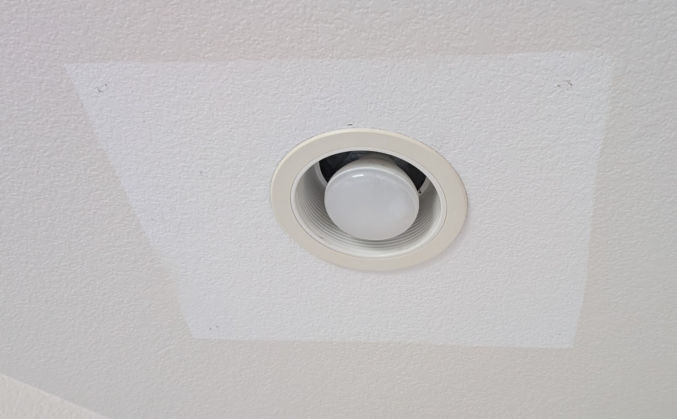
You’ll need to mask areas you don’t want to paint, like windows, ceiling lights, and doors.
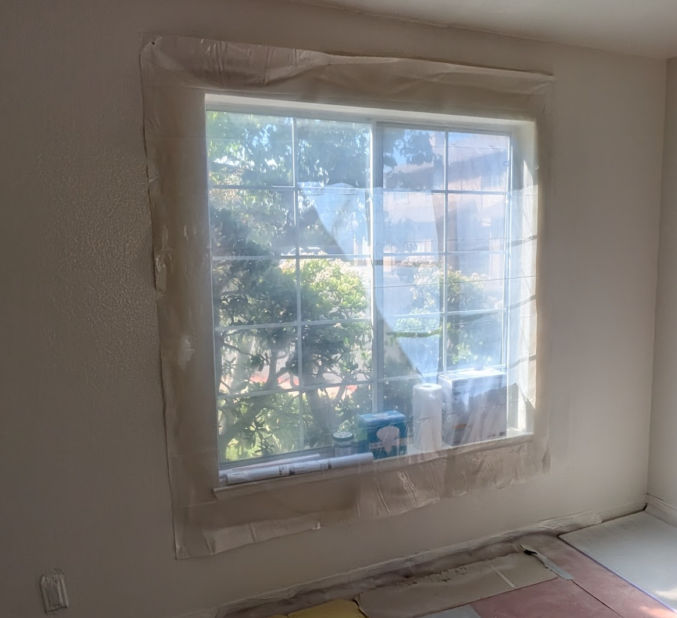
For windows, I like to staple somewhat thick (3.5 mm) transparent plastic. If it’s too thin, it’s harder to cut, it easily blows away, and it’s hard to secure to a surface. Also, stapling is much quicker and easier than taping all sides. The transparent plastic lets light in so you can see what you’re painting. Since the air pressure from spray painting can blow paint particles everywhere, I like to use a healthy margin around any objects I’m masking so that even if paint manages to get under the plastic, it won’t go far and reach the surface I don’t want painted.
For ceiling lights, I like to staple heavyweight red rosin paper over them, as shown below. Taping is not necessary as long as the paper is large enough to prevent paint particles from reaching the lights from the gaps along the edges. Cutting rosin paper is easy using scissors or a utility knife.
For other surfaces that could fit under one piece of red rosin paper, I’ll use that paper. Otherwise, for surfaces that are too large for the red rosin paper, I’ll use the plastic.
For the floor, I use red rosin paper taped to the top of the baseboard and I’ll use a plastic and fabric drop cloth for the middle of the floor.
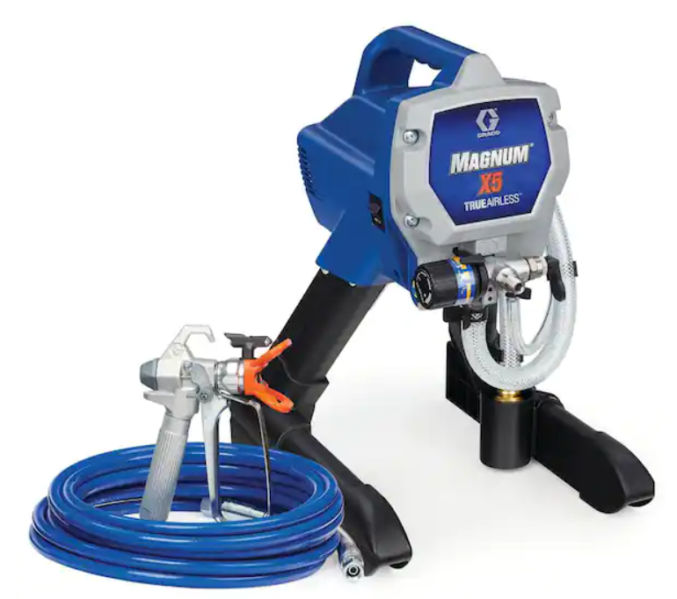
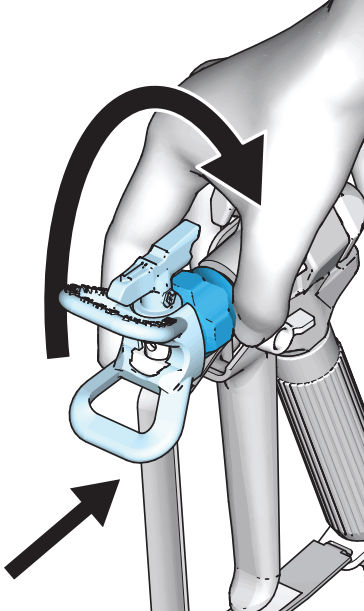
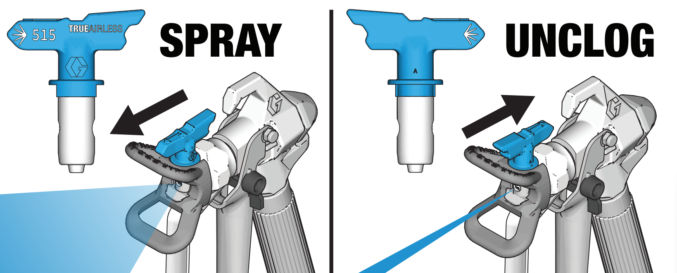
When screwing the spray tip guard assembly to the gun, make sure to only tighten by hand. If you tighten with a wrench, it may be too tight, preventing paint from coming out.
One way to tell if you’ve tightened it too tight is if you are unable to rotate the tip from the spray to the unclog position using your hand.
If you’re having trouble spraying paint, you might need to replace one or more parts, like the spray tip, spray gun and tip, and hose. Start with replacing the spray tip first since it’s cheaper than the other parts.
Clothing
When spray painting, paint particles can go everywhere. You can buy and wear a painter’s coverall, but they are very uncomfortable. Instead, I recommend wearing sacrificial clothing that you don’t mind getting paint on. I wear a long-sleeve shirt with a hoodie so I can cover my arms and hair, leaving only my hands and face exposed to paint particles. If you wear glasses, I also recommend wearing old glasses that you don’t mind getting paint on.
Removing masks
When removing plastic or red rosin paper that was stapled to a surface, I recommend using a staple puller. It makes removing staples and nails much easier than using other methods.
Painting Masked Areas
When you’re done spray painting and removing all masks, you can easily paint any masked surfaces manually using a paint roller.