


There are many options for a content management system (CMS). WordPress is the most popular one. Its native WYSIWYG block editor CMS is called Gutenberg. I’m using it right now as I’m typing these words 🙂 WordPress is more than just a CMS, it’s a platform that you can heavily customize and that you can add additional WYSIWYG CMSs on top of it, e.g. WP Bakery, Elementor, and many others. You can even create a non-WYSIWYG CMS in WordPress using Advanced Custom Fields (ACF), which would give you something similar to dedicated non-WYSIWYG CMSs like Contentful. Aside from WordPress, there’s a plethora of WYSIWYG CMSs like Webflow, Wix, etc. Then there are headless CMSs like Contentful, Strapi, Directus, and many more. WordPress can even be used as a headless CMS because it has an API from which you can get all content. This post will share a simple alternative to these complex CMS solutions by using a static site generator (SSG) called 11ty along with JSON files to store content in what you can consider a poor man’s CMS. Why? Because
- Faster updates
CMSs, whether WYSIWYG or not, are for non-technical users (like most marketing people). I’ve worked in marketing for 14 years with many, many marketers. The vast majority of them do not want to update a website themselves. So, if developers have to update the website, there’s no need for a CMS. As a developer myself, the abstraction layer that a CMS provides just slows me down. Elementor, for example, is one of the most popular WYSIWYG CMSs. It doesn’t give you the ability to edit the raw code. Everything must be done visually. That can slow me down if I can’t easily find how to do what I need using the Elementor UI. - Security
WordPress is known for being vulnerable to hacks, not necessarily because of WordPress itself but because of the many plugins that people install in them. Static websites are more secure than any dynamic website. - Performance
WordPress websites are dynamic (content is queried from a database and PHP files must be processed on the server before they are delivered to clients). Static websites, on the other hand, require no processing. Of course, caching can improve the performance of dynamic sites, but static sites are still faster. - Simplicity
WordPress is way more complex than a simple static site, including a static site built by a static site generator like Eleventy. If you add a CMS on top of WordPress, then it becomes even more complex. If you use a static site generator along with a headless CMS like Contentful, then you have another dependency and layer of complexity due to needing to set up content models and then fetch them using APIs. The setup I will show you in this post will allow developers to see their entire website structure in a familiar file system without any CMS UI to get in their way. No CMS will alter code in any unintended way. - Lower learning curve
If developers have to update a website instead of non-technical marketers, then a static website offers a lower learning curve because all developers already understand website code. On the other hand, not every developer is fluent in WordPress or one of the many CMS plugins it offers, along with whatever customizations may have been made, so it would take them longer to learn these CMSs. - Cost
The setup I’m using is free because 11ty is free (open source), GitHub is free, and Netlify (for web hosting) offers a free plan. While you can host WordPress for free and use a free open-source CMS, you’ll have to maintain them, which you probably don’t want to do. Many companies go with a managed WordPress host like WP Engine, but they can be somewhat expensive. The Contentful CMS can also be expensive depending on the number of users and records.
Rather than explain how I created this starter website that uses Eleventy + JSON, I will just explain how the code, which is in this GitHub repo, works. If you want to learn how to set up an Eleventy website, just read the 11ty docs. It’s very simple.
Let’s go!
1. Install NodeJS
https://nodejs.org/en/download
2. Install Git
3. Set Up a New Website Project Folder
mkdir test-website
cd test-website
4. Clone This Git Repo
git clone https://github.com/javanigus/eleventy-json-starter.git5. Install Dependencies
npm install 6. Run Eleventy
npm start11ty will start a local web server. Open the localhost URL and view the starter site on your machine.
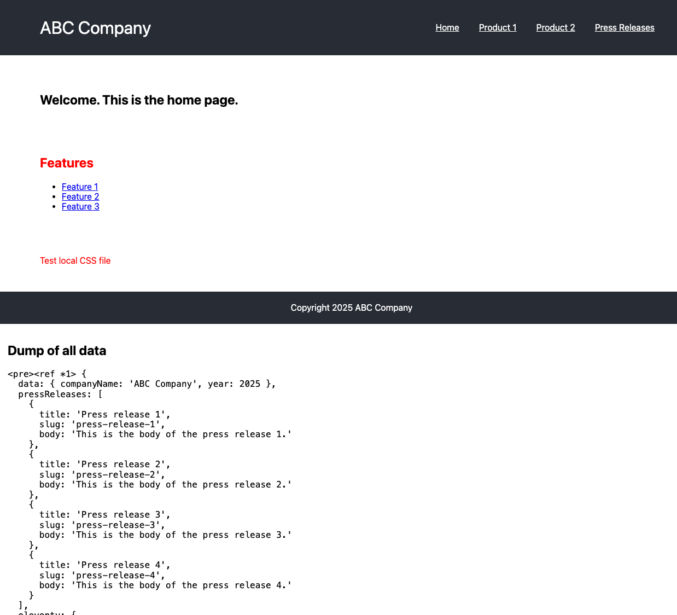
The top portion shows the starter site with a few menu links and some body content. At the bottom is a dump of all variables available to the page template, e.g. home page, about page, etc.
File Structure
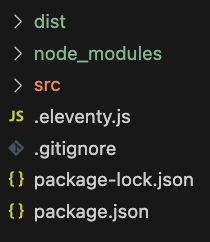
- “dist”, short for “distribution”, is the build output folder.
- “src”, short for “source”, is where your source code goes
- .eleventy.js is the Eleventy configuration file
- the other files are self-explanatory
Eleventy Configuration
The Eleventy config file is .eleventy.js. I’ve tried to keep it as simple as possible. The fewer dependencies, the less the maintenance and the fewer the things that could break. Now, I personally would add PostCSS and Tailwind CSS to this setup if I were using it for work, but that’s beyond the scope of this starter site.
This code basically
- tells Eleventy which file types to copy from the src folder to the dist folder
- adds some debugging capabilities
- tells Eleventy which folder is the source (“src”) and build output (“dist”)
- tells Eleventy which folder it uses for includes / partials / components (“_includes”)
- tells Eleventy which folder it uses for layouts (“_layouts”). To keep this starter simple, I’m not using any layouts.
module.exports = function(eleventyConfig) {
    const inspect = require("util").inspect;

    eleventyConfig.addPassthroughCopy("src", {
		//debug: true,
		filter: [
			"404.html",
			"**/*.css",
			"**/*.js",
			"**/*.json",
			"!**/*.11ty.js",
			"!**/*.11tydata.js",
            "!**/*.11tydata.json",
		]
	});

	// Copy img folder
	eleventyConfig.addPassthroughCopy("src/img");

	eleventyConfig.setServerPassthroughCopyBehavior("copy");

    eleventyConfig.addFilter("debug", (content) => `<pre>${inspect(content)}</pre>`);

	// tell 11ty which files to process and which files to copy while maintaining directory structure
	// eleventyConfig.setTemplateFormats(["md","html","njk"]);

	return {
		dir: {
			input: "src",
			output: "dist",
			// ⚠️ These values are both relative to your input directory.
			includes: "_includes",
			layouts: "_layouts",
		}
	}
};
Website Source Files (src folder)

The “src” folder is where you put your website files (HTML, CSS, JS, etc). Instead of HTML files, I’m using Nunjucks files (“njk” extension). You can use other templating languages like Handlebars, but I prefer Nunjucks. You can think of Nunjucks as a simple version of PHP. It allows you to add logic and loops and output variables.
_data folder
The _data folder contains global data, whether it’s data returned from a JavaScript file (data.js) or from JSON files (data.json, pressReleases.json). This data is available to all page templates.
_includes folder
The _includes folder is where I put shared code (header.njk, footer.njk) and components (section1.njk, section2.njk). Section 1 can be a hero component and section 2 can be a features component, for example.
css folder
The css folder contains sitewide CSS (global.css) and CSS for each component (header.css, section1.css, etc).
js folder
The js folder contains sitewide JavaScript (global.js) and JavaScript for each component (header.js, section1.js, etc).
Other files and folders
The other files and folders in the “src” folder correspond to each page on the site,
- src/index.njk (home page at /)
- src/product1/index.njk (product page at /product1)
- src/product1/support/index.njk (product support page at /product1/support/)
- etc
Home Page
Home Page-specific files
- src/index.njk (you can think of this as index.php)
- src/index.css (this CSS file is only needed if you have CSS that is exclusive to the home page)
- src/index.js (this JS file is only needed if you have JS that is exclusive to the home page)
- src/index.data.json (this is the JSON file that contains all component data that is used in the page)
---js
{
  variable1: "value1",
  eleventyComputed: {
    datum(data) {
      return data;
    }
  }
}
---

<html>
<head>
    <link rel="stylesheet" href="https://cdnjs.cloudflare.com/ajax/libs/modern-normalize/3.0.1/modern-normalize.min.css" integrity="sha512-q6WgHqiHlKyOqslT/lgBgodhd03Wp4BEqKeW6nNtlOY4quzyG3VoQKFrieaCeSnuVseNKRGpGeDU3qPmabCANg==" crossorigin="anonymous" referrerpolicy="no-referrer" />
    <link rel="stylesheet" href="/css/global.css" />
    <link rel="stylesheet" href="/css/header.css" />
    <link rel="stylesheet" href="/css/footer.css" />
    <link rel="stylesheet" href="/css/section1.css" />
    <link rel="stylesheet" href="/css/section2.css" />
    <link rel="stylesheet" href="/index.css" />
</head>
<body>
    {% include "header.njk" %}

    {% include "section1.njk" %}

    {% include "section2.njk" %}

    <section>
        <p class="localCss">Test local CSS file</p>
    </section>

    {% include "footer.njk" %}

    <script src="/js/global.js"></script>
    <script src="/js/header.js"></script>
    <script src="/js/footer.js"></script>
    <script src="/js/section1.js"></script>
    <script src="/js/section2.js"></script>
    <script src="/index.js"></script>
</body>
</html>

<!-- for debugging data -->
<div style="padding: 1em;">
<h2>Dump of all data</h2>
<pre style="white-space: pre-wrap; word-wrap: break-word;"><code>{{ datum | debug }}</code></pre>
</div>
The front matter at the top above the <html> tag is just some code to help with debugging. It goes with the debugging code block at the bottom. Together, this dumps all variables, including global data, to the bottom of the page in the browser.
In the <body> section, I’m including 4 components
- header.njk
- section1.njk
- section2.njk
- footer.njk
You can think of these as including PHP files in another PHP file. Instead of PHP, it’s Nunjucks.
In the <head> section, I’m including all CSS that I need, including the CSS for the components that I’m using (header.css, section1.css, etc).
At the bottom of the <body> section, I’m doing the same thing for JavaScript.
Now, you might be thinking that this approach could load a bunch of individual CSS and JS files. As is, it would, but you can easily just add a step to your build system to optimize (bundle and minify) all CSS and JS files in just 2 files, one for all CSS and one for all JS. That’s beyond the scope of this post.
So far, this should be straightforward. Before we look at the index.data.json file, let’s look at the components that the home page is using (section1.njk and section2.njk). For demo purposes, I kept them simple.
section1.njk
<section id="section1">
    <h1>Welcome. {{section1.title}}</h1>
</section>
This should be self-explanatory. You’re just outputting a variable just like you would in PHP.
section2.njk
<section id="section2">
    <h2 {% if section2.textColor %} style="color: {{ section2.textColor }};" {% endif %}>Features</h2>
    <ul>
        {% for feature in section2.features %}
            <li><a href="{{feature.link}}">{{ feature.text }}</a></li>
        {% endfor %}
    </ul>
</section>
This section demonstrates the use of conditional logic and looping.
Looking at the 2 components, we know what variables exist, so we can write our JSON data file with corresponding values.
index.data.json
{
    "section1": {
        "title": "This is the home page."
    },
    "section2": {
        "textColor": "red",
        "features": [
               {
                    "text": "Feature 1",
                    "link": "/forms/vmdr/"
               },
               {
                    "text": "Feature 2",
                    "link": "/forms/pm/"
               },
               {
                    "text": "Feature 3",
                    "link": "/forms/cmdb/"
               }
           ]
	}
}
The JSON file contains an object for each component (section1 and section2) along with variables for each.
Building Pages
If Eleventy is running, it will detect any file saves and rebuild, e.g.
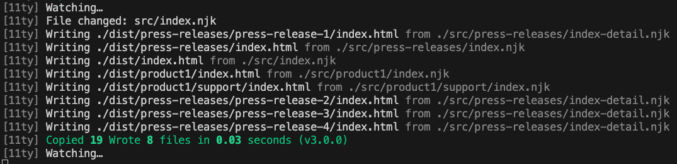
Notice how all static HTML files were built and put in the output folder (“dist”). When Eleventy builds each page, it takes all available data (global data from the “_data” folder and local page-specific data (e.g. from index.data.json) and evaluates all includes (components).
The /src/product1/ and /src/product1/support/ pages are very similar to the home page. The /src/press-releases/ folder is different in that it uses pagination to generate multiple pages from a single template. Let’s look at that in more detail.
Press Releases
The relevant files are
- _data/pressReleases.json (data file for all press releases)
- src/press-releases/index-detail.njk (file that generates all individual press releases)
- src/press-releases/index.njk (file that generates a listing page with links to all press releases)
_data/pressReleases.json
This file is an array of JSON objects. Each object contains data for one press release. Note that one key is “slug”. It will be used to generate the URL for the press release.
[
	{
		"title": "Press release 1",
		"slug": "press-release-1",
        "body": "This is the body of the press release 1."
	},
	{
		"title": "Press release 2",
		"slug": "press-release-2",
        "body": "This is the body of the press release 2."
	},
	{
		"title": "Press release 3",
		"slug": "press-release-3",
        "body": "This is the body of the press release 3."
	},
	{
		"title": "Press release 4",
		"slug": "press-release-4",
        "body": "This is the body of the press release 4."
	}
]
src/press-releases/index-detail.njk
This file will generate a bunch of individual press release pages that will look like this

In this file, we have some front matter that tells Eleventy to paginate (create multiple page) from the data in the “pressReleases” variable (which is from _data/pressReleases.json). The “permalink” contains the “slug” variable. It tells Eleventy the path to use as it iterates to generate each press release page.
In the <body> section, we’re just outputting the press release title and body using variables.
---
pagination:
  data: pressReleases
  size: 1
  alias: pressRelease
permalink: "press-releases/{{ pressRelease.slug | slugify }}/"
---

<html>
<head>
    <link rel="stylesheet" href="https://cdnjs.cloudflare.com/ajax/libs/modern-normalize/3.0.1/modern-normalize.min.css" integrity="sha512-q6WgHqiHlKyOqslT/lgBgodhd03Wp4BEqKeW6nNtlOY4quzyG3VoQKFrieaCeSnuVseNKRGpGeDU3qPmabCANg==" crossorigin="anonymous" referrerpolicy="no-referrer" />
    <link rel="stylesheet" href="/css/global.css" />
    <link rel="stylesheet" href="/css/header.css" />
    <link rel="stylesheet" href="/css/footer.css" />
</head>
<body>
    {% include "header.njk" %}

    <section>
        <h1>{{ pressRelease.title }}</h1>
        <p>{{ pressRelease.body }} </p>
    </section>

    {% include "footer.njk" %}

    <script src="/js/global.js"></script>
    <script src="/js/header.js"></script>
    <script src="/js/footer.js"></script>
</body>
</html>
src/press-releases/index.njk
In this file, we want to list all press releases with a link to each one so the page looks like this

So, we loop over the pressReleases array of JSON objects to do so.
---js
{
  variable1: "value1",
  eleventyComputed: {
    datum(data) {
      return data;
    }
  }
}
---

<html>
<head>
    <link rel="stylesheet" href="https://cdnjs.cloudflare.com/ajax/libs/modern-normalize/3.0.1/modern-normalize.min.css" integrity="sha512-q6WgHqiHlKyOqslT/lgBgodhd03Wp4BEqKeW6nNtlOY4quzyG3VoQKFrieaCeSnuVseNKRGpGeDU3qPmabCANg==" crossorigin="anonymous" referrerpolicy="no-referrer" />
    <link rel="stylesheet" href="/css/global.css" />
    <link rel="stylesheet" href="/css/header.css" />
    <link rel="stylesheet" href="/css/footer.css" />
</head>
<body>
    {% include "header.njk" %}

    <section>
        <h1>Listing of all press releases</h1>
        <ul>
            {% for pressRelease in pressReleases %}
                <li><a href="/press-releases/{{pressRelease.slug | slugify}}">{{ pressRelease.title }}</a></li>
            {% endfor %}
        </ul>
    </section>

    {% include "footer.njk" %}

    <script src="/js/global.js"></script>
    <script src="/js/header.js"></script>
    <script src="/js/footer.js"></script>
</body>
</html>

<!-- for debugging data -->
<div style="padding: 1em;">
<h2>Dump of all data</h2>
<pre style="white-space: pre-wrap; word-wrap: break-word;"><code>{{ datum | debug }}</code></pre>
</div>
When you save a file, Eleventy will build all pages. As you can see in the screenshot below, Eleventy created 4 press release pages, one for each JSON object in the JSON data file.
- [11ty] Writing ./dist/press-releases/press-release-1/index.html from ./src/press-releases/index-detail.njk
- [11ty] Writing ./dist/press-releases/press-release-2/index.html from ./src/press-releases/index-detail.njk
- [11ty] Writing ./dist/press-releases/press-release-3/index.html from ./src/press-releases/index-detail.njk
- [11ty] Writing ./dist/press-releases/press-release-4/index.html from ./src/press-releases/index-detail.njk
Eleventy also built the listing page.
- [11ty] Writing ./dist/press-releases/index.html from ./src/press-releases/index.njk
Hosting
If you use Netlify or Vercel for hosting, you can connect them to GitHub so that whenever you push to GitHub, each will trigger a build and deploy your changes to production on a global CDN.
Updating JSON Files Reliably
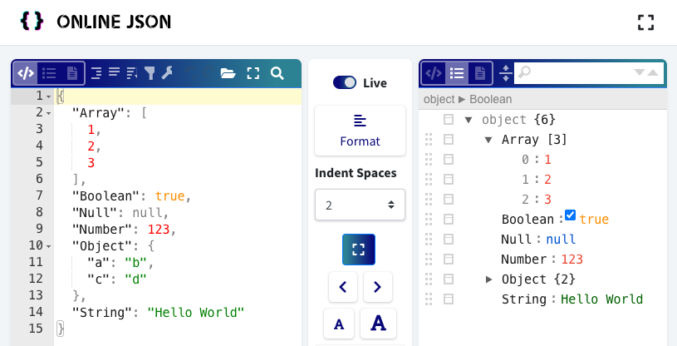
Since content will be in JSON files, you may wonder how easy it would be to edit them without breaking the JSON format. If this is your concern, you can always just copy and paste the JSON code into an online JSON editor like this one. On the left is the JSON content in “code” format and on the right is the same content in “tree” format. In the “tree” format, you can conveniently expand and collapse nodes (in case some are too long) and safely edit the name/value pairs without worrying about breaking the JSON format. If the “Live” toggle is enabled, you can see your changes in both panes updated automatically. When you’re done editing in “tree” view, you can just copy/paste the code in “code” view back to your code editor.
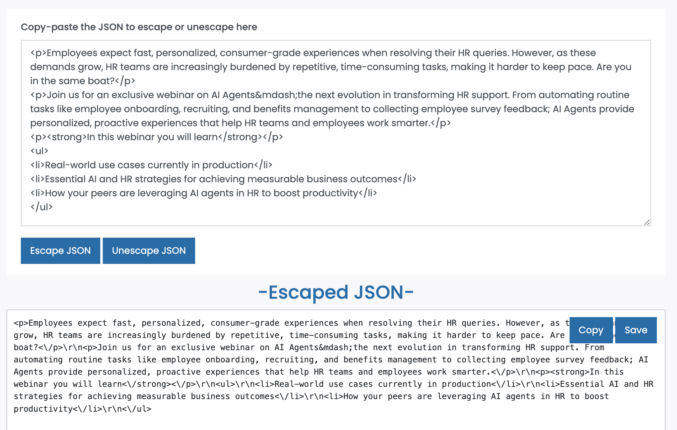
If you need to put HTML in a JSON value, you’ll need to escape the HTML first. you can use an online tool like this one to do that. Just paste the HTML in the top field, click “Escape JSON”, and get the escaped HTML in the bottom field.
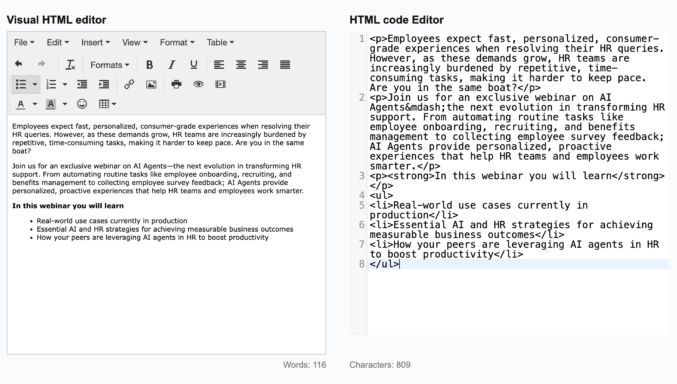
If you need an easy way to get HTML from a visual text editor like MS Word or a Google Doc, you can use EditorHTMLOnline. Just type your content on the left and then copy the HTML on the right.
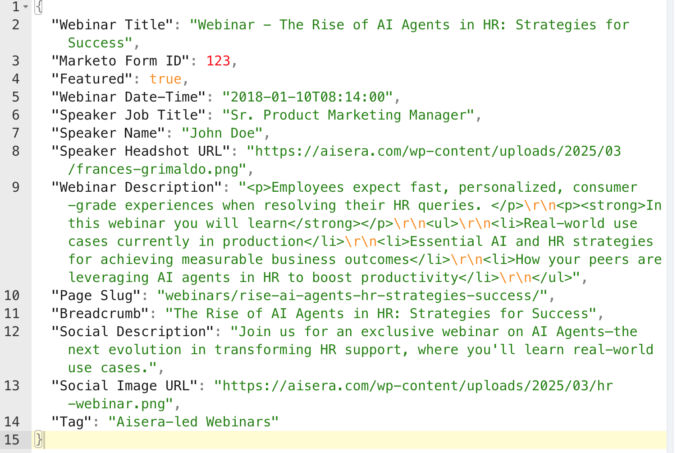
Here’s an example.
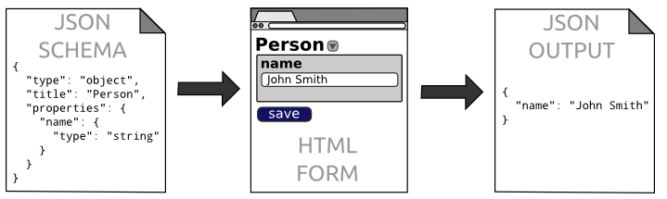
If you want to give users a simple web form with validation and select fields, you can use JSON editor.
Conclusion
Now, you can create components using simple HTML, CSS, JS, and Nunjucks (which is similar to JavaScript) and you can store all your data in simple JSON data files rather than some database or external headless CMS. The entire system is super simple but effective with a very low learning curve and zero abstraction.