
Chest Mount
Use this magnetic chest mount for hands-free FPV (first-person view) filming. The camera should be positioned upside down to lay flat on your chest.

Daytime Video Recording
- Choose “Freeframe video” mode.
- Ratio: 4:3 (in the Studio app, change it to 16:9)
- Active HDR: On
- Resolution: 4K (this is the only option)
- Frame Rate: 30 fps is good enough (this is the highest frame rate that supports HDR)
- Horizon lock: choose 360-degree horizon lock
Slow Motion Video Recording
Choose “slow motion” mode to record a video with a high frame rate. Allows you to shoot in 240 frames per second in 1080P, or up to 120 frames per second in 4K.
Night Shots and Low-Light Scenes
Choose “Pure Video” mode.
FlowState Stabilization
There are 3 stabilization options: Off, Low, Standard, and High. Choose High for very shaky situations. Note that the high setting will result in more cropping.
Field of View (FOV)
Choose Dewarp to experience a wide FOV with minimal distortion. This is ideal for scenarios such as skiing and vlogging.
Quickly cancel a recording
You can quickly cancel a recording if you’ve messed up by long-holding the shutter button while recording.
Pause recording
If you have some downtime during a shot, for example, you’re waiting at an intersection or for something to happen, tap the screen while recording (at the bottom) to pause your recording. You can then tap to resume at any time.
Quick Capture
When the camera is off, press the shutter button to start shooting with QuickCapture. The camera will start shooting using the last-used shooting mode.
Pre-recording
Save 15 or 30 seconds of footage before you start recording. This can be handy if you want to catch something on film that is imminent.
Interval (long period)
Take a series of single photos over a long period of time. The photos can then be combined into a timelapse.
Burst (short period)
Take a series of photos in a short period of time (up to 10s). One use case is if you are alone and want to take a selfie or if you are with someone who is not good at taking photos. You can set the burst setting to 30p/10s, meaning 30 pictures in 10 seconds. Then, you can stand, smile, try different poses, etc, and later pick the best shots.
Timelapse (for static, fixed-position shots)
Create a timelapse video that condenses a long scene into a short video by taking a photo at a set interval. Use a tripod or fix the camera in one spot.
- Shoot length: infinite, 3m, 5m, 10m, … 10h
- Interval: 0.5s, 1s, 2s, … 120s
For example, let’s say you want to film yourself having dinner on an airplane. You expect you will take 30 minutes to eat, so you choose 30m for “shoot length”. Then, you can adjust the interval to see how long the timelapse video will be. For example,
- interval = 0.5s, => timelapse duration = 2m
- interval = 10s, => timelapse duration = 6s
The timelapse duration is shown on the screen.
Timeshift (for moving shots)
This is like a moving time-lapse.
Auto-stop Recording
If you want to shoot a video and have the camera auto-stop recording, you can set the duration to one of the preset values. The default is infinity (until the battery dies). Other options include 15s, 30s, … 3h, etc.
Inconspicuous shooting
If you want to film without people knowing that you’re filming, you can do the following to make people think that the camera is turned off.
- Turn off the indicator light so there’s no flashing red light on the camera.
- Turn off “Front Screen Display”
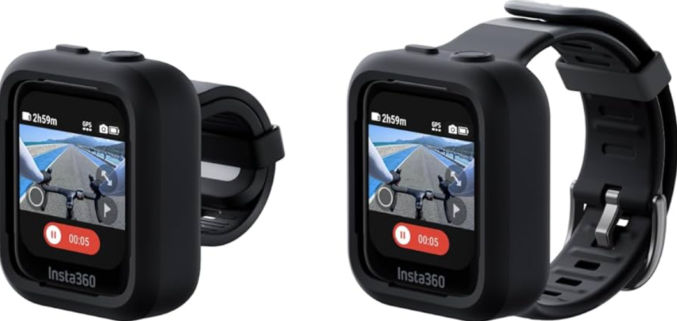
- Use the GPS remote to start and stop shooting without touching the camera.