


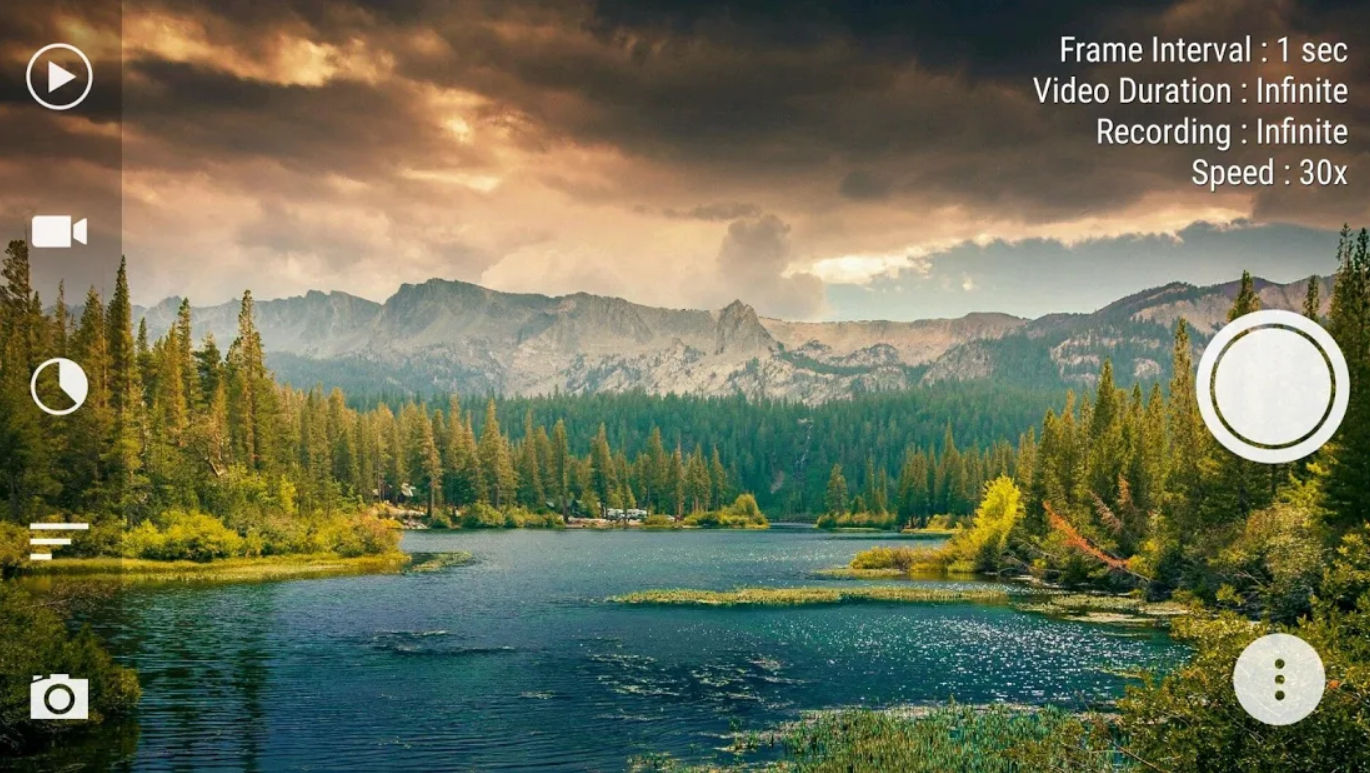
Creating a time lapse video is great for quickly showing changes that happen over a long period of time, e.g. the sky changing from day to night. I recently made a time lapse video of a pergola construction project using an Android app called Framelapse. It’s a very simple app which takes pictures at a user-specified interval over a set period of time or until you stop recording. What’s great is this method doesn’t fill up your phone by taking an actual video at the normal frame rate of 30 frames per second. For my first timelapse video, I chose a frame interval of 4 seconds. When I stopped recording, the timelapse video was instantly done and available in my Google Photos app and backed up to Google Photos in the cloud. I added some background music and I was done. Here’s the final video.
Category: Web Development
Easily Find and Remove Duplicate Files in Windows 10
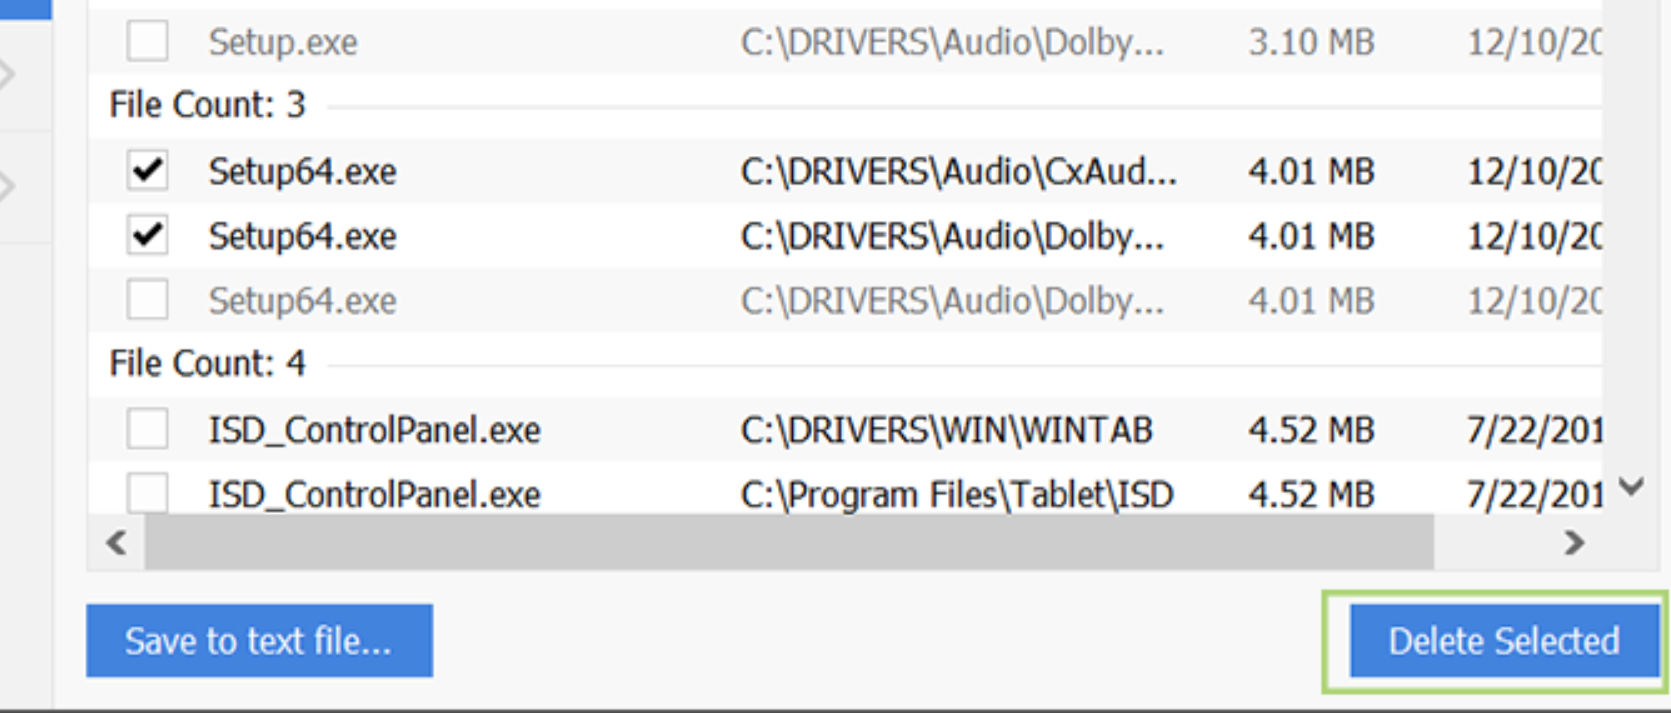
I’ve decided to move move and back up files files in the cloud. This includes moving all photos to Google Photos. Apparently, I had many duplicate photos in different folders that needed to be reorganized and deduped. Fortunately, CCCleaner makes finding and duplicating files of any time free, safe and easy. As you can see in the screenshot below, you can compare files and mark which ones to remove before removing them. There are many filters and controls so you can customize the search.

Test Rest APIs Using Postman
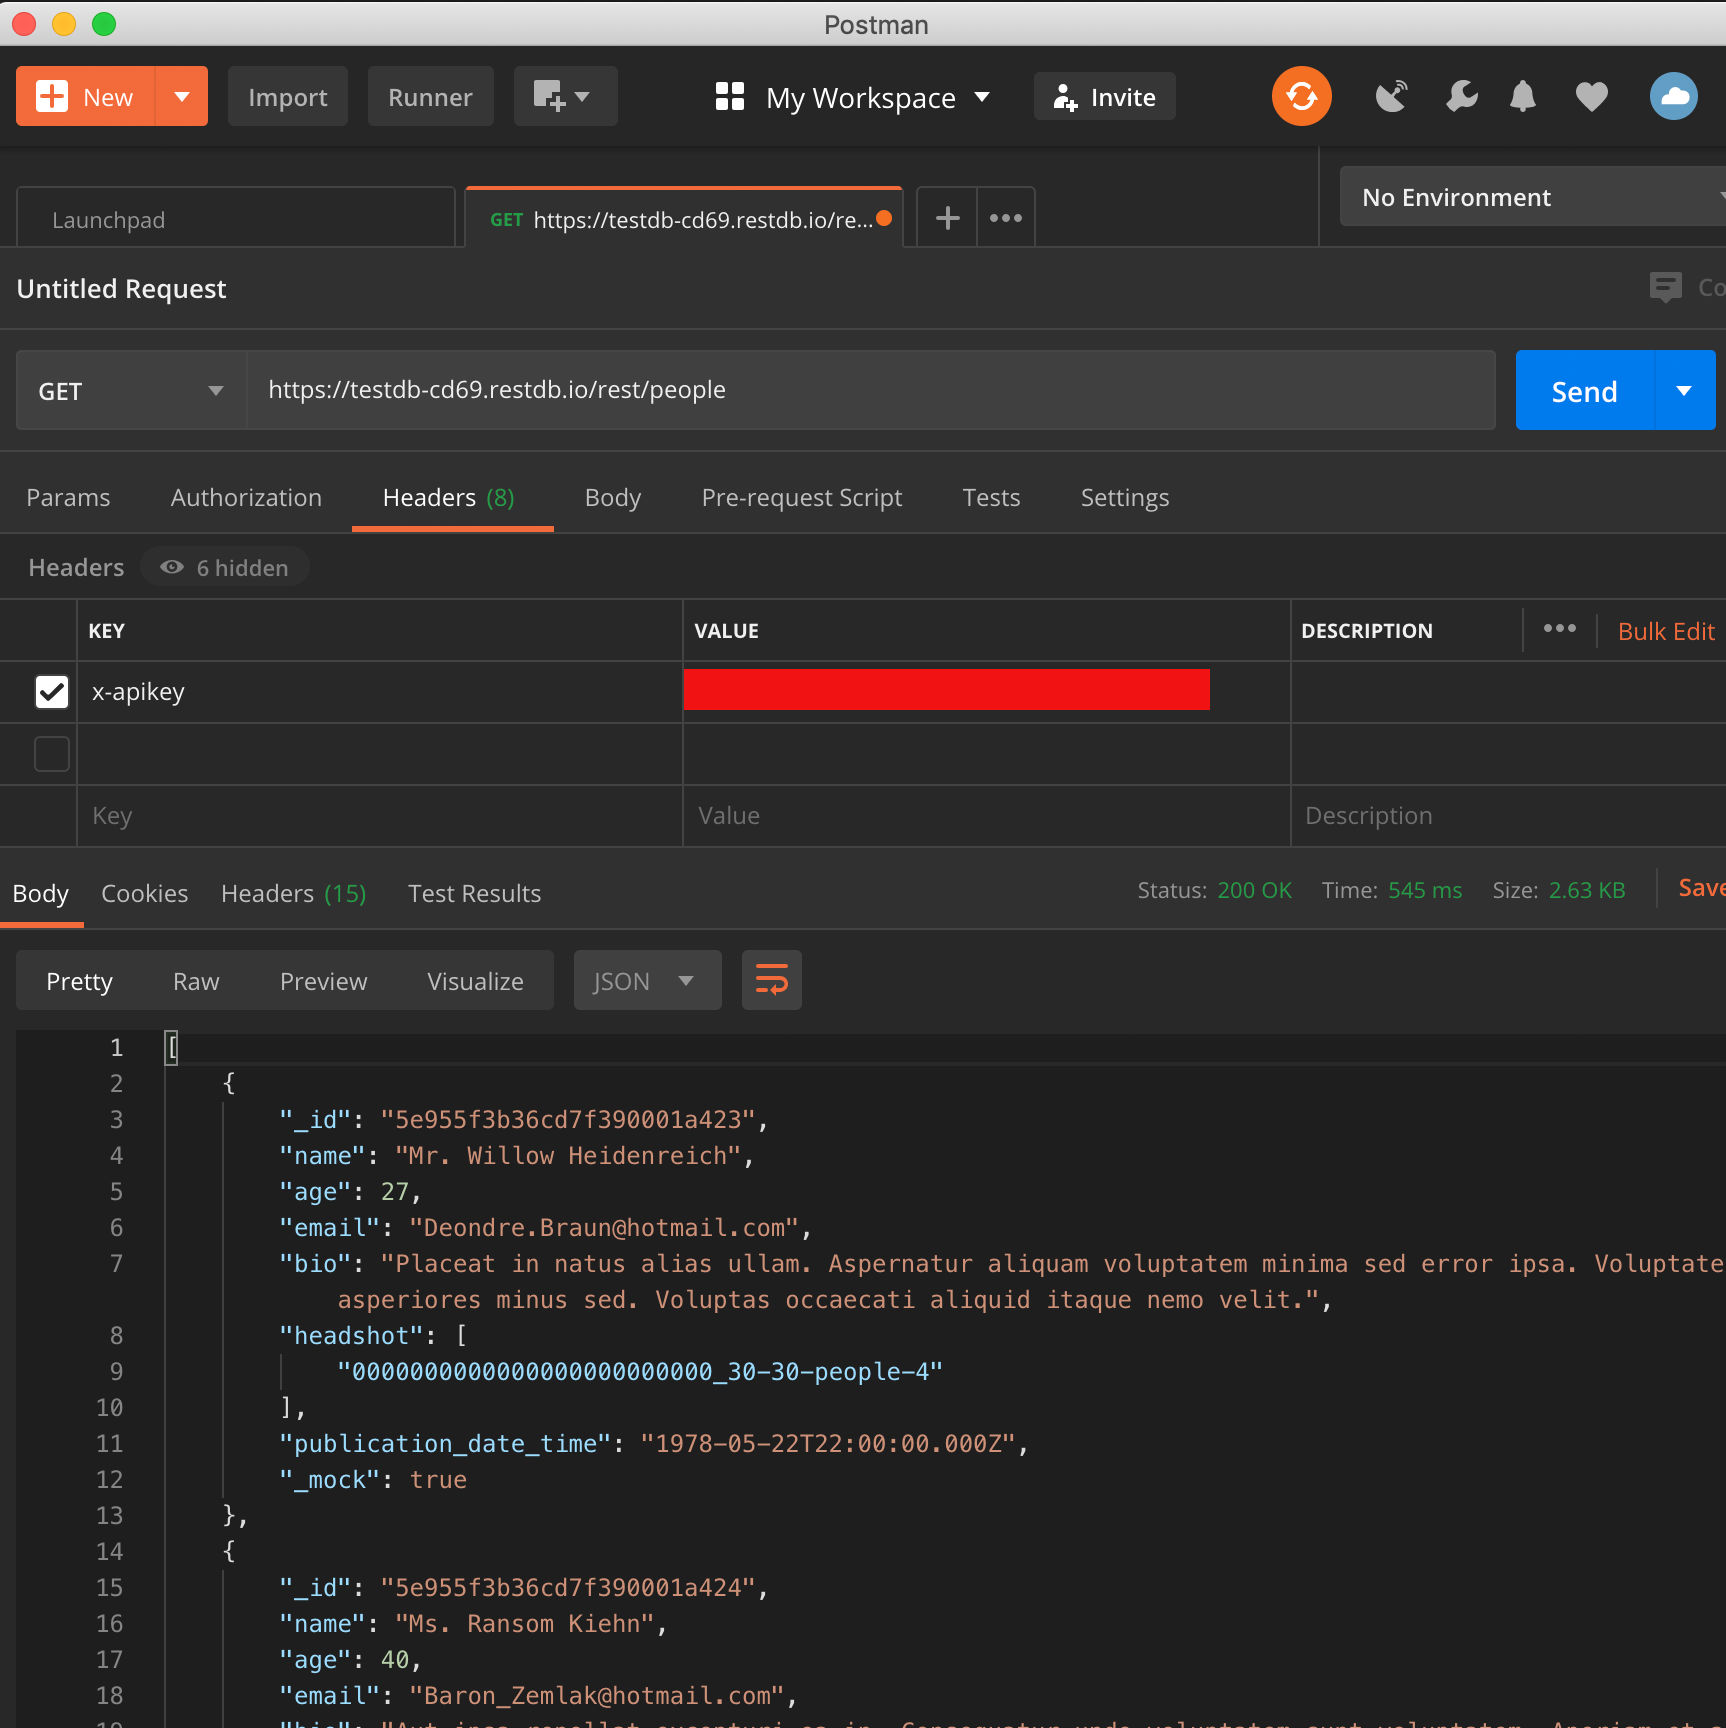
Testing HTTP connections and Rest APIs can easily be done using Postman. This handy tool allows you to provide HTTP headers, among many other things, to test connections and view responses.
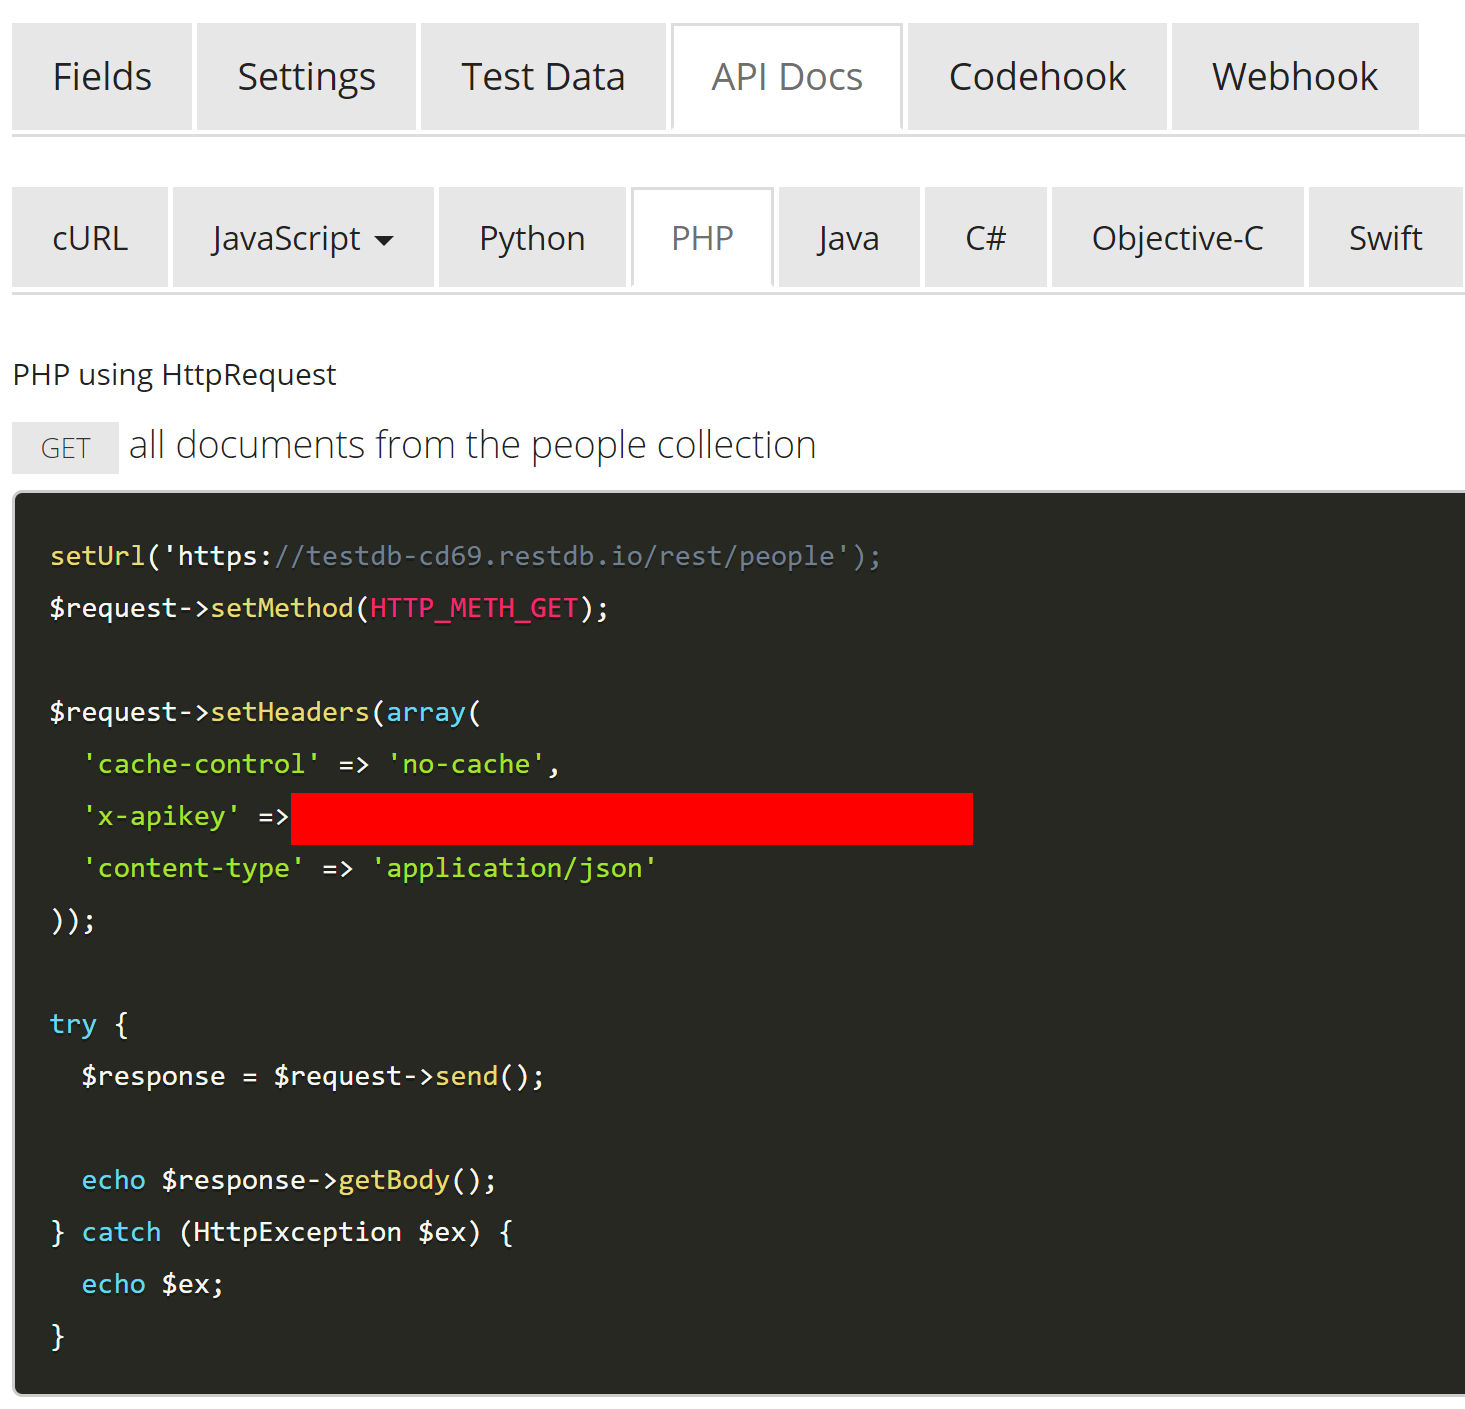
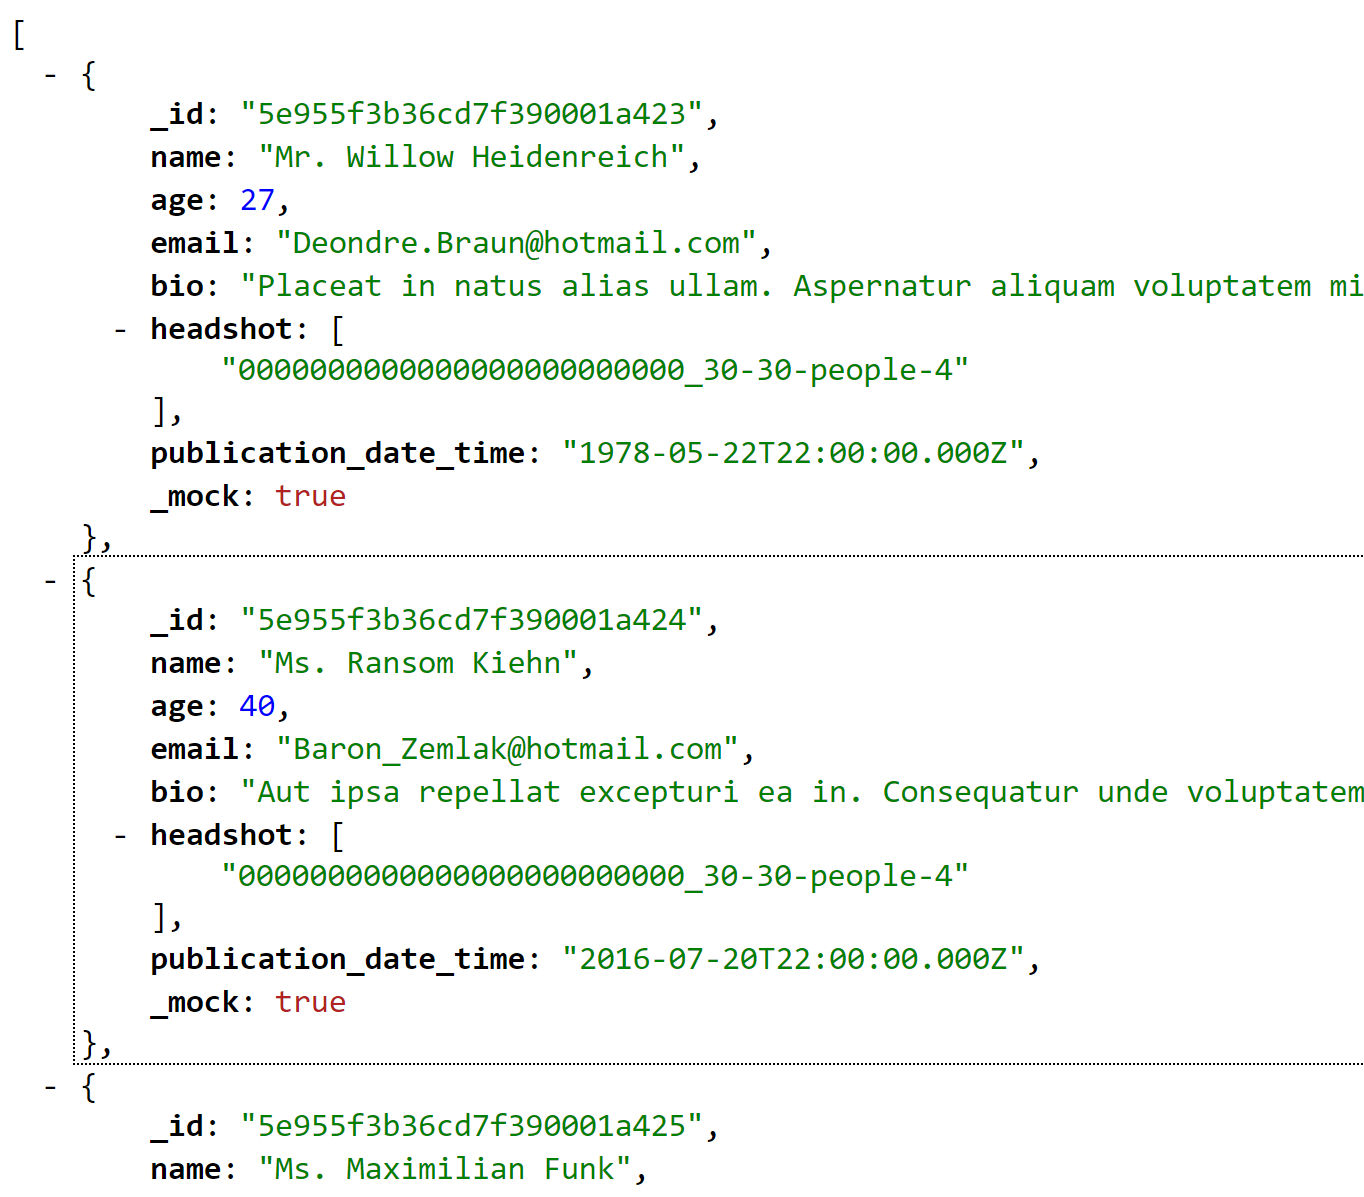
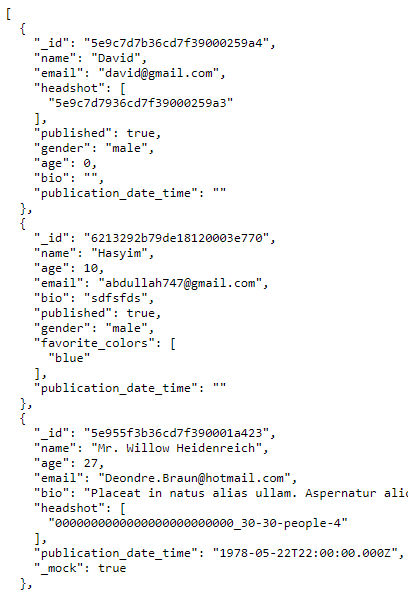
Here’s a test of querying a Rest API from restdb.io. The query URL is https://testdb-cd69.restdb.io/rest/people. For authentication, an HTTP header called “x-apikey” is provided with its value (redacted). The response from the call is in the body panel in JSON format.

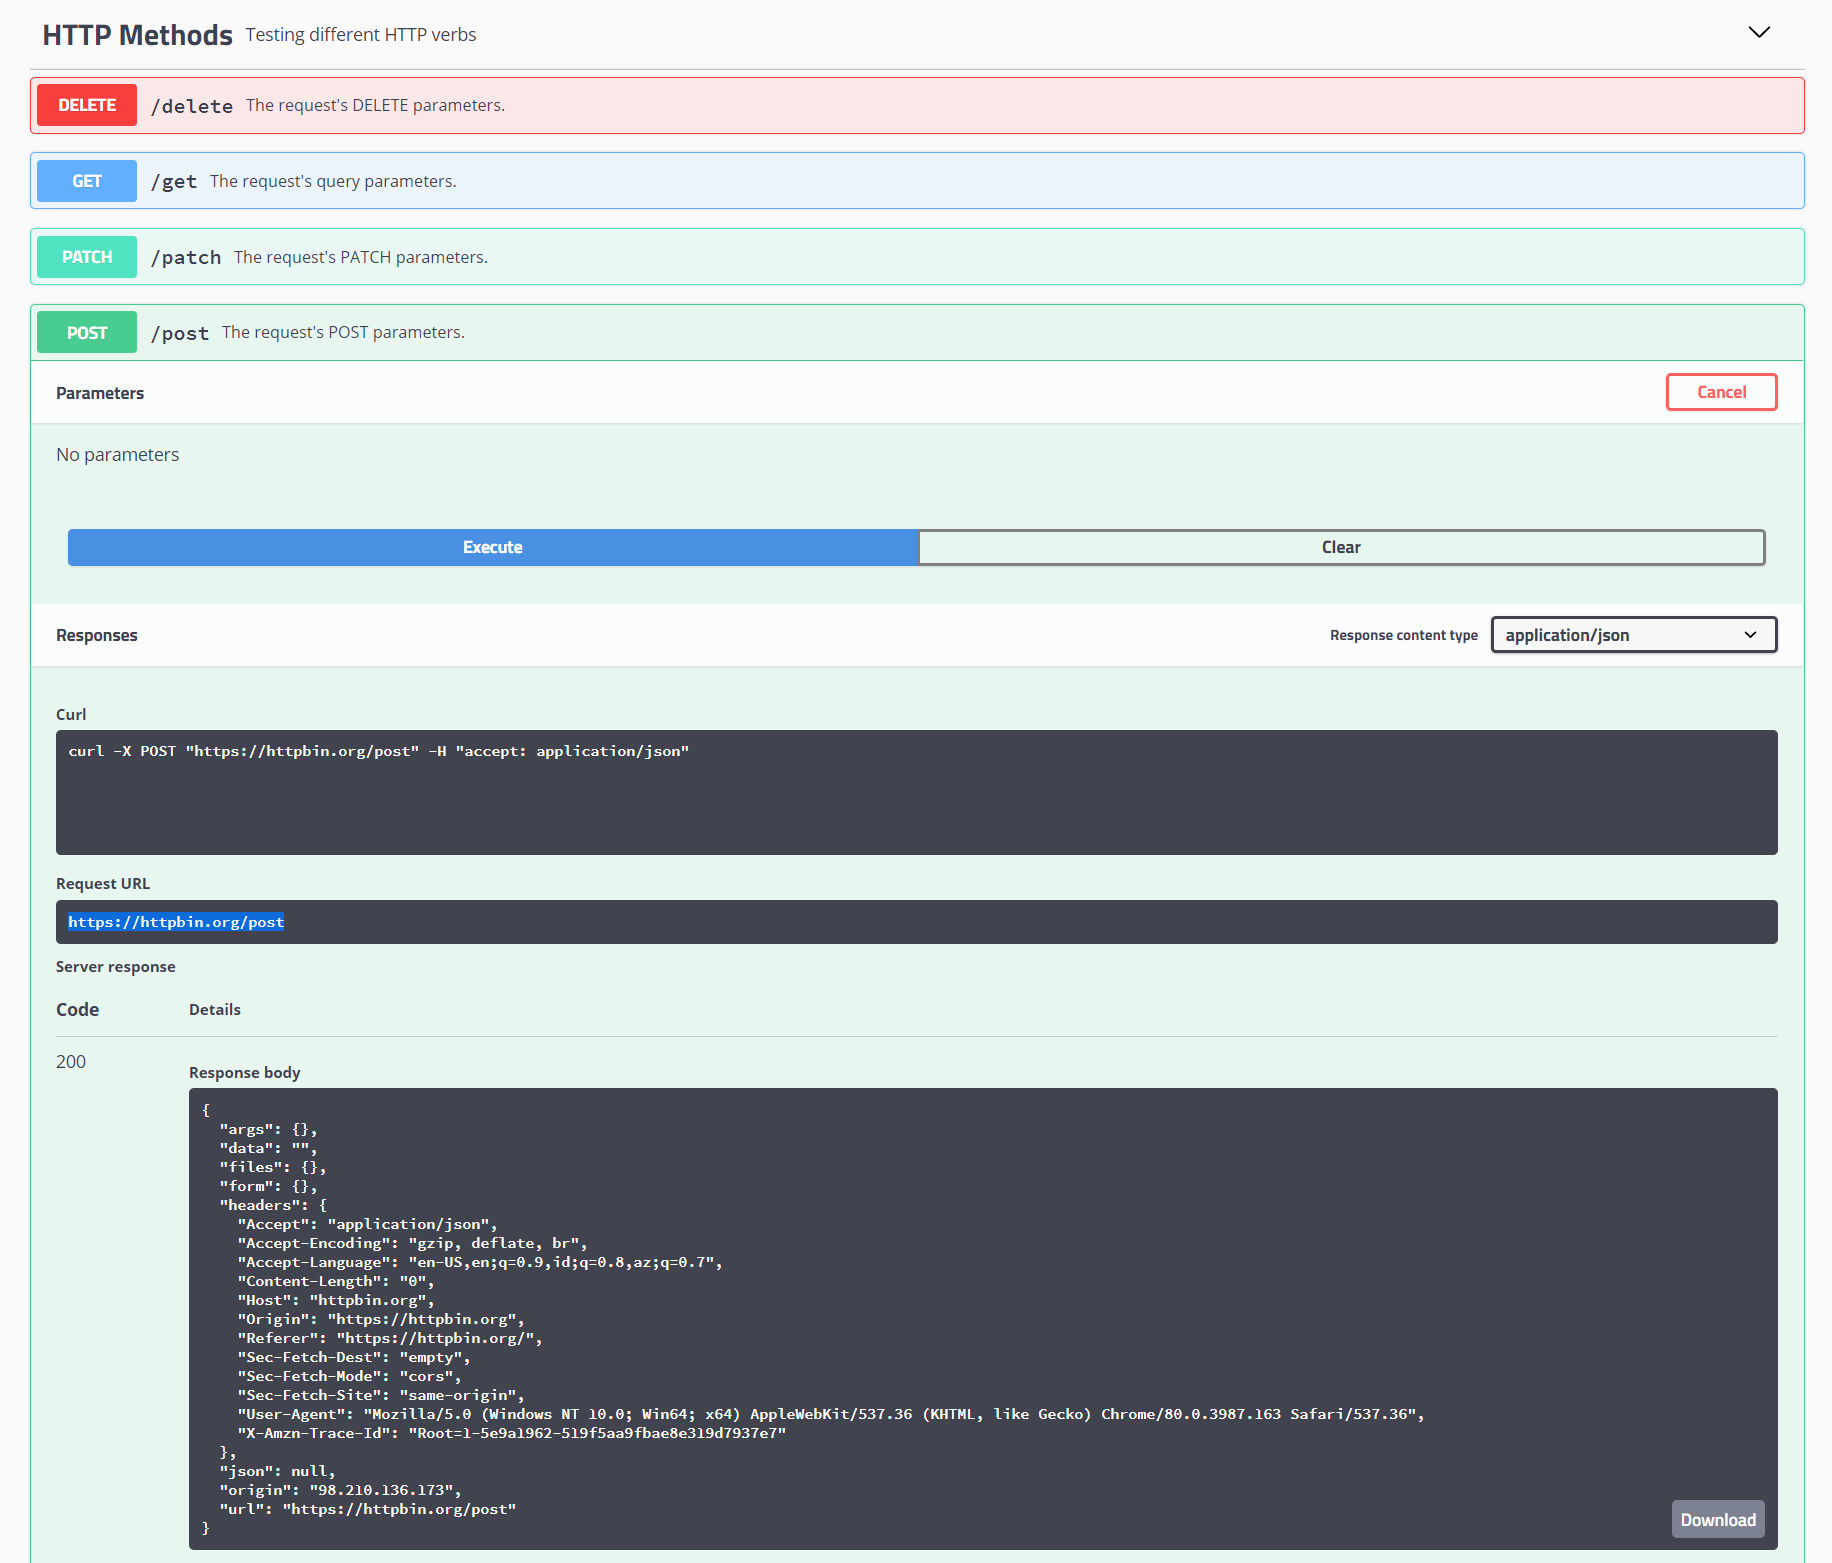
Test URL Endpoints Using httpbin.org
If you have a webhook or form that makes an http request to another system, you can test the request and see the response easily using httpbin.org.
For example, if you have a form that posts data, you can set the action attribute’s value to https://httpbin.org/post. Then, submit the form and you will see what the posts data looks like. This is great for testing.
Restdb.io – Super Simple, Low Code CMS and Database Backend for Web Apps
If you need a quick and easy way to create a CMS (content management system) or a database backend for an app, then Restdb.io will amaze! Here are some features:
- super developer-friendly with crystal clear documentation
- affordable and even has a free plan
- example code for popular programming languages, including client side JavaScript and server side NodeJS, which makes it quick to get up and running
- webhooks whenever a record is created, updated or deleted
- codehooks to run custom code before and after a record is created, updated or deleted, e.g. for data normalizing and validation. codehooks also support scheduled tasks like cron jobs.
- auto-generate test data to seed a table
- ability to import data from a CSV file
- native and custom field validation
- non-technical users can log in and add/edit/delete records using intuitive forms and controls without seeing any developer features
- ability to upload and host images and files
Below is a tutorial on how to create a simple CRUD (Create, Read, Update, Delete) app using Restdb.io with a PHP backend.
1. Log in to Restdb.io account and create a table (collection)
After you log in, you’ll need to be in Developer Mode to create a table. When creating fields in the table, Restdb.io offers numerous field property options including native and custom field validation.

2. Add or import data
To populate the table, you can
- Add data field by field, row by row
- Import data from a CSV file
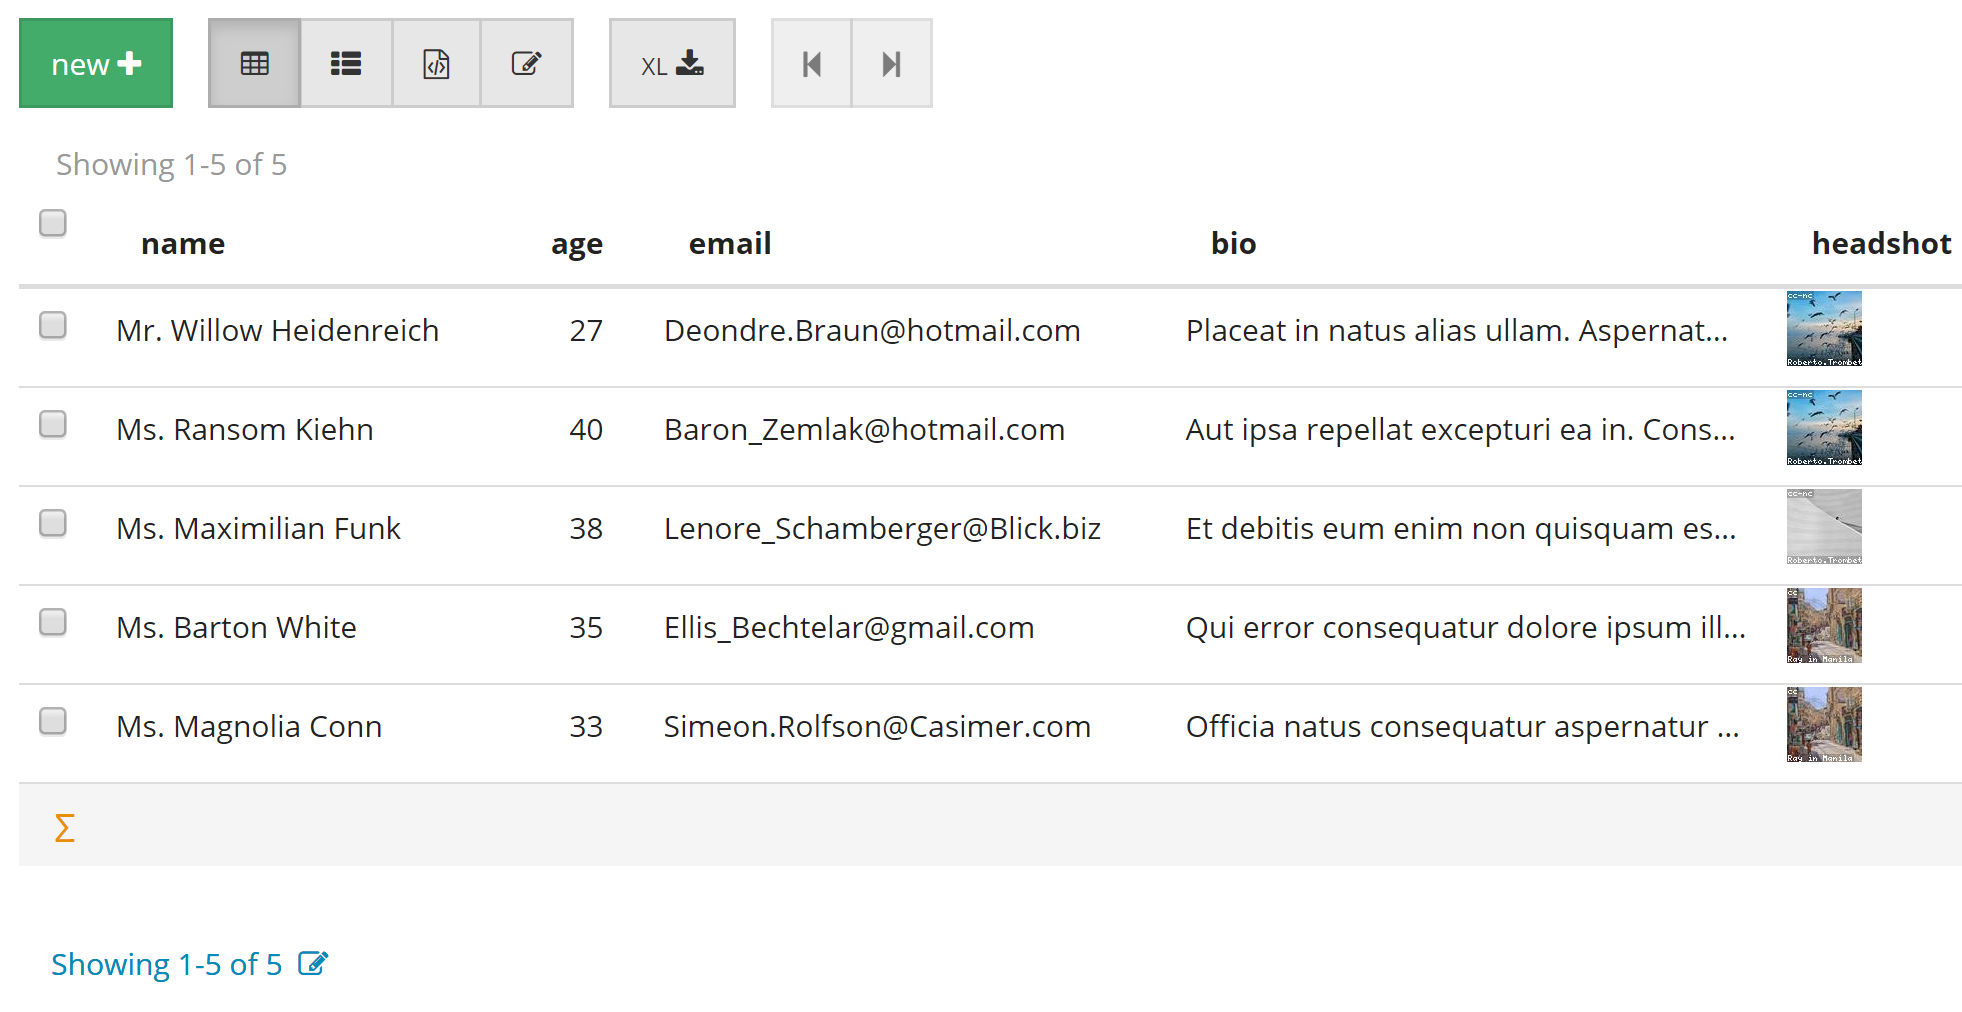
- Auto-generate data by clicking on the Test Data tab

Using the Test Data option, I chose to generate 5 rows which gave me this.
3. Get sample CRUD code
Click on [Table] > API Docs and choose a language to see sample code for
- getting records (using HTTP GET method)
- creating a record (using HTTP POST method)
- update a record (using HTTP PUT method)
- delete a record using (HTTP DELETE method)
- View the complete REST API
- View examples on how to query the database
- View examples on how to create, update and delete data
- View examples of NoSql data aggregation
PHP
The sample PHP CRUD code provided by RestDB.io requires the use of the HttpRequest PEAR PECEL HTTP_Request extension. To avoid having to install this dependency, you can just use cURL which is included with PHP.
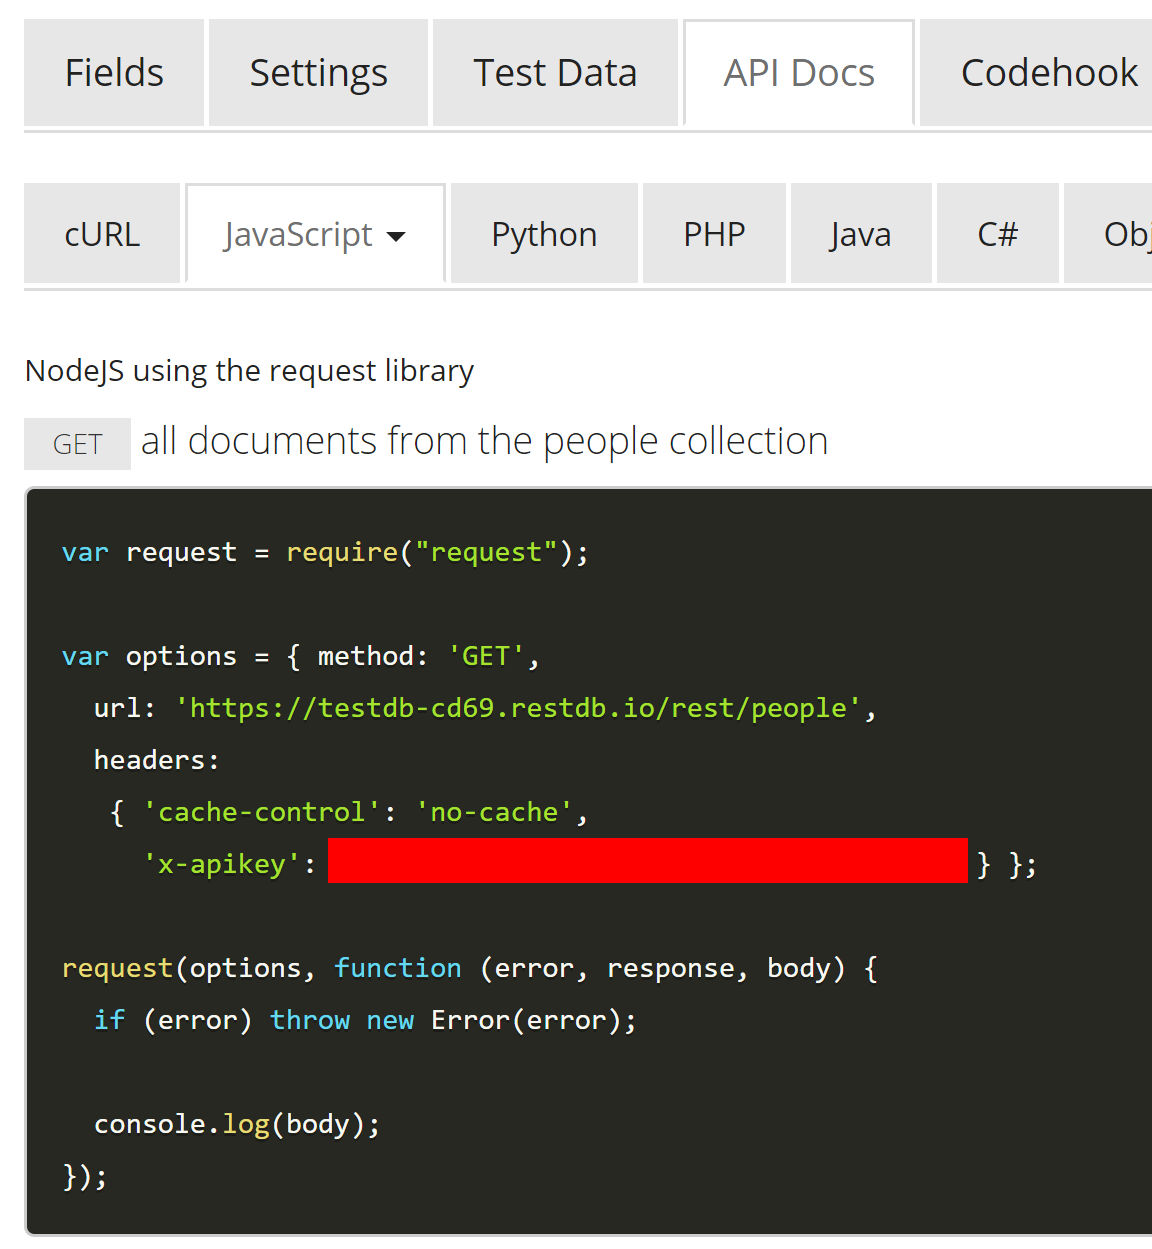
NodeJS
Below is a screenshot using NodeJS using the Request library.
JavaScript using jQuery AJAX
You can also perform CRUD actions using client-side JavaScript but you need to set up CORS (cross-origin resource sharing). The example below shows JavaScript using jQuery AJAX.
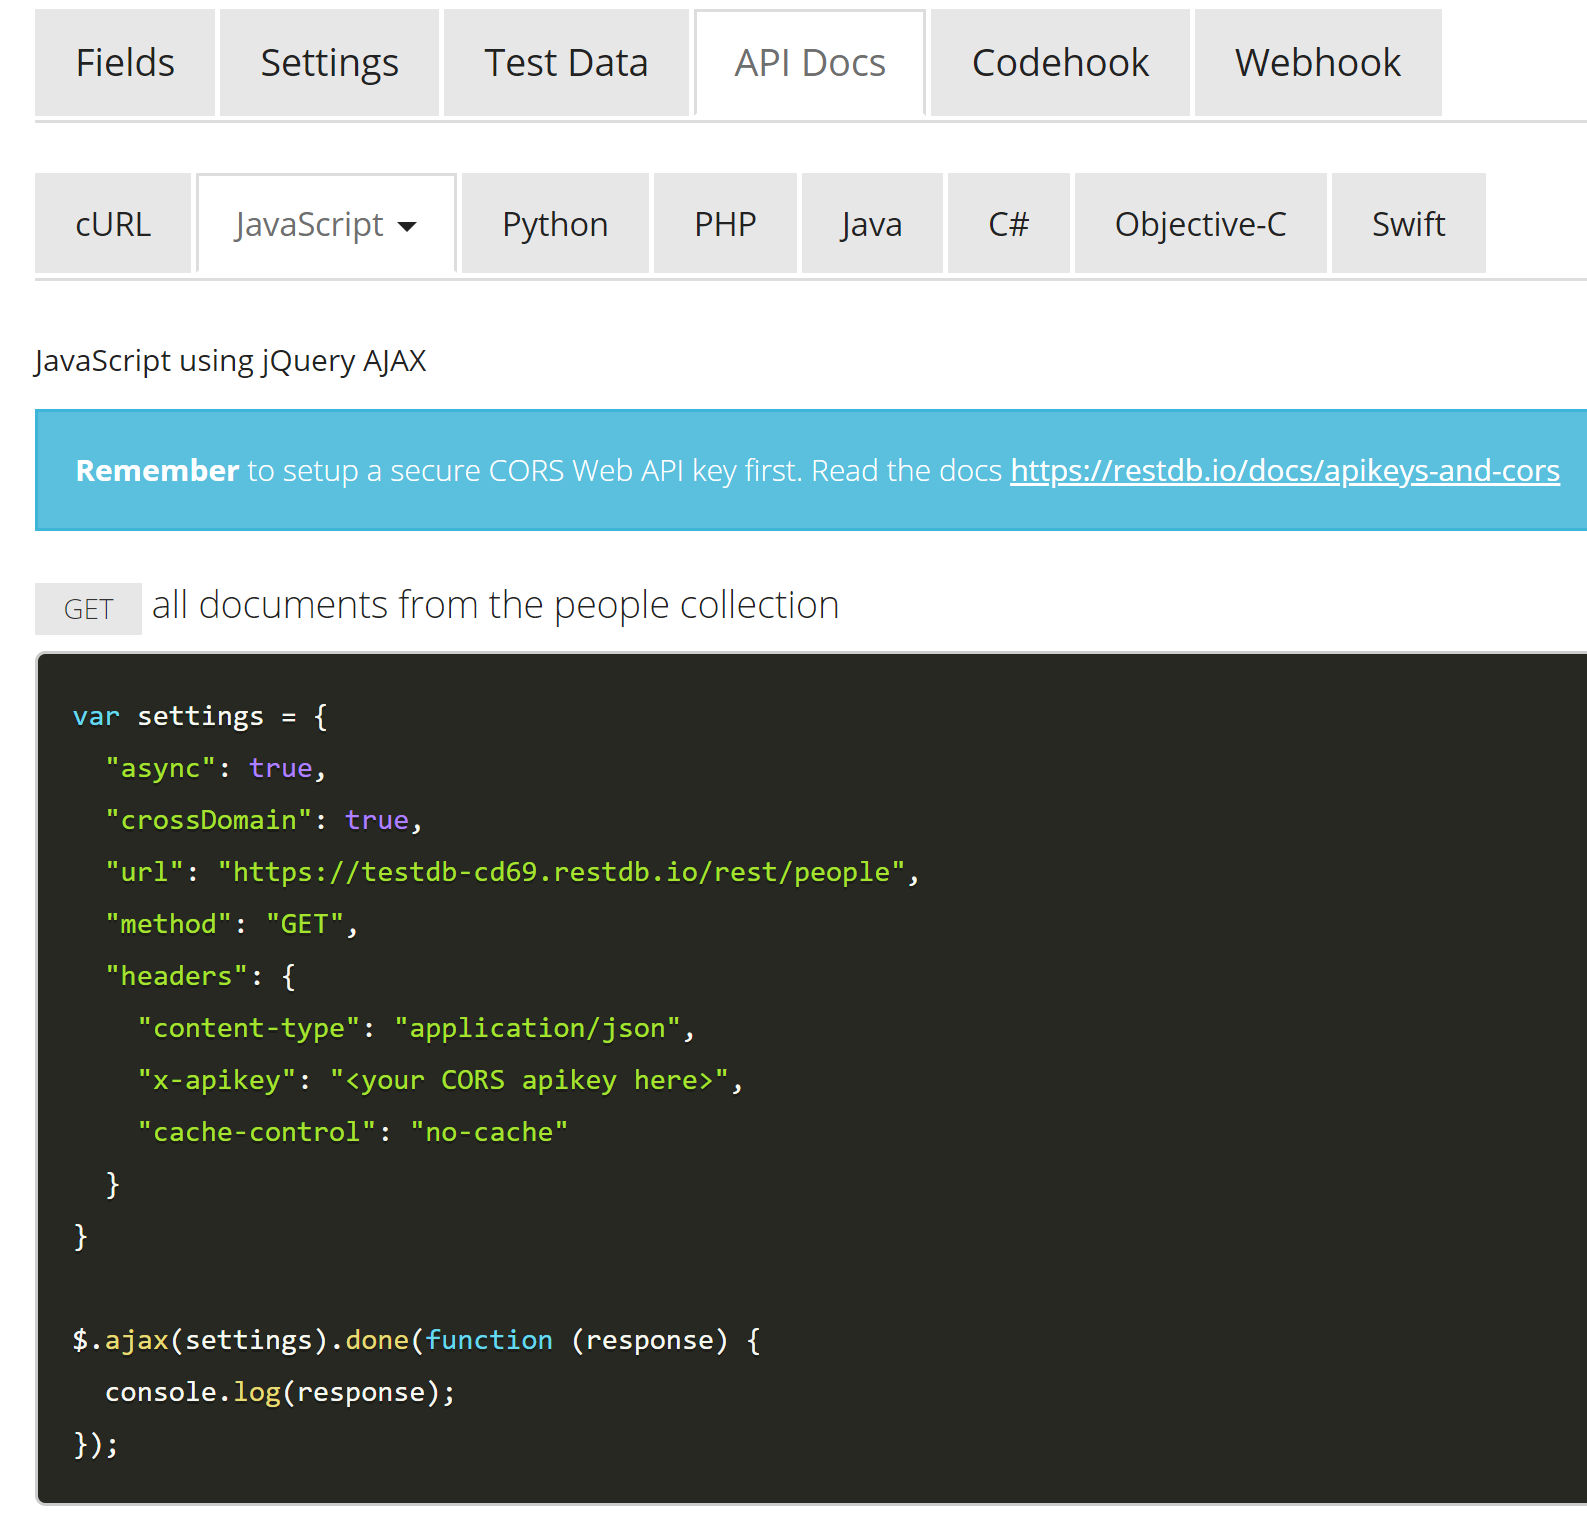
For client-side JavaScript, you need to generate a CORS API key. The screenshot below shows a CORS API key (redacted) that allows connections from any origin server but only allows the GET method to read data.
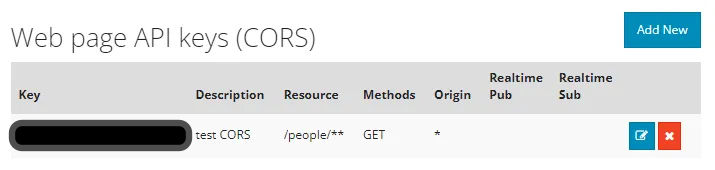
In the screenshot above, the API key would only work for the “people” table / collection. To have one key work for all tables / collections, use “/**” instead.

4. PHP: Create a file to test reading from the database
I created a test file called read-curl.php which uses cURL to connect to the remote database.
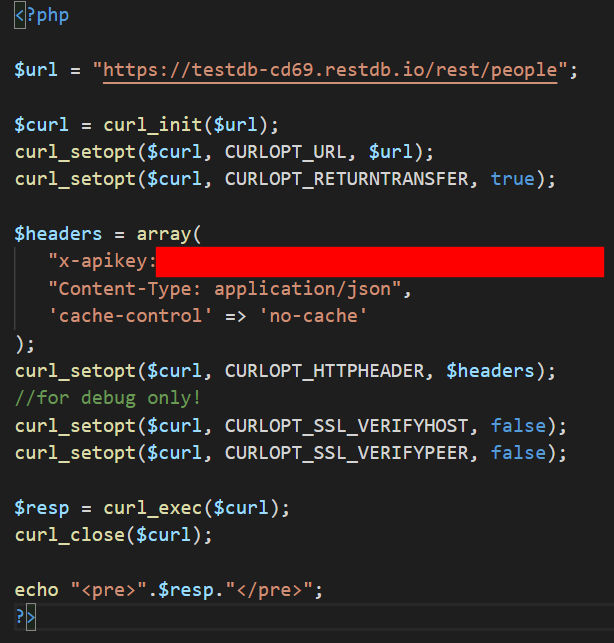
After uploading it to my web host, opening the file in a browser shows me the data in JSON format, as expected, which you can see live at http://zabuun.com/restdb.io/read-curl.php
You can also test the API by installing Postman (free), entering a query in the form of a REST URL, and entering your API key as an HTTP header.
4. JavaScript (jQuery + AJAX): Create a file to test reading from the database
I created a test file called read.html with the following code. This code uses the CORS key for cross-origin resource sharing.
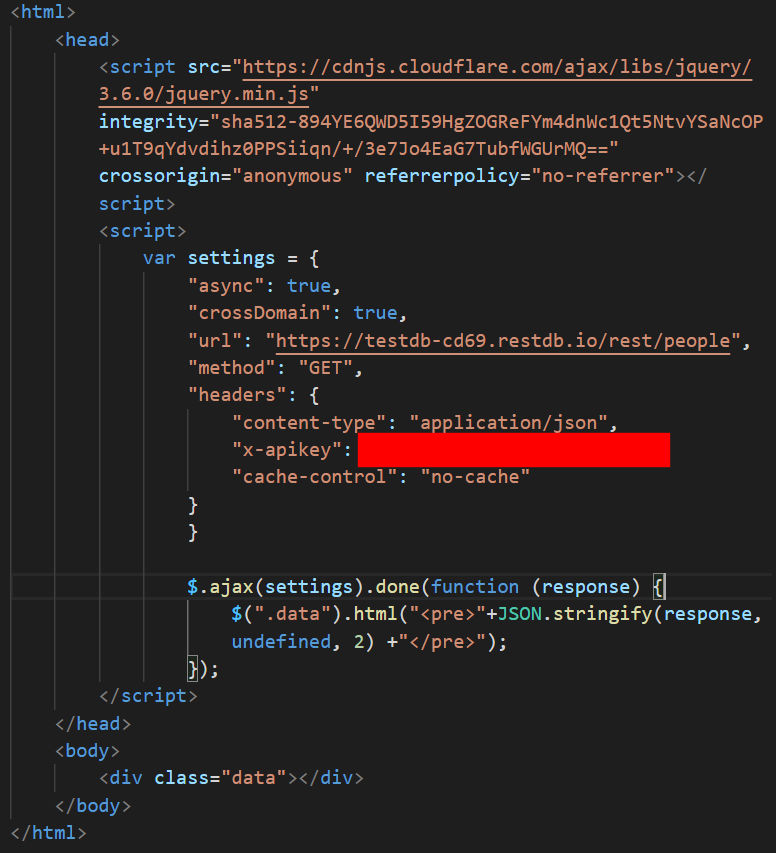
After uploading it to my web host, opening the file in a browser shows me the data in JSON format, as expected, which you can see live at http://zabuun.com/restdb.io/read.html
If you have JSON data as in the example above, you can use Handlebars.JS to format the output in HTML.
5. Query data
When reading data from RestDB , you will often want to filter data based on conditions rather than retrieve an entire collection (all records). RestDB supports many MongoDB-like query syntax. Read the docs. Here’s an example of RestDB queries for equivalent relational DB SQL queries.
| SQL | RestDB |
|---|---|
| SELECT * FROM users | https://<db-name>.restdb.io/rest/users?q={} |
| SELECT id, user_id, status FROM users | /rest/users?q={}&h={"$fields": {"user_id": 1, "status": 1} } |
| SELECT * FROM users WHERE status = “A” | /rest/users?q={ "status": "A" } |
| SELECT * FROM users WHERE status != “A” | /rest/users?q={"status":{"$not":"A"}} |
| SELECT * FROM users WHERE status = “A” AND age = 50 | /rest/users?q={ "status": "A", "age": 50 } |
| SELECT * FROM users WHERE status = “A” OR age = 50 | /rest/users?q={ "$or": [ { "status": "A" } ,{ "age": 50 } ] } |
| SELECT * FROM users WHERE age > 25 | /rest/users?q={ "age": { "$gt": 25 } } |
| SELECT * FROM users WHERE age < 25 | /rest/users?q={ "age": { "$lt": 25 } } |
| SELECT * FROM users WHERE age > 25 AND age <= 50 | /rest/users?q={ "age": { "$gt": 25, "$lte": 50 } } |
| SELECT * FROM users WHERE user_id like “%bc%” | /rest/users?q={ "user_id": {"$regex" :"bc"}} |
| SELECT * FROM users WHERE user_id like “bc%” | /rest/users?q={ "user_id": {"$regex" :"^bc"}} |
| SELECT * FROM users WHERE status = “A” ORDER BY user_id ASC | /rest/users?q={ "status": "A" }&sort=user_id&dir=1 |
| SELECT * FROM users WHERE status = “A” ORDER BY user_id DESC | /rest/users?q={ "status": "A" }&sort=user_id&dir=-1 |
| SELECT COUNT(*) FROM users | /rest/users?q={}&h={"$aggregate":["COUNT:"]} |
| SELECT COUNT(*) FROM users WHERE age > 30 | /rest/users?q={"age":{"$gt": 30}}&h={"$aggregate":["COUNT:"]} |
| SELECT * FROM users LIMIT 1 | /rest/users?q={}&max=1 |
| SELECT * FROM users LIMIT 5 SKIP 10 | /rest/users?q={}&max=5&skip=10 |
You can also aggregate data, e.g. min, max, avg, count, groupby, etc, using aggregation and grouping functions. Read the docs.
If you already have an entire JSON dataset and you want to query against it, you can use JSONata. JSONata is a lightweight query and transformation language for JSON data.
6. Auto-generate a web form
If you want to create a web form for public use, you can have restdb.io auto-generate one for you, complete with JavaScript validation and code to publish the data to your restdb.io database. See an example at
http://zabuun.com/restdb.io/form.html

7. Filesystem
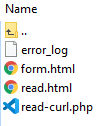
Below is a screenshot of my remote filesystem on a shared GoDaddy server. The error.log file is auto-generated.
8. Create users with editor access
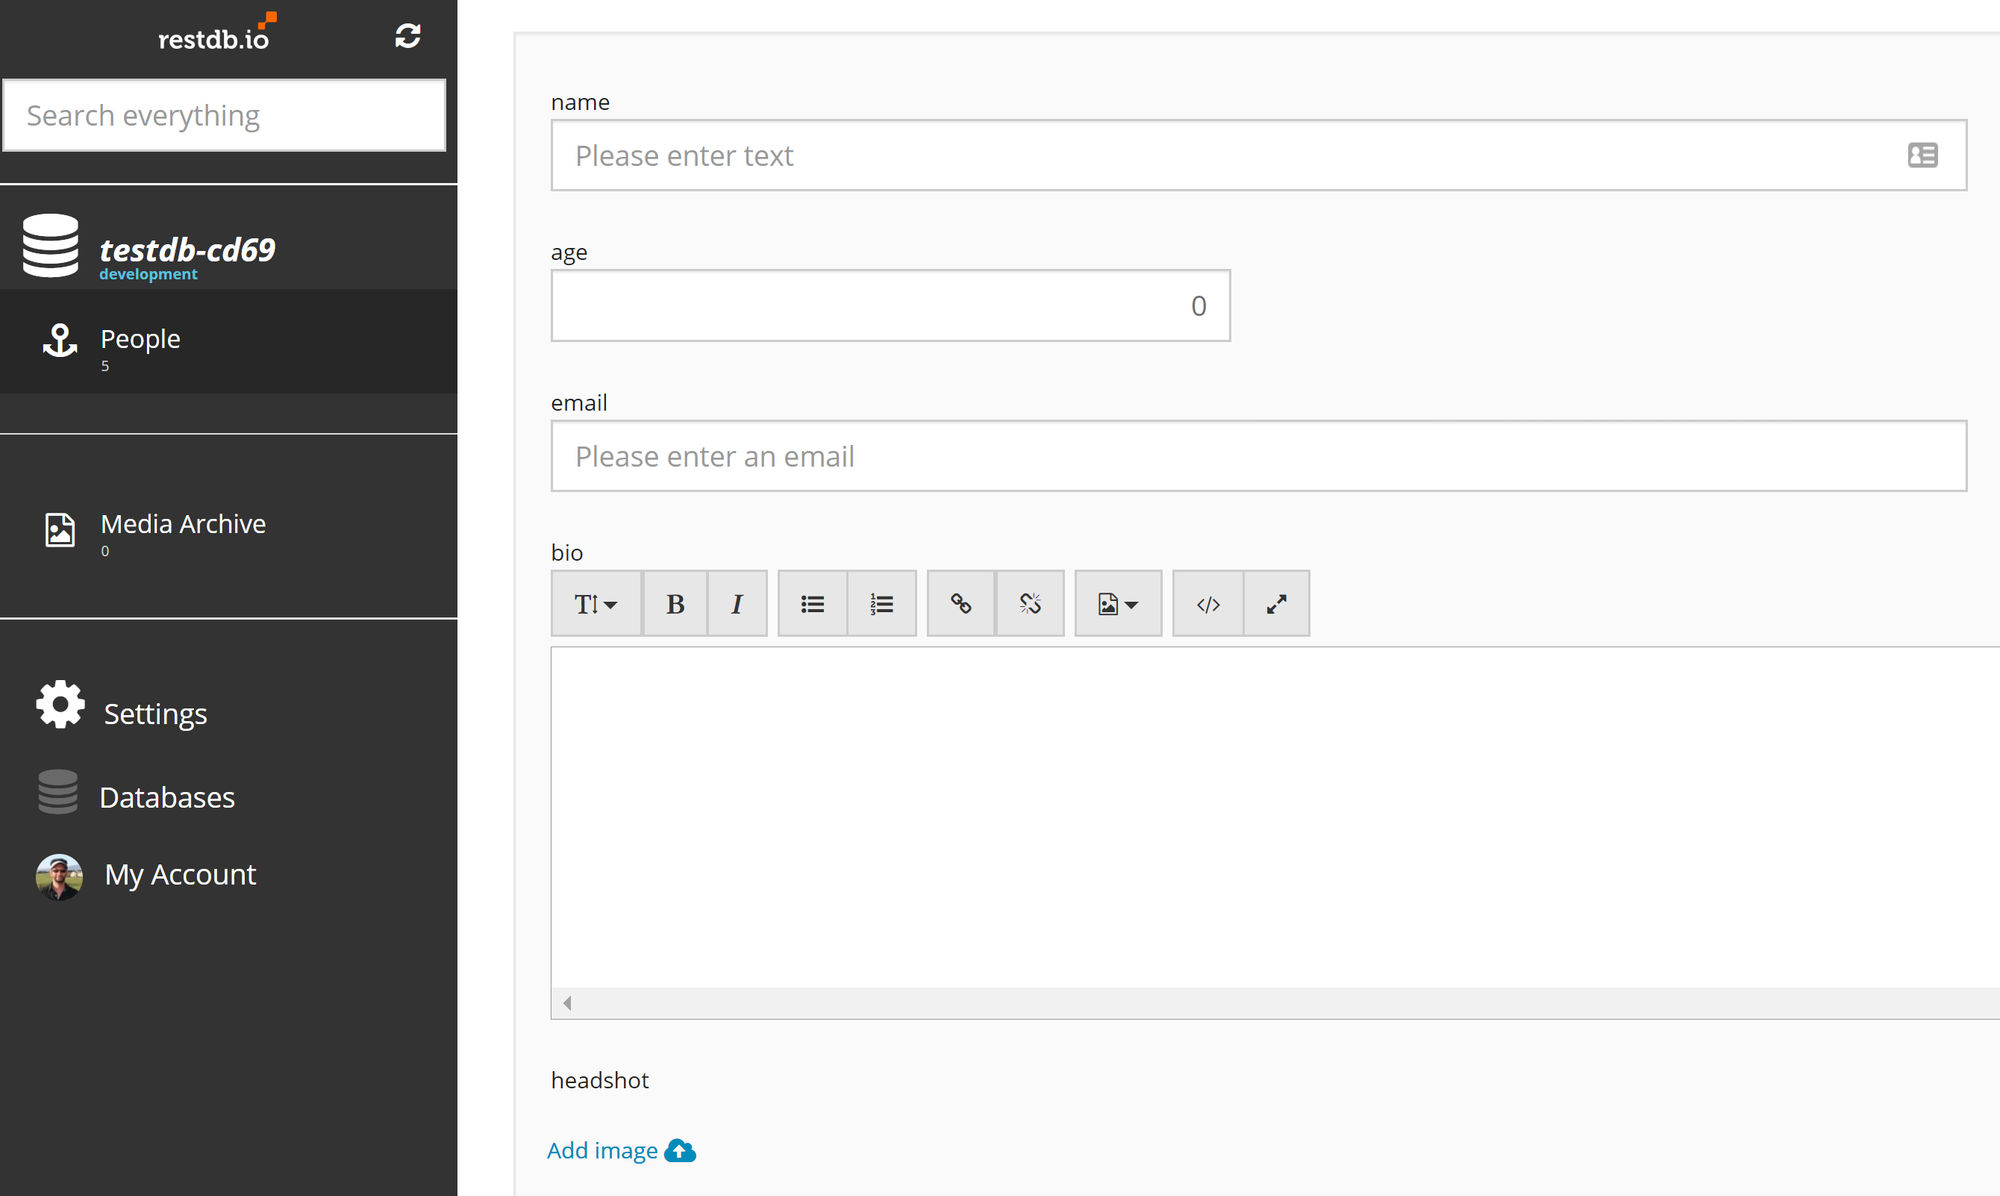
If you work with other developers or editors, you can give them role-based access to your restdb.io account to manage data. An editor, for example, will not see the developer features and can simply add records using a user-friendly web form like shown below.
Easily Highlight Text in a Screenshot Using Photoshop
Let’s say you’ve taken a screenshot of some text and you’d like to highlight part of the text. By using different blending modes, this becomes an easy task. Here’s how to do it.
1. Open the screenshot containing text in Photoshop and select the text you want to highlight

2. Create a new layer and fill it with yellow

3. Change the blending mode to darken or any other one you like to create the highlighted text.
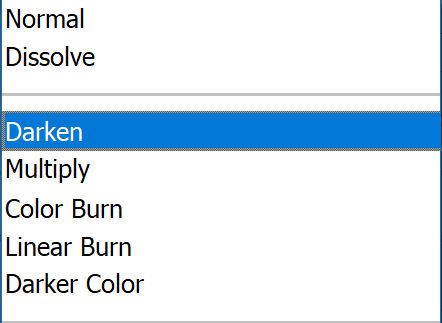
Here, I’ve chose the Darken blend mode.
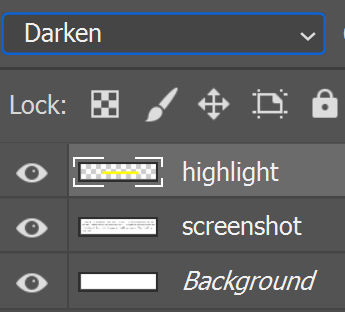
This is the result.

Sync Audio with Video in Corel VideoStudio Pro
Let’s say you want to make a music video of you lip syncing to a song. You have two files:
- Video file of you lip syncing
- Audio file of song
When you add these two files to VideoStudio Pro, you’ll need to adjust the start time of one so that the lip movement in the video file is in sync with the audio. One way to do this is as follows:
1. Add the audio file to the music track

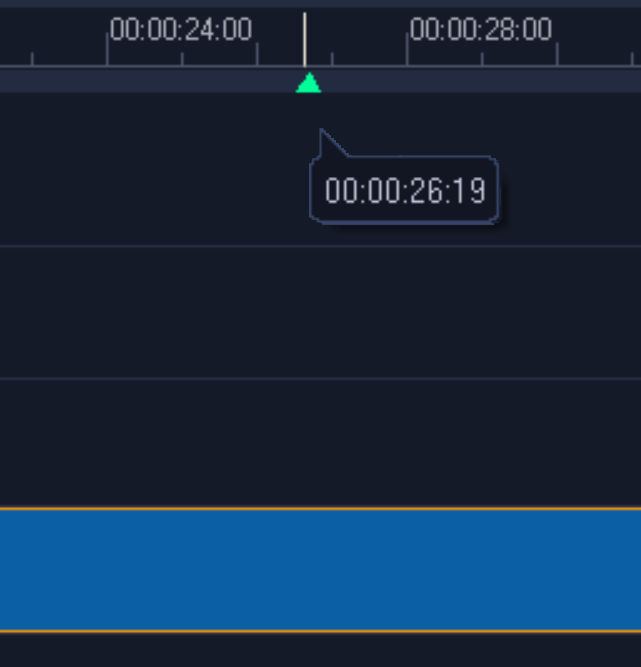
2. Set a cue marker at first vocal point
Play the music track until you hear the first point in time when you hear the vocals. At that point set a marker by clicking on the bar underneath the timeline. A green triangle marker will appear. If you make a mistake in placing the marker, you can drag it to another position.
If you are having a hard time finding the first vocal point, set a preview range around the time of the first vocal point. Then, keep playing the preview range and update the marker position. To set a preview range,
- Click on the timeline where the preview range would start. Then click the left bracket button [
- Click on the timeline where the preview range would end. Then click the right bracket button ]
In the player control panel, you’ll see two yellow markers indicating the preview range relative to the entire project length.
In the timeline, you’ll see an orange bar indicating the preview ranger.

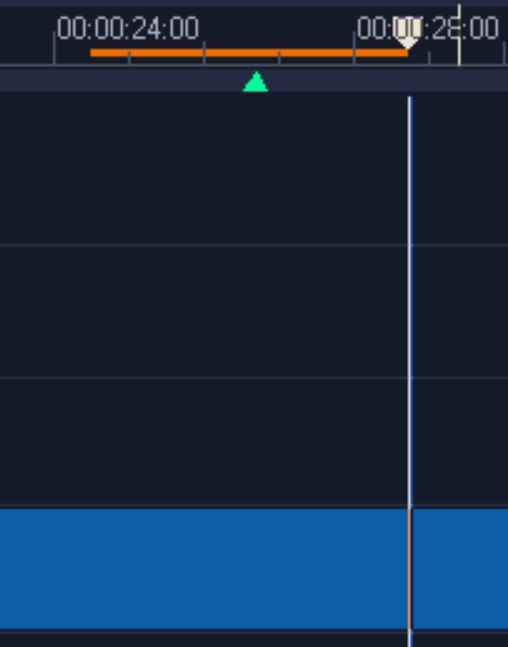
To play the preview range, make sure that “Project —” is selected / highlighted and not “Clip —”. Then click the play button. You can also click the loop button so the preview range plays repeatedly.
If the preview range appears very short, you can zoom in by clicking the + magnifying glass button.

Doing so allows you to see finer time increments in the timeline.

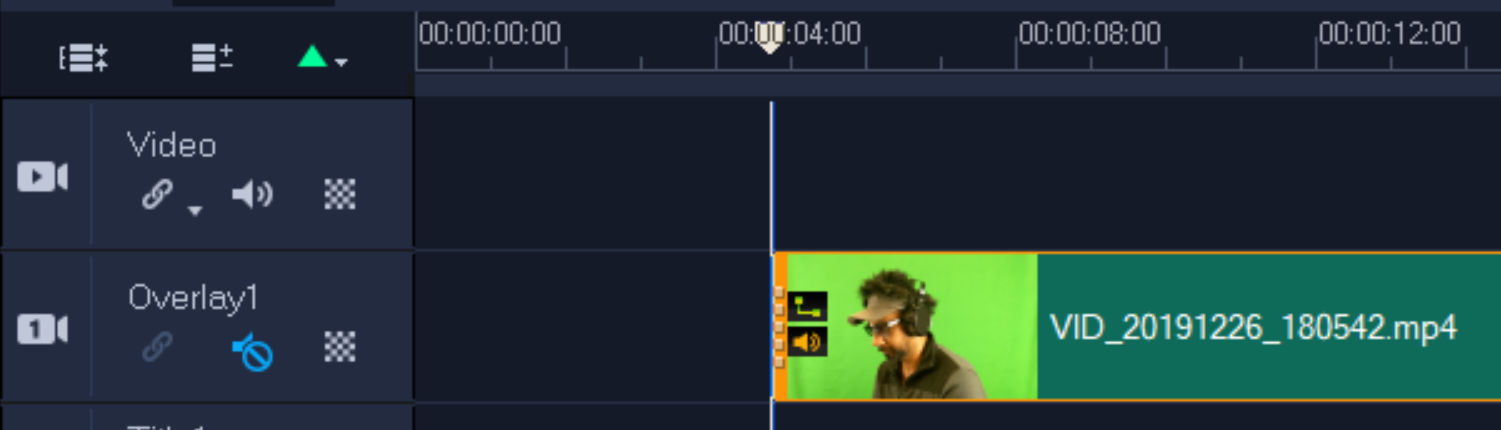
3. Add video to the Overlay 1 track
Don’t add the video to the Video track because doing so forces the video to begin from time 0 instead of a later time. Mute the audio in the Overlay 1 track by click the Mute icon.

4. Position the video to sync it with the audio
Drag the video track to the left and right and repeatedly play the preview range until the lip movement in the video is in sync with the vocal sound from the audio track.
Fix Images Using Adobe Lightroom Clone and Healing Brushes
If you’ve got a blemish or an unsightly object in an image, you can hide it by using either the cloning brush or the healing brush.
Cloning
Cloning is similar to copying some pixels elsewhere in an image and pasting it. This works in some situations but in others, it becomes obvious that you just copied and pasted.
Healing
The healing brush is similar to cloning except it tries to be smart so that the results look natural.
Here’s an example of a blemish in the sky.

And here’s the blemish gone with natural results using the healing brush.

With the healing brush, you tell Lightroom where the blemish is and then choose another area of the image to copy to fix the blemish.
Unsightly objects in the following images were removed using the healing brush.


Find Used CSS to Remove Unused CSS
When building websites, it’s inevitable that you’ll end up with a bunch of unused CSS as you make changes to the site. To remove unused CSS, you can use Sublime Text’s Get CSS Classes function to first find used CSS. Then, remove all CSS definitions that aren’t in that list.
- Open the HTML source in Sublime Text
- Click Edit > Tag > Get CSS Classes (this copies the used CSS classes to the clipboard)
- Paste the used CSS classes in a new file and sort alphabetically
- Go through each CSS definition and remove the ones not in the list of used CSS classes

How to Send a Responsive HTML Email from Outlook on the web and Gmail
- Open the email in a browser and copy it’s source code
- Inline the CSS using a tool such as https://www.campaignmonitor.com/resources/tools/css-inliner/
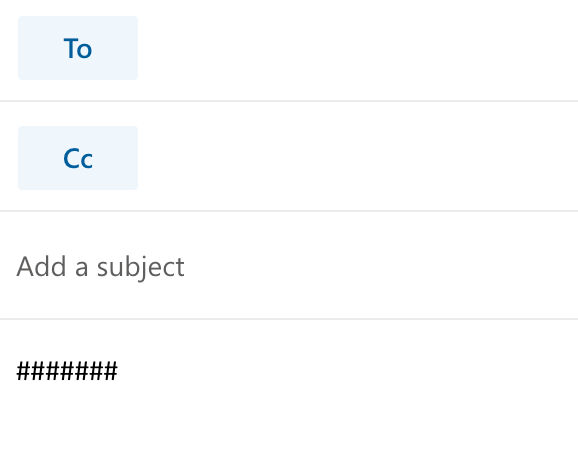
- In Outlook on the web or Gmail, create a new email message
- In the body of the email, type some text that can easily be found, e.g. a bunch of hash symbols.
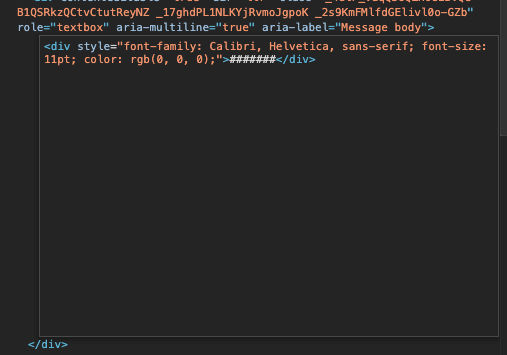
- Inspect the text you just typed and in your inspector, edit it by replacing the text you typed with the CSS-inlined email source code.
- Your email body will now show the HTML email. Click send.