Google Analytics version 4 (GA4) is quite different than the previous version, called Universal Analytics (UA). GA4 is event-based, and the UI is quite different. If you’ve got a link with UTM parameters like
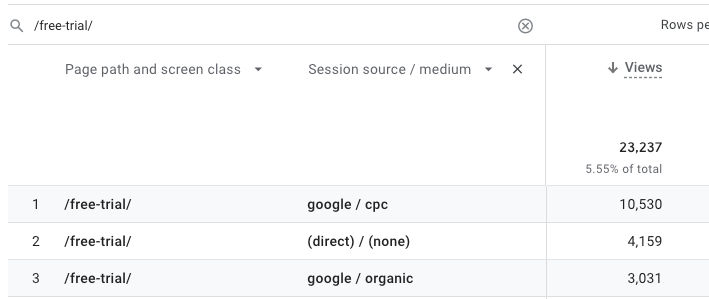
In GA4, if you go to Reports > Engagement > Pages and screens, you will see stats like pageviews for many pages. You can then filter to just one page like a free trial page by entering the page’s path in the search field, e.g. “/free-trial/”. You can then add a secondary dimension for source and medium. What you’ll end up will be something like this
This may not include the source and medium in your UTM parameters. A better way to get the traffic report based on a specific source and medium or name is by going to Explorations.
Here, you can create a new exploration. In the left “Variables” column
give the exploration a name like “Feb 2023 Campaign”
add some dimensions like
Page path and screen class
Session campaign
Session source / medium
add some metrics like “Views” and “Sessions”
In the middle “Settings” column,
drag some or all dimensions from the left column to the “Rows” field
drag some or all metrics from the left column to the “Values” field
add some filters like
Session source / medium contains market
Session campaign contains “Feb 2023 Campaign”
You will then see the report on the right.
Here’s the mapping between UTM query parameter and UTM dimension in GA4.
To find the number of clicks on a link with a UTM, go to
Reports > Acquisition > Traffic acquisition
In the primary dimension, choose session source or session medium or session campaign
In the Search field, enter a value for the session source or session medium or session campaign
Choose a date range
Scroll to the right and under “Event count”, choose “click”.
In Google Earth Pro for Desktop, you can record a tour in real time by clicking the navigation controls or by clicking on saved placemarks. However, unless you are just moving from one point to another, the resulting tour may not be as smooth as you’d like. For example, if you have three placemarks, then as you click each placemark while recording the tour, the transition between placemarks will not be smooth.
To create a smooth tour that appears as if you are flying a plane or drone at a fixed altitude along a multipoint path, you need to create a path in Google Earth. Here’s an example. Let’s say we want to fly along the Las Vegas Strip.
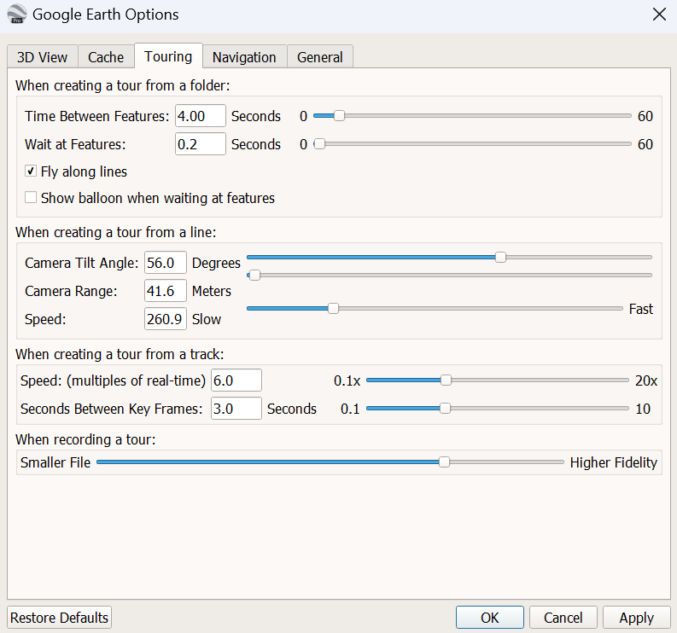
Change Settings
Go to Tools > Options > Touring and change the settings as in this screenshot. Make sure to click the “Apply” button and the “OK” button to save your changes.
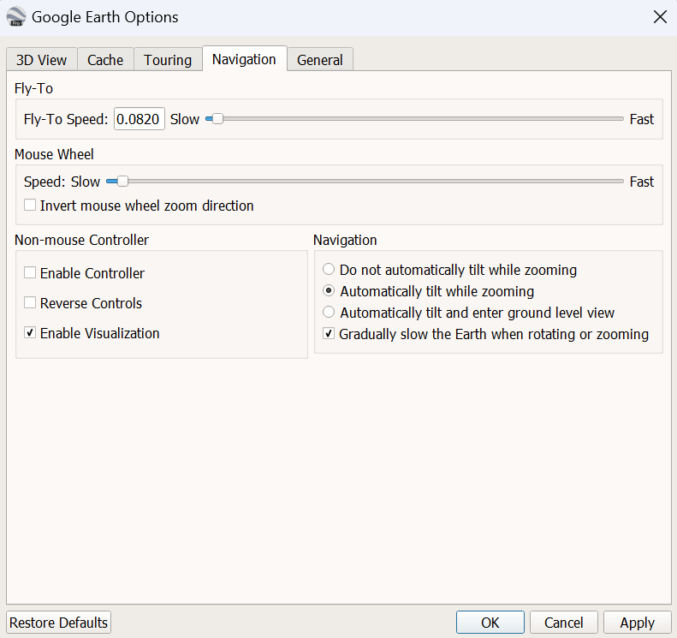
Now, click the “Navigation” tag and change the settings to match this screenshot.
Create Path
When adding a path, your mouse pointer will turn into a crosshair and you will need click to add points along your desired path. In this mode, you will not be able to zoom, change altitude, direction or pan by clicking on the screen because doing so would add path points. If you need to move around, you’ll need to use the navigation controls.
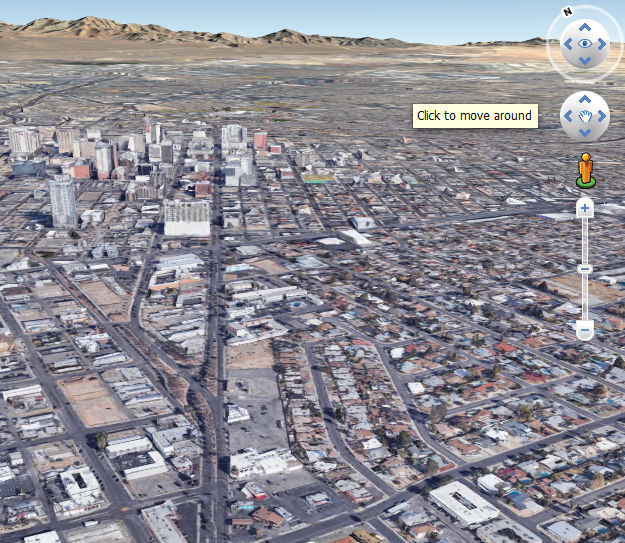
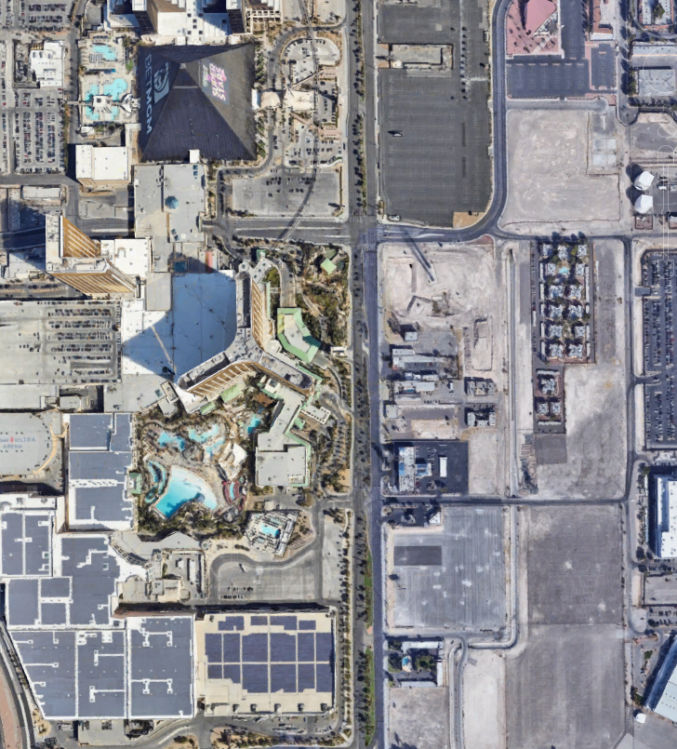
When creating a path, I find it easier to have your view facing straight down to the ground like this. In this example, my starting point will be just south of the south end of the Strip before the Mandalay Bay.
Click Add > Path
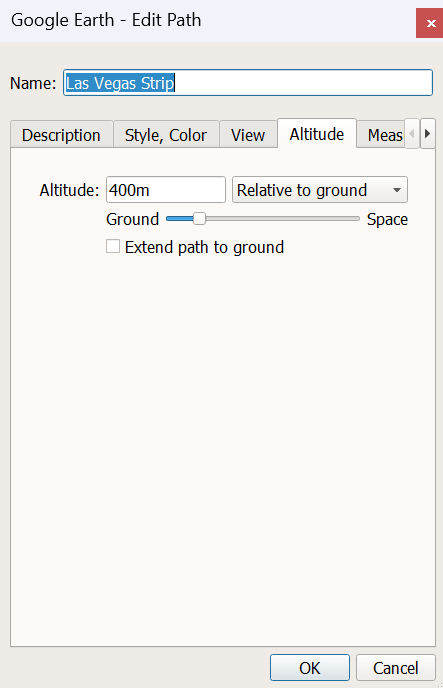
A dialog window will pop up. We’ll name the path “Las Vegas Strip”. Let’s also specify the altitude we want our flight path to be from the ground.
Click the “Altitude” tab.
Set Altitude to “400m” for 300 meters.
Make sure “Relative to ground” is selected.
Click to add path points
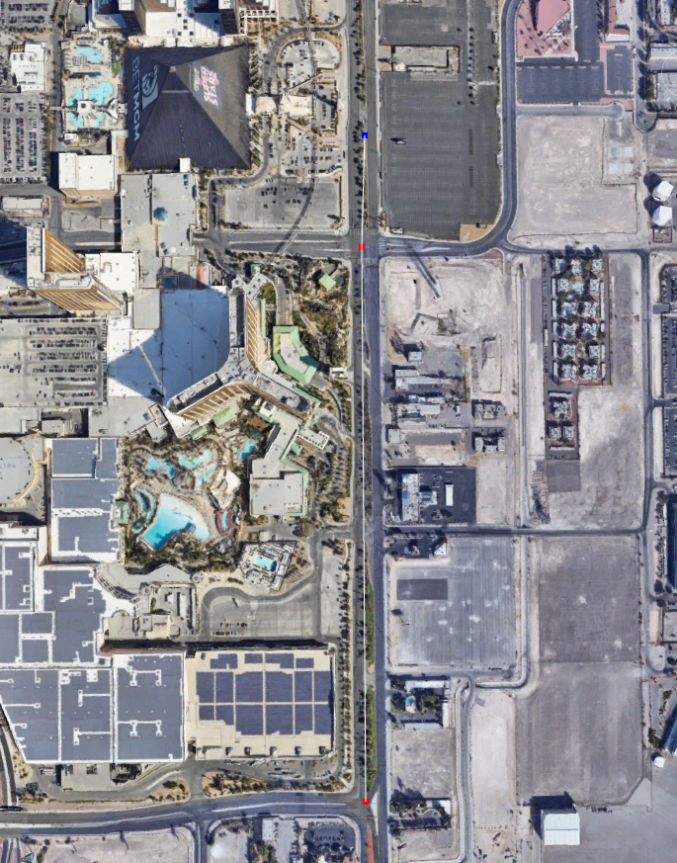
In the screenshot below, you’ll see that I created 3 points. From bottom to top, there’s 2 red points and 1 blue point.
Since I need to pan to the north to add more points along the Strip, I will use the navigation control up arrow to do so.
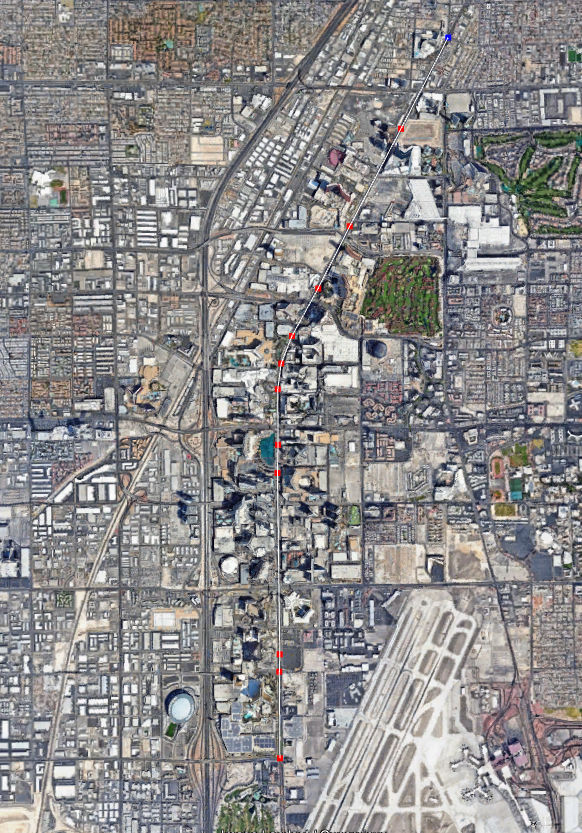
After adding all the last point (just north of the STRAT), I zoomed out to check the entire path. As you can see, all but the last point are red and the path curves to the right as it goes north.
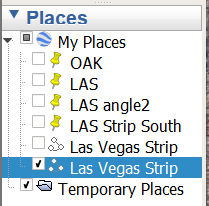
Now that my path is done, I’ll click the OK button in the path dialog window. That adds the path to My Places.
Since I don’t want to see the white path line / curve, I’ll uncheck the checkbox next to the path name.
To play the path tour, just click the path Play Tour button, as shown below.
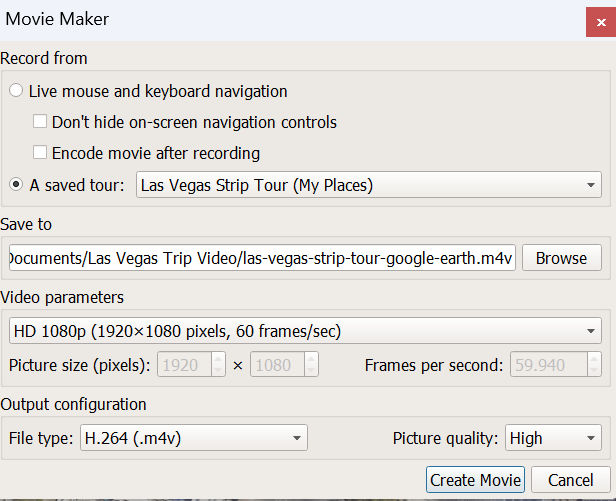
If you’re happy with how the tour looks, you can record it by clicking the “Record a Tour” button and then click the Play Tour button.
Then click Tools > Movie Maker to export the video.
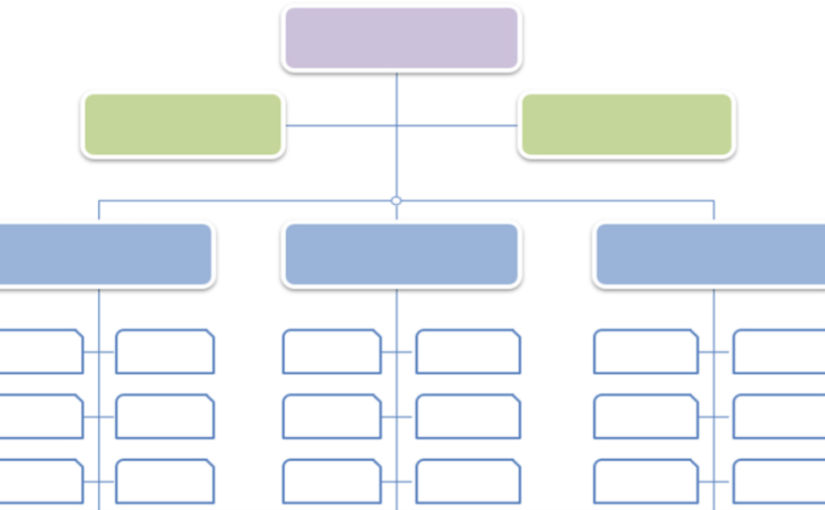
In my 12 years working in Marketing, I’ve see a few different organizational structures at both low and high levels. And in my particular role, I’ve had to work with pretty much everyone, which has given me exposure to many issues that often go unnoticed. While there are many ways you can structure an organization, whatever way you come up should always make sense based on your particular organization’s needs. Following is a structure that I think makes sense based on my experience. The specific job titles (chief, VP, director, manager, senior vs junior, etc) are just an example. The important thing is that the structure and hierarchy groups people by function, commonality and importance. The structure below is for a 2000+ employee organization. Obviously, if your organization is much smaller or larger and has more or less dependencies on particular functions, some positions and groups can be removed or consolidated or even divided and expanded.
Level 1:
CMO (Chief Marketing Officer) or CPO (Chief Product Officer)
Level 2:
VP of Marketing
VP of Product
Level 3 and 4
Director of Content (or similar name)
This functional group primarily deals with marketing activities that involve text content. Since a big part of SEO involves text content, I put SEO Expert in this group.
Public Relations Expert(s)
Copyediting Expert(s)
Proofreading Expert(s)
SEO Expert(s)
Social Media Expert(s)
etc
Director of Design (or similar name, e.g. creative, etc)
This functional group primarily deals with marketing activities that involve visual design. Brand has to do with a company’s external public image, which relates to both public relations and design. Depending on your preference, this role could be under this “design” group or the “content” group above.
Graphic Designer Expert(s)
Web Designer Expert(s)
Brand Expert(s)
Video Expert(s)
UI / UX Expert(s)
etc
Director of Web (or similar name)
This functional group primarily deals with marketing activities that involve websites. Due to the criticality and complexity of today’s websites, significant dependencies that all functional groups often have on a company’s website, and unique technical skills that members of this group have, I made this group a standalone group rather than a subset of another group. Also, since email marketing is very effective, and because HTML emails contain code like that used on a website, I put HTML Email Expert(s) in this group. Though many marketing automation tools like Marketo include an email builder tool, I’ve found that they are limited in features and produce emails that don’t look professional unless the user has web development skills.
HTML, CSS Expert(s)
JavaScript Expert(s)
WordPress Expert(s)
HTML Email Expert(s)
etc
Director of Marketing Operations (or similar name)
This functional group primarily deals with marketing activities that involve marketing automation tools like Marketo, revenue attribution tools like Bizible, data analysis and reporting tools like Tableau and Google Analytics, customer relationship management tools like Salesforce, lead processing and routing, etc.
Marketing Automation, e.g. Marketo Expert(s)
Customer Relationship Management (CRM), e.g. Salesforce, Experts
Reporting and Data Analysis Expert(s)
etc
Director of Channel Marketing (or similar name, e.g. demand generation)
This functional group primarily deals with marketing activities that fall under certain channels like events, e g. virtual or in-person conferences, partner marketing, etc, and demand generation activities like advertising campaigns such as Google Pay Per Click (PPC), email marketing, digital media marketing, print advertising, etc.
Event & Event Marketing Expert(s)
Partner Marketing Experts(s)
Google PPC Expert(s)
Campaigns Expert(s)
etc
Director of Product (or similar name)
This functional group primarily deals with product management and product-specific marketing. For example, many tech companies have multiple products. Each product requires a specific subject matter expert, as it may be uncommon to find someone who is an expert in multiple products. Each product expert (commonly called “product manager”) basically is responsible for their own product, from understanding their product’s customers’ needs, making product feature decisions, helping market a product, e.g. by writing product page content, product-related blog posts, giving product-related webinars, etc.
Product Expert for Product A
Product Marketing Expert for Product A
Product Expert for Product B
Product Marketing Expert for Product B
etc
Project Manager
There is one role that doesn’t quite fit in any of the categories above. Needless to say, many marketing activities require the collaboration of multiple functional groups, but each of these groups specialize in their own areas. There’s no such thing as a person or group who specializes (or is even interested) in everything. One big issue I often see is how certain marketing activities with a specific hard deadline, e.g. due to an earnings release or predetermined and pre-marketed event taking place, results in chaos, with many people working nights and weekends due to lack of planning, ownership and project management. That’s why there’s a particular title called Project Manager (PM) or Project Management Professional (PMP) and a certification where people can get a PMP certificate. These people don’t specialize in the various components that go into a project, but rather they keep a project on track to avoid delays, mistakes, oversight, etc. Sometimes, they have the boring task of having to keep reminding people to do their part to avoid delays caused by blocking subsequent tasks. Assigning a random person to be a temporary project manager may work for small projects involving few people, but for large projects involving many people, a “real” project manager who actually specializes in project management is needed.
Title Hierarchy
Here’s a title hierarchy commonly used in many companies.
UPDATE: I watched the Sphere Experience “Postcard from Earth” show at the Sphere in June 2025. It was just okay. I’d give it a 3.5/5.
Buffets
Buffet at Wynn
5/5
Buffet at Caesars Palace
4/5
Buffet at Palms
3/5
Buffet at SouthPoint
2/5
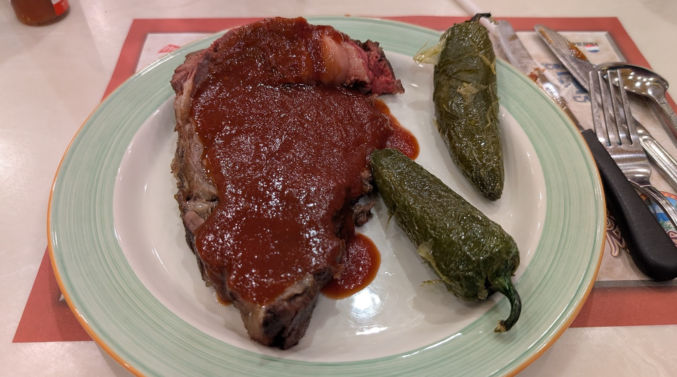
Note: Though the food at the SouthPoint Garden Buffet was just 2/5 on average, the prime rib was delicious. As one the cheapest buffets in Vegas, if you like prime rib like I do, then this buffet is worth it for $36.
Prime Rib Cooked Medium at SouthPoint’s Garden Buffet
Water Parks
Vegas can get really hot in the summer, which may make you want to go to a water park.
Personal opinion: the wave pool isn’t impressive. There’s only one wave every few minutes. The lazy river is small, but it has a strong current, which is nice.
Personal Opinion: This is a relatively small waterpark compared to the ones I’ve tried in Orlando, FL. However, it wasn’t crowded, which meant lines were short. There was a decent variety of rides and they were all fun. The wave pool creates large waves every 5 minutes and they last for maybe 5 minutes. Definitely a lot of fun as the strong waves can push you towards the beach. The lazy river is of decent length, however, the current wasn’t very strong.
Take free tram to Luxor and Excalibur or walk through the enclosed walkway
Luxor
Opened in 1993
4400 rooms
Take pictures of Egyptian architectural theme
Titanic Artifact Exhibition Apr 27 – Sep 4 | 11 AM – 8 PM; Last admission 7 PM Sep 8 – Nov 12 | 11 AM – 6 PM; Last admission 5 PM Nov 13 – Dec 31 | 11 AM – 8 PM; Last admission 7 PM $32
Bodies… The Exhibition Apr 27 – Sep 4 | 11 AM – 8 PM; Last admission 7 PM Sep 8 – Nov 12 | 11 AM – 6 PM; Last admission 5 PM Nov 13 – Dec 31 | 11 AM – 8 PM; Last admission 7 PM $32
See Cirque du Soleil’s Mystere FRIDAY – TUESDAY* 2 Shows | 7 p.m. & 9:30 p.m. Arrive 30 mins early for pre-show entertainment Actual performance time is approximately 90 mins $64 – $135
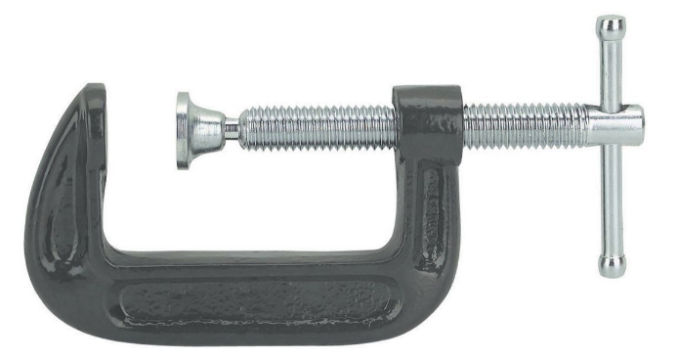
The way it works is you clamp the clamp onto your eaves, secure the hooks to the hole on the clamp, then wrap the straps around your ladder, securing it using the hook and loop velcro.
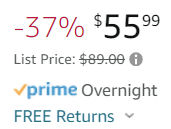
It’s a simple idea, but the price is $90. It just went on sale for $56, but that still seems overpriced. Not sure why Harbor Freight hasn’t created a cheaper alternative.
Anyway, you can probably make your own for much less by just using
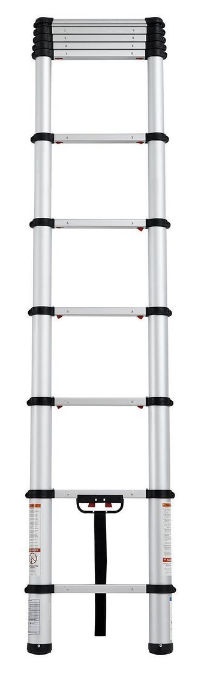
For an easy-to-transport ladder, this telescoping ladder ($160) is great.
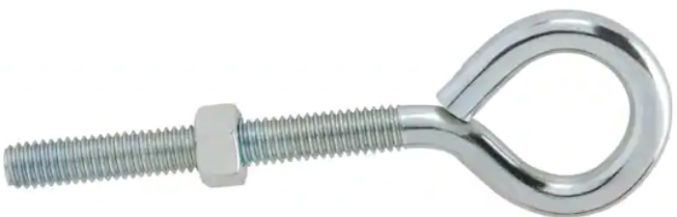
If you need this for your own home and there is one spot you would always use to get on the roof, and if you want a more secure solution, replace the C-clamp with a large screw eye or eye bolt with nut and use the ratchet straps instead of the cam buckle strap.
screw eyeeye bolt with nutI just used one cam buckle strap.
I’m currently migrating a large website from Handlebars to Nunjucks. Since the website is being updated daily, and because there are too many pages, I can’t convert the Handlebars syntax to Nunjucks syntax manually. To solve this, I started writing a script to convert the syntax programmatically using JavaScript (nodeJS). So far, it’s working very well. Here’s how I’m doing it, and how you can do something similar when confronted with a migration project.
Basically, the way it works is
it recursively finds all files in a folder called “temp”
if the file path ends with “hbs” – indicating it is a Handlebars file – then for each file, it executes a series of regex search and replace commands, e.g.
replace {{#if class}} with {% if class %}
replace {{/if}} with {% endif %}
and so on.
Those are simple search-and-replace situations. There may be a situation where you’ll need an advanced search and replace, e.g. when replacing
{{> social-list
    dark="true"
    centered="true"}}
with
{% set dark="true" %}
{% set centered="true" %}
{% include social-list.njk %}
In this case, you can use a “replacer” function, which allows you to do much more to manipulate the output.
When you’re all done and you’ve built the HTML files from both the handlebars templates and the nunjucks templates, you can write a script that recursively reads all HTML files in the build output folder and lists each HTML file path generated from each handlebars and nunjucks template along with their respective file size. The file sizes should be the same or almost the same. If some are not, then the migration script didn’t convert those templates correctly. Maybe something like:
Capital gains is the profit you make from selling a capital asset.
Capital assets include stocks, bonds, precious metals, jewelry, art, and real estate.
Selling a capital asset after owning it for one year or less results in a short-term capital gain.
Selling a capital asset after owning it for more than one year results in a long-term capital gain.
Net capital gains are calculated based on your adjusted basis in an asset. This is the amount that you paid to acquire the asset, less depreciation, plus any costs that you incurred during the sale of the asset and the costs of any improvements that you made.
Short-term capital gains are taxed as ordinary income from your salary or wages.
Long-term capital gains are subject to a tax of 0%, 15%, or 20% (depending on your income).
Short-Term Capital Gains Tax Rates By Income (2023)
Filing status = single
Income
Short-Term Tax Rate (same as ordinary income tax rate)
Up to $11,000
10%
$11,000+ to $44,725
12%
$44,725+ to $95,375
22%
$95,375+ to $182,100
24%
$182,100+ to $231,250
32%
$231,250+ to $578,125
35%
Over $578,125
37%
Filing status = married filing jointly
Income
Short-Term Tax Rate (same as ordinary income tax rate)
Long-Term Capital Gains Tax Rates By Income (2023)
Filing status = single
Income
Long-Term Tax Rate
Up to $44,625
0%
$44,626 to $492,300
15%
Over $492,300
20%
Filing status = married filing jointly
Income
Long-Term Tax Rate
Up to $89,250
0%
$89,251 to $553,850
15%
Over $553,850
20%
Taxable Income
Taxable income is the portion of your gross income that the IRS deems subject to taxes.
It consists of both earned income and unearned income.
Taxable income is generally less than adjusted gross income because of deductions that reduce it.
Taxable income = Gross income – deductions
For a business, revenue – business expenses = profit. Profit – deductions = taxable income.
Deductions
The IRS offers individual tax filers the option to claim the standard deduction or a list of itemized deductions.
Standard Deduction
The standard deduction is a set amount that tax filers can claim if they don’t have enough itemized deductions to claim. For the 2022 tax year, individual tax filers can claim a $12,950 standard deduction ($13,850 for 2023). If you are married filing jointly, the standard deduction is $25,900 ($27,700 for 2023).
Itemized Deductions
If you plan to itemize deductions rather than take the standard deduction, these are the records most commonly needed:
Property taxes and mortgage interest paid (form 1098)
State and local taxes paid (this is on form W-2 if you work for an employer)
Charitable donations
Educational expenses
Unreimbursed medical bills
Documents related to operating a rental property, such as receipts for repairs, advertising, etc. Learn more.
A tax credit will lower your tax liability (any taxes you owe). If you don’t owe any taxes, then you may or may not get a refund, depending on the tax credit details. Some tax credit examples are
30% credit off the total cost of a solar panel installation
$7,500 tax credit when you buy a qualifying electric vehicle
Refundable tax credit: If your tax credit is refundable, then even if you have no tax liability, e.g. if you are retired, then you will still get a refund for the entire tax credit amount.
Non-refundable tax credit: If your tax credit is non-refundable, then you will only get the full credit if your tax liability is at least as much as the tax credit. For example, if your tax credit is $1000 and your total tax liability before applying the credit is $1500, then your updated tax liability is reduced to $500. However, if your total tax liability before applying the credit is $800, then your updated tax liability is reduced to $0 and you will NOT get a refund for $200. For that reason, you should ensure your tax liability is at least as much as the tax credit you want to apply.
How to Calculate Taxable Income
Determine Your Filing Status
single,
married filing jointly,
etc
Gather Documents for all Sources of Income
form W-2 for earned compensation
form 1099-INT for interest income
etc
Calculate Your Adjusted Gross Income (AGI) Your AGI is the result of taking certain “above-the-line” adjustments to your gross income, such as contributions to a qualifying individual retirement account (IRA), student loan interest, and certain education expenses. These items are referred to as “above the line” because they reduce your income before taking any allowable itemized deductions or standard deductions.
Calculate Your Deductions (Standard or Itemized)
Calculate Taxable Income Taxable income = AGI – deductions
Marginal vs. Effective Tax Rates
The US has a progressive tax system, so your income is taxed at different rates. If your total annual income is $125,000 and your taxable income is $100,000 (income minus deductions and credits) and you are filing single, your tax liability would not be 24% of the entire $100,000. Instead, it would be $17,400. In this case, your “effective” or “average” tax rate is $17,400/$125,000 = 13.9%, which is much lower than 24%.
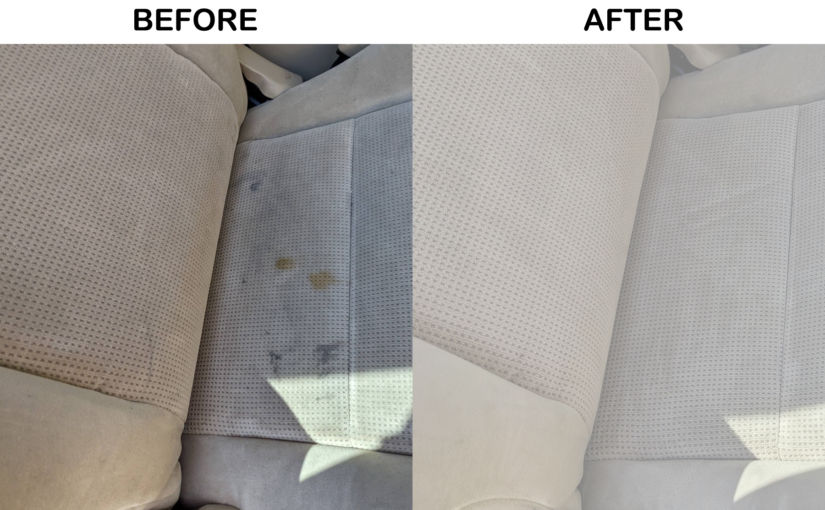
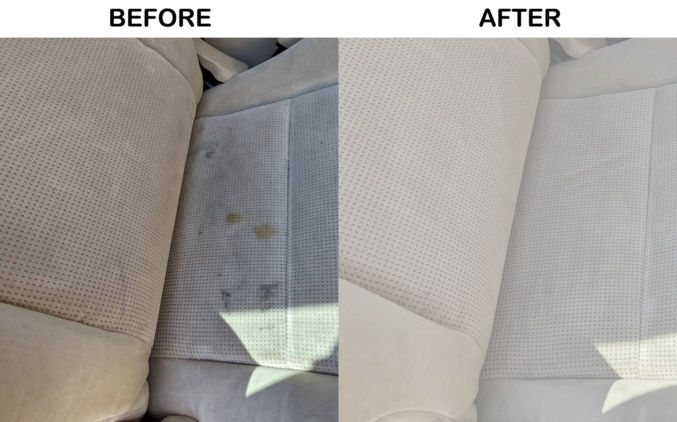
If your car seats, floor mats and furniture are made of upholstery, they will eventually get dirty. Fortunately, cleaning them isn’t too hard if you use the right tools and technique. I recently cleaned an old car seat and floor mats. The process was simpler than I thought. Here’s a before and after pic.
I also rented the Karcher Carpet Cleaner and Detailer from Home Depot to compare it to the Bissel.
Both of these tools have 2 functions;
Squirter: to squirt water or cleaning solution
Extractor: to suck water from upholstery
You could also just use a spray bottle to squirt the cleaning solution.
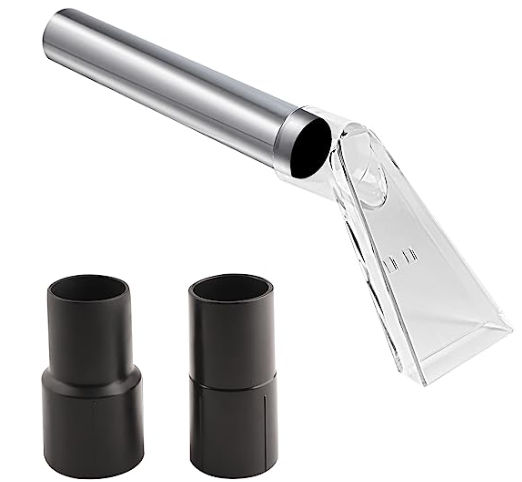
You can also use a wet shop vac, but it’s helpful to have a hose head that is transparent so you can see if any water is left in the upholstery. Here’s a transparent extractor nozzle designed to fit all shop vacs.
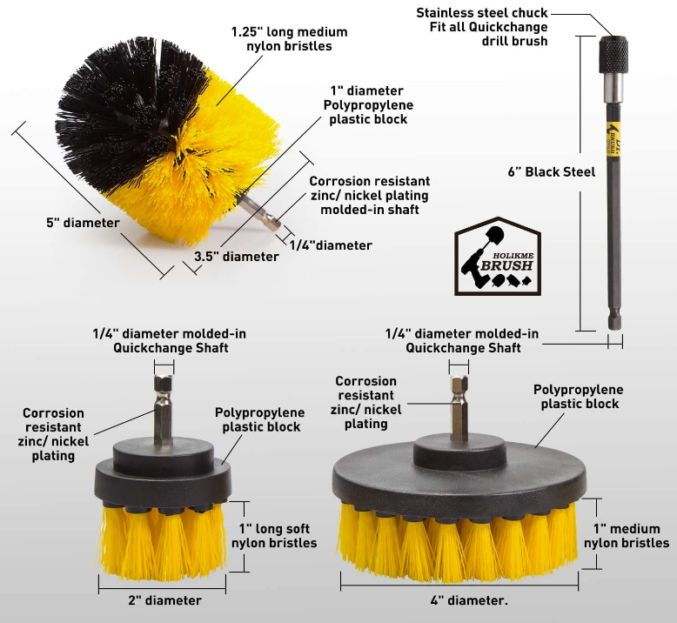
The Bissel nozzle includes a brush, but it’s better to use a drill brush. For the drill brush, I went with this one on Amazon. Make sure to choose brushes designed for upholstery.
This one includes 4 items:
2″ brush
3.5″ brush
4″ brush
Drill extension
Instructions
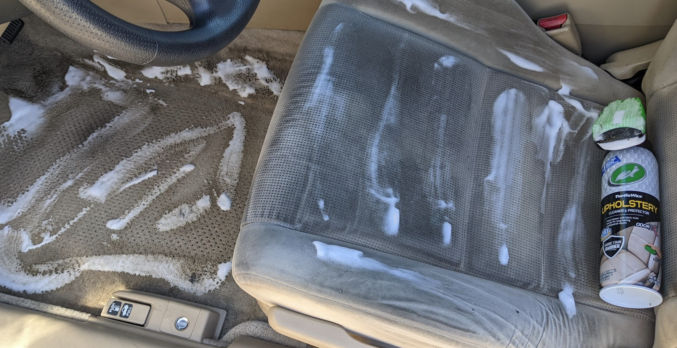
Add the cleaning solution to the carpet cleaner tool.
Spray the cleaning solution onto the item to be cleaned.
Use a drill brush to agitate the soiled upholstery. I find that using the 3.5″ brush sideways does a better job at agitating upholstery.
Suck any moisture using the carpet cleaner tool.
I added a cleaning solution to the carpet cleaner tool to spray the solution onto the upholstery.I also bought and applied a upholstery cleaning foam.The 4″ brush is also effective in agitating the soiled fabric.Here’s a stain that was actually easy to remove.This time, I use the 3.5″ brush sideways.After sucking the moisture, the stains were gone.
When cleaning upholstery in this way, not a lot of water is needed. After sucking the water, very little is left, so it doesn’t take long for the material to dry.
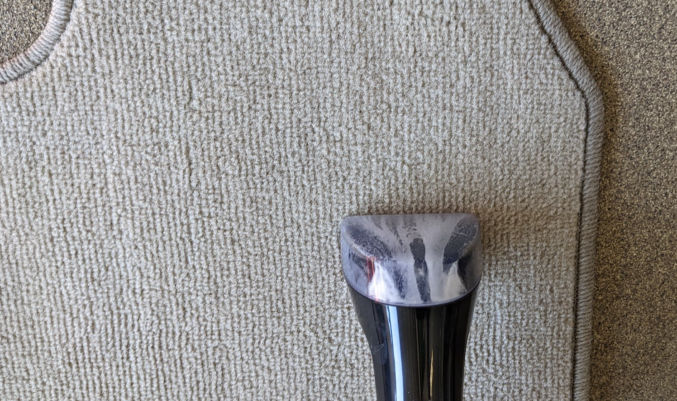
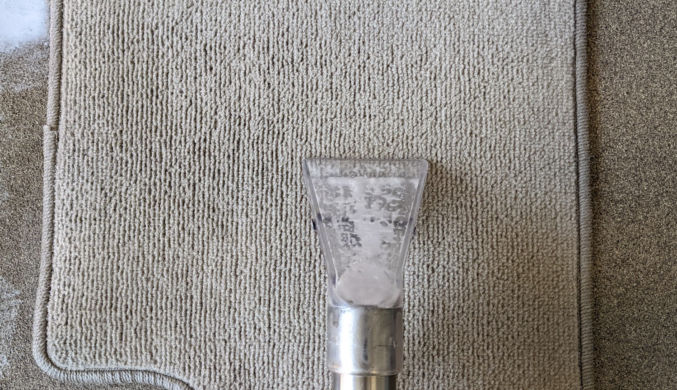
This is the nozzle on the Bissel.This is the nozzle on the Karcher.